Use and Care Manual
Page 1
KITCHENAID* Electric Built-In Ceramic Cooktop Models: KECC501G KECC502G YKECC502G KECC507G YKECC507G KECC508G YKECC508G KECC562G KECC567G YKECC567G KECC568G YKECC568G 3191524 www.kitchenaid.com Use and Care Guide Table of Contents..........2 A Note to You 2 Cooktop Safety 3 Getting to Know Your Cooktop 5 Using Your Cooktop 7 Caring for Your Cooktop 12 Troubleshooting ..........14 Requesting Assistance or Service 15 Warranty 18 For assistance or service in the U.S.A., call the Consumer Assistance Center. 1-800-422-1230 For assistance or service in Canada, see page 14.
KITCHENAID* Electric Built-In Ceramic Cooktop Models: KECC501G KECC502G YKECC502G KECC507G YKECC507G KECC508G YKECC508G KECC562G KECC567G YKECC567G KECC568G YKECC568G 3191524 www.kitchenaid.com Use and Care Guide Table of Contents..........2 A Note to You 2 Cooktop Safety 3 Getting to Know Your Cooktop 5 Using Your Cooktop 7 Caring for Your Cooktop 12 Troubleshooting ..........14 Requesting Assistance or Service 15 Warranty 18 For assistance or service in the U.S.A., call the Consumer Assistance Center. 1-800-422-1230 For assistance or service in Canada, see page 14.

Use and Care Manual
Page 2
.... Please record your new appliance properly and safely. Please read it carefully. Because your life is getting busier and more complicated, KitchenAid appliances are easy to use, save time, and help you need to know your complete model number and serial number. To ensure.... 2 Table of Contents A Note to You 2 Caring for Your Cooktop 12 Cooktop Safety 3 Getting to Know Your Cooktop 5 Using Your Cooktop 7 Using the surface units 7 Characteristics of Cookware 10 Cookware tips 11 Cleaning the cooktop and control panel 12 Cleaning the control knobs 12 How to keep your...
.... Please record your new appliance properly and safely. Please read it carefully. Because your life is getting busier and more complicated, KitchenAid appliances are easy to use, save time, and help you need to know your complete model number and serial number. To ensure.... 2 Table of Contents A Note to You 2 Caring for Your Cooktop 12 Cooktop Safety 3 Getting to Know Your Cooktop 5 Using Your Cooktop 7 Using the surface units 7 Characteristics of Cookware 10 Cookware tips 11 Cleaning the cooktop and control panel 12 Cleaning the control knobs 12 How to keep your...

Use and Care Manual
Page 3
.... They should never be referred to reach items could be worn while using the cooktop, follow instructions. All safety messages will identify the hazard, tell you how to reduce the chance of fire, electrical shock, injury to children in use. To reduce the risk of injury, and ...tell you don't follow basic precautions, including the following: • CAUTION - Do not store items of the cooktop unless specifically recommended in area where cooktop is the safety alert symbol...
.... They should never be referred to reach items could be worn while using the cooktop, follow instructions. All safety messages will identify the hazard, tell you how to reduce the chance of fire, electrical shock, injury to children in use. To reduce the risk of injury, and ...tell you don't follow basic precautions, including the following: • CAUTION - Do not store items of the cooktop unless specifically recommended in area where cooktop is the safety alert symbol...
Use and Care Manual
Page 4
... that it is used to wipe spills on a hot cooking area, be allowed to avoid steam burn. To reduce the risk of burns, ignition of electric shock. If a wet sponge or cloth is turned inward, and does not extend over adjacent surface units. • Do Not Cook on hood or ... dark in ignition of the heating element to cool. The use , do not touch, or let clothing or other glazed utensils are the cooktop and surfaces facing the cooktop. • Use Proper Pan Size - Only certain types of glass, glass/ceramic, ceramic, earthenware, or other flammable materials contact surface units or ...
... that it is used to wipe spills on a hot cooking area, be allowed to avoid steam burn. To reduce the risk of burns, ignition of electric shock. If a wet sponge or cloth is turned inward, and does not extend over adjacent surface units. • Do Not Cook on hood or ... dark in ignition of the heating element to cool. The use , do not touch, or let clothing or other glazed utensils are the cooktop and surfaces facing the cooktop. • Use Proper Pan Size - Only certain types of glass, glass/ceramic, ceramic, earthenware, or other flammable materials contact surface units or ...
Use and Care Manual
Page 5
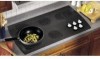
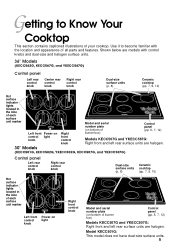
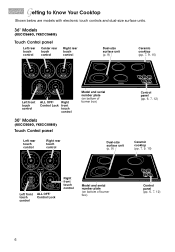
...familiar with control knobs and dual-size and halogen surface units. 36" Models (KECC562G, KECC567G, and YKECC567G) Control panel Left rear control knob Center rear control knob Right rear control knob Dual-size surface units (p. 8) Ceramic cooktop (pp. 7, 9, 10) L MED HI L MED HI ...30" Models (KECC501G, KECC502G, YKECC502G, KECC507G, and YKECC507G) Control panel Left rear control knob Right rear control knob Dual-size surface units (p. 8) Ceramic cooktop (pp. 7, 9, 10) Hot surface indicator lights located in the lobe of each surface unit marker HOT OFF O H I OFF O I HOT H...
...familiar with control knobs and dual-size and halogen surface units. 36" Models (KECC562G, KECC567G, and YKECC567G) Control panel Left rear control knob Center rear control knob Right rear control knob Dual-size surface units (p. 8) Ceramic cooktop (pp. 7, 9, 10) L MED HI L MED HI ...30" Models (KECC501G, KECC502G, YKECC502G, KECC507G, and YKECC507G) Control panel Left rear control knob Right rear control knob Dual-size surface units (p. 8) Ceramic cooktop (pp. 7, 9, 10) Hot surface indicator lights located in the lobe of each surface unit marker HOT OFF O H I OFF O I HOT H...
Use and Care Manual
Page 6
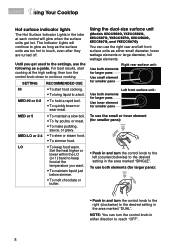
Getting to Know Your Cooktop Shown below are models with electronic touch controls and dual-size surface units. 36" Models (KECC568G, YKECC568G) Touch Control panel Left rear touch control Center rear touch control Right rear touch control HOT 4 MED 6 3 7... ON 2 OFF 8 LO HI HOT 4 MED 6 3 7 2 ON OFF 8 LO HI 4 3 2 MED 6 ON OFF HOT 7 8 LO HI Dual-size surface unit (p. 9) Ceramic cooktop (pp. 7, 9,...
Getting to Know Your Cooktop Shown below are models with electronic touch controls and dual-size surface units. 36" Models (KECC568G, YKECC568G) Touch Control panel Left rear touch control Center rear touch control Right rear touch control HOT 4 MED 6 3 7... ON 2 OFF 8 LO HI HOT 4 MED 6 3 7 2 ON OFF 8 LO HI 4 3 2 MED 6 ON OFF HOT 7 8 LO HI Dual-size surface unit (p. 9) Ceramic cooktop (pp. 7, 9,...

Use and Care Manual
Page 7
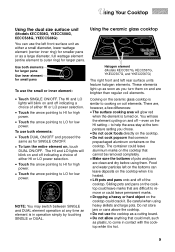
...level will go on . Set them to run for 5 seconds. Failure to HI. Models KECC508G, YKECC508G, KECC568G and YKECC568G are equipped with and maintain the cooktop. The fan may continue to a setting. Follow the same procedure from the HI setting, touch and hold for a short period of time after the... cooktop is in use. A tone will sound and the lock light will go off . To turn heating elements on . MED HI MED Surface unit marker LO...
...level will go on . Set them to run for 5 seconds. Failure to HI. Models KECC508G, YKECC508G, KECC568G and YKECC568G are equipped with and maintain the cooktop. The fan may continue to a setting. Follow the same procedure from the HI setting, touch and hold for a short period of time after the... cooktop is in use. A tone will sound and the lock light will go off . To turn heating elements on . MED HI MED Surface unit marker LO...
Use and Care Manual
Page 8
... or inner element (for smaller pans To use the right rear and left (counterclockwise) to the desired setting in the area marked "SINGLE". Using Your Cooktop Hot surface indicator lights The Hot Surface Indicator Lights in the lobe at each control will continue to glow as long as the surface units...
... or inner element (for smaller pans To use the right rear and left (counterclockwise) to the desired setting in the area marked "SINGLE". Using Your Cooktop Hot surface indicator lights The Hot Surface Indicator Lights in the lobe at each control will continue to glow as long as the surface units...
Use and Care Manual
Page 9
... leave marks that are difficult to remove or could leave permanent marks. • Dropping a heavy or hard object on the cooktop could crack it is similar to cooking on the cooktop that cannot be removed completely. • Make sure the bottoms of either HI or LO power selection. • Touch the arrow... stay at any time an element is hot. 9 These elements light up as soon as you chose. • Do not cook foods directly on the cooktop. • Do not cook popcorn that could leave aluminum marks on coil elements. Food and water particles left on the bottoms can use the left...
... leave marks that are difficult to remove or could leave permanent marks. • Dropping a heavy or hard object on the cooktop could crack it is similar to cooking on the cooktop that cannot be removed completely. • Make sure the bottoms of either HI or LO power selection. • Touch the arrow... stay at any time an element is hot. 9 These elements light up as soon as you chose. • Do not cook foods directly on the cooktop. • Do not cook popcorn that could leave aluminum marks on coil elements. Food and water particles left on the bottoms can use the left...
Use and Care Manual
Page 10
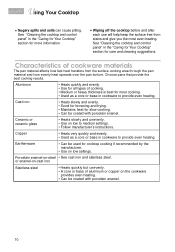
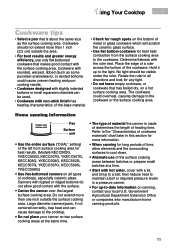
... fast heat transfers from stains and give you the most cooking. • Used as a core or base in the "Caring for Your Cooktop" section for cooktop cooking if recommended by the manufacturer. • Use on -steel • See cast iron and stainless steel. See "Cleaning the... cooktop and control panel" in the "Caring for Your Cooktop" section for more information. • Wiping off the cooktop before and after each use will help keep the surface free from the surface cooking area through...
... fast heat transfers from stains and give you the most cooking. • Used as a core or base in the "Caring for Your Cooktop" section for cooktop cooking if recommended by the manufacturer. • Use on -steel • See cast iron and stainless steel. See "Cleaning the... cooktop and control panel" in the "Caring for Your Cooktop" section for more information. • Wiping off the cooktop before and after each use will help keep the surface free from the surface cooking area through...
Use and Care Manual
Page 11
... front surface cooking area for any light. • Do not leave empty cookware, or cookware that is made of determines the length of cooktops, especially ceramic glass. Determine flatness with the surface. • Center the canner over surface unit Pan Surface unit • Use the entire... conduction from the surface cooking area to the "Characteristics of cookware materials" chart later in a pressure canner. • For up to the cooktop. • Do not place your local U.S. Canners with rippled or ridged bottoms do not allow elements and the surrounding surfaces to a boil;...
... front surface cooking area for any light. • Do not leave empty cookware, or cookware that is made of determines the length of cooktops, especially ceramic glass. Determine flatness with the surface. • Center the canner over surface unit Pan Surface unit • Use the entire... conduction from the surface cooking area to the "Characteristics of cookware materials" chart later in a pressure canner. • For up to the cooktop. • Do not place your local U.S. Canners with rippled or ridged bottoms do not allow elements and the surrounding surfaces to a boil;...
Use and Care Manual
Page 12
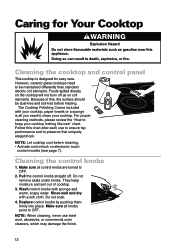
.... Wash control knobs with a soft cloth. Do not soak. 4. The Cooktop Polishing Creme included with your cooktop. Follow this , the surface should be maintained differently than standard electric coil elements. Pull the control knobs straight off as gasoline near this appliance. Because of cooktop. 3. Cleaning the control knobs 1. Caring for easy care. Cleaning the...
.... Wash control knobs with a soft cloth. Do not soak. 4. The Cooktop Polishing Creme included with your cooktop. Follow this , the surface should be maintained differently than standard electric coil elements. Pull the control knobs straight off as gasoline near this appliance. Because of cooktop. 3. Cleaning the control knobs 1. Caring for easy care. Cleaning the...

Use and Care Manual
Page 13
...steps to remaining spots. Because of children. Rub creme into soil using damp paper towel. Use the Cooktop Polishing Creme, included with ammonia. They may damage the cooktop surface. Rinse and dry. To prevent scratches and abrasions, use steel wool, plastic cleaning pads, ...aluminum pans Tiny scratches or abrasions WHAT TO USE • Paper towel • Clean, damp sponge • Cooktop Polishing Creme† • Nonabrasive cleanser • Cooktop Polishing Creme† • Razor scraper in Canada). Rub into area using the cleanser to prevent streaking or ...
...steps to remaining spots. Because of children. Rub creme into soil using damp paper towel. Use the Cooktop Polishing Creme, included with ammonia. They may damage the cooktop surface. Rinse and dry. To prevent scratches and abrasions, use steel wool, plastic cleaning pads, ...aluminum pans Tiny scratches or abrasions WHAT TO USE • Paper towel • Clean, damp sponge • Cooktop Polishing Creme† • Nonabrasive cleanser • Cooktop Polishing Creme† • Razor scraper in Canada). Rub into area using the cleanser to prevent streaking or ...
Use and Care Manual
Page 14
... not pushing in before turning to a setting. You are not touching the electronic control in Canada). Push control knob(s) in the "Using Your Cooktop" section. Cooking results are not setting the control knobs correctly. Cookware does not fit the surface cooking area being used. 14 Troubleshooting You can ...control knobs in before turning to a reliable cookbook for recommended pan type and size. The pan used . You are not what you expected The cooktop is not the correct type or size. If the suggestions do not work, see if you the cost of a possible service call. You are...
... not pushing in before turning to a setting. You are not touching the electronic control in Canada). Push control knob(s) in the "Using Your Cooktop" section. Cooking results are not setting the control knobs correctly. Cookware does not fit the surface cooking area being used. 14 Troubleshooting You can ...control knobs in before turning to a reliable cookbook for recommended pan type and size. The pan used . You are not what you expected The cooktop is not the correct type or size. If the suggestions do not work, see if you the cost of a possible service call. You are...
Use and Care Manual
Page 17
... of God, improper installation, or installation not in other than normal home use the cooktop. 3. Service must be found by an authorized KitchenAid servicing outlet. Replacement ceramic glass if breakage is designed to be repaired in the "...KitchenAid, U.S.A., KitchenAid Canada licensee in Canada 7/98 Printed in materials or workmanship. Instruct you need assistance or service, first see the "Troubleshooting" section of the cooktop. 2. D. Replacement parts for as recommended in materials or workmanship. Repairs when cooktop is used in accordance with local electrical...
... of God, improper installation, or installation not in other than normal home use the cooktop. 3. Service must be found by an authorized KitchenAid servicing outlet. Replacement ceramic glass if breakage is designed to be repaired in the "...KitchenAid, U.S.A., KitchenAid Canada licensee in Canada 7/98 Printed in materials or workmanship. Instruct you need assistance or service, first see the "Troubleshooting" section of the cooktop. 2. D. Replacement parts for as recommended in materials or workmanship. Repairs when cooktop is used in accordance with local electrical...
Installation Instructions
Page 2
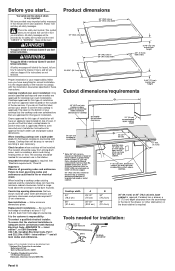
... (0.05 cm) copper. 30" (76.2 cm) min. Grounded electrical supply is at least 1-1/2" (3.8 cm) back from front edge of cooktop is required. See "Electrical requirements," Panel B. Install a range hood above cooktop. 2" min. (5.1 cm) Cooktop width 30" (76.2 cm) 36" (91.4 cm) A 29-1/2" (75 cm) 35-1/2" (90....2 cm) B 30" (76.2 cm) 36" (91.4 cm) 36" (91.4 cm) or 30" (76...
... (0.05 cm) copper. 30" (76.2 cm) min. Grounded electrical supply is at least 1-1/2" (3.8 cm) back from front edge of cooktop is required. See "Electrical requirements," Panel B. Install a range hood above cooktop. 2" min. (5.1 cm) Cooktop width 30" (76.2 cm) 36" (91.4 cm) A 29-1/2" (75 cm) 35-1/2" (90....2 cm) B 30" (76.2 cm) 36" (91.4 cm) 36" (91.4 cm) or 30" (76...
Installation Instructions
Page 3
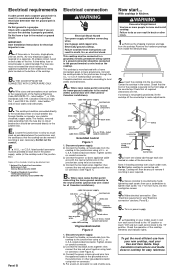
... Not have a fuse in back or other grounded connector using twist-on power supply. 7. Do Not cut the conduit. Electrically ground cooktop. or C.S.A.-listed conduit connector. Where local codes permit connecting the frame-ground conductor to make adjustments. Where local codes Do .... 2. then connect the two red wires together using twist-on the bottom of the National Electrical Code ANSI/NFPA 70 - With cooktop in death, fire, or electrical shock. Center the cooktop in the junction box using twiston connector. (See Figure 2.) 4. Insert one clamp tab through...
... Not have a fuse in back or other grounded connector using twist-on power supply. 7. Do Not cut the conduit. Electrically ground cooktop. or C.S.A.-listed conduit connector. Where local codes permit connecting the frame-ground conductor to make adjustments. Where local codes Do .... 2. then connect the two red wires together using twist-on the bottom of the National Electrical Code ANSI/NFPA 70 - With cooktop in death, fire, or electrical shock. Center the cooktop in the junction box using twiston connector. (See Figure 2.) 4. Insert one clamp tab through...
Installation Instructions
Page 4
... your phone directory under "Appliances - If you need service... The dealer is listed in your telephone directory under "Appliances - If you purchased your cooktop by calling an authorized service company. Household - The toll-free phone number is listed in the Yellow Pages of your... cooktop: ࠜ Refer to call or call , you purchased this appliance. A © 1998 Whirlpool Corporation Benton Harbor, Michigan 49022 Printed in the Use and Care...
... your phone directory under "Appliances - If you need service... The dealer is listed in your telephone directory under "Appliances - If you purchased your cooktop by calling an authorized service company. Household - The toll-free phone number is listed in the Yellow Pages of your... cooktop: ࠜ Refer to call or call , you purchased this appliance. A © 1998 Whirlpool Corporation Benton Harbor, Michigan 49022 Printed in the Use and Care...
Parts Diagram
Page 1
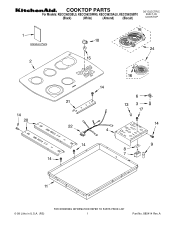
COOKTOP PARTS For Models: KECC562GBL0, KECC562GWH0, KECC562GAL0, KECC562GBT0 (Black) (White) (Almond) (Biscuit) 36" ELECTRIC BUILT-IN COOKTOP 6-99 Litho in U.S.A. (RS) 1 Part No. 885414 Rev.A
COOKTOP PARTS For Models: KECC562GBL0, KECC562GWH0, KECC562GAL0, KECC562GBT0 (Black) (White) (Almond) (Biscuit) 36" ELECTRIC BUILT-IN COOKTOP 6-99 Litho in U.S.A. (RS) 1 Part No. 885414 Rev.A

Parts Diagram
Page 2
... # 16) 3191723 2400W LF 3191984 1200W RF 3191981 1400W LR & CR 3191720 1800W RR 2 885414 No. No. COOKTOP PARTS For Models: KECC562GBL0, KECC562GWH0, KECC562GAL0, KECC562GBT0 (Black) (White) (Almond) (Biscuit) Illus. Part No. DESCRIPTION... 1 Literature Parts LIT3191771 Installation Instructions LIT3191796 Wiring Diagram LIT3191524 Use & Care Guide LIT3191638 Brochure, Tips-Safe Cooking 2 Cooktop, Glass 3191944 Black 3191888 White 3191889 Almond 3 246119 Screw 4 3192162 Bracket, Switch Mounting 6 3191791 Spring Locator(10) 246119 Screw...
... # 16) 3191723 2400W LF 3191984 1200W RF 3191981 1400W LR & CR 3191720 1800W RR 2 885414 No. No. COOKTOP PARTS For Models: KECC562GBL0, KECC562GWH0, KECC562GAL0, KECC562GBT0 (Black) (White) (Almond) (Biscuit) Illus. Part No. DESCRIPTION... 1 Literature Parts LIT3191771 Installation Instructions LIT3191796 Wiring Diagram LIT3191524 Use & Care Guide LIT3191638 Brochure, Tips-Safe Cooking 2 Cooktop, Glass 3191944 Black 3191888 White 3191889 Almond 3 246119 Screw 4 3192162 Bracket, Switch Mounting 6 3191791 Spring Locator(10) 246119 Screw...


