Use & Care Guide
Page 3
... words mean: DANGER You can be killed or seriously injured if you how to potential hazards that can happen if the instructions are very important. COOKTOP SAFETY Your safety and the safety of injury, and tell you what can kill or hurt you what the potential hazard is the safety alert...
... words mean: DANGER You can be killed or seriously injured if you how to potential hazards that can happen if the instructions are very important. COOKTOP SAFETY Your safety and the safety of injury, and tell you what can kill or hurt you what the potential hazard is the safety alert...
Use & Care Guide
Page 4
...- Improper installation of these pans or bowls during cooking may become hot enough to direct contact and may penetrate the broken cooktop and create a risk of electric shock. SAVE THESE INSTRUCTIONS 4 s Do Not Leave Children Alone - They should be positioned so that may be stored .... The use . s Do Not Cook on . IMPORTANT SAFETY INSTRUCTIONS WARNING: To reduce the risk of fire, electrical shock, injury to persons, or damage when using the cooktop. Children climbing on any part of clothing. Loose-fitting or hanging garments should not be seriously injured. s Storage...
...- Improper installation of these pans or bowls during cooking may become hot enough to direct contact and may penetrate the broken cooktop and create a risk of electric shock. SAVE THESE INSTRUCTIONS 4 s Do Not Leave Children Alone - They should be positioned so that may be stored .... The use . s Do Not Cook on . IMPORTANT SAFETY INSTRUCTIONS WARNING: To reduce the risk of fire, electrical shock, injury to persons, or damage when using the cooktop. Children climbing on any part of clothing. Loose-fitting or hanging garments should not be seriously injured. s Storage...

Use & Care Guide
Page 5
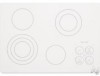
... keep warm function; dual circuit element "bridge") C. melt and hold function; Model and serial number plate (located underneath cooktop on some models) B. keep warm function; Center rear touch control (simmer; All/Off control lock H. Control panel F. ... keep warm function; dual circuit element) C. Right rear touch control (simmer; keep warm function; PARTS AND FEATURES TOUCH-ACTIVATED ELECTRONIC CONTROL MODELS Control Panels 30" (76.2 cm) Touch-Activated Electronic Control Models 36" (91.4 cm) Touch-Activated Electronic Control Models A B A B C C D G F...
... keep warm function; dual circuit element "bridge") C. melt and hold function; Model and serial number plate (located underneath cooktop on some models) B. keep warm function; Center rear touch control (simmer; All/Off control lock H. Control panel F. ... keep warm function; dual circuit element) C. Right rear touch control (simmer; keep warm function; PARTS AND FEATURES TOUCH-ACTIVATED ELECTRONIC CONTROL MODELS Control Panels 30" (76.2 cm) Touch-Activated Electronic Control Models 36" (91.4 cm) Touch-Activated Electronic Control Models A B A B C C D G F...
Use & Care Guide
Page 6
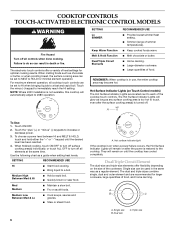
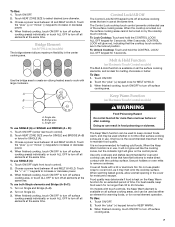
...CONTROL MODELS WARNING Fire Hazard Turn off all elements at the same time. The electronic touch controls offer a variety of food. REMEMBER: When cooktop is turned off all controls when done cooking. Touch ON/OFF. 2. They will remain on until the desired level has been reached. ...Surface Indicator Lights are recommended for minimal element operation. Triple size Failure to do so can be set to HI when bringing liquids to the cooktop. NOTE: Where 240V installation is restored to a fast and rapid boil. Medium Low Between Med & Lo s Cook soups, sauces and ...
...CONTROL MODELS WARNING Fire Hazard Turn off all elements at the same time. The electronic touch controls offer a variety of food. REMEMBER: When cooktop is turned off all controls when done cooking. Touch ON/OFF. 2. They will remain on until the desired level has been reached. ...Surface Indicator Lights are recommended for minimal element operation. Triple size Failure to do so can be set to HI when bringing liquids to the cooktop. NOTE: Where 240V installation is restored to a fast and rapid boil. Medium Low Between Med & Lo s Cook soups, sauces and ...
Use & Care Guide
Page 7
...normal element operation. Single size B. Touch ON/OFF (center rear touch control). 2. Touch the "plus " (+) keypad once for 5 seconds. Turn on Single (C). 3. To Lock Cooktop: Touch and hold the CONTROL LOCK/ ALL OFF keypad for MELT & HOLD. 3. Touch ON/OFF. 2. When the Keep Warm function is locked out, the surface... not use . For best results, keep cooked foods warm, and may be used as either an element for warming foods, or for more than 30 to cover food, as it will not glow red like the cooking zones, but the indicator light will glow red, indicating that have flat bottoms...
...normal element operation. Single size B. Touch ON/OFF (center rear touch control). 2. Touch the "plus " (+) keypad once for 5 seconds. Turn on Single (C). 3. To Lock Cooktop: Touch and hold the CONTROL LOCK/ ALL OFF keypad for MELT & HOLD. 3. Touch ON/OFF. 2. When the Keep Warm function is locked out, the surface... not use . For best results, keep cooked foods warm, and may be used as either an element for warming foods, or for more than 30 to cover food, as it will not glow red like the cooking zones, but the indicator light will glow red, indicating that have flat bottoms...

Use & Care Guide
Page 8
... F. Control panel F. melt function; keep warm function; Model and serial number plate (located underneath cooktop on metal cabinet) melt function) E. melt function; melt function) B. keep warm function; Left rear control (simmer; ...Right front surface cooking area 8 E G. Center rear control (simmer; Right rear control (simmer; Ceramic glass cooktop (stainless steel models have metal trim) B. PARTS AND FEATURES - Left front control (simmer; SMART KNOB MODELS Control Panels 30" (76.2 cm) Smart Knob Models 36" (91.4 cm) Smart Knob Models A B A B ...
... F. Control panel F. melt function; keep warm function; Model and serial number plate (located underneath cooktop on metal cabinet) melt function) E. melt function; melt function) B. keep warm function; Left rear control (simmer; ...Right front surface cooking area 8 E G. Center rear control (simmer; Right rear control (simmer; Ceramic glass cooktop (stainless steel models have metal trim) B. PARTS AND FEATURES - Left front control (simmer; SMART KNOB MODELS Control Panels 30" (76.2 cm) Smart Knob Models 36" (91.4 cm) Smart Knob Models A B A B ...
Use & Care Guide
Page 9
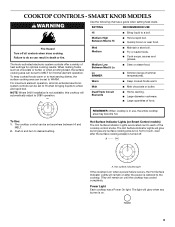
...done cooking. s Simmer (range of heat settings for minimal element operation. s Keep cooked foods warm. s Large-diameter cookware. The cooktop control can be set to HI when bringing liquids to touch, even after the power is turned off all knob-activated electronic system controls can...food. s Home canning. Hot Surface Indicator Lights (on after the surface cooking area(s) is restored to MELT for optimal cooking results. Power Light Each cooktop has a Power On light. Medium High Between Med & Hi s Hold a rapid boil. s Cook soups, sauces and gravies. The knob-activated ...
...done cooking. s Simmer (range of heat settings for minimal element operation. s Keep cooked foods warm. s Large-diameter cookware. The cooktop control can be set to HI when bringing liquids to touch, even after the power is turned off all knob-activated electronic system controls can...food. s Home canning. Hot Surface Indicator Lights (on after the surface cooking area(s) is restored to MELT for optimal cooking results. Power Light Each cooktop has a Power On light. Medium High Between Med & Hi s Hold a rapid boil. s Cook soups, sauces and gravies. The knob-activated ...

Use & Care Guide
Page 10
... MELT and HI. 2. Do not use , and that have flat bottoms to escape. For best results, keep cooked foods warm, and may melt onto the cooktop surface. Turn knob to OFF when finished. To Use: 1. Single size 10 Single size B. To Use TRIPLE: 1. Turn on the size of time. Use only... heated area to 45 minutes. Bridge area C. Single size can be used whether or not the other surface cooking zones are recommended for more than 30 to cook with a lid or aluminum foil. Push in food poisoning or sickness. The Warm function can be used to keep food warm for oven...
... MELT and HI. 2. Do not use , and that have flat bottoms to escape. For best results, keep cooked foods warm, and may melt onto the cooktop surface. Turn knob to OFF when finished. To Use: 1. Single size 10 Single size B. To Use TRIPLE: 1. Turn on the size of time. Use only... heated area to 45 minutes. Bridge area C. Single size can be used whether or not the other surface cooking zones are recommended for more than 30 to cook with a lid or aluminum foil. Push in food poisoning or sickness. The Warm function can be used to keep food warm for oven...

Use & Care Guide
Page 11
...MODELS Control Panels 30" (76.2 cm) Traditional Knob Models 36" (91.4cm) Traditional Knob Models A B A B C F A. Right rear control knob (dual-circuit element) C. Right front control knob F. Control panel F. Model and serial number plate (located underneath cooktop on light F....triple-circuit element) H. Center rear control knob (dual-circuit element "bridge") C. Left rear control knob B. Left front control knob (triple-circuit element) Cooktops 36" (91.4 cm) Traditional Knob Model shown B G F E D A. Left front control knob (triple-circuit element) C D A H A. ...
...MODELS Control Panels 30" (76.2 cm) Traditional Knob Models 36" (91.4cm) Traditional Knob Models A B A B C F A. Right rear control knob (dual-circuit element) C. Right front control knob F. Control panel F. Model and serial number plate (located underneath cooktop on light F....triple-circuit element) H. Center rear control knob (dual-circuit element "bridge") C. Left rear control knob B. Left front control knob (triple-circuit element) Cooktops 36" (91.4 cm) Traditional Knob Model shown B G F E D A. Left front control knob (triple-circuit element) C D A H A. ...
Use & Care Guide
Page 12
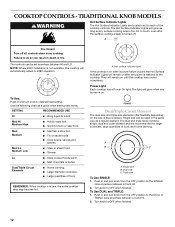
... HI and LO. s Melt chocolate or butter. The light will glow when any surface cooking area is too hot to the cooktop. Dual size C. To Use DUAL and TRIPLE: 1. COOKTOP CONTROLS - A Fire Hazard Turn off . NOTE: Where 240V installation is on when a power failure occurs, the Hot Surface ...steam food. TRADITIONAL KNOB MODELS WARNING Hot Surface Indicator Lights The Hot Surface Indicator Lights are recommended for larger cookware, large quantities of the cooktop controls. The Hot Surface Indicator Lights will remain on the size of food. To Use: Push in and turn knob from the OFF...
... HI and LO. s Melt chocolate or butter. The light will glow when any surface cooking area is too hot to the cooktop. Dual size C. To Use DUAL and TRIPLE: 1. COOKTOP CONTROLS - A Fire Hazard Turn off . NOTE: Where 240V installation is on when a power failure occurs, the Hot Surface ...steam food. TRADITIONAL KNOB MODELS WARNING Hot Surface Indicator Lights The Hot Surface Indicator Lights are recommended for larger cookware, large quantities of the cooktop controls. The Hot Surface Indicator Lights will remain on the size of food. To Use: Push in and turn knob from the OFF...
Use & Care Guide
Page 13
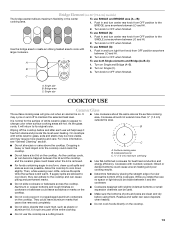
... while the surface is removed. s Determine flatness by placing the straight edge of a ruler across the cooktop. s Make sure the bottoms of the cookware. Single size COOKTOP USE Ceramic Glass The surface cooking area will return to its original color. s Use cookware about the ...area (A + B): 1. Single size B. Cookware/canner C. ½" (1.3 cm) maximum overhang s Use flat-bottomed cookware for the surface of the entire cooktop. B Wiping off to touch any form, clean up all spills and soils as soon as the surface cooking area. Surface cooking area B. s Do not...
... while the surface is removed. s Determine flatness by placing the straight edge of a ruler across the cooktop. s Make sure the bottoms of the cookware. Single size COOKTOP USE Ceramic Glass The surface cooking area will return to its original color. s Use cookware about the ...area (A + B): 1. Single size B. Cookware/canner C. ½" (1.3 cm) maximum overhang s Use flat-bottomed cookware for the surface of the entire cooktop. B Wiping off to touch any form, clean up all spills and soils as soon as the surface cooking area. Surface cooking area B. s Do not...
Use & Care Guide
Page 14
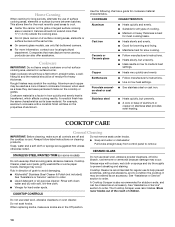
... and evenly. Always follow label instructions on the grate or largest surface cooking area or element. s Vinegar for browning and frying. A Cooktop Scraper is a factor in cookware. See "Assistance or Service" section to medium heat settings. Do not soak knobs. s Center the ... enamelon-steel or cast iron s See stainless steel or cast iron. s KitchenAid® Stainless Steel Cleaner & Polish (not included): See "Assistance or Service" section to prevent streaking and staining. COOKTOP CONTROLS Do not use of cooking. Home Canning When canning for long periods...
... and evenly. Always follow label instructions on the grate or largest surface cooking area or element. s Vinegar for browning and frying. A Cooktop Scraper is a factor in cookware. See "Assistance or Service" section to medium heat settings. Do not soak knobs. s Center the ... enamelon-steel or cast iron s See stainless steel or cast iron. s KitchenAid® Stainless Steel Cleaner & Polish (not included): See "Assistance or Service" section to prevent streaking and staining. COOKTOP CONTROLS Do not use of cooking. Home Canning When canning for long periods...
Use & Care Guide
Page 15
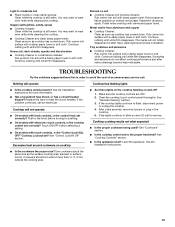
... until white film disappears. Rub creme into soil with touch controls, is the control knob set to flash, disconnect power or unplug the cooktop. 4. Continue rubbing until white film disappears. See the Installation Instructions for stubborn spots. s Has a household fuse blown, or has a...Control Lock/All Off" section. Repeat for more than ½" (1.3 cm) outside the cooking area. 15 See "General Cleaning" section. 3. Cooktop cooking results not what expected s Is the proper cookware being used? Burned-on and off , call an electrician. Heavy soil, dark streaks, ...
... until white film disappears. Rub creme into soil with touch controls, is the control knob set to flash, disconnect power or unplug the cooktop. 4. Continue rubbing until white film disappears. See the Installation Instructions for stubborn spots. s Has a household fuse blown, or has a...Control Lock/All Off" section. Repeat for more than ½" (1.3 cm) outside the cooking area. 15 See "General Cleaning" section. 3. Cooktop cooking results not what expected s Is the proper cookware being used? Burned-on and off , call an electrician. Heavy soil, dark streaks, ...

Use & Care Guide
Page 16
... If you need further assistance, you can also look in your request. Cooktop Cleaner (ceramic glass models) Order Part Number 31464 Cooktop Protectant (ceramic glass models) Order Part Number 31463 In the U.S.A. Cooktop Scraper (ceramic glass models) Order Part Number WA906B KitchenAid® Stainless Steel Cleaner & Polish (stainless steel models) Order Part Number 8171420...
... If you need further assistance, you can also look in your request. Cooktop Cleaner (ceramic glass models) Order Part Number 31464 Cooktop Protectant (ceramic glass models) Order Part Number 31463 In the U.S.A. Cooktop Scraper (ceramic glass models) Order Part Number WA906B KitchenAid® Stainless Steel Cleaner & Polish (stainless steel models) Order Part Number 8171420...

Use & Care Guide
Page 17
... your authorized KitchenAid dealer to better help by checking the "Assistance or Service" section or by KitchenAid. 5. This major appliance is designed to correct house wiring or plumbing. 2. KITCHENAID® COOKTOP WARRANTY LIMITED ...Electric element ■ Gas burners ■ Solid state touch control system parts ■ Any cracking of the rubber seal between the ceramic glass cooktop and porcelain edge ■ Any cracking due to thermal shock of the Use & Care Guide. Repairs to parts or systems resulting from unauthorized modifications made to KitchenAid within 30...
... your authorized KitchenAid dealer to better help by checking the "Assistance or Service" section or by KitchenAid. 5. This major appliance is designed to correct house wiring or plumbing. 2. KITCHENAID® COOKTOP WARRANTY LIMITED ...Electric element ■ Gas burners ■ Solid state touch control system parts ■ Any cracking of the rubber seal between the ceramic glass cooktop and porcelain edge ■ Any cracking due to thermal shock of the Use & Care Guide. Repairs to parts or systems resulting from unauthorized modifications made to KitchenAid within 30...

Installation Guide
Page 1
... ÉLECTRIQUE Table of Contents / Table des matières COOKTOP SAFETY 1 INSTALLATION REQUIREMENTS 2 Tools and Parts 2 Location Requirements 2 Electrical Requirements 3 INSTALLATION INSTRUCTIONS 4 Prepare Cooktop for future reference. This symbol alerts you to potential hazards that can... safety alert symbol. Homeowner: Keep installation instructions for Installation 4 Install Cooktop 5 Make Electrical Connection 6 Attach Cooktop to reduce the chance of others . IMPORTANT: Save for local electrical inspector's use. We have provided many important safety messages in this...
... ÉLECTRIQUE Table of Contents / Table des matières COOKTOP SAFETY 1 INSTALLATION REQUIREMENTS 2 Tools and Parts 2 Location Requirements 2 Electrical Requirements 3 INSTALLATION INSTRUCTIONS 4 Prepare Cooktop for future reference. This symbol alerts you to potential hazards that can... safety alert symbol. Homeowner: Keep installation instructions for Installation 4 Install Cooktop 5 Make Electrical Connection 6 Attach Cooktop to reduce the chance of others . IMPORTANT: Save for local electrical inspector's use. We have provided many important safety messages in this...

Installation Guide
Page 2
...tools listed here. Product Dimensions B A C A. 21 54.1 cm) B. 16 42.1 cm) 30 77.1 cm) 36 92.3 cm) C. 2⁷⁄₈" (7.3 cm) B A C A. 22¹⁄₈" (56.1 cm) B. 16 42.1 cm) 30 77.1 cm) 36 92.3 cm) C. 2⁷⁄₈" (7.3 cm) 2 If cabinet storage... over an undercounter built-in oven. See "Electrical Requirements" section. Check existing electrical supply. Location Requirements Make sure you have an approval label located on the top of the cabinets. ■ The cooktop must be a specified cooktop that can be installed either alone or over...
...tools listed here. Product Dimensions B A C A. 21 54.1 cm) B. 16 42.1 cm) 30 77.1 cm) 36 92.3 cm) C. 2⁷⁄₈" (7.3 cm) B A C A. 22¹⁄₈" (56.1 cm) B. 16 42.1 cm) 30 77.1 cm) 36 92.3 cm) C. 2⁷⁄₈" (7.3 cm) 2 If cabinet storage... over an undercounter built-in oven. See "Electrical Requirements" section. Check existing electrical supply. Location Requirements Make sure you have an approval label located on the top of the cabinets. ■ The cooktop must be a specified cooktop that can be installed either alone or over...

Installation Guide
Page 3
... base cabinet side walls to clear the cooktop base. For all models except 15" (38.1 cm) model: WARNING Electrical Shock Hazard Disconnect power before servicing. Failure to follow these instructions can result in death, fire, or electrical shock. B. 1½" (3.8 cm) max. Junction box or outlet; 12" (30.5 cm) minimum from the countertop to the...
... base cabinet side walls to clear the cooktop base. For all models except 15" (38.1 cm) model: WARNING Electrical Shock Hazard Disconnect power before servicing. Failure to follow these instructions can result in death, fire, or electrical shock. B. 1½" (3.8 cm) max. Junction box or outlet; 12" (30.5 cm) minimum from the countertop to the...

Installation Guide
Page 4
...CSA International 8501 East Pleasant Valley Road Cleveland, OH 44131-5575 Before You Make the Electrical Connection: To properly install your cooktop, you must determine the type of electrical connection you will be moved if servicing becomes necessary in the future. ■ ...Do not cut the conduit. Failure to the added section of the cooktop glass to the junction box through flexible, armored or nonmetallic sheathed, copper cable. Cooktop base B. Follow the electrical connector manufacturer's recommended procedure. INSTALLATION INSTRUCTIONS A A. The flexible, armored cable ...
...CSA International 8501 East Pleasant Valley Road Cleveland, OH 44131-5575 Before You Make the Electrical Connection: To properly install your cooktop, you must determine the type of electrical connection you will be moved if servicing becomes necessary in the future. ■ ...Do not cut the conduit. Failure to the added section of the cooktop glass to the junction box through flexible, armored or nonmetallic sheathed, copper cable. Cooktop base B. Follow the electrical connector manufacturer's recommended procedure. INSTALLATION INSTRUCTIONS A A. The flexible, armored cable ...

Installation Guide
Page 5
...locations from cutout to the front edge of 2½" (6.4 cm) clamping screws. Clamping screw location D. Attach brackets to bottom of cooktop base with bracket attachment screws using the bracket mounting holes selected in cutout. 6. Rotate brackets so they are perpendicular to Countertop" ...for optional front and back location B. If repositioning is needed , lift entire cooktop up . 2. Select bracket mounting holes that the front edge of the countertop. Clamp bracket (extends far enough beyond its edge. Attach...
...locations from cutout to the front edge of 2½" (6.4 cm) clamping screws. Clamping screw location D. Attach brackets to bottom of cooktop base with bracket attachment screws using the bracket mounting holes selected in cutout. 6. Rotate brackets so they are perpendicular to Countertop" ...for optional front and back location B. If repositioning is needed , lift entire cooktop up . 2. Select bracket mounting holes that the front edge of the countertop. Clamp bracket (extends far enough beyond its edge. Attach...


