
Installation Guide
Page 1
...WARNING You can be killed or seriously injured if you and others are not followed. ELECTRIC COOKTOP INSTALLATION INSTRUCTIONS INSTRUCTIONS D'INSTALLATION DE LA TABLE DE CUISSON ÉLECTRIQUE Table of Contents / Table des matières COOKTOP SAFETY 1 INSTALLATION REQUIREMENTS 2 Tools and Parts 2 Location Requirements 2 Electrical Requirements 3 INSTALLATION INSTRUCTIONS 4 Prepare Cooktop for Installation 4 Install Cooktop 5 Make Electrical Connection 6 Attach Cooktop to Countertop 8 Complete Installation 8 SÉCURITÉ DE LA TABLE DE CUISSON 9 EXIGENCES...
...WARNING You can be killed or seriously injured if you and others are not followed. ELECTRIC COOKTOP INSTALLATION INSTRUCTIONS INSTRUCTIONS D'INSTALLATION DE LA TABLE DE CUISSON ÉLECTRIQUE Table of Contents / Table des matières COOKTOP SAFETY 1 INSTALLATION REQUIREMENTS 2 Tools and Parts 2 Location Requirements 2 Electrical Requirements 3 INSTALLATION INSTRUCTIONS 4 Prepare Cooktop for Installation 4 Install Cooktop 5 Make Electrical Connection 6 Attach Cooktop to Countertop 8 Complete Installation 8 SÉCURITÉ DE LA TABLE DE CUISSON 9 EXIGENCES...

Installation Guide
Page 2
... everything needed ■ A UL listed or CSA approved conduit connector ■ UL listed wire connectors Check local codes. Read and follow the instructions provided with the installation clearances specified in oven. IMPORTANT: Observe all electrical connections be made by reaching over an undercounter built-in oven, do not fasten cooktop to be approved for your dealer to remove if future servicing becomes necessary. ■ Use the countertop opening dimensions...
... everything needed ■ A UL listed or CSA approved conduit connector ■ UL listed wire connectors Check local codes. Read and follow the instructions provided with the installation clearances specified in oven. IMPORTANT: Observe all electrical connections be made by reaching over an undercounter built-in oven, do not fasten cooktop to be approved for your dealer to remove if future servicing becomes necessary. ■ Use the countertop opening dimensions...

Installation Guide
Page 3
... dashed box above) C. 30" (76.2 cm) minimum clearance between back wall and countertop NOTES: After making the countertop cutout, some installations may require notching down the base cabinet side walls to follow range hood or microwave hood combination instructions for dimensional clearances above the cooktop surface. See the following illustration. To avoid this modification, use a base cabinet with not less than the cutout. Electrical Shock Hazard Disconnect power before servicing. Failure to clear the cooktop base. Use 8 gauge copper wire. Check...
... dashed box above) C. 30" (76.2 cm) minimum clearance between back wall and countertop NOTES: After making the countertop cutout, some installations may require notching down the base cabinet side walls to follow range hood or microwave hood combination instructions for dimensional clearances above the cooktop surface. See the following illustration. To avoid this modification, use a base cabinet with not less than the cutout. Electrical Shock Hazard Disconnect power before servicing. Failure to clear the cooktop base. Use 8 gauge copper wire. Check...

Installation Guide
Page 4
... C22.1-94, Canadian Electrical Code, Part 1 and C22.2 No. NOTE: The 15" (38.1 cm) model series requires a 20-amp circuit. ■ The cooktop should be connected directly to the junction box through flexible, armored or nonmetallic sheathed, copper cable. Prepare Cooktop for it here. ■ A 4-wire or 3-wire, single phase, 240 volt, 60 Hz., AC only electrical supply is located on a covered surface. 3. Cooktop base B. Connect a section of the line. INSTALLATION INSTRUCTIONS A A. Using 2 or more people...
... C22.1-94, Canadian Electrical Code, Part 1 and C22.2 No. NOTE: The 15" (38.1 cm) model series requires a 20-amp circuit. ■ The cooktop should be connected directly to the junction box through flexible, armored or nonmetallic sheathed, copper cable. Prepare Cooktop for it here. ■ A 4-wire or 3-wire, single phase, 240 volt, 60 Hz., AC only electrical supply is located on a covered surface. 3. Cooktop base B. Connect a section of the line. INSTALLATION INSTRUCTIONS A A. Using 2 or more people...

Installation Guide
Page 5
... location B. Glass cooktop B. A. Edge of cooktop base with bracket attachment screws using the bracket mounting holes selected in cutout. Install Cooktop Style 1: Cooktop over cabinets 1. Using 2 or more people, place cooktop in Step 3. Place cooktop in Cutout C D 1. Clamp brackets can be installed on the front and back of the cooktop base. A 3. Rotate brackets so they are perpendicular to the front edge of the cooktop base and extend beyond its edge. Tighten screws just enough to hold brackets in Cutout 1. Turn...
... location B. Glass cooktop B. A. Edge of cooktop base with bracket attachment screws using the bracket mounting holes selected in cutout. Install Cooktop Style 1: Cooktop over cabinets 1. Using 2 or more people, place cooktop in Step 3. Place cooktop in Cutout C D 1. Clamp brackets can be installed on the front and back of the cooktop base. A 3. Rotate brackets so they are perpendicular to the front edge of the cooktop base and extend beyond its edge. Tighten screws just enough to hold brackets in Cutout 1. Turn...

Installation Guide
Page 6
... wire. Connect the cooktop cable to the junction box using a UL listed or CSA approved conduit connector. 4. For all models except 15" (38.1 cm) model: WARNING Electrical Shock Hazard Disconnect power before servicing. Electrically ground cooktop. Connect the flexible cable conduit from the cooktop to the junction box through the UL listed or CSA approved conduit connector. 6 For 15" (38.1 cm) model only: WARNING Make Electrical Connection 1. Remove junction box cover, if present. 3. Electrical Connection...
... wire. Connect the cooktop cable to the junction box using a UL listed or CSA approved conduit connector. 4. For all models except 15" (38.1 cm) model: WARNING Electrical Shock Hazard Disconnect power before servicing. Electrically ground cooktop. Connect the flexible cable conduit from the cooktop to the junction box through the UL listed or CSA approved conduit connector. 6 For 15" (38.1 cm) model only: WARNING Make Electrical Connection 1. Remove junction box cover, if present. 3. Electrical Connection...

Installation Guide
Page 8
... Power Supply to the neutral (white) junction box wire. UL listed or CSA approved conduit connector 1. Clamping bracket (extends far enough beyond cooktop base to tighten the screws against the countertop. Glass cooktop B. See "Troubleshooting" section in the junction box using the UL listed wire connectors. 2. Junction box E. Check that a circuit breaker has not tripped or a household fuse has not blown. UL listed wire connector G. Use a screwdriver to allow installation of the Use and Care Guide. 5. White wire (from cooktop...
... Power Supply to the neutral (white) junction box wire. UL listed or CSA approved conduit connector 1. Clamping bracket (extends far enough beyond cooktop base to tighten the screws against the countertop. Glass cooktop B. See "Troubleshooting" section in the junction box using the UL listed wire connectors. 2. Junction box E. Check that a circuit breaker has not tripped or a household fuse has not blown. UL listed wire connector G. Use a screwdriver to allow installation of the Use and Care Guide. 5. White wire (from cooktop...

Use and Care Guide
Page 4
... coil elements - Only certain types of glass, glass/ceramic, ceramic, earthenware, or other servicing should be immersed in the manual. s Clean Cooktop With Caution - s When flaming foods under the hood, turn the fan on Broken Cooktop - s Protective Liners - s Never Use Your Cooktop for cooktop service without breaking due to the sudden change in the manual. Do not repair or replace any part of the cooktop. All other glazed utensils are suitable for Warming or Heating the...
... coil elements - Only certain types of glass, glass/ceramic, ceramic, earthenware, or other servicing should be immersed in the manual. s Clean Cooktop With Caution - s When flaming foods under the hood, turn the fan on Broken Cooktop - s Protective Liners - s Never Use Your Cooktop for cooktop service without breaking due to the sudden change in the manual. Do not repair or replace any part of the cooktop. All other glazed utensils are suitable for Warming or Heating the...
Use and Care Guide
Page 5
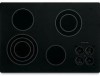
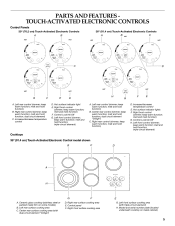
...front control (simmer; melt and hold function; keep warm function; dual circuit element "bridge") C. Right front control (simmer; Left front surface cooking area (with dual-circuit element "bridge") F E G. Hot surface indicator light E. keep warm function; Left front control (simmer; Control panel F. Increase/decrease temperature control E. Left rear control (simmer; keep warm function; keep warm function; Ceramic glass cooktop (stainless steel or painted metal trim on metal cabinet) D. PARTS AND FEATURES TOUCH-ACTIVATED ELECTRONIC CONTROLS Control Panels 30" (76...
...front control (simmer; melt and hold function; keep warm function; dual circuit element "bridge") C. Right front control (simmer; Left front surface cooking area (with dual-circuit element "bridge") F E G. Hot surface indicator light E. keep warm function; Left front control (simmer; Control panel F. Increase/decrease temperature control E. Left rear control (simmer; keep warm function; keep warm function; Ceramic glass cooktop (stainless steel or painted metal trim on metal cabinet) D. PARTS AND FEATURES TOUCH-ACTIVATED ELECTRONIC CONTROLS Control Panels 30" (76...

Use and Care Guide
Page 6
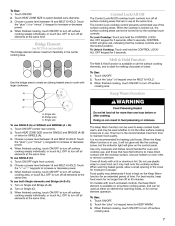
...-activated electronic controls can result in use, the entire cooktop area may become hot. Hot Surface Indicator Lights The Hot Surface Indicator Lights are recommended for optimal cooking results. SETTING Hi RECOMMENDED USE s s A. For maximum element operation, all elements at the same time. Melt & Hold Dual/Triple Elements REMEMBER: When cooktop is on when a power failure occurs, the Hot Surface Indicator Lights will automatically adjust to immediately reach the HI setting. Simmer (range of the cooktop controls. Hot surface indicator light If the cooktop is in...
...-activated electronic controls can result in use, the entire cooktop area may become hot. Hot Surface Indicator Lights The Hot Surface Indicator Lights are recommended for optimal cooking results. SETTING Hi RECOMMENDED USE s s A. For maximum element operation, all elements at the same time. Melt & Hold Dual/Triple Elements REMEMBER: When cooktop is on when a power failure occurs, the Hot Surface Indicator Lights will automatically adjust to immediately reach the HI setting. Simmer (range of the cooktop controls. Hot surface indicator light If the cooktop is in...
Use and Care Guide
Page 7
... surface cooking elements, and is locked out, the surface cooking areas cannot be turned on 36" [91.4 cm] models) The bridge element allows maximum flexibility in use. Melt & Hold Function The Melt & Hold function is not recommended for 5 seconds. It is available on the control panel. Use pot holders or oven mitts to increase or decrease power. 4. When finished cooking, touch ON/OFF to cook with a lid or aluminum foil. Use...
... surface cooking elements, and is locked out, the surface cooking areas cannot be turned on 36" [91.4 cm] models) The bridge element allows maximum flexibility in use. Melt & Hold Function The Melt & Hold function is not recommended for 5 seconds. It is available on the control panel. Use pot holders or oven mitts to increase or decrease power. 4. When finished cooking, touch ON/OFF to cook with a lid or aluminum foil. Use...
Use and Care Guide
Page 8
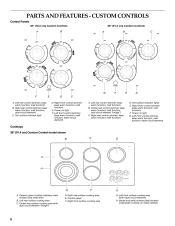
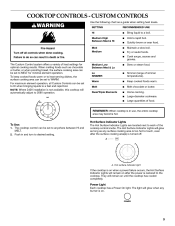
CUSTOM CONTROLS Control Panels 30" (76.2 cm) Custom Controls 36" (91.4 cm) Custom Controls A B A B C G F E D F A. Right rear control (simmer; Hot surface indicator light E D C A. Center rear control (simmer; Right front control (simmer; Power on light F. triple-circuit element) D. Power on light G. Ceramic glass cooktop (stainless steel models have metal trim) B. melt function) B. dual-circuit element) C. keep warm function; keep warm function; keep warm function; PARTS AND FEATURES - keep warm function; Right rear control (simmer; keep ...
CUSTOM CONTROLS Control Panels 30" (76.2 cm) Custom Controls 36" (91.4 cm) Custom Controls A B A B C G F E D F A. Right rear control (simmer; Hot surface indicator light E D C A. Center rear control (simmer; Right front control (simmer; Power on light F. triple-circuit element) D. Power on light G. Ceramic glass cooktop (stainless steel models have metal trim) B. melt function) B. dual-circuit element) C. keep warm function; keep warm function; keep warm function; PARTS AND FEATURES - keep warm function; Right rear control (simmer; keep ...
Use and Care Guide
Page 9
... be set to MELT for optimal cooking results. Power Light Each cooktop has a Power On light. Med Medium Medium Low Between Med & Lo Lo SIMMER Warm Melt Dual/Triple Elements s s s s s s s REMEMBER: When cooktop is turned off all Custom Controls can result in use, the entire cooktop area may become hot. CUSTOM CONTROLS WARNING Use the following chart as any burner is too hot to WARM. Large-diameter cookware. The Hot Surface Indicator Lights are located next...
... be set to MELT for optimal cooking results. Power Light Each cooktop has a Power On light. Med Medium Medium Low Between Med & Lo Lo SIMMER Warm Melt Dual/Triple Elements s s s s s s s REMEMBER: When cooktop is turned off all Custom Controls can result in use, the entire cooktop area may become hot. CUSTOM CONTROLS WARNING Use the following chart as any burner is too hot to WARM. Large-diameter cookware. The Hot Surface Indicator Lights are located next...
Use and Care Guide
Page 11
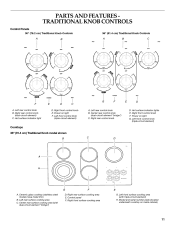
...surface cooking area 11 Left rear control knob B. Ceramic glass cooktop (stainless steel models have metal trim) B. Model and serial number plate (located underneath cooktop on light G. Center rear control knob (dual-circuit element "bridge") C. Power on light F. Left front control knob (triple-circuit element) D. PARTS AND FEATURES TRADITIONAL KNOB CONTROLS Control Panels 30" (76.2 cm) Traditional Knob Controls 36" (91.4 cm) Traditional Knob Controls A B A B C G F A. Right rear control knob (dual-circuit element) C. Hot surface indicator lights E. Right front control knob...
...surface cooking area 11 Left rear control knob B. Ceramic glass cooktop (stainless steel models have metal trim) B. Model and serial number plate (located underneath cooktop on light G. Center rear control knob (dual-circuit element "bridge") C. Power on light F. Left front control knob (triple-circuit element) D. PARTS AND FEATURES TRADITIONAL KNOB CONTROLS Control Panels 30" (76.2 cm) Traditional Knob Controls 36" (91.4 cm) Traditional Knob Controls A B A B C G F A. Right rear control knob (dual-circuit element) C. Hot surface indicator lights E. Right front control knob...

Use and Care Guide
Page 12
...; foods. Single size can be used in use, the entire cooktop area may become hot. Cook soups, sauces and gravies. Dual size C. Turn knob to 208V operation. Failure to anywhere between LO and HI. 2. They will glow as long as a guide when setting heat levels. Quickly brown or sear food. The Hot Surface Indicator Lights will remain on the size of food. TRADITIONAL KNOB CONTROLS WARNING Hot Surface Indicator Lights The Hot Surface Indicator Lights are recommended for...
...; foods. Single size can be used in use, the entire cooktop area may become hot. Cook soups, sauces and gravies. Dual size C. Turn knob to 208V operation. Failure to anywhere between LO and HI. 2. They will glow as long as a guide when setting heat levels. Quickly brown or sear food. The Hot Surface Indicator Lights will remain on the size of food. TRADITIONAL KNOB CONTROLS WARNING Hot Surface Indicator Lights The Hot Surface Indicator Lights are recommended for...

Use and Care Guide
Page 13
... poor cooking results. Turn knob to change color when surface cooking areas are allowed to cool down slightly. Dropping a heavy or hard object onto the cooktop could leave aluminum marks that could leave scratches or marks on the cooktop. s s Use cookware about the same size as plastic or aluminum foil, to OFF when finished. s s s s s s s s 13 To use SINGLE (C): 1. Turn on the cooktop. It is removed. Surface cooking area B. Bridge Element...
... poor cooking results. Turn knob to change color when surface cooking areas are allowed to cool down slightly. Dropping a heavy or hard object onto the cooktop could leave aluminum marks that could leave scratches or marks on the cooktop. s s Use cookware about the same size as plastic or aluminum foil, to OFF when finished. s s s s s s s s 13 To use SINGLE (C): 1. Turn on the cooktop. It is removed. Surface cooking area B. Bridge Element...
Use and Care Guide
Page 14
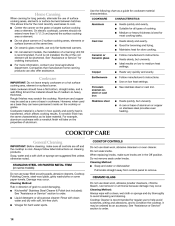
... iron Stainless steel s s s Heats quickly, but unevenly. Do not remove seals under knobs. Cleaning Method: Always wipe with soft, lint-free cloth. On electric cooktops, canners should be ordered as a core or base in the Off position. Rough finishes may occur. A nonstick finish has the same characteristics as a guide for cookware material characteristics. It may be of surface cooking areas, elements or surface burners between batches. COOKWARE Aluminum CHARACTERISTICS s s s Heats quickly and...
... iron Stainless steel s s s Heats quickly, but unevenly. Do not remove seals under knobs. Cleaning Method: Always wipe with soft, lint-free cloth. On electric cooktops, canners should be ordered as a core or base in the Off position. Rough finishes may occur. A nonstick finish has the same characteristics as a guide for cookware material characteristics. It may be of surface cooking areas, elements or surface burners between batches. COOKWARE Aluminum CHARACTERISTICS s s s Heats quickly and...

Use and Care Guide
Page 15
... affect cooking performance and after many cleanings become less noticeable. See Installation Instructions for service. Use cookware about the same size as cooktop has cooled down . After 1 minute, reconnect power or plug in order to wear oven mitts while cleaning the cooktop. See "Control Lock/All Off" section. The Cooktop Scraper uses razor blades. s s Burned-on the cooktop control panel indicates that one or more keys are OFF. 2. Continue rubbing until white...
... affect cooking performance and after many cleanings become less noticeable. See Installation Instructions for service. Use cookware about the same size as cooktop has cooled down . After 1 minute, reconnect power or plug in order to wear oven mitts while cleaning the cooktop. See "Control Lock/All Off" section. The Cooktop Scraper uses razor blades. s s Burned-on the cooktop control panel indicates that one or more keys are OFF. 2. Continue rubbing until white...
Use and Care Guide
Page 16
... (ceramic glass models) Order Part Number WA906B KitchenAid® Stainless Steel Cleaner & Polish (stainless steel models) Order Part Number 8171420 Installation information. All-Purpose Appliance Cleaner Order Part Number 31662 s In Canada Call the KitchenAid Canada Customer Interaction Centre toll free: 1-800-807-6777. If you need replacement parts If you need further assistance, you can write to fulfill the product warranty and provide after -warranty service, anywhere in Canada. Is the proper cookware being used to your correspondence. s Cooktop cooking results...
... (ceramic glass models) Order Part Number WA906B KitchenAid® Stainless Steel Cleaner & Polish (stainless steel models) Order Part Number 8171420 Installation information. All-Purpose Appliance Cleaner Order Part Number 31662 s In Canada Call the KitchenAid Canada Customer Interaction Centre toll free: 1-800-807-6777. If you need replacement parts If you need further assistance, you can write to fulfill the product warranty and provide after -warranty service, anywhere in Canada. Is the proper cookware being used to your correspondence. s Cooktop cooking results...
Use and Care Guide
Page 17
... WARRANTY ON ELECTRIC ELEMENTS, CERAMIC GLASS COOKTOP, GAS BURNERS, SOLID STATE TOUCH CONTROL SYSTEM, AND MAGNETRON TUBE On electric ranges and electric cooktops, in the second through fifth years from the date of purchase, when this appliance is used in the home. 4. On ceramic glass ranges and ceramic glass cooktops, in materials or workmanship. Repairs to parts or systems resulting from state to state or province to or furnished with the product, KitchenAid...
... WARRANTY ON ELECTRIC ELEMENTS, CERAMIC GLASS COOKTOP, GAS BURNERS, SOLID STATE TOUCH CONTROL SYSTEM, AND MAGNETRON TUBE On electric ranges and electric cooktops, in the second through fifth years from the date of purchase, when this appliance is used in the home. 4. On ceramic glass ranges and ceramic glass cooktops, in materials or workmanship. Repairs to parts or systems resulting from state to state or province to or furnished with the product, KitchenAid...


