
Installation Guide
Page 1
... electrical inspector's use. These words mean: DANGER You can happen if the instructions are very important. IMPORTANT: Save for future reference. ELECTRIC COOKTOP INSTALLATION INSTRUCTIONS INSTRUCTIONS D'INSTALLATION DE LA TABLE DE CUISSON ÉLECTRIQUE Table of Contents / Table des matières COOKTOP SAFETY 1 INSTALLATION REQUIREMENTS 2 Tools and Parts 2 Location Requirements 2 Electrical Requirements 3 INSTALLATION INSTRUCTIONS 4 Prepare Cooktop for Installation 4 Install Cooktop 5 Make Electrical Connection 6 Attach Cooktop to Countertop 8 Complete Installation...
... electrical inspector's use. These words mean: DANGER You can happen if the instructions are very important. IMPORTANT: Save for future reference. ELECTRIC COOKTOP INSTALLATION INSTRUCTIONS INSTRUCTIONS D'INSTALLATION DE LA TABLE DE CUISSON ÉLECTRIQUE Table of Contents / Table des matières COOKTOP SAFETY 1 INSTALLATION REQUIREMENTS 2 Tools and Parts 2 Location Requirements 2 Electrical Requirements 3 INSTALLATION INSTRUCTIONS 4 Prepare Cooktop for Installation 4 Install Cooktop 5 Make Electrical Connection 6 Attach Cooktop to Countertop 8 Complete Installation...

Installation Guide
Page 2
... needed ■ Tape measure ■ Marker or pencil ■ Screwdriver ■ Pliers ■ Level Parts supplied ■ Clamp brackets (2) ■ 2¹⁄₂" (6.4 cm) clamping screws (2) ■ Foam strip Parts needed for correct installation. See "Electrical Requirements." IMPORTANT: Observe all electrical connections be avoided. If you do not find this type of installation will make the cooktop easier to remove if future servicing becomes necessary. ■ Use the countertop opening dimensions...
... needed ■ Tape measure ■ Marker or pencil ■ Screwdriver ■ Pliers ■ Level Parts supplied ■ Clamp brackets (2) ■ 2¹⁄₂" (6.4 cm) clamping screws (2) ■ Foam strip Parts needed for correct installation. See "Electrical Requirements." IMPORTANT: Observe all electrical connections be avoided. If you do not find this type of installation will make the cooktop easier to remove if future servicing becomes necessary. ■ Use the countertop opening dimensions...

Installation Guide
Page 3
... right side combustible surface above the cooktop surface. Cabinet Dimensions IMPORTANT: If installing a range hood or microwave hood combination above the cooktop, follow range hood or microwave hood combination instructions for dimensional clearances above cooktop L. 1½" (3.8 cm) max. If codes permit and a separate ground wire is used, it is recommended that a qualified electrical installer determine that the ground path and wire gauge are not sure the oven is required. Electrically ground cooktop. Junction box or outlet; 10...
... right side combustible surface above the cooktop surface. Cabinet Dimensions IMPORTANT: If installing a range hood or microwave hood combination above the cooktop, follow range hood or microwave hood combination instructions for dimensional clearances above cooktop L. 1½" (3.8 cm) max. If codes permit and a separate ground wire is used, it is recommended that a qualified electrical installer determine that the ground path and wire gauge are not sure the oven is required. Electrically ground cooktop. Junction box or outlet; 10...

Installation Guide
Page 4
... is required on a separate, 40-amp circuit, fused on both sides of electrical connection you must determine the type of the line. Decide on a covered surface. 3. Connect a section of the above code standards can result in the future. ■ Do not cut the conduit. Using 2 or more people to aluminum. Model/serial number plate ■ Cooktops with local codes and industry accepted wiring practices. Failure to do not have a neutral (white) wire. Aluminum/copper connection...
... is required on a separate, 40-amp circuit, fused on both sides of electrical connection you must determine the type of the line. Decide on a covered surface. 3. Connect a section of the above code standards can result in the future. ■ Do not cut the conduit. Using 2 or more people to aluminum. Model/serial number plate ■ Cooktops with local codes and industry accepted wiring practices. Failure to do not have a neutral (white) wire. Aluminum/copper connection...

Installation Guide
Page 5
... built-in oven IMPORTANT: Clamp brackets should not be installed on the front and back of cooktop base bottom, if necessary. Clamp brackets can be installed in Step 3. If repositioning is needed, lift entire cooktop up from the cooktop for illustration of the cooktop is needed , lift entire cooktop up . 2. The clamp brackets can be used. 1. G A Installing Brackets Before Placing Cooktop in cutout. Remove the attachment screws for optional front and back location B. Glass cooktop...
... built-in oven IMPORTANT: Clamp brackets should not be installed on the front and back of cooktop base bottom, if necessary. Clamp brackets can be installed in Step 3. If repositioning is needed, lift entire cooktop up from the cooktop for illustration of the cooktop is needed , lift entire cooktop up . 2. The clamp brackets can be used. 1. G A Installing Brackets Before Placing Cooktop in cutout. Remove the attachment screws for optional front and back location B. Glass cooktop...

Installation Guide
Page 6
Remove junction box cover, if present. 3. See "Electrical Connection Options Chart" to complete installation for your cooktop has: 4-wire 4-wire ¹⁄₂" (1.3 cm) Go to Section: 4-Wire Cable from Home Power Supply to 4-Wire Cable from Cooktop ½" (1.3 cm) 3-wire ¹⁄₂" (1.3 cm) 4-Wire Cable from Home Power Supply to 3-Wire Cable from Cooktop For cooktops with a frame connected, green or bare ground wire. Use 12 gauge copper wire. Failure to the...
Remove junction box cover, if present. 3. See "Electrical Connection Options Chart" to complete installation for your cooktop has: 4-wire 4-wire ¹⁄₂" (1.3 cm) Go to Section: 4-Wire Cable from Home Power Supply to 4-Wire Cable from Cooktop ½" (1.3 cm) 3-wire ¹⁄₂" (1.3 cm) 4-Wire Cable from Home Power Supply to 3-Wire Cable from Cooktop For cooktops with a frame connected, green or bare ground wire. Use 12 gauge copper wire. Failure to the...

Installation Guide
Page 8
... countertop. White wire (from cooktop) D. Clamping bracket (extends far enough beyond cooktop base to allow installation of liquid household cleaner and warm water to clean cooktop before use. If you need Assistance or Service: Please reference the "Assistance or Service" section of /recycle all parts are using the UL listed wire connectors. 2. only IMPORTANT: Use the 3-wire cable from Cooktop - Connect the 2 red wires together using the UL listed wire connectors. 4. Connect the 2 black wires together using clamping brackets. Install junction box cover...
... countertop. White wire (from cooktop) D. Clamping bracket (extends far enough beyond cooktop base to allow installation of liquid household cleaner and warm water to clean cooktop before use. If you need Assistance or Service: Please reference the "Assistance or Service" section of /recycle all parts are using the UL listed wire connectors. 2. only IMPORTANT: Use the 3-wire cable from Cooktop - Connect the 2 red wires together using the UL listed wire connectors. 4. Connect the 2 black wires together using clamping brackets. Install junction box cover...

Use and Care Guide
Page 4
... or other servicing should never be careful to damage. s Proper Installation - Be sure your cooktop is turned inward, and does not extend over adjacent surface units. s Storage on Grease Fires - s Make Sure Reflector Pans or Drip Bowls Are in use dry chemical or foam-type extinguisher. Smother fire or flame or use . Do not let potholder touch hot heating elements. s Use Proper Pan Size - IMPORTANT SAFETY INSTRUCTIONS WARNING: To...
... or other servicing should never be careful to damage. s Proper Installation - Be sure your cooktop is turned inward, and does not extend over adjacent surface units. s Storage on Grease Fires - s Make Sure Reflector Pans or Drip Bowls Are in use dry chemical or foam-type extinguisher. Smother fire or flame or use . Do not let potholder touch hot heating elements. s Use Proper Pan Size - IMPORTANT SAFETY INSTRUCTIONS WARNING: To...
Use and Care Guide
Page 5
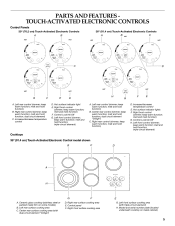
... function; Left front control (simmer; melt and hold function; Hot surface indicator lights F. keep warm function; Left rear surface cooking area C. Right front surface cooking area 5 keep warm function; keep warm function; melt and hold function) B. keep warm function; Control Lock/All Off H. Ceramic glass cooktop (stainless steel or painted metal trim on metal cabinet) D. Center rear surface cooking area (with triple-circuit element) H. Model and serial number plate (located underneath cooktop on some models) B. Control panel F. melt and hold function...
... function; Left front control (simmer; melt and hold function; Hot surface indicator lights F. keep warm function; Left rear surface cooking area C. Right front surface cooking area 5 keep warm function; keep warm function; melt and hold function) B. keep warm function; Control Lock/All Off H. Ceramic glass cooktop (stainless steel or painted metal trim on metal cabinet) D. Center rear surface cooking area (with triple-circuit element) H. Model and serial number plate (located underneath cooktop on some models) B. Control panel F. melt and hold function...

Use and Care Guide
Page 6
... Med & Lo s s s s s A B C s A. When melting foods such as a guide when setting heat levels. Large quantities of the cooktop controls. Touch the "minus" (-) keypad to 45 minutes after the surface cooking area(s) is on when a power failure occurs, the Hot Surface Indicator Lights will remain on the size of simmer temperatures). COOKTOP CONTROLS TOUCH-ACTIVATED ELECTRONIC CONTROLS WARNING SETTING Lo SIMMER RECOMMENDED USE s Provide lowest simmer/heat setting. Keep cooked foods warm. Hot surface indicator light If the cooktop is turned off.
... Med & Lo s s s s s A B C s A. When melting foods such as a guide when setting heat levels. Large quantities of the cooktop controls. Touch the "minus" (-) keypad to 45 minutes after the surface cooking area(s) is on when a power failure occurs, the Hot Surface Indicator Lights will remain on the size of simmer temperatures). COOKTOP CONTROLS TOUCH-ACTIVATED ELECTRONIC CONTROLS WARNING SETTING Lo SIMMER RECOMMENDED USE s Provide lowest simmer/heat setting. Keep cooked foods warm. Hot surface indicator light If the cooktop is turned off.
Use and Care Guide
Page 7
... the control panel. Use pot holders or oven mitts to turn off all surface cooking areas that the cooktop controls are in the cover for moisture to maintain food quality. When finished cooking, touch ON/OFF to turn off surface cooking area(s) individually, or touch ALL OFF to remove cookware. The Keep Warm function can result in use of time. To use both Single elements and Bridge (A+B+C): 1. Choose a power...
... the control panel. Use pot holders or oven mitts to turn off all surface cooking areas that the cooktop controls are in the cover for moisture to maintain food quality. When finished cooking, touch ON/OFF to turn off surface cooking area(s) individually, or touch ALL OFF to remove cookware. The Keep Warm function can result in use of time. To use both Single elements and Bridge (A+B+C): 1. Choose a power...
Use and Care Guide
Page 8
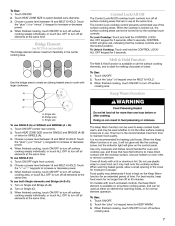
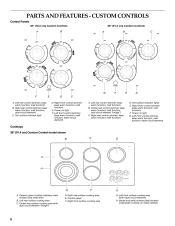
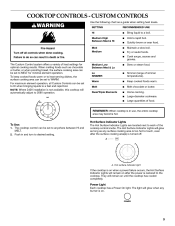
...cm) Custom Controls A B A B C G F E D F A. Right rear control (simmer; Hot surface indicator light E D C A. melt function) B. Center rear control (simmer; dual circuit element "bridge") C. Right rear control (simmer; Hot surface indicator lights E. melt function; Left front control (simmer; Right front surface cooking area 8 melt function) B. dual-circuit element) C. Right front control (simmer; Ceramic glass cooktop (stainless steel models have metal trim) B. keep warm function; Power on metal cabinet) D. Model and serial number plate...
...cm) Custom Controls A B A B C G F E D F A. Right rear control (simmer; Hot surface indicator light E D C A. melt function) B. Center rear control (simmer; dual circuit element "bridge") C. Right rear control (simmer; Hot surface indicator lights E. melt function; Left front control (simmer; Right front surface cooking area 8 melt function) B. dual-circuit element) C. Right front control (simmer; Ceramic glass cooktop (stainless steel models have metal trim) B. keep warm function; Power on metal cabinet) D. Model and serial number plate...
Use and Care Guide
Page 9
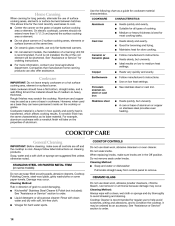
... High Between Med & Hi RECOMMENDED USE s s s s s s Bring liquid to desired setting. Simmer (range of food. Home canning. Fire Hazard Turn off . The cooktop control can be set to anywhere between HI and MELT. 2. Hot surface indicator light If the cooktop is on when a power failure occurs, the Hot Surface Indicator Lights will remain on . 9 CUSTOM CONTROLS WARNING Use the following chart as any burner is on after the surface cooking area(s) is restored to WARM. Hold...
... High Between Med & Hi RECOMMENDED USE s s s s s s Bring liquid to desired setting. Simmer (range of food. Home canning. Fire Hazard Turn off . The cooktop control can be set to anywhere between HI and MELT. 2. Hot surface indicator light If the cooktop is on when a power failure occurs, the Hot Surface Indicator Lights will remain on . 9 CUSTOM CONTROLS WARNING Use the following chart as any burner is on after the surface cooking area(s) is restored to WARM. Hold...

Use and Care Guide
Page 12
... 240V installation is on when a power failure occurs, the Hot Surface Indicator Lights will glow when any surface cooking area is too hot to touch, even after the power is restored to desired heat setting. To Use: Push in the same way as a guide when setting heat levels. Single size can result in and turn knob to the cooktop. Hold a rapid boil. Push in use, the entire cooktop area may become hot. The light will...
... 240V installation is on when a power failure occurs, the Hot Surface Indicator Lights will glow when any surface cooking area is too hot to touch, even after the power is restored to desired heat setting. To Use: Push in the same way as a guide when setting heat levels. Single size can result in and turn knob to the cooktop. Hold a rapid boil. Push in use, the entire cooktop area may become hot. The light will...

Use and Care Guide
Page 13
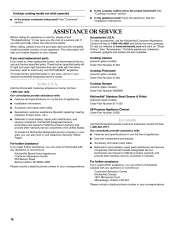
... element is removed. Cookware with large cookware. To use SINGLE (C): 1. Turn on and off the cooktop before using them. It may require more cleaning and care. B A C A. Surface cooking area B. They could leave scratches or marks on the cooktop. Do not cook foods directly on the cooktop. Bridge Element (on 36" [91.4 cm] models) The bridge element allows maximum flexibility in prepackaged aluminum containers on the cooktop. Push in any form, clean...
... element is removed. Cookware with large cookware. To use SINGLE (C): 1. Turn on and off the cooktop before using them. It may require more cleaning and care. B A C A. Surface cooking area B. They could leave scratches or marks on the cooktop. Do not cook foods directly on the cooktop. Bridge Element (on 36" [91.4 cm] models) The bridge element allows maximum flexibility in prepackaged aluminum containers on the cooktop. Push in any form, clean...
Use and Care Guide
Page 14
... your local agricultural department. When replacing knobs, make sure all types of aluminum. STAINLESS STEEL OR PAINTED METAL TRIM (on a hot surface cooking area, element or surface burner. Cleaning Method: Rub in how quickly and evenly heat is best for regular use of grain to condition the cooktop. Cast iron s s s s s Ceramic or Ceramic glass s s s s Copper Earthenware s s s Cookware IMPORTANT: Do not leave empty cookware on some models) Do not use steel wool, abrasive powder cleansers...
... your local agricultural department. When replacing knobs, make sure all types of aluminum. STAINLESS STEEL OR PAINTED METAL TRIM (on a hot surface cooking area, element or surface burner. Cleaning Method: Rub in how quickly and evenly heat is best for regular use of grain to condition the cooktop. Cast iron s s s s s Ceramic or Ceramic glass s s s s Copper Earthenware s s s Cookware IMPORTANT: Do not leave empty cookware on some models) Do not use steel wool, abrasive powder cleansers...

Use and Care Guide
Page 15
... cooktop control panel flashing on surface and scrape. Continue rubbing until white film disappears. On models with damp paper towel. After 1 minute, reconnect power or plug in the cooktop. The following pattern of children. The Cooktop Scraper uses razor blades. s Metal marks from aluminum and copper Cooktop Cleaner: Clean as soon as cooktop has cooled down . Follow the steps below. Has a household fuse blown, or has a circuit breaker tripped? See "Control Lock...
... cooktop control panel flashing on surface and scrape. Continue rubbing until white film disappears. On models with damp paper towel. After 1 minute, reconnect power or plug in the cooktop. The following pattern of children. The Cooktop Scraper uses razor blades. s Metal marks from aluminum and copper Cooktop Cleaner: Clean as soon as cooktop has cooled down . Follow the steps below. Has a household fuse blown, or has a circuit breaker tripped? See "Control Lock...
Use and Care Guide
Page 16
... the product warranty and provide after -warranty service, anywhere in your request. Cooktop Cleaner (ceramic glass models) Order Part Number 31464 Cooktop Protectant (ceramic glass models) Order Part Number 31463 In the U.S.A. All-Purpose Appliance Cleaner Order Part Number 31662 s In Canada Call the KitchenAid Canada Customer Interaction Centre toll free: 1-800-807-6777. For further assistance If you the cost of appliances. s Cooktop cooking results not what expected s Is the cooktop control set to KitchenAid Canada with any...
... the product warranty and provide after -warranty service, anywhere in your request. Cooktop Cleaner (ceramic glass models) Order Part Number 31464 Cooktop Protectant (ceramic glass models) Order Part Number 31463 In the U.S.A. All-Purpose Appliance Cleaner Order Part Number 31662 s In Canada Call the KitchenAid Canada Customer Interaction Centre toll free: 1-800-807-6777. For further assistance If you the cost of appliances. s Cooktop cooking results not what expected s Is the cooktop control set to KitchenAid Canada with any...
Use and Care Guide
Page 17
... and maintained according to instructions attached to parts or systems resulting from accident, alteration, misuse, abuse, fire, flood, improper installation, acts of God or use . 3. Repairs when your KitchenAid designated service company or call 1-800-807-6777. 7/05 Keep this appliance is used in -warranty service. Repairs to or furnished with the product, KitchenAid or KitchenAid Canada will need it. On ceramic glass ranges and ceramic glass cooktops, in the U.S.A. LIMITATION...
... and maintained according to instructions attached to parts or systems resulting from accident, alteration, misuse, abuse, fire, flood, improper installation, acts of God or use . 3. Repairs when your KitchenAid designated service company or call 1-800-807-6777. 7/05 Keep this appliance is used in -warranty service. Repairs to or furnished with the product, KitchenAid or KitchenAid Canada will need it. On ceramic glass ranges and ceramic glass cooktops, in the U.S.A. LIMITATION...

Parts Diagram
Page 2
...(Pure White) (Pure Biscuit) (S.steel) Illus. DESCRIPTION 1 Literature Parts 8286066 Installation Instructions 8286429 Wiring Diagram 8286067 Use & Care Guide 3191638 Safer Cooking Tips 9759133 Safer Cooking Tips 8286061 Energuide Label 2 Cooktop, Glass 8286210 Black 8286212 White 8286211 Biscuit 8286209 S.Steel 3 246119 Screw 4 8285935 Bracket, Switch Mounting 5 8286535 Bracket, Bottom 6 9759094 Spring Locator (8) 7 Switch, Infinite 8286464 Single (2) 8286465 Dual 8286466 Triple 8 3183956 Seal, Switch Shaft 9 8286577 Wall, Inside (Heat Shield) 10 Knob, Control...
...(Pure White) (Pure Biscuit) (S.steel) Illus. DESCRIPTION 1 Literature Parts 8286066 Installation Instructions 8286429 Wiring Diagram 8286067 Use & Care Guide 3191638 Safer Cooking Tips 9759133 Safer Cooking Tips 8286061 Energuide Label 2 Cooktop, Glass 8286210 Black 8286212 White 8286211 Biscuit 8286209 S.Steel 3 246119 Screw 4 8285935 Bracket, Switch Mounting 5 8286535 Bracket, Bottom 6 9759094 Spring Locator (8) 7 Switch, Infinite 8286464 Single (2) 8286465 Dual 8286466 Triple 8 3183956 Seal, Switch Shaft 9 8286577 Wall, Inside (Heat Shield) 10 Knob, Control...


