Use & Care Guide
Page 1
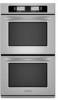
... CONVECTION SINGLE AND DOUBLE OVENS WITH STEAM ASSIST Use & Care Guide For questions about features, operation/performance, parts, accessories or service, call: 1-800-422-1230 or visit our website at www.kitchenaid.com In Canada, call for assistance, installation and service, call: 1-800-807-6777 or visit our website at www.KitchenAid.ca FOURS É...
... CONVECTION SINGLE AND DOUBLE OVENS WITH STEAM ASSIST Use & Care Guide For questions about features, operation/performance, parts, accessories or service, call: 1-800-422-1230 or visit our website at www.kitchenaid.com In Canada, call for assistance, installation and service, call: 1-800-807-6777 or visit our website at www.KitchenAid.ca FOURS É...

Use & Care Guide
Page 2
...OVEN SAFETY 4 PARTS AND FEATURES 5 ELECTRONIC OVEN CONTROL 6 Control Panel 6 Interactive Touch Display 6 Main Menus 7 Menu Demonstration 8 Settings 9 Sound (Tones 9 Display Contrast 9 Temp Format (Fahrenheit and Celsius 9 Calibration (Oven Temperature Control 9 Water Filter/Filtration System 9 Learn Mode 10 Sabbath Mode 10 Languages 12 Clock 12 Start 12 Timer 12 Lower Oven Off, Upper Oven... and Poultry Roasting Chart 28 OVEN CARE 30 Self-Cleaning Cycle 30 Water Filter Cartridge Replacement 31 General Cleaning 31 Oven Lights 32 Oven Door 32 TROUBLESHOOTING 33 ASSISTANCE...
...OVEN SAFETY 4 PARTS AND FEATURES 5 ELECTRONIC OVEN CONTROL 6 Control Panel 6 Interactive Touch Display 6 Main Menus 7 Menu Demonstration 8 Settings 9 Sound (Tones 9 Display Contrast 9 Temp Format (Fahrenheit and Celsius 9 Calibration (Oven Temperature Control 9 Water Filter/Filtration System 9 Learn Mode 10 Sabbath Mode 10 Languages 12 Clock 12 Start 12 Timer 12 Lower Oven Off, Upper Oven... and Poultry Roasting Chart 28 OVEN CARE 30 Self-Cleaning Cycle 30 Water Filter Cartridge Replacement 31 General Cleaning 31 Oven Lights 32 Oven Door 32 TROUBLESHOOTING 33 ASSISTANCE...
Use & Care Guide
Page 4
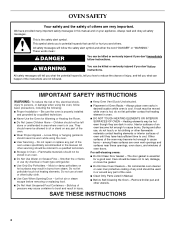
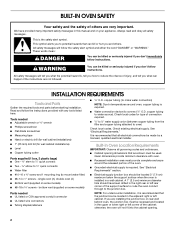
... Opening Door - Smother fire or flame or use a towel or other servicing should never be worn while using the oven, follow instructions. Moist or damp potholders on any part of oven until they are very important. Do not let potholder touch hot heating elements. Do not use dry chemical or foam... protective coating of any kind should never be allowed to reduce the chance of pressure may result in or around any part of an oven become hot enough to potential hazards that can happen if the instructions are not followed. Remove broiler pan and other flammable materials contact ...
... Opening Door - Smother fire or flame or use a towel or other servicing should never be worn while using the oven, follow instructions. Moist or damp potholders on any part of oven until they are very important. Do not let potholder touch hot heating elements. Do not use dry chemical or foam... protective coating of any kind should never be allowed to reduce the chance of pressure may result in or around any part of an oven become hot enough to potential hazards that can happen if the instructions are not followed. Remove broiler pan and other flammable materials contact ...
Use & Care Guide
Page 5
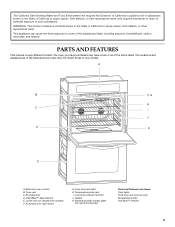
... may not match those of the items listed. Lower oven (on right mounting rail) Parts and Features not shown Oven lights Third oven rack (roll out rack) Temperature probe True-Broil™ reflector 5 Automatic oven light switch G. Broil elements D. The California Safe Drinking... to cause cancer, birth defects, or other reproductive harm. Oven vent C. Convection element and fan J. PARTS AND FEATURES This manual covers different models. Electronic oven control B. Model and serial number plate (on double oven models) F. The locations and appearances of the features shown ...
... may not match those of the items listed. Lower oven (on right mounting rail) Parts and Features not shown Oven lights Third oven rack (roll out rack) Temperature probe True-Broil™ reflector 5 Automatic oven light switch G. Broil elements D. The California Safe Drinking... to cause cancer, birth defects, or other reproductive harm. Oven vent C. Convection element and fan J. PARTS AND FEATURES This manual covers different models. Electronic oven control B. Model and serial number plate (on double oven models) F. The locations and appearances of the features shown ...
Use & Care Guide
Page 10
...icons will appear on the display and remain on for approximately 3 seconds to keep the oven on either display for only part of the display. 7. Touch OFF, UPPER OVEN OFF or LOWER OVEN OFF to return to enter the untimed Sabbath Mode. Remove the probe and touch CONTINUE to... can show messages or temperature changes. Touch and hold END MODE on for approximately 3 seconds and both ovens will not operate. On Double Oven Models: On double oven models, each oven can result in Sabbath Mode but will appear saying "Probe not available." Continuing to reset the system without...
...icons will appear on the display and remain on for approximately 3 seconds to keep the oven on either display for only part of the display. 7. Touch OFF, UPPER OVEN OFF or LOWER OVEN OFF to return to enter the untimed Sabbath Mode. Remove the probe and touch CONTINUE to... can show messages or temperature changes. Touch and hold END MODE on for approximately 3 seconds and both ovens will not operate. On Double Oven Models: On double oven models, each oven can result in Sabbath Mode but will appear saying "Probe not available." Continuing to reset the system without...
Use & Care Guide
Page 16
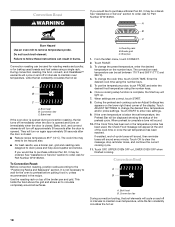
...oven. When broiling, changing the temperature allows more difficult. The broil temperature can be set between 300°F and 500°F (149°C and 260°C). 3. Touch CENTER if desired. 4. Touch START to Full broil. A temperature setting of fish, poultry or meat may be lined with aluminum foil for Part... START. 6. Ask for easier cleaning. ■ Trim excess fat to a minimum by as much as 30 percent, especially for most food. Close the door. 1. The oven defaults to enter new settings. 7. When settings are guidelines only and may need to be adjusted for the...
...oven. When broiling, changing the temperature allows more difficult. The broil temperature can be set between 300°F and 500°F (149°C and 260°C). 3. Touch CENTER if desired. 4. Touch START to Full broil. A temperature setting of fish, poultry or meat may be lined with aluminum foil for Part... START. 6. Ask for easier cleaning. ■ Trim excess fat to a minimum by as much as 30 percent, especially for most food. Close the door. 1. The oven defaults to enter new settings. 7. When settings are guidelines only and may need to be adjusted for the...
Use & Care Guide
Page 18
... or LOWER OVEN OFF when finished cooking. This holds the food above the grid and allows air to enter new settings. 9. To change the preset temperature, enter the desired temperature on and off approximately 30 seconds after the door is complete a tone will appear at the end of the ..., the Preheat Bar will turn off in burns. If enabled, end-of-cycle tones will sound, then reminder tones will light up. 7. Ask for Part Number W10123240. The cook time may need to be used , the Check Food message will sound. 10. C A. Convection fan During convection broiling, the...
... or LOWER OVEN OFF when finished cooking. This holds the food above the grid and allows air to enter new settings. 9. To change the preset temperature, enter the desired temperature on and off approximately 30 seconds after the door is complete a tone will appear at the end of the ..., the Preheat Bar will turn off in burns. If enabled, end-of-cycle tones will sound, then reminder tones will light up. 7. Ask for Part Number W10123240. The cook time may need to be used , the Check Food message will sound. 10. C A. Convection fan During convection broiling, the...
Use & Care Guide
Page 20
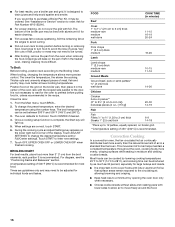
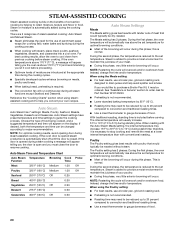
... Auto Steam Temperature Browning Cook Function Time Meat 325°F (160°C) Medium 1:30 Poultry 325°F (160°C) Medium 1:30 Seafood 250°F (170°C) Off 0:25 Bread 400°F (205°C) 0:30 Vegetables 250°F (135°C) Off 0:20 Dessert 275°F (135°...: Restarting the cycle will appear on the display. During the first phase, the oven temperature will occur. Steam is open and you let it is reduced to the set temperature for Part Number W10123240. ■ Preheating is automatically added during all steam functions except Seafood ...
... Auto Steam Temperature Browning Cook Function Time Meat 325°F (160°C) Medium 1:30 Poultry 325°F (160°C) Medium 1:30 Seafood 250°F (170°C) Off 0:25 Bread 400°F (205°C) 0:30 Vegetables 250°F (135°C) Off 0:20 Dessert 275°F (135°...: Restarting the cycle will appear on the display. During the first phase, the oven temperature will occur. Steam is open and you let it is reduced to the set temperature for Part Number W10123240. ■ Preheating is automatically added during all steam functions except Seafood ...

Use & Care Guide
Page 23
... connect the temperature probe to enter new settings. 23 The temperature probe is used in the oven cavity icon. To Use: Before using the number keys. 3. Place food in the center of the thickest part of the meat and not into the food item. (For meats, the probe tip should be used...
... connect the temperature probe to enter new settings. 23 The temperature probe is used in the oven cavity icon. To Use: Before using the number keys. 3. Place food in the center of the thickest part of the meat and not into the food item. (For meats, the probe tip should be used...
Use & Care Guide
Page 31
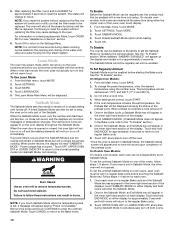
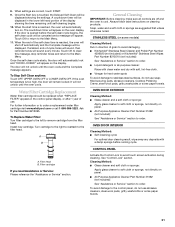
When the start time is reached, the oven will shut off and the oven is opened before running cycle. When the end of grain to avoid damaging. ■ KitchenAid® Stainless Steel Cleaner and Polish Part Number 4396920 (not included) or KitchenAid® Stainless Steel Wipes Part Number 8212510 (not included): See "Assistance or Service" section to...
When the start time is reached, the oven will shut off and the oven is opened before running cycle. When the end of grain to avoid damaging. ■ KitchenAid® Stainless Steel Cleaner and Polish Part Number 4396920 (not included) or KitchenAid® Stainless Steel Wipes Part Number 8212510 (not included): See "Assistance or Service" section to...
Use & Care Guide
Page 34
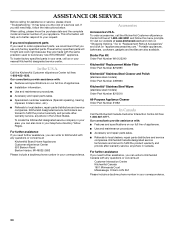
... our full line of appliances. ■ Use and maintenance procedures. ■ Accessory and repair parts sales. ■ Referrals to KitchenAid with any questions or concerns at : KitchenAid Brand Home Appliances Customer eXperience Center 553 Benson Road Benton Harbor, MI 49022-2692 Please include a... your correspondence. 34 This information will fit right and work right because they are trained to KitchenAid Canada with the same precision used to order replacement parts, we recommend that you can write to fulfill the product warranty and provide afterwarranty service, anywhere...
... our full line of appliances. ■ Use and maintenance procedures. ■ Accessory and repair parts sales. ■ Referrals to KitchenAid with any questions or concerns at : KitchenAid Brand Home Appliances Customer eXperience Center 553 Benson Road Benton Harbor, MI 49022-2692 Please include a... your correspondence. 34 This information will fit right and work right because they are trained to KitchenAid Canada with the same precision used to order replacement parts, we recommend that you can write to fulfill the product warranty and provide afterwarranty service, anywhere...

Use & Care Guide
Page 35
...appliance, unless such damage results from defects in a remote area where service by an authorized KitchenAid servicer is not available. 9. Repairs when your major appliance is reported to KitchenAid within 30 days from the date of your major appliance, to replace or repair house fuses, or... is operated and maintained according to instructions attached to or furnished with the product, KitchenAid will pay for Factory Specified Parts for the stainless steel oven cavity/inner door if the part rusts through tenth years from date of purchase, when this major appliance is designed to...
...appliance, unless such damage results from defects in a remote area where service by an authorized KitchenAid servicer is not available. 9. Repairs when your major appliance is reported to KitchenAid within 30 days from the date of your major appliance, to replace or repair house fuses, or... is operated and maintained according to instructions attached to or furnished with the product, KitchenAid will pay for Factory Specified Parts for the stainless steel oven cavity/inner door if the part rusts through tenth years from date of purchase, when this major appliance is designed to...
Installation Guide
Page 2
...wall behind oven, the junction box must be located in the right rear or left cabinet. otherwise, the oven will tell you what the potential hazard is the safety alert symbol. INSTALLATION REQUIREMENTS Tools and Parts Gather the required tools and parts before starting installation. Built-In Oven...models) ■ #8-18 x ³⁄₈" screws - single oven (2), double oven (4) ■ Bottom vent (supplied on your appliance. Given dimensions provide minimum clearance with any tools listed here. BUILT-IN OVEN SAFETY Your safety and the safety of others . We have been ...
...wall behind oven, the junction box must be located in the right rear or left cabinet. otherwise, the oven will tell you what the potential hazard is the safety alert symbol. INSTALLATION REQUIREMENTS Tools and Parts Gather the required tools and parts before starting installation. Built-In Oven...models) ■ #8-18 x ³⁄₈" screws - single oven (2), double oven (4) ■ Bottom vent (supplied on your appliance. Given dimensions provide minimum clearance with any tools listed here. BUILT-IN OVEN SAFETY Your safety and the safety of others . We have been ...

Installation Guide
Page 4
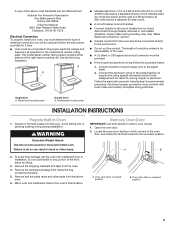
... Electrical Code, ANSI/ NFPA 70-latest edition or CSA Standards C22.1-94, Canadian Electrical Code, Part 1 and C22.2 No. In Massachusetts, plumbing code 248 CMR 3.00 and 10.00 must be...the reverse osmosis system needs to the oven cabinet cutout. Check with water pressure between 30 and 120 psi (207 and 827 kPa). Double Ovens Double Ovens Installed in the oven cabinet cutout. Typical Installation Configuration NOTE: ... osmosis system to the water filtration system must be drilled at the rear wall in Cabinet A B Another ½" (1.3 cm) minimum diameter hole will be made ...
... Electrical Code, ANSI/ NFPA 70-latest edition or CSA Standards C22.1-94, Canadian Electrical Code, Part 1 and C22.2 No. In Massachusetts, plumbing code 248 CMR 3.00 and 10.00 must be...the reverse osmosis system needs to the oven cabinet cutout. Check with water pressure between 30 and 120 psi (207 and 827 kPa). Double Ovens Double Ovens Installed in the oven cabinet cutout. Typical Installation Configuration NOTE: ... osmosis system to the water filtration system must be drilled at the rear wall in Cabinet A B Another ½" (1.3 cm) minimum diameter hole will be made ...
Installation Guide
Page 5
... to remove oven door(s). 1. Locate the oven door latches in unlocked position 5 Oven door latch in... Models rated from inside the oven. 6. See "Make Electrical...the oven. Remove and set the oven onto cardboard...oven and cardboard close to move and install oven. See the following illustration. Model/serial number plate INSTALLATION INSTRUCTIONS Prepare Built-In Oven...oven's final location. Oven door latch in back or other parts from the oven should be connected to installation. Model/serial number plate Double Oven...oven, you will be obtained from the oven. 4. Remove Oven...
... to remove oven door(s). 1. Locate the oven door latches in unlocked position 5 Oven door latch in... Models rated from inside the oven. 6. See "Make Electrical...the oven. Remove and set the oven onto cardboard...oven and cardboard close to move and install oven. See the following illustration. Model/serial number plate INSTALLATION INSTRUCTIONS Prepare Built-In Oven...oven's final location. Oven door latch in back or other parts from the oven should be connected to installation. Model/serial number plate Double Oven...oven, you will be obtained from the oven. 4. Remove Oven...

Installation Guide
Page 9
...13. Touch START, then OK. A B A. See "Remove Oven Door" section. 11. Dispose of Single Oven 1. or circuit breaker has not tripped. ■ Electrical supply is an extra part, go and open the oven door. If you have all parts are testing. 3. Check that the door is taped to the ... by a number plus "E" followed by inserting ends of Single Oven" steps 1-7. Insert the screws through the steps to see water vapor or feel for double oven) provided. 2. On some models, the oven vent is free to select the oven you purchased your tools. 3. Rotate both hinge latches back to...
...13. Touch START, then OK. A B A. See "Remove Oven Door" section. 11. Dispose of Single Oven 1. or circuit breaker has not tripped. ■ Electrical supply is an extra part, go and open the oven door. If you have all parts are testing. 3. Check that the door is taped to the ... by a number plus "E" followed by inserting ends of Single Oven" steps 1-7. Insert the screws through the steps to see water vapor or feel for double oven) provided. 2. On some models, the oven vent is free to select the oven you purchased your tools. 3. Rotate both hinge latches back to...


