Use and Care Guide
Page 1
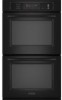
KitcheinAid® Use and Care Guide I I I , d Superba Electric Thermal-Convection Oven With Electronic Clock Models: KEBS177 Single Oven KEBS277 Double Oven
KitcheinAid® Use and Care Guide I I I , d Superba Electric Thermal-Convection Oven With Electronic Clock Models: KEBS177 Single Oven KEBS277 Double Oven
Use and Care Guide
Page 2
...KitchenAid Thermal-Convection Oven allows you to expand your present methods of cooking and at one time, thus saving time and energy. This circulating air allows you the added convenience of food prepared. The oven... Ownership Registration Built-In Oven Features Single Oven Control Panel Double Oven Control Panel Electronic Clock Operation Minute Timer How To Use the Single/Upper Oven How To Use the Lower Oven Baking and Convection Baking ...23 24 25-26 27-28 29 30 31 2 The convection oven is a thermal oven with a fan that circulates heated air over food causing the food to reduce the...
...KitchenAid Thermal-Convection Oven allows you to expand your present methods of cooking and at one time, thus saving time and energy. This circulating air allows you the added convenience of food prepared. The oven... Ownership Registration Built-In Oven Features Single Oven Control Panel Double Oven Control Panel Electronic Clock Operation Minute Timer How To Use the Single/Upper Oven How To Use the Lower Oven Baking and Convection Baking ...23 24 25-26 27-28 29 30 31 2 The convection oven is a thermal oven with a fan that circulates heated air over food causing the food to reduce the...
Use and Care Guide
Page 3
...qualified technician. 10. All other servicing should be referred to children in use as described in either oven. 6. Know where your main electrical switch is in cabinets above your oven. Have the installer show you where it has been damaged or dropped. 9. They should never be... with the provided installation instructions. 3. See care and cleaning instructions in this appliance only in area where oven is located. IMPORTANT SAFETY INSTRUCTIONS When using electrical appliances, basic safety precautions should be seriously injured. 5. Children climbing on any part of this...
...qualified technician. 10. All other servicing should be referred to children in use as described in either oven. 6. Know where your main electrical switch is in cabinets above your oven. Have the installer show you where it has been damaged or dropped. 9. They should never be... with the provided installation instructions. 3. See care and cleaning instructions in this appliance only in area where oven is located. IMPORTANT SAFETY INSTRUCTIONS When using electrical appliances, basic safety precautions should be seriously injured. 5. Children climbing on any part of this...
Use and Care Guide
Page 4
... protective coating of any part of pressure may result in or around any kind should be moved while oven is cool. SAFETY INSTRUCTIONS OVEN PRECAUTIONS 1. Never use oven cleaners. Do not use your oven and the bulb is essential for a potholder. Smother fire or flame or use a towel or bulky ...cloth for a good seal. Do not touch heating elements or interior surfaces of oven until they are oven vent openings and surfaces near these surfaces are dark in color. During and after use, do not let potholder contact hot heating element...
... protective coating of any part of pressure may result in or around any kind should be moved while oven is cool. SAFETY INSTRUCTIONS OVEN PRECAUTIONS 1. Never use oven cleaners. Do not use your oven and the bulb is essential for a potholder. Smother fire or flame or use a towel or bulky ...cloth for a good seal. Do not touch heating elements or interior surfaces of oven until they are oven vent openings and surfaces near these surfaces are dark in color. During and after use, do not let potholder contact hot heating element...
Use and Care Guide
Page 5
...Name Address Phone *Model and serial numbers are located on the lower oven door opening for single ovens, and on a label at the left side of purchase. OWNERSHIP REGISTRATION Before using your oven, please fill out and mail your oven ever requires service. PROOF OF PURCHASE WILL ASSURE YOU OF IN-WARRANTY... SERVICE. THIS CARD DOES NOT VERIFY YOUR WARRANTY. Keep a copy of the sales receipt showing the date of the door opening for double ovens. 5 You will enable us to contact you in the unlikely event of a product safety notification and assist us in complying with the Use ...
...Name Address Phone *Model and serial numbers are located on the lower oven door opening for single ovens, and on a label at the left side of purchase. OWNERSHIP REGISTRATION Before using your oven, please fill out and mail your oven ever requires service. PROOF OF PURCHASE WILL ASSURE YOU OF IN-WARRANTY... SERVICE. THIS CARD DOES NOT VERIFY YOUR WARRANTY. Keep a copy of the sales receipt showing the date of the door opening for double ovens. 5 You will enable us to contact you in the unlikely event of a product safety notification and assist us in complying with the Use ...
Use and Care Guide
Page 7
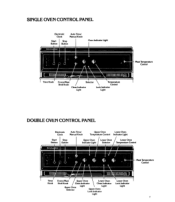
... Knob Selector Clean Indicator Light Temperature Control Lock Indicator Light Meat Temperature Control DOUBLE OVEN CONTROL PANEL Electronic Clock Auto Time/ Manual Knob Upper Oven Lower Oven Temperature Control Indicator Light Start I Stop Button Button 4genc.4. 'me MIMI= Upper Oven Lower Oven Lower Oven Indicator Light Selector Temperature Control IIINZERNIEW oa 11//1/Mlf (4) ir (4) tip Meat Temperature...
... Knob Selector Clean Indicator Light Temperature Control Lock Indicator Light Meat Temperature Control DOUBLE OVEN CONTROL PANEL Electronic Clock Auto Time/ Manual Knob Upper Oven Lower Oven Temperature Control Indicator Light Start I Stop Button Button 4genc.4. 'me MIMI= Upper Oven Lower Oven Lower Oven Indicator Light Selector Temperature Control IIINZERNIEW oa 11//1/Mlf (4) ir (4) tip Meat Temperature...

Use and Care Guide
Page 8
... only an audible reminder and will sound until the Minute Timer is cancelled, or until the desired time is in use it, turn the oven ON or OFF. The Display Window will continue to show "TIMER" and the selected time will be displayed in the Window. Press the STOP/CANCEL ... button, TIME knob and STOP/CANCEL button. To Use The Minute Timer: The Minute Timer can be displayed for both the single/upper and lower ovens. It consists of 15 minutes have elapsed. When your home, 00:00 will begin clock operation. ELECTRONIC CLOCK OPERATION The electronic clock controls all timed...
... only an audible reminder and will sound until the Minute Timer is cancelled, or until the desired time is in use it, turn the oven ON or OFF. The Display Window will continue to show "TIMER" and the selected time will be displayed in the Window. Press the STOP/CANCEL ... button, TIME knob and STOP/CANCEL button. To Use The Minute Timer: The Minute Timer can be displayed for both the single/upper and lower ovens. It consists of 15 minutes have elapsed. When your home, 00:00 will begin clock operation. ELECTRONIC CLOCK OPERATION The electronic clock controls all timed...
Use and Care Guide
Page 9
... bake, convection bake, convection cook, broil, convection broil, defrost and dehydrate. Heat will be set for the oven to 225°F are suggested for warming and holding foods. It can be provided by the double broil element. It has two controls - CONVECTION BAKE-Use this setting for automatic cooking. 2 hr • tart...
... bake, convection bake, convection cook, broil, convection broil, defrost and dehydrate. Heat will be set for the oven to 225°F are suggested for warming and holding foods. It can be provided by the double broil element. It has two controls - CONVECTION BAKE-Use this setting for automatic cooking. 2 hr • tart...
Use and Care Guide
Page 10
... Time Cooking. NOTE: The lower oven will not operate while the upper oven is being cleaned, and the upper oven will go past the desired set for self-cleaning only. HOW TO USE THE LOWER OVEN (For Double Ovens Only) The lower oven is made to clean both ovens at 25 percent power to BAKE ...or CONVECTION BAKE. 10 The Oven Light will not operate while the lower oven is being cleaned.If an attempt is a thermal oven which operates at full (100 percent) ...
... Time Cooking. NOTE: The lower oven will not operate while the upper oven is being cleaned, and the upper oven will go past the desired set for self-cleaning only. HOW TO USE THE LOWER OVEN (For Double Ovens Only) The lower oven is made to clean both ovens at 25 percent power to BAKE ...or CONVECTION BAKE. 10 The Oven Light will not operate while the lower oven is being cleaned.If an attempt is a thermal oven which operates at full (100 percent) ...
Use and Care Guide
Page 11
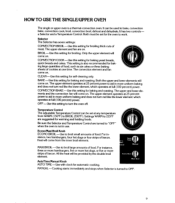
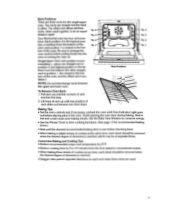
...;F. • Reduce cooking time by 5 to be an equal distance apart. Your KitchenAid oven has four rack positions. Lift front of rack up until Oven Indicator Light goes out before putting foods into the oven or turning the oven on. Single/Upper Oven rack position recommendation -place one time, each sheet should be removed when the...
...;F. • Reduce cooking time by 5 to be an equal distance apart. Your KitchenAid oven has four rack positions. Lift front of rack up until Oven Indicator Light goes out before putting foods into the oven or turning the oven on. Single/Upper Oven rack position recommendation -place one time, each sheet should be removed when the...
Use and Care Guide
Page 12
...muffins in recipes to insure good results. FOIL CAN OBSTRUCT NORMAL HEAT FLOW, CAUSE COOKING FAILURES AND DAMAGE THE OVEN INTERIOR. 12 No pan should be directly above another. • Allow 11to 2 inches of air space around all sides of each pan for even air circulation. • When using glass pans..., except when baking pies or yeast breads. • Cookies, biscuits and cream puffs bake best on the oven rack below the pan. NEVER COVER AN ...
...muffins in recipes to insure good results. FOIL CAN OBSTRUCT NORMAL HEAT FLOW, CAUSE COOKING FAILURES AND DAMAGE THE OVEN INTERIOR. 12 No pan should be directly above another. • Allow 11to 2 inches of air space around all sides of each pan for even air circulation. • When using glass pans..., except when baking pies or yeast breads. • Cookies, biscuits and cream puffs bake best on the oven rack below the pan. NEVER COVER AN ...
Use and Care Guide
Page 14
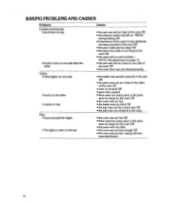
... • rises higher on top Pies: • burns around the edges • Too light in the oven. • the oven was too full, cutting off even heat distribution. 14 NOTE: Pan placement on page 12. • the... pan was set too close to the sides of the oven OR • the oven door was not closed properly. • the batter was spread unevenly in the pan OR •... pans were warped. • there were too many pans or the pans were too large for the oven OR • the oven was too hot. • the batter was too thick OR • the pan was not the ...
... • rises higher on top Pies: • burns around the edges • Too light in the oven. • the oven was too full, cutting off even heat distribution. 14 NOTE: Pan placement on page 12. • the... pan was set too close to the sides of the oven OR • the oven door was not closed properly. • the batter was spread unevenly in the pan OR •... pans were warped. • there were too many pans or the pans were too large for the oven OR • the oven was too hot. • the batter was too thick OR • the pan was not the ...
Use and Care Guide
Page 15
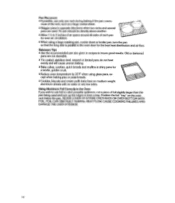
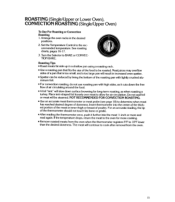
... in the desired positions. 2. The meat will be steamed. Arrange the oven racks in increased oven spatter. • Spatter can be roasted. Set the Temperature Control to BAKE... as when roasting a turkey. ROASTING (Single/Upper or Lower Oven), CONVECTION ROASTING (Single/Upper Oven) To Use For Roasting or Convection Roasting 1. Turn the Selector ... or breast of a pan that fits the size of the food to the oven for air circulation. fl Roasting Tips • Roast meats fat side up in...removal from the oven when the thermometer registers 5°F to allow for more and read again....
... in the desired positions. 2. The meat will be steamed. Arrange the oven racks in increased oven spatter. • Spatter can be roasted. Set the Temperature Control to BAKE... as when roasting a turkey. ROASTING (Single/Upper or Lower Oven), CONVECTION ROASTING (Single/Upper Oven) To Use For Roasting or Convection Roasting 1. Turn the Selector ... or breast of a pan that fits the size of the food to the oven for air circulation. fl Roasting Tips • Roast meats fat side up in...removal from the oven when the thermometer registers 5°F to allow for more and read again....
Use and Care Guide
Page 18
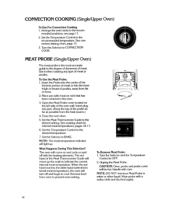
...meat temperature indicator will be hot. NOTE: DO NOT immerse Meat Probe in water or other liquid. mended positions, see page 11. 2. CAUTION: Oven, probe and probe cover will light up the scale to BAKE. Set the Temperature Control to prevent overcooking. 7): 1771 I To Remove Meat Probe...: 1. Remove food from oven to the desired temperature. 7. CONVECTION COOKING (Single/Upper Oven) To Use For Convection Cooking 1. Use it when roasting any type of the oven wall. Insert the Probe into the center of the thickest portion of meat or...
...meat temperature indicator will be hot. NOTE: DO NOT immerse Meat Probe in water or other liquid. mended positions, see page 11. 2. CAUTION: Oven, probe and probe cover will light up the scale to BAKE. Set the Temperature Control to prevent overcooking. 7): 1771 I To Remove Meat Probe...: 1. Remove food from oven to the desired temperature. 7. CONVECTION COOKING (Single/Upper Oven) To Use For Convection Cooking 1. Use it when roasting any type of the oven wall. Insert the Probe into the center of the thickest portion of meat or...
Use and Care Guide
Page 19
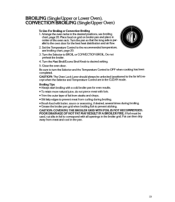
...HOT FAT MAY RESULT IN A BROILER FIRE. If foil must be unlocked (positioned to correspond with fork. • Trim the outer layer of the oven rack. Fat can then drip away from curling during broiling. • Brush food with butter, sauce or seasoning, if desired, several times during ... Broiling Tips • Always start broiling with a cold broiler pan for the best heat distribution and air flow. 2. Turn the Selector to the oven door for even results. • To retain more natural juice, do not pierce meat with all openings in the CLEAN mode. CAUTION: COVERING THE ...
...HOT FAT MAY RESULT IN A BROILER FIRE. If foil must be unlocked (positioned to correspond with fork. • Trim the outer layer of the oven rack. Fat can then drip away from curling during broiling. • Brush food with butter, sauce or seasoning, if desired, several times during ... Broiling Tips • Always start broiling with a cold broiler pan for the best heat distribution and air flow. 2. Turn the Selector to the oven door for even results. • To retain more natural juice, do not pierce meat with all openings in the CLEAN mode. CAUTION: COVERING THE ...
Use and Care Guide
Page 21
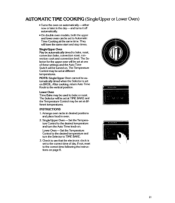
... be automatically timed to bake or roast. INSTRUCTIONS 1. Arrange oven racks in desired positions and place food in the day -and turns it off automatically. • On double oven models, both the upper and lower oven can be set at different temperatures. The Temperature Control may ...be automatically timed when the Selector is set at the same time. NOTE: Single/Upper Oven cannot be used to bake, roast, ...
... be automatically timed to bake or roast. INSTRUCTIONS 1. Arrange oven racks in desired positions and place food in the day -and turns it off automatically. • On double oven models, both the upper and lower oven can be set at different temperatures. The Temperature Control may ...be automatically timed when the Selector is set at the same time. NOTE: Single/Upper Oven cannot be used to bake, roast, ...
Use and Care Guide
Page 22
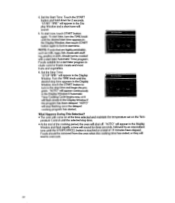
...fruits and vegetables. 6. "AUTO" will appear continuously in the Display Window if the program has been delayed. Foods should not be removed from the oven when the cooking time has ended, or they will come on at the time selected and maintain the temperature set on the Temperature Control until... flash slowly in the Display Window if Automatic Time Cooking Cycle begins now, or it will sound. 5. What Happens During This Selection? • The oven will tend to lock in the Display Window. Set the Start Time. "AUTO" will appear in the Display Window and flash rapidly, a tone will ...
...fruits and vegetables. 6. "AUTO" will appear continuously in the Display Window if the program has been delayed. Foods should not be removed from the oven when the cooking time has ended, or they will come on at the time selected and maintain the temperature set on the Temperature Control until... flash slowly in the Display Window if Automatic Time Cooking Cycle begins now, or it will sound. 5. What Happens During This Selection? • The oven will tend to lock in the Display Window. Set the Start Time. "AUTO" will appear in the Display Window and flash rapidly, a tone will ...
Use and Care Guide
Page 23
... dehydration see, How To Dry Foods (H. A tone will sound each time and the clock will be displayed for two seconds. DEHYDRATING (Single/Upper Oven) Your KitchenAid Thermal-Convection Oven can be necessary to turn the Temperature Control to the right of the WARM setting to achieve the recommended temperature. Prepare food as this...
... dehydration see, How To Dry Foods (H. A tone will sound each time and the clock will be displayed for two seconds. DEHYDRATING (Single/Upper Oven) Your KitchenAid Thermal-Convection Oven can be necessary to turn the Temperature Control to the right of the WARM setting to achieve the recommended temperature. Prepare food as this...
Use and Care Guide
Page 24
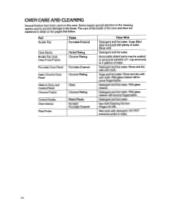
... wool pad with detergent. Removable plated parts may be soaked in Door and Control Panel Chrome Frame Glass Chrome Plating Control Knobs Oven Interior Meat Probe Plated Plastic Pyrolytic Porcelain Enamel Clean With Detergent and hot water. Detergent and hot water. DO NOT immerse probe... pages that follow. Mild glass cleaner will remove fingermarks. Rinse and dry with soft cloth. Mild glass cleaner will remove fingermarks. OVEN CARE AND CLEANING Several finishes have been used to prevent damage to the finish. Detergent and hot water. Rinse and dry with soft...
... wool pad with detergent. Removable plated parts may be soaked in Door and Control Panel Chrome Frame Glass Chrome Plating Control Knobs Oven Interior Meat Probe Plated Plastic Pyrolytic Porcelain Enamel Clean With Detergent and hot water. Detergent and hot water. DO NOT immerse probe... pages that follow. Mild glass cleaner will remove fingermarks. Rinse and dry with soft cloth. Mild glass cleaner will remove fingermarks. OVEN CARE AND CLEANING Several finishes have been used to prevent damage to the finish. Detergent and hot water. Rinse and dry with soft...
Use and Care Guide
Page 25
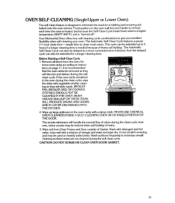
... be delayed to 4 hours if a longer cleaning time is recommended 4- Your KitchenAid Oven offers four self-cleaning cycle combinations to instruc- [ tions on page 11. that the oven racks be extended up large spillovers in the oven during the self-clean cycle. clean cycle. Wipe soil from the... with vegetable oil after clean- The Automatic Self-Clean Cycle can also be used on the oven wall become harder to clean most ovens. Re- If the oven racks remained in the oven cavity with a mixture of Gasket. ing so they will discolor and darken during the clean cycle...
... be delayed to 4 hours if a longer cleaning time is recommended 4- Your KitchenAid Oven offers four self-cleaning cycle combinations to instruc- [ tions on page 11. that the oven racks be extended up large spillovers in the oven during the self-clean cycle. clean cycle. Wipe soil from the... with vegetable oil after clean- The Automatic Self-Clean Cycle can also be used on the oven wall become harder to clean most ovens. Re- If the oven racks remained in the oven cavity with a mixture of Gasket. ing so they will discolor and darken during the clean cycle...


