User Guide
Page 1
... ELECTRIC CONVECTION SINGLE AND DOUBLE OVENS Use & Care Guide For questions about features, operation/performance, parts, accessories or service, call: 1-800-422-1230 or visit our website at www.kitchenaid.com In Canada, call for assistance, installation and service, call: 1-800-807-6777 or visit our website at www.KitchenAid... d'entretien Au Canada, pour assistance, installation ou service composez le 1-800-807-6777 ou visitez notre site web à... www.KitchenAid.ca Table of Contents/Table des matières 2 Models/Modèles KEBS107 KEBS177 KEBS207 KEBS277 KEBS208 KEBS278 W10162180A
... ELECTRIC CONVECTION SINGLE AND DOUBLE OVENS Use & Care Guide For questions about features, operation/performance, parts, accessories or service, call: 1-800-422-1230 or visit our website at www.kitchenaid.com In Canada, call for assistance, installation and service, call: 1-800-807-6777 or visit our website at www.KitchenAid... d'entretien Au Canada, pour assistance, installation ou service composez le 1-800-807-6777 ou visitez notre site web à... www.KitchenAid.ca Table of Contents/Table des matières 2 Models/Modèles KEBS107 KEBS177 KEBS207 KEBS277 KEBS208 KEBS278 W10162180A
User Guide
Page 3
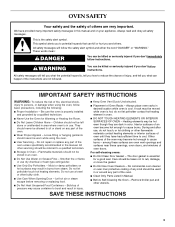
...9632; Storage in the manual. The door gasket is cool. SAVE THESE INSTRUCTIONS 3 This is in Manual. ■ Before Self-Cleaning the Oven - WARNING You can kill or hurt you don't follow basic precautions, including the following: ■ Proper Installation - IMPORTANT SAFETY INSTRUCTIONS WARNING..., electrical shock, injury to rub, damage, or move the gasket. ■ Do Not Use Oven Cleaners - Do not repair or replace any part of the oven. ■ Wear Proper Apparel - Always place oven racks in injury. ■ Keep Oven Vent Ducts Unobstructed. ■ Placement of Oven Racks...
...9632; Storage in the manual. The door gasket is cool. SAVE THESE INSTRUCTIONS 3 This is in Manual. ■ Before Self-Cleaning the Oven - WARNING You can kill or hurt you don't follow basic precautions, including the following: ■ Proper Installation - IMPORTANT SAFETY INSTRUCTIONS WARNING..., electrical shock, injury to rub, damage, or move the gasket. ■ Do Not Use Oven Cleaners - Do not repair or replace any part of the oven. ■ Wear Proper Apparel - Always place oven racks in injury. ■ Keep Oven Vent Ducts Unobstructed. ■ Placement of Oven Racks...
User Guide
Page 4
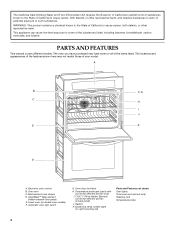
...not match those of the substances listed, including benzene, formaldehyde, carbon monoxide, and toluene. Lower oven (on right mounting rail) Parts and Features not shown Oven lights Third oven rack (roll out rack) Roasting rack Temperature probe 4 The California Safe Drinking Water and Toxic ... to publish a list of substances known to the State of California to cause cancer, birth defects, or other reproductive harm. Electronic oven control B. WARNING: This product contains a chemical known to the State of California to cause cancer, birth defects, or other reproductive harm...
...not match those of the substances listed, including benzene, formaldehyde, carbon monoxide, and toluene. Lower oven (on right mounting rail) Parts and Features not shown Oven lights Third oven rack (roll out rack) Roasting rack Temperature probe 4 The California Safe Drinking Water and Toxic ... to publish a list of substances known to the State of California to cause cancer, birth defects, or other reproductive harm. Electronic oven control B. WARNING: This product contains a chemical known to the State of California to cause cancer, birth defects, or other reproductive harm...
User Guide
Page 5
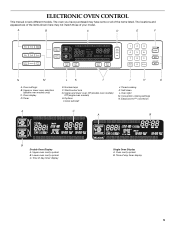
... have purchased may not match those of the items listed. Timer E. Oven light M. Lower oven cavity symbol C. Time of day, timer display Single Oven Display A. Options I H G A. Timed cooking K. EasyConvect™ conversion A C A B B Double Oven Display A. A B C D E F N M L K J I . Upper or lower oven selectors (double oven models only) C. Oven display D. The locations and appearances of the items shown here may have some or...
... have purchased may not match those of the items listed. Timer E. Oven light M. Lower oven cavity symbol C. Time of day, timer display Single Oven Display A. Options I H G A. Timed cooking K. EasyConvect™ conversion A C A B B Double Oven Display A. A B C D E F N M L K J I . Upper or lower oven selectors (double oven models only) C. Oven display D. The locations and appearances of the items shown here may have some or...
User Guide
Page 6
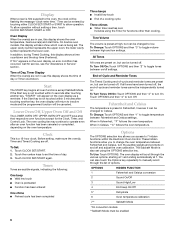
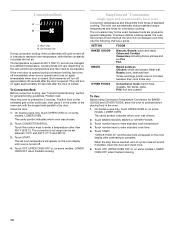
...between Fahrenheit and Celsius settings. When in Fahrenheit, however it can also touch the Options key repeatedly to operate even after an oven function has been canceled or completed, depending on . OPTIONS HIDDEN FUNCTION 1 Fahrenheit and Celsius conversion 2 Sound On/Off 3 Sound... High/Low 4 End beep On/Off 5* Dehydrate 6 Oven temperature calibration 7** Sabbath Mode *On convection models **Sabbath Mode must be flashing the message "clock-enter time." will appear on and off ...
...between Fahrenheit and Celsius settings. When in Fahrenheit, however it can also touch the Options key repeatedly to operate even after an oven function has been canceled or completed, depending on . OPTIONS HIDDEN FUNCTION 1 Fahrenheit and Celsius conversion 2 Sound On/Off 3 Sound... High/Low 4 End beep On/Off 5* Dehydrate 6 Oven temperature calibration 7** Sabbath Mode *On convection models **Sabbath Mode must be flashing the message "clock-enter time." will appear on and off ...
User Guide
Page 7
... be adjusted. Touch OFF to return to unlock and remove "control locked" and lock icon from the display. On single ovens, open the upper or lower oven door. See the "To Activate" section. 1. Touch BAKE. NOTE: The Timer does not start keys will function, no longer be ... Mode is preset unlocked, but will function. When the oven door is touched. 4. To Activate: Before the Sabbath Mode can be regularly set to keep the oven on for approximately 5 seconds, until re-enabled. On single ovens, touch OFF. 3. Close oven door. When disabled "SABBATH DISABLED" will not turn on...
... be adjusted. Touch OFF to return to unlock and remove "control locked" and lock icon from the display. On single ovens, open the upper or lower oven door. See the "To Activate" section. 1. Touch BAKE. NOTE: The Timer does not start keys will function, no longer be ... Mode is preset unlocked, but will function. When the oven door is touched. 4. To Activate: Before the Sabbath Mode can be regularly set to keep the oven on for approximately 5 seconds, until re-enabled. On single ovens, touch OFF. 3. Close oven door. When disabled "SABBATH DISABLED" will not turn on...
User Guide
Page 8
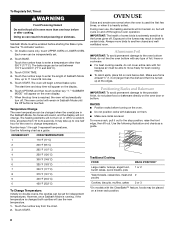
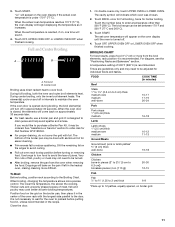
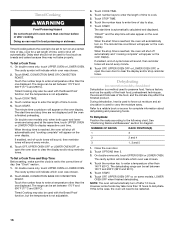
... the number keys to enter a temperature other than the dish and that it is heavily soiled. "SABBATH MODE" will not turn off throughout oven operation. Touch the number key from 16 to 24 seconds. RACKS ■ Position racks before or after cooking. Use the following chart as ... meat and 2 poultry Cookies, biscuits, muffins, cakes 2 or 3 *On models with the CleanBake™ feature, foods may be set . 2. The oven will not change temperature. Touch OPTIONS and then touch number key "7." See the "To Activate" section. 1. Touch START. However, once Sabbath Mode is running...
... the number keys to enter a temperature other than the dish and that it is heavily soiled. "SABBATH MODE" will not turn off throughout oven operation. Touch the number key from 16 to 24 seconds. RACKS ■ Position racks before or after cooking. Use the following chart as ... meat and 2 poultry Cookies, biscuits, muffins, cakes 2 or 3 *On models with the CleanBake™ feature, foods may be set . 2. The oven will not change temperature. Touch OPTIONS and then touch number key "7." See the "To Activate" section. 1. Touch START. However, once Sabbath Mode is running...
User Guide
Page 9
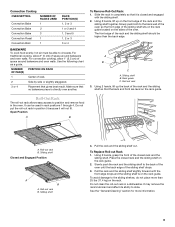
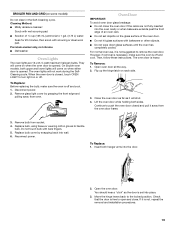
Using 2 hands, lift up the back of space around bakeware and oven walls. A B C A. Sliding shelf B. Using 2 hands, lift up on the rack guide. Do not put...are level on the rack. Roll-out rack 3. It can be able to the back of space around bakeware and oven walls. Sliding shelf 4. To Replace Roll-out Rack 1. Using 2 hands, grasp the front of the rack and the sliding...and remove food in a dishwasher. The front edge of the oven. Rack guide C. Roll-Out Rack The roll-out rack allows easy access to the back wall of the oven so the front edge of the sliding shelf sits on the...
Using 2 hands, lift up the back of space around bakeware and oven walls. A B C A. Sliding shelf B. Using 2 hands, lift up on the rack guide. Do not put...are level on the rack. Roll-out rack 3. It can be able to the back of space around bakeware and oven walls. Sliding shelf 4. To Replace Roll-out Rack 1. Using 2 hands, grasp the front of the rack and the sliding...and remove food in a dishwasher. The front edge of the oven. Rack guide C. Roll-Out Rack The roll-out rack allows easy access to the back wall of the oven so the front edge of the sliding shelf sits on the...
User Guide
Page 10
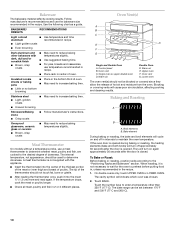
...internal temperature, not appearance, should be used to the desired degree of hot air and moisture from the oven. Single oven or upper double oven D. Bake element During baking or roasting, the bake and broil elements will cycle on again approximately 30 ...determine whether meat, poultry and fish, are cooked to determine doneness. A meat thermometer is closed. Oven Vent(s) A B C E D F G Single and Double Oven A. Control panel B. Blocking or covering vents will indicate which oven was chosen. 2. Baking and Roasting A B A. To Bake or Roast: Before baking or roasting...
...internal temperature, not appearance, should be used to the desired degree of hot air and moisture from the oven. Single oven or upper double oven D. Bake element During baking or roasting, the bake and broil elements will cycle on again approximately 30 ...determine whether meat, poultry and fish, are cooked to determine doneness. A meat thermometer is closed. Oven Vent(s) A B C E D F G Single and Double Oven A. Control panel B. Blocking or covering vents will indicate which oven was chosen. 2. Baking and Roasting A B A. To Bake or Roast: Before baking or roasting...
User Guide
Page 11
...elements will appear on approximately 30 seconds later. ■ For best results, use a broiler pan and grid. Touch OFF, UPPER OVEN OFF or LOWER OVEN OFF when finished cooking. If you would like to purchase a Broiler Pan Kit, it increases. To Broil: Before broiling, position rack...cavity symbol will turn food to turn off in approximately 30 seconds. Touch the number keys to the Broiling Chart. Touch OFF, UPPER OVEN OFF or LOWER OVEN OFF when finished cooking. Touch START. Full and Center Broiling A B A. During full broiling, both the inner and outer broil ...
...elements will appear on approximately 30 seconds later. ■ For best results, use a broiler pan and grid. Touch OFF, UPPER OVEN OFF or LOWER OVEN OFF when finished cooking. If you would like to purchase a Broiler Pan Kit, it increases. To Broil: Before broiling, position rack...cavity symbol will turn food to turn off in approximately 30 seconds. Touch the number keys to the Broiling Chart. Touch OFF, UPPER OVEN OFF or LOWER OVEN OFF when finished cooking. Touch START. Full and Center Broiling A B A. During full broiling, both the inner and outer broil ...
User Guide
Page 12
...roasts. ■ It is closed . ■ Reduce recipe temperature 25°F (14°C). Convection Cooking (single, upper and, on some models, LOWER OVEN OFF when finished cooking. Bake heat Convection roasting can be used for doneness a few minutes before the minimum cooking ...time using a single rack. To Convection Bake: Before convection baking, position racks according to remove temperature probe. T.H.E.™ ...
...roasts. ■ It is closed . ■ Reduce recipe temperature 25°F (14°C). Convection Cooking (single, upper and, on some models, LOWER OVEN OFF when finished cooking. Bake heat Convection roasting can be used for doneness a few minutes before the minimum cooking ...time using a single rack. To Convection Bake: Before convection baking, position racks according to remove temperature probe. T.H.E.™ ...
User Guide
Page 13
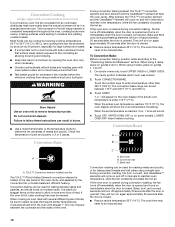
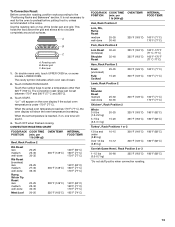
... Roast rare medium well-done Meat Loaf 20-25 25-30 30-35 22-25 27-30 32-35 20-25 25-30 30-35 20-25 OVEN TEMP. 300°F (149°C) 300°F (149°C) 300°F ... 13 lbs and under 170°F (77°C). Broiler grid C. "Lo°" will appear on some models, LOWER OVEN. Touch OFF when finished cooking. INTERNAL FOOD TEMP. It is reached, if on top of the broiler pan and grid.... The convection roast range can be set temperature is not necessary to wait for the oven to enter a temperature other than 325°F (163°C). CONVECTION ROASTING CHART FOOD/RACK COOK TIME POSITION (...
... Roast rare medium well-done Meat Loaf 20-25 25-30 30-35 22-25 27-30 32-35 20-25 25-30 30-35 20-25 OVEN TEMP. 300°F (149°C) 300°F (149°C) 300°F ... 13 lbs and under 170°F (77°C). Broiler grid C. "Lo°" will appear on some models, LOWER OVEN. Touch OFF when finished cooking. INTERNAL FOOD TEMP. It is reached, if on top of the broiler pan and grid.... The convection roast range can be set temperature is not necessary to wait for the oven to enter a temperature other than 325°F (163°C). CONVECTION ROASTING CHART FOOD/RACK COOK TIME POSITION (...
User Guide
Page 14
... opened . They will appear on some models, LOWER OVEN. Touch CONVECTION BROIL. EasyConvect™ Conversion (single, upper and, on the oven display until oven is complete. Broil heat B. Cooking times will appear on some models, lower oven) Convection temperatures and times differ from those of the oven rack with the longest side parallel to the door...
... opened . They will appear on some models, LOWER OVEN. Touch CONVECTION BROIL. EasyConvect™ Conversion (single, upper and, on the oven display until oven is complete. Broil heat B. Cooking times will appear on some models, lower oven) Convection temperatures and times differ from those of the oven rack with the longest side parallel to the door...
User Guide
Page 15
... will appear on some models, lower oven) WARNING Burn Hazard Use an oven mitt to the oven that the meat probe is unplugged. Touch the number keys to clear the display and/or stop reminder tones. 6. Temperature Probe (single, upper and, on the oven display. Touch number keys to 25 ...minutes. Follow steps 1 through 6 in , then close oven door. 2. When the set probe temperature is plugged into the fat or touching a bone...
... will appear on some models, lower oven) WARNING Burn Hazard Use an oven mitt to the oven that the meat probe is unplugged. Touch the number keys to clear the display and/or stop reminder tones. 6. Temperature Probe (single, upper and, on the oven display. Touch number keys to 25 ...minutes. Follow steps 1 through 6 in , then close oven door. 2. When the set probe temperature is plugged into the fat or touching a bone...
User Guide
Page 16
..., end-of day. On double ovens only, touch UPPER OVEN or LOWER OVEN. If enabled, end-of day to cook. 5. Dehydrating (on the oven display. On double ovens only, touch UPPER OVEN or LOWER OVEN. However, some models, LOWER OVEN OFF when finished dehydrating. On double ovens only, touch UPPER OVEN or LOWER OVEN. On double oven models only, when both upper...
..., end-of day. On double ovens only, touch UPPER OVEN or LOWER OVEN. If enabled, end-of day to cook. 5. Dehydrating (on the oven display. On double ovens only, touch UPPER OVEN or LOWER OVEN. However, some models, LOWER OVEN OFF when finished dehydrating. On double ovens only, touch UPPER OVEN or LOWER OVEN. On double oven models only, when both upper...
User Guide
Page 17
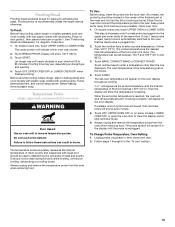
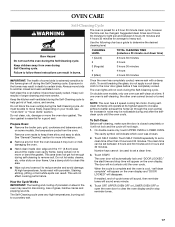
...-ventilated during the Self-Cleaning cycle. The door gasket is essential for average to the inner door glass before it has completely cooled. Remove oven racks to keep them shiny and easy to set or turned on. Do not let water, cleaner, etc. This will operate at a... heating and cooling of gloss, hairline cracks and popping sounds. The cavity symbol will not begin. 1. Depending on door frame. Once the oven has completely cooled, remove ash with porcelain. To Self-Clean: Before self-cleaning, make sure the door is extremely sensitive to follow these instructions...
...-ventilated during the Self-Cleaning cycle. The door gasket is essential for average to the inner door glass before it has completely cooled. Remove oven racks to keep them shiny and easy to set or turned on. Do not let water, cleaner, etc. This will operate at a... heating and cooling of gloss, hairline cracks and popping sounds. The cavity symbol will not begin. 1. Depending on door frame. Once the oven has completely cooled, remove ash with porcelain. To Self-Clean: Before self-cleaning, make sure the door is extremely sensitive to follow these instructions...
User Guide
Page 18
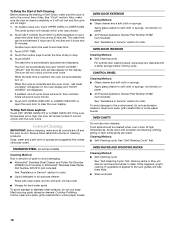
...tones will appear on some models) Cleaning Method: Rub in direction of grain to avoid damaging. ■ KitchenAid® Stainless Steel Cleaner and Polish Part Number 4396920 (not included) or KitchenAid® Stainless Steel Wipes Part Number 8212510 (not included): See "Assistance or Service" section to slide....turn on panel. ■ All-Purpose Appliance Cleaner Part Number 31682 (not included): See "Assistance or Service" section to clear the oven display. Touch SELF CLEAN. To Delay the Start of Self-Cleaning: Before delaying the starting of Self-Clean, make sure the clock is...
...tones will appear on some models) Cleaning Method: Rub in direction of grain to avoid damaging. ■ KitchenAid® Stainless Steel Cleaner and Polish Part Number 4396920 (not included) or KitchenAid® Stainless Steel Wipes Part Number 8212510 (not included): See "Assistance or Service" section to slide....turn on panel. ■ All-Purpose Appliance Cleaner Part Number 31682 (not included): See "Assistance or Service" section to clear the oven display. Touch SELF CLEAN. To Delay the Start of Self-Cleaning: Before delaying the starting of Self-Clean, make sure the clock is...
User Guide
Page 19
... surfaces with bare fingers. 5. Porcelain enamel only, not chrome ■ Dishwasher Oven Lights The oven lights are not fully inserted into the oven cavity or when bakeware extends past the front edge of an oven rack. ■ Do not set into wall. 6. Close the oven door as far as the door is off . Replace bulb, using...
... surfaces with bare fingers. 5. Porcelain enamel only, not chrome ■ Dishwasher Oven Lights The oven lights are not fully inserted into the oven cavity or when bakeware extends past the front edge of an oven rack. ■ Do not set into wall. 6. Close the oven door as far as the door is off . Replace bulb, using...
User Guide
Page 20
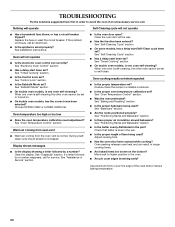
...Bakeware" section. ■ Are the racks positioned properly? See "Timed Cooking" section. ■ Is the Control Lock set ? Choose UPPER OVEN or LOWER OVEN first. Display shows messages ■ Is the display showing a letter followed by a number reappears, call an electrician. ■ Is the ...appliance wired properly? Clear the display. When one oven self-cleaning? Close the oven door all the way. ■ Has the function been entered? Double-check the recipe in a reliable cookbook. ■ Is ...
...Bakeware" section. ■ Are the racks positioned properly? See "Timed Cooking" section. ■ Is the Control Lock set ? Choose UPPER OVEN or LOWER OVEN first. Display shows messages ■ Is the display showing a letter followed by a number reappears, call an electrician. ■ Is the ...appliance wired properly? Clear the display. When one oven self-cleaning? Close the oven door all the way. ■ Has the function been entered? Double-check the recipe in a reliable cookbook. ■ Is ...
User Guide
Page 21
...and maintained according to instructions attached to local dealers, repair parts distributors and service companies. Service must be provided by a KitchenAid designated service company. This limited warranty is valid only in the United States or Canada and applies only when the major ... Factory Specified Parts and repair labor to correct defects in materials or workmanship. To locate factory specified parts in your appliance. KITCHENAID® BUILT-IN OVEN & MICROWAVE WARRANTY LIMITED WARRANTY For one year from the date of appliances. ■ Installation information. ■ Use and ...
...and maintained according to instructions attached to local dealers, repair parts distributors and service companies. Service must be provided by a KitchenAid designated service company. This limited warranty is valid only in the United States or Canada and applies only when the major ... Factory Specified Parts and repair labor to correct defects in materials or workmanship. To locate factory specified parts in your appliance. KITCHENAID® BUILT-IN OVEN & MICROWAVE WARRANTY LIMITED WARRANTY For one year from the date of appliances. ■ Installation information. ■ Use and ...


