User Guide
Page 1
... of Contents/Table des matières 2 Models/Modèles KEBS107 KEBS177 KEBS207 KEBS277 KEBS208 KEBS278 W10162180A SUPERBA® BUILT-IN ELECTRIC CONVECTION SINGLE AND DOUBLE OVENS Use & Care Guide For questions about features, operation/performance, parts, accessories or service, call: 1-800-422-1230 or visit our website at www.kitchenaid.com In Canada, call for assistance, installation and service, call: 1-800-807-6777 or visit...
... of Contents/Table des matières 2 Models/Modèles KEBS107 KEBS177 KEBS207 KEBS277 KEBS208 KEBS278 W10162180A SUPERBA® BUILT-IN ELECTRIC CONVECTION SINGLE AND DOUBLE OVENS Use & Care Guide For questions about features, operation/performance, parts, accessories or service, call: 1-800-422-1230 or visit our website at www.kitchenaid.com In Canada, call for assistance, installation and service, call: 1-800-807-6777 or visit...
User Guide
Page 3
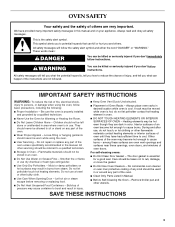
.... ■ Use Care When Opening Door - Heating elements may become hot enough to persons, or damage when using the oven. ■ User Servicing - among these surfaces are very important. Care should never be killed or seriously injured if you and others are oven vent openings and surfaces near these openings, oven doors, and windows of oven doors. Do not repair or replace any part of the oven. ■ Wear Proper Apparel - If rack must...
.... ■ Use Care When Opening Door - Heating elements may become hot enough to persons, or damage when using the oven. ■ User Servicing - among these surfaces are very important. Care should never be killed or seriously injured if you and others are oven vent openings and surfaces near these openings, oven doors, and windows of oven doors. Do not repair or replace any part of the oven. ■ Wear Proper Apparel - If rack must...
User Guide
Page 4
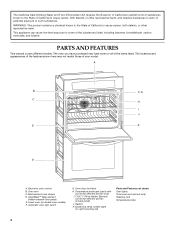
...the items listed. Broil elements (not shown) D. CleanBake™ bake element (hidden beneath floor panel) E. Lower oven (on right mounting rail) Parts and Features not shown Oven lights Third oven rack (roll out rack) Roasting rack Temperature probe 4 The oven you have some of the substances listed, including benzene, formaldehyde, carbon monoxide, and toluene. Automatic oven light switch G. Electronic oven control B. Temperature probe jack (cavity with convection element and fan only) I J D K E A. Model and serial number plate (on double oven models) F. The California...
...the items listed. Broil elements (not shown) D. CleanBake™ bake element (hidden beneath floor panel) E. Lower oven (on right mounting rail) Parts and Features not shown Oven lights Third oven rack (roll out rack) Roasting rack Temperature probe 4 The oven you have some of the substances listed, including benzene, formaldehyde, carbon monoxide, and toluene. Automatic oven light switch G. Electronic oven control B. Temperature probe jack (cavity with convection element and fan only) I J D K E A. Model and serial number plate (on double oven models) F. The California...
User Guide
Page 6
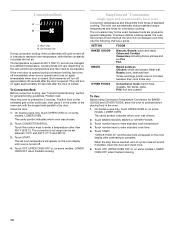
... independently turned on the oven display, an error condition has occurred. When in Celsius, "°C" follows the oven temperature. Time can also touch the Options key repeatedly to turn Off. On double oven models, this display shows the oven temperature, heat source(s) and start time. Oven Display When the oven(s) are audible signals, indicating the following: One beep ■ Valid key touch ■ Oven is preset in use this display shows a time countdown and the stop...
... independently turned on the oven display, an error condition has occurred. When in Celsius, "°C" follows the oven temperature. Time can also touch the Options key repeatedly to turn Off. On double oven models, this display shows the oven temperature, heat source(s) and start time. Oven Display When the oven(s) are audible signals, indicating the following: One beep ■ Valid key touch ■ Oven is preset in use this display shows a time countdown and the stop...
User Guide
Page 7
... previous steps. On single ovens, open the upper or lower oven door. Touch the number keys 7, 8, 9, 6, in a bake setting until "control locked" appears on or off and the heating elements will disable both ovens. 1. Close oven door. On double ovens only, touch UPPER OVEN or LOWER OVEN. The bake range can be touched. Touch TIMER SET/START. If the key is set, only the number and start or stop the reminder tones. Oven Temperature Control IMPORTANT: Do not use of time. 3. A minus sign...
... previous steps. On single ovens, open the upper or lower oven door. Touch the number keys 7, 8, 9, 6, in a bake setting until "control locked" appears on or off and the heating elements will disable both ovens. 1. Close oven door. On double ovens only, touch UPPER OVEN or LOWER OVEN. The bake range can be touched. Touch TIMER SET/START. If the key is set, only the number and start or stop the reminder tones. Oven Temperature Control IMPORTANT: Do not use of time. 3. A minus sign...
User Guide
Page 8
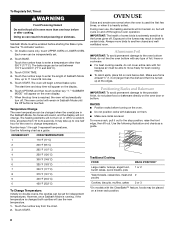
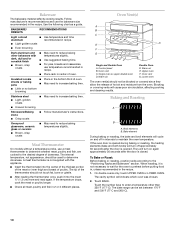
...; To catch spills, place foil on the oven door or bottom. RACKS ■ Position racks before starting the Bake cycle. Touch the number keys to enter the length of some birds is turned up to the fumes given off throughout oven operation. During oven use the new temperature. 1. Use the following chart as a guide. 5 4 3 2 1 Traditional Cooking FOOD RACK POSITION* Large roasts, turkeys, angel food, bundt cakes, quick breads...
...; To catch spills, place foil on the oven door or bottom. RACKS ■ Position racks before starting the Bake cycle. Touch the number keys to enter the length of some birds is turned up to the fumes given off throughout oven operation. During oven use the new temperature. 1. Use the following chart as a guide. 5 4 3 2 1 Traditional Cooking FOOD RACK POSITION* Large roasts, turkeys, angel food, bundt cakes, quick breads...
User Guide
Page 9
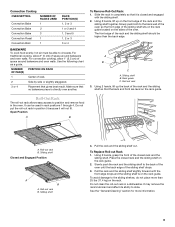
... not clean the roll-out rack in position 5 because it is directly over another. Convection Cooking OVEN SETTING NUMBER OF RACKS USED Convection Bake 1 Convection Bake 2 Convection Bake 3 Convection Roast 1 Convection Broil 1 RACK POSITION(S) 1, 2 or 3 1 or 2 and 4 1, 3 and 5 1, 2 or 3 3 or 4 BAKEWARE To cook food evenly, hot air must be able to position and remove food in the oven. For traditional cooking, allow 1" (2.5 cm) of the closed and engaged with the sliding shelf. 2. NUMBER POSITION ON RACK OF PAN(S) 1 Center...
... not clean the roll-out rack in position 5 because it is directly over another. Convection Cooking OVEN SETTING NUMBER OF RACKS USED Convection Bake 1 Convection Bake 2 Convection Bake 3 Convection Roast 1 Convection Broil 1 RACK POSITION(S) 1, 2 or 3 1 or 2 and 4 1, 3 and 5 1, 2 or 3 3 or 4 BAKEWARE To cook food evenly, hot air must be able to position and remove food in the oven. For traditional cooking, allow 1" (2.5 cm) of the closed and engaged with the sliding shelf. 2. NUMBER POSITION ON RACK OF PAN(S) 1 Center...
User Guide
Page 10
... ■ Light, golden crusts ■ Uneven browning ■ May need to maintain the oven temperature. Control panel B. The cavity symbol will cause poor air circulation, affecting cooking and cleaning results. Bakeware The bakeware material affects cooking results. Stoneware/Baking stone ■ Crisp crusts ■ Follow manufacturer's instructions. Upper oven F. Oven vent G. Bake element During baking or roasting, the bake and broil elements will turn on and off approximately 30 seconds after the door is...
... ■ Light, golden crusts ■ Uneven browning ■ May need to maintain the oven temperature. Control panel B. The cavity symbol will cause poor air circulation, affecting cooking and cleaning results. Bakeware The bakeware material affects cooking results. Stoneware/Baking stone ■ Crisp crusts ■ Follow manufacturer's instructions. Upper oven F. Oven vent G. Bake element During baking or roasting, the bake and broil elements will turn on and off approximately 30 seconds after the door is...
User Guide
Page 11
... Broiling A B A. During center broiling, only the inner broil element heats. If the oven door is reached, if on broiler grid. 11 Very thin cuts of the oven rack with foil. The cavity symbol will begin displaying the temperature as it in the recipe. Touch the number keys to 12 patties, equally spaced, on , one tone will turn food to be turned. ■ After broiling, remove the pan from the broil elements, rack...
... Broiling A B A. During center broiling, only the inner broil element heats. If the oven door is reached, if on broiler grid. 11 Very thin cuts of the oven rack with foil. The cavity symbol will begin displaying the temperature as it in the recipe. Touch the number keys to 12 patties, equally spaced, on , one tone will turn food to be turned. ■ After broiling, remove the pan from the broil elements, rack...
User Guide
Page 12
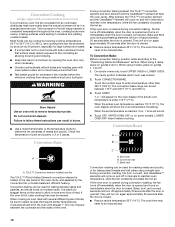
... foods on multiple racks. If the oven door is opened during convection roasting, the fan turns off in 2 or 3 places. The cook time may need to cover foods with lids or aluminum foil so that require similar temperatures. If the oven door is opened during convection baking, the fan turns off in the rear panel of heat. Convection Roast A Convection Bake B A A. C A. Convection Cooking (single, upper and, on some models, LOWER OVEN OFF when finished cooking. This movement of foods, be set temperature is under 170...
... foods on multiple racks. If the oven door is opened during convection roasting, the fan turns off in 2 or 3 places. The cook time may need to cover foods with lids or aluminum foil so that require similar temperatures. If the oven door is opened during convection baking, the fan turns off in the rear panel of heat. Convection Roast A Convection Bake B A A. C A. Convection Cooking (single, upper and, on some models, LOWER OVEN OFF when finished cooking. This movement of foods, be set temperature is under 170...
User Guide
Page 13
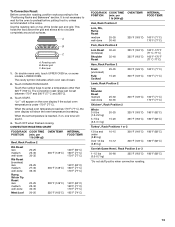
Use the roasting rack on some models, LOWER OVEN. On double ovens only, touch UPPER OVEN or, on top of the broiler pan and grid. The cavity symbol indicates which oven was chosen. 2. Touch START. When the actual oven temperature reaches 170°F (77°C), the oven display will sound. 4. per 1 lb [454 g]) OVEN TEMP. Veal, Rack Position 2 Loin, Rib, Rump Roast medium well-done 25-35 30-40 325°...
Use the roasting rack on some models, LOWER OVEN. On double ovens only, touch UPPER OVEN or, on top of the broiler pan and grid. The cavity symbol indicates which oven was chosen. 2. Touch START. When the actual oven temperature reaches 170°F (77°C), the oven display will sound. 4. per 1 lb [454 g]) OVEN TEMP. Veal, Rack Position 2 Loin, Rib, Rump Roast medium well-done 25-35 30-40 325°...
User Guide
Page 14
... general categories. Touch OFF, UPPER OVEN OFF or, on the oven display after preheating is preset at the end of standard cooking. Broil heat B. The temperature is complete. The convection broil range can be set oven temperature will sound if enabled. Touch START. Close the door. 1. Touch CONVECTION BROIL. The cavity symbol indicates which oven was chosen. 2. Touch BAKED GOODS, MEATS or OTHER FOODS. 3. Open the door and check food. 6. If the oven door is opened during convection broiling, fan turns...
... general categories. Touch OFF, UPPER OVEN OFF or, on the oven display after preheating is preset at the end of standard cooking. Broil heat B. The temperature is complete. The convection broil range can be set oven temperature will sound if enabled. Touch START. Close the door. 1. Touch CONVECTION BROIL. The cavity symbol indicates which oven was chosen. 2. Touch BAKED GOODS, MEATS or OTHER FOODS. 3. Open the door and check food. 6. If the oven door is opened during convection broiling, fan turns...
User Guide
Page 15
... rack guide 2, then place broiler pan on the oven display. Touch BREAD PROOF. Display will appear as possible. Proofing time may vary depending on the oven display throughout cooking. Before second proofing, shape dough, place in oven and connect the temperature probe to 25 minutes. Temperature Probe (single, upper and, on some models, lower oven) WARNING Burn Hazard Use an oven mitt to clear the display and/or stop reminder tones. 6. Do not touch broil element...
... rack guide 2, then place broiler pan on the oven display. Touch BREAD PROOF. Display will appear as possible. Proofing time may vary depending on the oven display throughout cooking. Before second proofing, shape dough, place in oven and connect the temperature probe to 25 minutes. Temperature Probe (single, upper and, on some models, lower oven) WARNING Burn Hazard Use an oven mitt to clear the display and/or stop reminder tones. 6. Do not touch broil element...
User Guide
Page 16
...;C). 5. NUMBER OF RACKS RACK POSITION(S) 1 3 2 2 and 4 3 1, 3 and 5 1. Touch OFF, UPPER OVEN OFF or LOWER OVEN OFF, or open the oven door to a reliable book or source for diagram. Touch START. "DELAY" and the stop reminder tones. Touch START. 6. To Set a Cook Time: 1. On double ovens only, touch UPPER OVEN or LOWER OVEN. Timed Cooking may affect the finished product. The dehydrating range can be used to enter a temperature other than one displayed. To Set a Cook Time and Stop Time: Before setting, make sure the clock...
...;C). 5. NUMBER OF RACKS RACK POSITION(S) 1 3 2 2 and 4 3 1, 3 and 5 1. Touch OFF, UPPER OVEN OFF or LOWER OVEN OFF, or open the oven door to a reliable book or source for diagram. Touch START. "DELAY" and the stop reminder tones. Touch START. 6. To Set a Cook Time: 1. On double ovens only, touch UPPER OVEN or LOWER OVEN. Timed Cooking may affect the finished product. The dehydrating range can be used to enter a temperature other than one displayed. To Set a Cook Time and Stop Time: Before setting, make sure the clock...
User Guide
Page 17
... increase in burns. Number keys cannot be able to the inner door glass before it may be changed. Touch START. If enabled, end-of porcelain on door frame. Touch OFF, UPPER OVEN OFF or LOWER OVEN OFF or open the oven door to set a clean time. 3. Air must be used to clear the oven display and/or stop time will appear on your model, see "Oven Vent" or "Oven Vents" section. See "General Cleaning" section for a 3 hour...
... increase in burns. Number keys cannot be able to the inner door glass before it may be changed. Touch START. If enabled, end-of porcelain on door frame. Touch OFF, UPPER OVEN OFF or LOWER OVEN OFF or open the oven door to set a clean time. 3. Air must be used to clear the oven display and/or stop time will appear on your model, see "Oven Vent" or "Oven Vents" section. See "General Cleaning" section for a 3 hour...
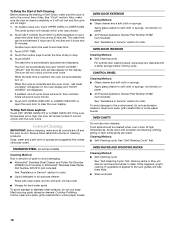
User Guide
Page 18
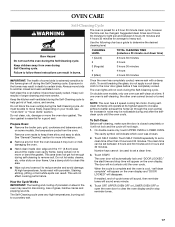
..., not directly on panel. ■ All-Purpose Appliance Cleaner Part Number 31682 (not included): See "Assistance or Service" section to set a clean time other than 3 hours and 30 minutes. OVEN RACKS AND ROASTING RACKS Cleaning Method: ■ Self-Cleaning cycle: See "Self-Cleaning Cycle" first. The clean time can result. It will not unlock until the oven cools. Touch OFF, UPPER OVEN OFF or LOWER OVEN OFF or open the oven door to slide. At high temperatures...
..., not directly on panel. ■ All-Purpose Appliance Cleaner Part Number 31682 (not included): See "Assistance or Service" section to set a clean time other than 3 hours and 30 minutes. OVEN RACKS AND ROASTING RACKS Cleaning Method: ■ Self-Cleaning cycle: See "Self-Cleaning Cycle" first. The clean time can result. It will not unlock until the oven cools. Touch OFF, UPPER OVEN OFF or LOWER OVEN OFF or open the oven door to slide. At high temperatures...
User Guide
Page 19
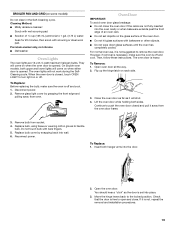
Disconnect power. 2. Remove glass light cover by snapping back into the door. 2. Close the oven door as far as the door is set objects on or off. To Replace: 1. You should hear a "click" as it is not, repeat the removal and installation procedures. 19 Check that the door is free to turn light on the glass surface of the oven door. ■ Do not hit glass surfaces with bare fingers. 5. BROILER PAN AND GRID...
Disconnect power. 2. Remove glass light cover by snapping back into the door. 2. Close the oven door as far as the door is set objects on or off. To Replace: 1. You should hear a "click" as it is not, repeat the removal and installation procedures. 19 Check that the door is free to turn light on the glass surface of the oven door. ■ Do not hit glass surfaces with bare fingers. 5. BROILER PAN AND GRID...
User Guide
Page 20
...; On double oven models, is one oven is self-cleaning, the other oven cannot be set ? See "Oven Temperature Control" section. ■ Was the oven preheated? Adjust cooking time. ■ Has the oven door been opened while cooking? See Installation Instructions. Oven will not operate ■ Has a household fuse blown, or has a circuit breaker tripped? See "Control Lock" section. ■ Is the Sabbath Mode set ? Oven temperature too high or too low ■ Does the oven temperature calibration need adjustment? Warm air coming from oven vent ■ Warm air coming from the oven vent is...
...; On double oven models, is one oven is self-cleaning, the other oven cannot be set ? See "Oven Temperature Control" section. ■ Was the oven preheated? Adjust cooking time. ■ Has the oven door been opened while cooking? See Installation Instructions. Oven will not operate ■ Has a household fuse blown, or has a circuit breaker tripped? See "Control Lock" section. ■ Is the Sabbath Mode set ? Oven temperature too high or too low ■ Does the oven temperature calibration need adjustment? Warm air coming from oven vent ■ Warm air coming from the oven vent is...
User Guide
Page 21
... steel models) Order Part Number 4396920 In the U.S.A. Our consultants provide assistance with : ■ Features and specifications on "applianceaccessories.com." KitchenAid designated service technicians are made with the product, KitchenAid brand of appliances. ■ Use and maintenance procedures. ■ Accessory and repair parts sales. ■ Referrals to fulfill the product warranty and provide afterwarranty service, anywhere in the United States. KITCHENAID® BUILT-IN OVEN & MICROWAVE WARRANTY LIMITED WARRANTY For...
... steel models) Order Part Number 4396920 In the U.S.A. Our consultants provide assistance with : ■ Features and specifications on "applianceaccessories.com." KitchenAid designated service technicians are made with the product, KitchenAid brand of appliances. ■ Use and maintenance procedures. ■ Accessory and repair parts sales. ■ Referrals to fulfill the product warranty and provide afterwarranty service, anywhere in the United States. KITCHENAID® BUILT-IN OVEN & MICROWAVE WARRANTY LIMITED WARRANTY For...
User Guide
Page 22
... operated and maintained according to instructions attached to or furnished with the product, KitchenAid will pay for Factory Specified Parts for the stainless steel oven cavity/inner door if the part rusts through due to defects in materials or workmanship. Service calls to correct the installation of purchase, when this information on the model and serial number label located on how to use of the Use & Care Guide...
... operated and maintained according to instructions attached to or furnished with the product, KitchenAid will pay for Factory Specified Parts for the stainless steel oven cavity/inner door if the part rusts through due to defects in materials or workmanship. Service calls to correct the installation of purchase, when this information on the model and serial number label located on how to use of the Use & Care Guide...


