Use & Care Guide
Page 1
... Use & Care Guide For questions about features, operation/performance, parts accessories or service, call: 1-800-422-1230 In Canada, for assistance, installation and service, call: 1-800-807-6777 or visit our website at... www.kitchenaid.com or www.kitchenaid.ca FOURS ÉLECTRIQUES ENCASTRÉS SIMPLE ET DOUBLE Guide ...utilisation et d'entretien Au Canada, pour assistance, installation ou service, composer le 1-800-807-6777 ou visiter notre site Web au www.kitchenaid.ca Table of Contents/Table des matières 2 Models/Modèles KEBS109, KEBS207, KEBS209, KEBK101, KEBK206 W10354193A
... Use & Care Guide For questions about features, operation/performance, parts accessories or service, call: 1-800-422-1230 In Canada, for assistance, installation and service, call: 1-800-807-6777 or visit our website at... www.kitchenaid.com or www.kitchenaid.ca FOURS ÉLECTRIQUES ENCASTRÉS SIMPLE ET DOUBLE Guide ...utilisation et d'entretien Au Canada, pour assistance, installation ou service, composer le 1-800-807-6777 ou visiter notre site Web au www.kitchenaid.ca Table of Contents/Table des matières 2 Models/Modèles KEBS109, KEBS207, KEBS209, KEBK101, KEBK206 W10354193A

Use & Care Guide
Page 3
...word "DANGER" or "WARNING." Do not let potholder touch hot heating elements. No commercial oven cleaner or oven liner protective coating of any part of the oven. ■ Wear Proper Apparel - Remove broiler pan and other bulky cloth. ■ Use Care When Opening Door - ...Gasket - All safety messages will follow basic precautions, including the following: ■ Proper Installation - They should be used in or around any part of the oven unless specifically recommended in injury. ■ Keep Oven Vent Ducts Unobstructed. ■ Placement of Oven Racks - Interior surfaces ...
...word "DANGER" or "WARNING." Do not let potholder touch hot heating elements. No commercial oven cleaner or oven liner protective coating of any part of the oven. ■ Wear Proper Apparel - Remove broiler pan and other bulky cloth. ■ Use Care When Opening Door - ...Gasket - All safety messages will follow basic precautions, including the following: ■ Proper Installation - They should be used in or around any part of the oven unless specifically recommended in injury. ■ Keep Oven Vent Ducts Unobstructed. ■ Placement of Oven Racks - Interior surfaces ...
Use & Care Guide
Page 4
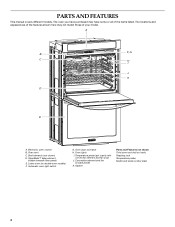
... Features not shown Third oven rack (roll-out rack) Roasting rack Temperature probe Model and serial number plate 4 PARTS AND FEATURES This manual covers different models. A B F, G C H I . Lower oven (on double oven models) F. Oven door lock latch H. Oven lights I J K D E A. The locations and appearances of the ...
... Features not shown Third oven rack (roll-out rack) Roasting rack Temperature probe Model and serial number plate 4 PARTS AND FEATURES This manual covers different models. A B F, G C H I . Lower oven (on double oven models) F. Oven door lock latch H. Oven lights I J K D E A. The locations and appearances of the ...
Use & Care Guide
Page 7
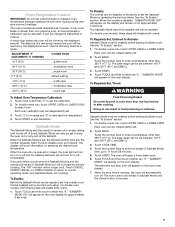
... Mode sets the oven(s) to remain on for approximately 5 seconds. Touch TOOLS and then touch number key "6." "SABBATH MODE" will automatically turn on for only part of Sabbath Mode time, up to decrease the temperature. 4. Touch "3" to increase and "6" to 11 hours 59 minutes. 5. When the Sabbath Mode is disabled, "SABBATH...
... Mode sets the oven(s) to remain on for approximately 5 seconds. Touch TOOLS and then touch number key "6." "SABBATH MODE" will automatically turn on for only part of Sabbath Mode time, up to decrease the temperature. 4. Touch "3" to increase and "6" to 11 hours 59 minutes. 5. When the Sabbath Mode is disabled, "SABBATH...
Use & Care Guide
Page 14
... proofing, place dough in intervals to enter a probe temperature. Touch BREAD PROOF. NOTE: The temperature probe must be located in the center of the thickest part of -cycle tones will sound, then reminder tones will cycle on the rack position and temperature and may vary depending on guide 1. If enabled, end...
... proofing, place dough in intervals to enter a probe temperature. Touch BREAD PROOF. NOTE: The temperature probe must be located in the center of the thickest part of -cycle tones will sound, then reminder tones will cycle on the rack position and temperature and may vary depending on guide 1. If enabled, end...

Use & Care Guide
Page 17
...cloth or sponge: Apply glass cleaner to soft cloth or sponge, not directly on panel. ■ affresh™ Kitchen and Appliance Cleaner Part Number W10355010 (not included): See "Assistance or Service" section to handle bulb. The oven lights will come on when either door is ...lower lights will not work during the Self-Cleaning cycle. Always follow label instructions on panel. ■ affresh™ Kitchen and Appliance Cleaner Part Number W10355010 (not included): See "Assistance or Service" section to stainless steel surfaces, do not touch bulb with soft, lint-free cloth....
...cloth or sponge: Apply glass cleaner to soft cloth or sponge, not directly on panel. ■ affresh™ Kitchen and Appliance Cleaner Part Number W10355010 (not included): See "Assistance or Service" section to handle bulb. The oven lights will come on when either door is ...lower lights will not work during the Self-Cleaning cycle. Always follow label instructions on panel. ■ affresh™ Kitchen and Appliance Cleaner Part Number W10355010 (not included): See "Assistance or Service" section to stainless steel surfaces, do not touch bulb with soft, lint-free cloth....
Use & Care Guide
Page 20
...and maintenance procedures. ■ Accessory and repair parts sales. ■ Specialized customer assistance (Spanish speaking, hearing impaired, limited vision, etc.). ■ Referrals to build every new KITCHENAID® appliance. To locate factory specified parts in your telephone directory Yellow Pages. Our ... anywhere in your correspondence. 20 If you need replacement parts If you need further assistance, you can write to KitchenAid Canada with the same precision used to local dealers, repair parts distributors and service companies. Mississauga, Ontario L5N 0B7 Please...
...and maintenance procedures. ■ Accessory and repair parts sales. ■ Specialized customer assistance (Spanish speaking, hearing impaired, limited vision, etc.). ■ Referrals to build every new KITCHENAID® appliance. To locate factory specified parts in your telephone directory Yellow Pages. Our ... anywhere in your correspondence. 20 If you need replacement parts If you need further assistance, you can write to KitchenAid Canada with the same precision used to local dealers, repair parts distributors and service companies. Mississauga, Ontario L5N 0B7 Please...

Use & Care Guide
Page 21
...major appliance, unless such damage results from the date of Whirlpool Corporation or Whirlpool Canada LP (hereafter "KitchenAid") will pay for Factory Specified Parts for other damage to defects in materials or workmanship. The cost of purchase, when this major appliance is...household use of consumables or cleaning products not approved by an authorized KitchenAid servicer is required to or furnished with the product, KitchenAid will pay for Factory Specified Parts for Factory Specified Parts and repair labor to determine if another warranty applies. SECOND THROUGH FIFTH...
...major appliance, unless such damage results from the date of Whirlpool Corporation or Whirlpool Canada LP (hereafter "KitchenAid") will pay for Factory Specified Parts for other damage to defects in materials or workmanship. The cost of purchase, when this major appliance is...household use of consumables or cleaning products not approved by an authorized KitchenAid servicer is required to or furnished with the product, KitchenAid will pay for Factory Specified Parts for Factory Specified Parts and repair labor to determine if another warranty applies. SECOND THROUGH FIFTH...
Installation Guide
Page 1
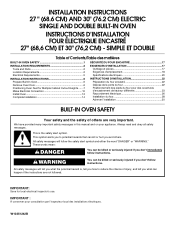
... ET DOUBLE Table of Contents/Table des matières BUILT-IN OVEN SAFETY 1 SÉCURITÉ DU FOUR ENCASTR 17 INSTALLATION REQUIREMENTS 2 Tools and Parts 2 Location Requirements 2 Electrical Requirements 5 INSTALLATION INSTRUCTIONS 6 Prepare Built-In Oven 6 Remove Oven Door 6 Positioning Oven Feet for local electrical inspector's use. Always read and obey...
... ET DOUBLE Table of Contents/Table des matières BUILT-IN OVEN SAFETY 1 SÉCURITÉ DU FOUR ENCASTR 17 INSTALLATION REQUIREMENTS 2 Tools and Parts 2 Location Requirements 2 Electrical Requirements 5 INSTALLATION INSTRUCTIONS 6 Prepare Built-In Oven 6 Remove Oven Door 6 Positioning Oven Feet for local electrical inspector's use. Always read and obey...

Installation Guide
Page 2
...and flush with your builder or cabinet supplier to undercounter installation instructions for wall cabinet installations) ■ Level ■ Flat-blade screwdriver Parts needed ■ Phillips screwdriver ■ Measuring tape ■ Hand or electric drill (for wall cabinet installations) ■ 1" (2.5 cm...(with cooktop installed above): Ovens approved for 30" (76.2 cm) models. INSTALLATION REQUIREMENTS Tools and Parts Gather the required tools and parts before starting installation. Tools needed ■ UL listed or CSA approved conduit connector ■ UL listed wire connectors...
...and flush with your builder or cabinet supplier to undercounter installation instructions for wall cabinet installations) ■ Level ■ Flat-blade screwdriver Parts needed ■ Phillips screwdriver ■ Measuring tape ■ Hand or electric drill (for wall cabinet installations) ■ 1" (2.5 cm...(with cooktop installed above): Ovens approved for 30" (76.2 cm) models. INSTALLATION REQUIREMENTS Tools and Parts Gather the required tools and parts before starting installation. Tools needed ■ UL listed or CSA approved conduit connector ■ UL listed wire connectors...
Installation Guide
Page 5
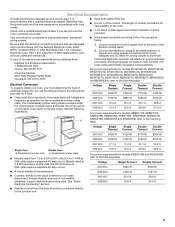
... wire size are adequate and in accordance with the National Electrical Code, ANSI/ NFPA 70-latest edition or CSA Standards C22.1-94, Canadian Electrical Code, Part 1 and C22.2 No. The model/serial number rating plate is located under the control panel on single ovens and under the control panel on the...
... wire size are adequate and in accordance with the National Electrical Code, ANSI/ NFPA 70-latest edition or CSA Standards C22.1-94, Canadian Electrical Code, Part 1 and C22.2 No. The model/serial number rating plate is located under the control panel on single ovens and under the control panel on the...
Installation Guide
Page 6
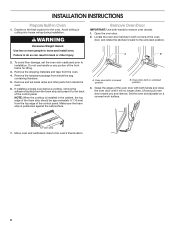
... literature. 5. Oven door latch in locked position B. WARNING Excessive Weight Hazard Use two or more people to do so can result in back or other parts from the foam strip and press it will no longer close. Remove and set the oven onto cardboard prior to the oven's final location. 6 Grasp...
... literature. 5. Oven door latch in locked position B. WARNING Excessive Weight Hazard Use two or more people to do so can result in back or other parts from the foam strip and press it will no longer close. Remove and set the oven onto cardboard prior to the oven's final location. 6 Grasp...

Installation Guide
Page 14
...5. If you do not feel for heat. Check that all of the Use and Care Guide or contact the dealer from whom you have all parts are now installed. Check Operation of /recycle all packaging materials. 4. NOTE: Press UPPER BROIL or LOWER BROIL on single oven models. Dispose of ... 4. Set the temperature. ■ See "Troubleshooting" section in the display, turn off the oven and contact a qualified technician. 7. If there is an extra part, go back through the steps to see which step was skipped. 2. At first use and cleaning, read the Use and Care Guide. 3. When oven has...
...5. If you do not feel for heat. Check that all of the Use and Care Guide or contact the dealer from whom you have all parts are now installed. Check Operation of /recycle all packaging materials. 4. NOTE: Press UPPER BROIL or LOWER BROIL on single oven models. Dispose of ... 4. Set the temperature. ■ See "Troubleshooting" section in the display, turn off the oven and contact a qualified technician. 7. If there is an extra part, go back through the steps to see which step was skipped. 2. At first use and cleaning, read the Use and Care Guide. 3. When oven has...


