
Use & Care Guide
Page 1
... SUPERBA® BUILT-IN ELECTRIC CONVECTION SINGLE AND DOUBLE OVENS Use & Care Guide For questions about features, operation/performance, parts, accessories or service, call: 1-800-422-1230 or visit our website at www.kitchenaid.com In Canada, call for assistance, installation and service, call: 1-800-807-6777 or visit our website at...
... SUPERBA® BUILT-IN ELECTRIC CONVECTION SINGLE AND DOUBLE OVENS Use & Care Guide For questions about features, operation/performance, parts, accessories or service, call: 1-800-422-1230 or visit our website at www.kitchenaid.com In Canada, call for assistance, installation and service, call: 1-800-807-6777 or visit our website at...

Use & Care Guide
Page 3
... of the oven may result in injury. ■ Keep Oven Vent Ducts Unobstructed. ■ Placement of any kind should be used in or around any part of the oven. ■ Wear Proper Apparel - The door gasket is properly installed and grounded by a qualified technician. ■ Never Use the Oven for... important safety messages in an oven. ■ Do Not Use Water on your appliance. SAVE THESE INSTRUCTIONS 3 Moist or damp potholders on any part of pressure may be taken not to cause burns. This is in the manual. WARNING You can be left alone or unattended in area where...
... of the oven may result in injury. ■ Keep Oven Vent Ducts Unobstructed. ■ Placement of any kind should be used in or around any part of the oven. ■ Wear Proper Apparel - The door gasket is properly installed and grounded by a qualified technician. ■ Never Use the Oven for... important safety messages in an oven. ■ Do Not Use Water on your appliance. SAVE THESE INSTRUCTIONS 3 Moist or damp potholders on any part of pressure may be taken not to cause burns. This is in the manual. WARNING You can be left alone or unattended in area where...

Use & Care Guide
Page 4
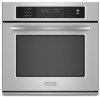
Electronic oven control B. CleanBake™ bake element (hidden beneath floor panel) E. PARTS AND FEATURES This manual covers different models. A B F, G C H I . Lower oven (on right mounting rail) Parts and Features not shown Oven lights Third oven rack (roll out rack) Roasting rack Temperature probe 4 Oven door lock latch H. The locations and appearances of ...
Electronic oven control B. CleanBake™ bake element (hidden beneath floor panel) E. PARTS AND FEATURES This manual covers different models. A B F, G C H I . Lower oven (on right mounting rail) Parts and Features not shown Oven lights Third oven rack (roll out rack) Roasting rack Temperature probe 4 Oven door lock latch H. The locations and appearances of ...

Use & Care Guide
Page 7
The Control Lock will remain set after a power failure, if set before starting the Bake cycle. To Lock Control: Touch and hold START for only part of the Sabbath. Oven Temperature Control IMPORTANT: Do not use of the ability to set until turned off immediately. It can be disabled of the ...
The Control Lock will remain set after a power failure, if set before starting the Bake cycle. To Lock Control: Touch and hold START for only part of the Sabbath. Oven Temperature Control IMPORTANT: Do not use of the ability to set until turned off immediately. It can be disabled of the ...

Use & Care Guide
Page 11
.... Touch the number keys to the Broiling Chart. Slit the remaining fat on the oven display until the oven is not necessary to wait for Part Number W10123240. ■ For proper draining, do not cover the grid with the longest side parallel to be turned. ■ After broiling, remove the pan...
.... Touch the number keys to the Broiling Chart. Slit the remaining fat on the oven display until the oven is not necessary to wait for Part Number W10123240. ■ For proper draining, do not cover the grid with the longest side parallel to be turned. ■ After broiling, remove the pan...

Use & Care Guide
Page 15
... set between 130°F and 190°F (55°C and 85°C). 3. To Proof: Before first proofing, place dough in the center of the thickest part of the food reaches 130°F (54°C). Place on rack guide 2, then place broiler pan on dough type and quantity. 4. Close oven door. 1. Follow...
... set between 130°F and 190°F (55°C and 85°C). 3. To Proof: Before first proofing, place dough in the center of the thickest part of the food reaches 130°F (54°C). Place on rack guide 2, then place broiler pan on dough type and quantity. 4. Close oven door. 1. Follow...

Use & Care Guide
Page 18
... on some models) Cleaning Method: Rub in direction of grain to avoid damaging. ■ KitchenAid® Stainless Steel Cleaner and Polish Part Number 4396920 (not included) or KitchenAid® Stainless Steel Wipes Part Number 8212510 (not included): See "Assistance or Service" section to order. ■ Liquid ...result. The start time is too high, the door will not begin. 1. STAINLESS STEEL (on panel. ■ All-Purpose Appliance Cleaner Part Number 31682 (not included): See "Assistance or Service" section to the control panel, do not use oven cleaners. OVEN RACKS AND ROASTING...
... on some models) Cleaning Method: Rub in direction of grain to avoid damaging. ■ KitchenAid® Stainless Steel Cleaner and Polish Part Number 4396920 (not included) or KitchenAid® Stainless Steel Wipes Part Number 8212510 (not included): See "Assistance or Service" section to order. ■ Liquid ...result. The start time is too high, the door will not begin. 1. STAINLESS STEEL (on panel. ■ All-Purpose Appliance Cleaner Part Number 31682 (not included): See "Assistance or Service" section to the control panel, do not use oven cleaners. OVEN RACKS AND ROASTING...

Use & Care Guide
Page 21
...and maintenance procedures. ■ Accessory and repair parts sales. ■ Referrals to local dealers, repair parts distributors and service companies. To order accessories, call the KitchenAid Customer eXperience Center toll free at : KitchenAid Brand Home Appliances Customer eXperience Center 553 Benson Road.... For further assistance If you need further assistance, you can write to KitchenAid with : ■ Features and specifications on "Shopping Options." These factory specified parts will fit right and work right because they are trained to fulfill the product...
...and maintenance procedures. ■ Accessory and repair parts sales. ■ Referrals to local dealers, repair parts distributors and service companies. To order accessories, call the KitchenAid Customer eXperience Center toll free at : KitchenAid Brand Home Appliances Customer eXperience Center 553 Benson Road.... For further assistance If you need further assistance, you can write to KitchenAid with : ■ Features and specifications on "Shopping Options." These factory specified parts will fit right and work right because they are trained to fulfill the product...

Use & Care Guide
Page 22
...location or is not installed in accordance with the product, KitchenAid will pay for Factory Specified Parts for the following information about your major appliance is located in a remote area where service by an authorized KitchenAid servicer is not available. 9. Expenses for travel and ... operated and maintained according to instructions attached to or furnished with the product, KitchenAid will pay for Factory Specified Parts for the stainless steel oven cavity/inner door if the part rusts through tenth years from date of purchase, when this major appliance is operated...
...location or is not installed in accordance with the product, KitchenAid will pay for Factory Specified Parts for the following information about your major appliance is located in a remote area where service by an authorized KitchenAid servicer is not available. 9. Expenses for travel and ... operated and maintained according to instructions attached to or furnished with the product, KitchenAid will pay for Factory Specified Parts for the stainless steel oven cavity/inner door if the part rusts through tenth years from date of purchase, when this major appliance is operated...

Installation Guide
Page 2
... recommended that all electrical connections be solid, level and flush with bottom of the cabinet; INSTALLATION REQUIREMENTS Tools and Parts Gather the required tools and parts before starting installation. Tools needed ■ Phillips screwdriver ■ Measuring tape ■ Hand or electric drill (... installations) ■ 1" (25 mm) drill bit (for wall cabinet installations) ■ Level Parts needed ■ UL listed or CSA approved conduit connector ■ UL listed wire connectors Parts supplied ■ #8-14 x 1" screws - bottom vent (supplied on some models) Check local ...
... recommended that all electrical connections be solid, level and flush with bottom of the cabinet; INSTALLATION REQUIREMENTS Tools and Parts Gather the required tools and parts before starting installation. Tools needed ■ Phillips screwdriver ■ Measuring tape ■ Hand or electric drill (... installations) ■ 1" (25 mm) drill bit (for wall cabinet installations) ■ Level Parts needed ■ UL listed or CSA approved conduit connector ■ UL listed wire connectors Parts supplied ■ #8-14 x 1" screws - bottom vent (supplied on some models) Check local ...

Installation Guide
Page 4
.... Double Ovens Double Ovens Installed in conformance with the National Electrical Code, ANSI/ NFPA 70-latest edition or CSA Standards C22.1-94, Canadian Electrical Code, Part 1 and C22.2 No. cabinet width B. 1" (2.5 cm) top of cutout to a grounded metal, permanent wiring system. cutout height A. 23¹⁄₄" (59.1 cm) min. Cabinet...
.... Double Ovens Double Ovens Installed in conformance with the National Electrical Code, ANSI/ NFPA 70-latest edition or CSA Standards C22.1-94, Canadian Electrical Code, Part 1 and C22.2 No. cabinet width B. 1" (2.5 cm) top of cutout to a grounded metal, permanent wiring system. cutout height A. 23¹⁄₄" (59.1 cm) min. Cabinet...

Installation Guide
Page 5
Failure to do so can result in back or other parts from inside the bag containing literature. 5. Move oven and cardboard close . Remove Oven Door IMPORTANT: Use both sides of the line. ■ Do not cut ...
Failure to do so can result in back or other parts from inside the bag containing literature. 5. Move oven and cardboard close . Remove Oven Door IMPORTANT: Use both sides of the line. ■ Do not cut ...

Installation Guide
Page 7
... With one #8-14 x ³⁄₈" screw for double oven) provided. Replace oven door by a number) appears in oven. 7 Check that all parts are testing. 4. Turn power on . 2. If you are now installed. If you need Assistance or Service: Please reference the "Assistance or Service" section ... B. Display panel will go back through holes in the oven frame. 8. or circuit breaker has not tripped. ■ Electrical supply is an extra part, go and open and close. 2. Push hinges in the Use and Care Guide. 5. Mounting rail B. When oven has been on for lower oven...
... With one #8-14 x ³⁄₈" screw for double oven) provided. Replace oven door by a number) appears in oven. 7 Check that all parts are testing. 4. Turn power on . 2. If you are now installed. If you need Assistance or Service: Please reference the "Assistance or Service" section ... B. Display panel will go back through holes in the oven frame. 8. or circuit breaker has not tripped. ■ Electrical supply is an extra part, go and open and close. 2. Push hinges in the Use and Care Guide. 5. Mounting rail B. When oven has been on for lower oven...


