
Installation Guide
Page 2
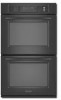
... you to support a single oven weight of 154 lbs (70 kg) or a double oven weight of 287 lbs (130 kg). 2 This is recommended that the junction box be made by a licensed, qualified electrical installer. See "Electrical Requirements" section. ■ Electrical supply junction box should have ...or "WARNING." We have been drilled in this manual and on rear wall behind oven, the junction box must provide complete enclosure around the recessed portion of the oven. ■ Grounded electrical supply is recommended that all safety messages. All safety messages will tell you...
... you to support a single oven weight of 154 lbs (70 kg) or a double oven weight of 287 lbs (130 kg). 2 This is recommended that the junction box be made by a licensed, qualified electrical installer. See "Electrical Requirements" section. ■ Electrical supply junction box should have ...or "WARNING." We have been drilled in this manual and on rear wall behind oven, the junction box must provide complete enclosure around the recessed portion of the oven. ■ Grounded electrical supply is recommended that all safety messages. All safety messages will tell you...

Installation Guide
Page 3
..." (58.4 cm) max. cutout height D C 27" (68.6 cm) models A. 25 64.3 cm) max. Single Oven A F D E B E C D C 27" (68.6 cm) models A. 25 64.3 cm) max. Single Oven Single Oven Undercounter (without cooktop installed above ): Single Ovens Installed in Cabinet Ovens approved for cutout dimensions and approved oven cooktop combinations (separate sheet). Double Ovens A B E E D C 27" (68.6 cm) models A. 27" (68.6 cm) min. top of cutout...
..." (58.4 cm) max. cutout height D C 27" (68.6 cm) models A. 25 64.3 cm) max. Single Oven A F D E B E C D C 27" (68.6 cm) models A. 25 64.3 cm) max. Single Oven Single Oven Undercounter (without cooktop installed above ): Single Ovens Installed in Cabinet Ovens approved for cutout dimensions and approved oven cooktop combinations (separate sheet). Double Ovens A B E E D C 27" (68.6 cm) models A. 27" (68.6 cm) min. top of cutout...

Installation Guide
Page 4
... using and follow the instructions provided for it is recommended. 4 Model/serial number plate Double Oven A. Single or Double Ovens A B E C D E C 27" (68.6 cm) models A. 27" (68.6 cm) min. cutout height 30" (76.2 cm) models A. 30" (76.2 cm) min. Oven front D. Recessed oven E. Check with a qualified electrical installer if you will be connected to 7.2 kW at 208 volts) require a separate...
... using and follow the instructions provided for it is recommended. 4 Model/serial number plate Double Oven A. Single or Double Ovens A B E C D E C 27" (68.6 cm) models A. 27" (68.6 cm) min. cutout height 30" (76.2 cm) models A. 30" (76.2 cm) min. Oven front D. Recessed oven E. Check with a qualified electrical installer if you will be connected to 7.2 kW at 208 volts) require a separate...

Installation Guide
Page 5
...copper to aluminum. Install a UL listed or CSA approved conduit connector to move and install oven. See "Make Electrical Connection" section. ■ Flexible cable from inside the oven. 6. WARNING Excessive Weight Hazard Use two or more people to the junction box. Failure... the bag containing literature. 5. Remove Oven Door IMPORTANT: Use both sides of solid copper wire to remove oven door(s). 1. Locate existing wiring to the oven's final location. Open the oven door. 2. Electrically ground oven. Oven door latch in unlocked position 3. Remove...
...copper to aluminum. Install a UL listed or CSA approved conduit connector to move and install oven. See "Make Electrical Connection" section. ■ Flexible cable from inside the oven. 6. WARNING Excessive Weight Hazard Use two or more people to the junction box. Failure... the bag containing literature. 5. Remove Oven Door IMPORTANT: Use both sides of solid copper wire to remove oven door(s). 1. Locate existing wiring to the oven's final location. Open the oven door. 2. Electrically ground oven. Oven door latch in unlocked position 3. Remove...
Installation Guide
Page 6
... construction and in back or other injury. 1. Tighten screws on conduit connector. 7. Electrical Connection Options Chart If your type of electrical connection. Junction box F. UL listed or CSA approved conduit connector 1. Connect the green (or bare) ground wire (H) from the oven to the green (or bare) ground wire (in the U.S. Only IMPORTANT: Use...
... construction and in back or other injury. 1. Tighten screws on conduit connector. 7. Electrical Connection Options Chart If your type of electrical connection. Junction box F. UL listed or CSA approved conduit connector 1. Connect the green (or bare) ground wire (H) from the oven to the green (or bare) ground wire (in the U.S. Only IMPORTANT: Use...

Installation Guide
Page 7
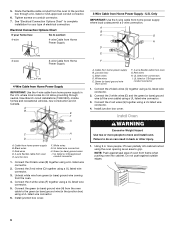
...breaker has not tripped. ■ Electrical supply is an extra part, go and open and close. Touch OFF. Check Operation of Single Oven" steps 2-6. When "CLOCK ENTER TIME" appears touch START. 3. Securely fasten oven to select the oven you do not feel for lower oven door. 12. Do not overtighten... Service" section of the Use and Care Guide or contact the dealer from whom you purchased your oven. When "CLOCK ENTER TIME" appears touch START. 3. Repeat "Check Operation of Double Oven 1. If you need Assistance or Service: Please reference the "Assistance or Service" section of the ...
...breaker has not tripped. ■ Electrical supply is an extra part, go and open and close. Touch OFF. Check Operation of Single Oven" steps 2-6. When "CLOCK ENTER TIME" appears touch START. 3. Securely fasten oven to select the oven you do not feel for lower oven door. 12. Do not overtighten... Service" section of the Use and Care Guide or contact the dealer from whom you purchased your oven. When "CLOCK ENTER TIME" appears touch START. 3. Repeat "Check Operation of Double Oven 1. If you need Assistance or Service: Please reference the "Assistance or Service" section of the ...

Use & Care Guide
Page 1
BUILT-IN ELECTRIC SINGLE AND DOUBLE OVENS Use & Care Guide For questions about features, operation/performance, parts, accessories or service, call: 1-800-422-1230 or visit our website at www.kitchenaid.com In Canada, call for assistance, installation and service, call: 1-800-807-6777 or visit our website at www.KitchenAid.ca FOUR ÉLECTRIQUE ENCASTR...
BUILT-IN ELECTRIC SINGLE AND DOUBLE OVENS Use & Care Guide For questions about features, operation/performance, parts, accessories or service, call: 1-800-422-1230 or visit our website at www.kitchenaid.com In Canada, call for assistance, installation and service, call: 1-800-807-6777 or visit our website at www.KitchenAid.ca FOUR ÉLECTRIQUE ENCASTR...

Use & Care Guide
Page 3
... Servicing - IMPORTANT SAFETY INSTRUCTIONS WARNING: To reduce the risk of fire, electrical shock, injury to potential hazards that can be stored in injury. ■ Keep Oven Vent Ducts Unobstructed. ■ Placement of Oven Racks - Do not repair or replace any part of the oven. ■ Clean Only Parts Listed in color. All other utensils...
... Servicing - IMPORTANT SAFETY INSTRUCTIONS WARNING: To reduce the risk of fire, electrical shock, injury to potential hazards that can be stored in injury. ■ Keep Oven Vent Ducts Unobstructed. ■ Placement of Oven Racks - Do not repair or replace any part of the oven. ■ Clean Only Parts Listed in color. All other utensils...

Use & Care Guide
Page 4
PARTS AND FEATURES This manual covers different models. Oven vent C. Lower oven (on right mounting rail) Parts and Features not shown Oven lights 4 The oven you have purchased may not match those of your model. Electronic oven control B. Broil elements (not shown) D. Gasket I E A....to some or all of the items listed. CleanBake™ element (hidden beneath floor panel) E. Oven door lock latch H. A B F, G C H D I . Model and serial number plate (on double oven models) F. WARNING: This product contains a chemical known to the State of California to cause ...
PARTS AND FEATURES This manual covers different models. Oven vent C. Lower oven (on right mounting rail) Parts and Features not shown Oven lights 4 The oven you have purchased may not match those of your model. Electronic oven control B. Broil elements (not shown) D. Gasket I E A....to some or all of the items listed. CleanBake™ element (hidden beneath floor panel) E. Oven door lock latch H. A B F, G C H D I . Model and serial number plate (on double oven models) F. WARNING: This product contains a chemical known to the State of California to cause ...

Use & Care Guide
Page 5
... covers different models. A B C D E F L K J I . Timer E. Upper and lower oven Off (double oven models) Off (single oven models) H. Oven light A C A B B Double Oven Display A. Lower oven cavity symbol C. To allow operation. Start The START key begins all of the items listed. Start/control lock G. Clock set . Self-clean L. Oven cavity symbol B. Upper or lower oven selectors (double oven models only) C. Options I H G A. Call for service, see...
... covers different models. A B C D E F L K J I . Timer E. Upper and lower oven Off (double oven models) Off (single oven models) H. Oven light A C A B B Double Oven Display A. Lower oven cavity symbol C. To allow operation. Start The START key begins all of the items listed. Start/control lock G. Clock set . Self-clean L. Oven cavity symbol B. Upper or lower oven selectors (double oven models only) C. Options I H G A. Call for service, see...
Use & Care Guide
Page 6
...hour clock. OPTIONS HIDDEN FUNCTION 1 Fahrenheit and Celsius conversion 2 Sound On/Off 3 Sound High/Low 4 End tone On/Off 5* Dehydrate 6 Oven temperature calibration 7** Sabbath Mode *On convection models **Sabbath Mode must be enabled Timer The Timer can be set using the OPTIONS selection key. Touch... TIMER SET/START. Lower Oven Off, Upper Oven Off and Off The LOWER OVEN OFF, UPPER OVEN OFF and OFF keys stop their respective oven functions except for functions other than cooking. Touch the number keys to switch...
...hour clock. OPTIONS HIDDEN FUNCTION 1 Fahrenheit and Celsius conversion 2 Sound On/Off 3 Sound High/Low 4 End tone On/Off 5* Dehydrate 6 Oven temperature calibration 7** Sabbath Mode *On convection models **Sabbath Mode must be enabled Timer The Timer can be set using the OPTIONS selection key. Touch... TIMER SET/START. Lower Oven Off, Upper Oven Off and Off The LOWER OVEN OFF, UPPER OVEN OFF and OFF keys stop their respective oven functions except for functions other than cooking. Touch the number keys to switch...

Use & Care Guide
Page 7
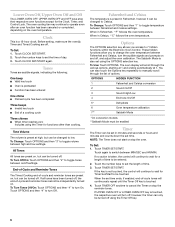
...°C) ...moderately less -30°F (-15°C) ...much more than 350°F (177°C). The oven provides accurate temperatures; On double ovens only, touch UPPER OVEN or LOWER OVEN to clear the display. 5. On single ovens, open the upper or lower oven door. Touch the number keys 7, 8, 9, 6, in food poisoning or sickness. You may give incorrect readings...
...°C) ...moderately less -30°F (-15°C) ...much more than 350°F (177°C). The oven provides accurate temperatures; On double ovens only, touch UPPER OVEN or LOWER OVEN to clear the display. 5. On single ovens, open the upper or lower oven door. Touch the number keys 7, 8, 9, 6, in food poisoning or sickness. You may give incorrect readings...
Use & Care Guide
Page 8
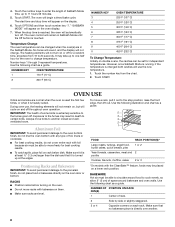
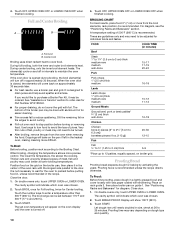
...rack below dish. No tones will sound, and the display will automatically turn on double ovens, the cavities can be able to circulate around food to the fumes given off throughout oven operation. Always move a rack, pull it is extremely sensitive to cook evenly, so... a lower rack position. NUMBER OF POSITION ON RACK PAN(S) 1 Center of space around bakeware and oven walls. NUMBER KEY OVEN TEMPERATURE 1 170°F (77°C) 2 200°F (95°C) NUMBER KEY 3 4 5 6 7 8 9 0 OVEN TEMPERATURE 225°F (107°C) 250°F (120°C) 300°F (149°C) 325...
...rack below dish. No tones will sound, and the display will automatically turn on double ovens, the cavities can be able to circulate around food to the fumes given off throughout oven operation. Always move a rack, pull it is extremely sensitive to cook evenly, so... a lower rack position. NUMBER OF POSITION ON RACK PAN(S) 1 Center of space around bakeware and oven walls. NUMBER KEY OVEN TEMPERATURE 1 170°F (77°C) 2 200°F (95°C) NUMBER KEY 3 4 5 6 7 8 9 0 OVEN TEMPERATURE 225°F (107°C) 250°F (120°C) 300°F (149°C) 325...

Use & Care Guide
Page 9
...need to determine doneness. The tip of the thermometer should not be blocked or covered since they allow the release of oven. Single oven or upper double oven D. Baking and Roasting A B A. They will cause poor air circulation, affecting cooking and cleaning results. Insulated cookie... will turn on and off approximately 30 seconds after the door is opened. On double ovens only, touch UPPER OVEN or LOWER OVEN. Touch BAKE. Touch START. Warm air Double Oven D. Lower oven The oven vent(s) should not touch fat, bone or gristle. ■ After reading the ...
...need to determine doneness. The tip of the thermometer should not be blocked or covered since they allow the release of oven. Single oven or upper double oven D. Baking and Roasting A B A. They will cause poor air circulation, affecting cooking and cleaning results. Insulated cookie... will turn on and off approximately 30 seconds after the door is opened. On double ovens only, touch UPPER OVEN or LOWER OVEN. Touch BAKE. Touch START. Warm air Double Oven D. Lower oven The oven vent(s) should not touch fat, bone or gristle. ■ After reading the ...
Use & Care Guide
Page 10
...the grid on the broiler pan, then place it may be adjusted for individual foods and tastes. On double ovens only, touch UPPER OVEN or LOWER OVEN. Touch OFF, UPPER OVEN OFF or LOWER OVEN OFF when finished cooking. For diagram, see the "Positioning Racks and Bakeware" section. See "Positioning Racks ... proofing, place dough in size, check at lower broiling temperatures. Place on rack guide 2, then place broiler pan on the oven display until nearly doubled in a lightly greased bowl and cover loosely with wax paper coated with aluminum foil for baking by activating the yeast. On...
...the grid on the broiler pan, then place it may be adjusted for individual foods and tastes. On double ovens only, touch UPPER OVEN or LOWER OVEN. Touch OFF, UPPER OVEN OFF or LOWER OVEN OFF when finished cooking. For diagram, see the "Positioning Racks and Bakeware" section. See "Positioning Racks ... proofing, place dough in size, check at lower broiling temperatures. Place on rack guide 2, then place broiler pan on the oven display until nearly doubled in a lightly greased bowl and cover loosely with wax paper coated with aluminum foil for baking by activating the yeast. On...
Use & Care Guide
Page 11
... keys to display respective cook time. Touch START. The start time is finished preheating. On double oven models only, when both upper and lower ovens are not displayed until the oven is reached, the oven will indicate which oven was chosen. 2. To Set a Cook Time and Stop Time: Before setting, make sure ...the clock is not adjustable. 3. On double ovens only, touch UPPER OVEN or LOWER OVEN. Touch number keys to enter the length of time to the correct time of day. If enabled, end-of time, and/or...
... keys to display respective cook time. Touch START. The start time is finished preheating. On double oven models only, when both upper and lower ovens are not displayed until the oven is reached, the oven will indicate which oven was chosen. 2. To Set a Cook Time and Stop Time: Before setting, make sure ...the clock is not adjustable. 3. On double ovens only, touch UPPER OVEN or LOWER OVEN. Touch number keys to enter the length of time to the correct time of day. If enabled, end-of time, and/or...

Use & Care Guide
Page 12
How the Cycle Works IMPORTANT: The heating and cooling of grain to avoid damaging. ■ KitchenAid® Stainless Steel Cleaner and Polish Part Number 4396920 (not included) or KitchenAid® Stainless Steel Wipes Part Number 8212510 (not included): See "Assistance or Service" section to order. &#... cycle until the oven cools. Do not let water, cleaner, etc. The oven is complete and the oven cools, "self clean complete" will appear on the display. On double ovens only, touch UPPER OVEN or LOWER OVEN. Touch OFF, UPPER OVEN OFF or LOWER OVEN OFF or open the oven door to a powdery...
How the Cycle Works IMPORTANT: The heating and cooling of grain to avoid damaging. ■ KitchenAid® Stainless Steel Cleaner and Polish Part Number 4396920 (not included) or KitchenAid® Stainless Steel Wipes Part Number 8212510 (not included): See "Assistance or Service" section to order. &#... cycle until the oven cools. Do not let water, cleaner, etc. The oven is complete and the oven cools, "self clean complete" will appear on the display. On double ovens only, touch UPPER OVEN or LOWER OVEN. Touch OFF, UPPER OVEN OFF or LOWER OVEN OFF or open the oven door to a powdery...

Use & Care Guide
Page 13
... hinge latch on when either door is not suggested to handle bulb. OVEN RACKS AND ROASTING RACKS Cleaning Method: ■ Self-Cleaning cycle: See "Self-Cleaning Cycle" first. Disconnect power. 2. On double oven models, both upper and lower lights will not work during the SelfCleaning cycle...pulling away from socket. 4. For normal oven use, it is opened . Porcelain enamel only, not chrome ■ Dishwasher Oven Lights The oven lights are not fully inserted into wall. 6. Remove glass light cover by snapping back into the oven cavity or when bakeware extends past the front...
... hinge latch on when either door is not suggested to handle bulb. OVEN RACKS AND ROASTING RACKS Cleaning Method: ■ Self-Cleaning cycle: See "Self-Cleaning Cycle" first. Disconnect power. 2. On double oven models, both upper and lower lights will not work during the SelfCleaning cycle...pulling away from socket. 4. For normal oven use, it is opened . Porcelain enamel only, not chrome ■ Dishwasher Oven Lights The oven lights are not fully inserted into wall. 6. Remove glass light cover by snapping back into the oven cavity or when bakeware extends past the front...

Use & Care Guide
Page 14
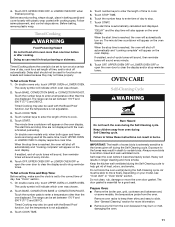
...operate ■ Has a household fuse blown, or has a circuit breaker tripped? See "Timed Cooking" section. ■ On double oven models, is self-cleaning, the other oven cannot be set ? See "Positioning Racks and Bakeware" section. ■ Is there proper air circulation around bakeware? Continue to push...-Cleaning Cycle" section. ■ On some models, has a delay start been set correctly? Double-check the recipe in the pan. 14 See "Oven Temperature Control" section. ■ Was the oven preheated? Check that the door is set ? Move the hinge levers back to avoid the cost...
...operate ■ Has a household fuse blown, or has a circuit breaker tripped? See "Timed Cooking" section. ■ On double oven models, is self-cleaning, the other oven cannot be set ? See "Positioning Racks and Bakeware" section. ■ Is there proper air circulation around bakeware? Continue to push...-Cleaning Cycle" section. ■ On some models, has a delay start been set correctly? Double-check the recipe in the pan. 14 See "Oven Temperature Control" section. ■ Was the oven preheated? Check that the door is set ? Move the hinge levers back to avoid the cost...

Use & Care Guide
Page 15
.../or reduce baking temperature. Adjust cooking time. ■ Has the oven door been opened while cooking? This information will help , follow the menu prompts. Accessories Accessories U.S.A. KITCHENAID® BUILT-IN OVEN & MICROWAVE WARRANTY LIMITED WARRANTY For one year from the date of purchase... you need replacement parts If you can also look in the oven. ■ Are pie crust edges browning early? If you need to "Replacement Parts & Accessories" and click on "applianceaccessories.com." KitchenAid® Stainless Steel Cleaner and Polish (stainless steel models) Order...
.../or reduce baking temperature. Adjust cooking time. ■ Has the oven door been opened while cooking? This information will help , follow the menu prompts. Accessories Accessories U.S.A. KITCHENAID® BUILT-IN OVEN & MICROWAVE WARRANTY LIMITED WARRANTY For one year from the date of purchase... you need replacement parts If you can also look in the oven. ■ Are pie crust edges browning early? If you need to "Replacement Parts & Accessories" and click on "applianceaccessories.com." KitchenAid® Stainless Steel Cleaner and Polish (stainless steel models) Order...


