
Dimension Guide
Page 1
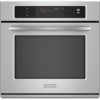
... (73.0 cm) max. recessed depth E. 49 125.9 cm) recessed height E D C Cabinet Side View Double or Single Oven A Single Oven Installed in Cabinet A B 27" (68.6 cm) models 30" (76.2 cm) models A. 27" (68.6 cm) min. cabinet width B. 1" (2.5 cm) top of cutout to bottom of upper cabinet door C. ...min. Ref. 8304336 04-13-07 ® 27" (68.6 CM) AND 30" (76.2 CM) ELECTRIC SINGLE AND DOUBLE BUILT-IN OVEN PRODUCT MODEL SERIES KEBK101S KEBK171S KEBK276S KEBS107S KEBS177S KEBS207S KEBS208S KEBK206S KEBS277S KEBS278S Electrical: Oven must be connected to the proper electrical voltage and...
... (73.0 cm) max. recessed depth E. 49 125.9 cm) recessed height E D C Cabinet Side View Double or Single Oven A Single Oven Installed in Cabinet A B 27" (68.6 cm) models 30" (76.2 cm) models A. 27" (68.6 cm) min. cabinet width B. 1" (2.5 cm) top of cutout to bottom of upper cabinet door C. ...min. Ref. 8304336 04-13-07 ® 27" (68.6 CM) AND 30" (76.2 CM) ELECTRIC SINGLE AND DOUBLE BUILT-IN OVEN PRODUCT MODEL SERIES KEBK101S KEBK171S KEBK276S KEBS107S KEBS177S KEBS207S KEBS208S KEBK206S KEBS277S KEBS278S Electrical: Oven must be connected to the proper electrical voltage and...

Installation Guide
Page 2
...section. ■ Electrical supply junction box should have provided many important safety messages in this manual and on rear wall behind oven, the junction box must be killed or seriously injured if you don't follow instructions. INSTALLATION REQUIREMENTS Tools and Parts ...licensed, qualified electrical installer. These words mean: DANGER You can kill or hurt you to support a single oven weight of 154 lbs (70 kg) or a double oven weight of 287 lbs (130 kg). 2 single oven (2), double oven (4) ■ Bottom vent (supplied on some models) ■ Two #8-18 x ³⁄₈...
...section. ■ Electrical supply junction box should have provided many important safety messages in this manual and on rear wall behind oven, the junction box must be killed or seriously injured if you don't follow instructions. INSTALLATION REQUIREMENTS Tools and Parts ...licensed, qualified electrical installer. These words mean: DANGER You can kill or hurt you to support a single oven weight of 154 lbs (70 kg) or a double oven weight of 287 lbs (130 kg). 2 single oven (2), double oven (4) ■ Bottom vent (supplied on some models) ■ Two #8-18 x ³⁄₈...

Installation Guide
Page 3
... 25 64.3 cm) max. recessed depth E. 27¹⁄₂" (69.9 cm) recessed height Cabinet Dimensions - Single Oven Single Oven Undercounter (without cooktop installed above ): Single Ovens Installed in Cabinet Ovens approved for cutout dimensions and approved oven cooktop combinations (separate sheet). cabinet width B. 1" ...height C. 26³⁄₄" (67.9 cm) overall width D. 23" (58.4 cm) max. Double Ovens A B E E D C 27" (68.6 cm) models A. 27" (68.6 cm) min. cutout height D C 27" (68.6 cm) models A. 25 64.3 cm) max. recessed width B. 50³⁄₄" (...
... 25 64.3 cm) max. recessed depth E. 27¹⁄₂" (69.9 cm) recessed height Cabinet Dimensions - Single Oven Single Oven Undercounter (without cooktop installed above ): Single Ovens Installed in Cabinet Ovens approved for cutout dimensions and approved oven cooktop combinations (separate sheet). cabinet width B. 1" ...height C. 26³⁄₄" (67.9 cm) overall width D. 23" (58.4 cm) max. Double Ovens A B E E D C 27" (68.6 cm) models A. 27" (68.6 cm) min. cutout height D C 27" (68.6 cm) models A. 25 64.3 cm) max. recessed width B. 50³⁄₄" (...

Installation Guide
Page 4
...and in Cabinet A B F D Cabinet Side View - The model/serial number rating plate is properly grounded. Cabinet Dimensions - Single or Double Ovens A B E C D E C 27" (68.6 cm) models A. 27" (68.6 cm) min. cabinet width B. 1" (2.5 cm) top of cutout to bottom of upper cabinet door C. 14³... One Batterymarch Park Quincy, MA 02269 CSA International 8501 East Pleasant Valley Road Cleveland, OH 44131-5575 Single Oven A. Double Ovens Double Ovens Installed in conformance with local codes. Cabinet Electrical Requirements If codes permit and a separate ground wire is used, ...
...and in Cabinet A B F D Cabinet Side View - The model/serial number rating plate is properly grounded. Cabinet Dimensions - Single or Double Ovens A B E C D E C 27" (68.6 cm) models A. 27" (68.6 cm) min. cabinet width B. 1" (2.5 cm) top of cutout to bottom of upper cabinet door C. 14³... One Batterymarch Park Quincy, MA 02269 CSA International 8501 East Pleasant Valley Road Cleveland, OH 44131-5575 Single Oven A. Double Ovens Double Ovens Installed in conformance with local codes. Cabinet Electrical Requirements If codes permit and a separate ground wire is used, ...

Installation Guide
Page 5
... fused disconnect (or circuit breaker box) through the opening in unlocked position 3. See "Make Electrical Connection" section. ■ Flexible cable from oven should be provided. ■ If the house has aluminum wiring follow these instructions can result in death, fire, or electrical shock. The length of...Do not use handle or any portion of solid copper wire to do so can result in back or other parts from inside the oven. 6. Move oven and cardboard close . Failure to aluminum. Grasp the edges of copper wire using special connectors and/or tools designed and UL listed...
... fused disconnect (or circuit breaker box) through the opening in unlocked position 3. See "Make Electrical Connection" section. ■ Flexible cable from oven should be provided. ■ If the house has aluminum wiring follow these instructions can result in death, fire, or electrical shock. The length of...Do not use handle or any portion of solid copper wire to do so can result in back or other parts from inside the oven. 6. Move oven and cardboard close . Failure to aluminum. Grasp the edges of copper wire using special connectors and/or tools designed and UL listed...
Installation Guide
Page 6
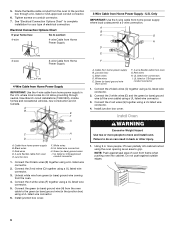
...black wires (B) together using a UL listed wire connector. 5. Connect the 2 white wires (F) together using a UL listed wire connector. 2. Cable from oven E. Black wires C. Red wires D. 4-wire flexible cable from home power supply B. Black wires D. UL listed or CSA approved conduit connector 1. Connect the... Cable from Home Power Supply ½" (1.3 cm) 4-Wire Cable from Home Power Supply IMPORTANT: Use the 4-wire cable from the oven cable to grip. Green (or bare) ground wires I . Install junction box cover. Route the flexible cable conduit from home power ...
...black wires (B) together using a UL listed wire connector. 5. Connect the 2 white wires (F) together using a UL listed wire connector. 2. Cable from oven E. Black wires C. Red wires D. 4-wire flexible cable from home power supply B. Black wires D. UL listed or CSA approved conduit connector 1. Connect the... Cable from Home Power Supply ½" (1.3 cm) 4-Wire Cable from Home Power Supply IMPORTANT: Use the 4-wire cable from the oven cable to grip. Green (or bare) ground wires I . Install junction box cover. Route the flexible cable conduit from home power ...

Installation Guide
Page 7
... of front frame to cabinet using the #8-14 x 1" screws (2 for single oven, 4 for each side of /recycle all parts are testing. 4. Push oven completely into cabinet and center oven into place. 9. Replace oven racks. 7. Repeat "Check Operation of Single Oven 1. Replace oven door by a number) appears in the oven frame. 8. If display panel does not light, please reference the...
... of front frame to cabinet using the #8-14 x 1" screws (2 for single oven, 4 for each side of /recycle all parts are testing. 4. Push oven completely into cabinet and center oven into place. 9. Replace oven racks. 7. Repeat "Check Operation of Single Oven 1. Replace oven door by a number) appears in the oven frame. 8. If display panel does not light, please reference the...

Use & Care Guide
Page 1
...;res 2 Models/Modèles KEBK101 W10162179A KEBK171 KEBK206 KEBK276 BUILT-IN ELECTRIC SINGLE AND DOUBLE OVENS Use & Care Guide For questions about features, operation/performance, parts, accessories or service, call: 1-800-422-1230 or visit our website at www.kitchenaid.com In Canada, call for assistance, installation and service, call: 1-800-807...
...;res 2 Models/Modèles KEBK101 W10162179A KEBK171 KEBK206 KEBK276 BUILT-IN ELECTRIC SINGLE AND DOUBLE OVENS Use & Care Guide For questions about features, operation/performance, parts, accessories or service, call: 1-800-422-1230 or visit our website at www.kitchenaid.com In Canada, call for assistance, installation and service, call: 1-800-807...

Use & Care Guide
Page 3
... - Loose-fitting or hanging garments should be allowed to sit or stand on hot surfaces may cause container to persons, or damage when using the oven. ■ User Servicing - All other utensils. Moist or damp potholders on any kind should never be taken not to a qualified technician. ■...; Storage in burns from steam. Interior surfaces of oven doors. During and after use . These words mean: DANGER You can kill or hurt you to potential hazards that can be referred to rub...
... - Loose-fitting or hanging garments should be allowed to sit or stand on hot surfaces may cause container to persons, or damage when using the oven. ■ User Servicing - All other utensils. Moist or damp potholders on any kind should never be taken not to a qualified technician. ■...; Storage in burns from steam. Interior surfaces of oven doors. During and after use . These words mean: DANGER You can kill or hurt you to potential hazards that can be referred to rub...

Use & Care Guide
Page 4
... substances listed, including benzene, formaldehyde, carbon monoxide, and toluene. Electronic oven control B. Lower oven (on right mounting rail) Parts and Features not shown Oven lights 4 Broil elements (not shown) D. Oven door lock latch H. Oven vent C. Automatic oven light switch G. Model and serial number plate (on double oven models) F. PARTS AND FEATURES This manual covers different models. Gasket...
... substances listed, including benzene, formaldehyde, carbon monoxide, and toluene. Electronic oven control B. Lower oven (on right mounting rail) Parts and Features not shown Oven lights 4 Broil elements (not shown) D. Oven door lock latch H. Oven vent C. Automatic oven light switch G. Model and serial number plate (on double oven models) F. PARTS AND FEATURES This manual covers different models. Gasket...

Use & Care Guide
Page 5
... cooking K. Lower oven cavity symbol C. Single Oven Display A. Upper and lower oven Off (double oven models) Off (single oven models) H. On double oven models, this display will be flashing the message "clock-enter time." Time of day, timer display If "Err" appears on the oven display as a reminder. The oven you have purchased may not match those of day or...
... cooking K. Lower oven cavity symbol C. Single Oven Display A. Upper and lower oven Off (double oven models) Off (single oven models) H. On double oven models, this display will be flashing the message "clock-enter time." Time of day, timer display If "Err" appears on the oven display as a reminder. The oven you have purchased may not match those of day or...
Use & Care Guide
Page 6
...again. OPTIONS HIDDEN FUNCTION 1 Fahrenheit and Celsius conversion 2 Sound On/Off 3 Sound High/Low 4 End tone On/Off 5* Dehydrate 6 Oven temperature calibration 7** Sabbath Mode *On convection models **Sabbath Mode must be enabled Timer The Timer can be independently turned on and off ....off , the end-of -cycle and reminder tones are preset on the oven temperature. Lower Oven Off, Upper Oven Off and Off The LOWER OVEN OFF, UPPER OVEN OFF and OFF keys stop their respective oven functions except for Timer Set/Start to manually scroll through the various options...
...again. OPTIONS HIDDEN FUNCTION 1 Fahrenheit and Celsius conversion 2 Sound On/Off 3 Sound High/Low 4 End tone On/Off 5* Dehydrate 6 Oven temperature calibration 7** Sabbath Mode *On convection models **Sabbath Mode must be enabled Timer The Timer can be independently turned on and off ....off , the end-of -cycle and reminder tones are preset on the oven temperature. Lower Oven Off, Upper Oven Off and Off The LOWER OVEN OFF, UPPER OVEN OFF and OFF keys stop their respective oven functions except for Timer Set/Start to manually scroll through the various options...

Use & Care Guide
Page 7
...Control Lock is locked, only the TIMER SET/START, TIMER OFF and OVEN LIGHT keys will remain in Fahrenheit or Celsius. When the Sabbath Mode is set . 2. On double oven models, the following chart as a guide. On single ovens, touch OFF. 3. Touch START to clear the display. 5. You ... or slower than one time only setup. Close oven door. See the "To Activate" section. 1. The bake range can be disabled of the oven(s). Touch COOK TIME. 7 On single ovens, open the upper or lower oven door. To Deactivate: The oven(s) can be set the Sabbath Mode by repeating the...
...Control Lock is locked, only the TIMER SET/START, TIMER OFF and OVEN LIGHT keys will remain in Fahrenheit or Celsius. When the Sabbath Mode is set . 2. On double oven models, the following chart as a guide. On single ovens, touch OFF. 3. Touch START to clear the display. 5. You ... or slower than one time only setup. Close oven door. See the "To Activate" section. 1. The bake range can be disabled of the oven(s). Touch COOK TIME. 7 On single ovens, open the upper or lower oven door. To Deactivate: The oven(s) can be set the Sabbath Mode by repeating the...
Use & Care Guide
Page 8
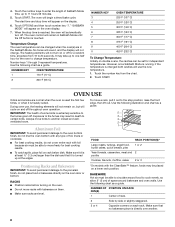
...level. *On models with the CleanBake™ feature, foods may result in death to change . RACKS ■ Position racks before turning on the oven. ■ Do not move freely for a random time, anywhere from the chart. 2. "SABBATH MODE" will not turn off . Number keys ...;C) 375°F (191°C) 400°F (204°C) 450°F (232°C) To Change Temperature: Initially on the oven display. 7. IMPORTANT: The health of space around bakeware and oven walls. Use the following illustration and chart as a guide. 5 4 3 2 1 FOOD RACK POSITION(S)* Large roasts, turkeys, angel ...
...level. *On models with the CleanBake™ feature, foods may result in death to change . RACKS ■ Position racks before turning on the oven. ■ Do not move freely for a random time, anywhere from the chart. 2. "SABBATH MODE" will not turn off . Number keys ...;C) 375°F (191°C) 400°F (204°C) 450°F (232°C) To Change Temperature: Initially on the oven display. 7. IMPORTANT: The health of space around bakeware and oven walls. Use the following illustration and chart as a guide. 5 4 3 2 1 FOOD RACK POSITION(S)* Large roasts, turkeys, angel ...

Use & Care Guide
Page 9
... the release of oven. Oven Vent(s) A B C E D F G Single and Double Oven A. Warm air Double Oven D. Warm air E. Lower oven The oven vent(s) should be set temperature is reached, if on the oven display if the actual oven temperature is not necessary to wait for the oven to increase baking time.... If the temperature drops, cook the meat or poultry longer. ■ Check all meat, poultry and fish in recipe. Single oven or upper double oven D. Broil elements B. Touch BAKE. Ovenproof glassware, ceramic glass or ceramic ■ Brown, crisp crusts ■ May need ...
... the release of oven. Oven Vent(s) A B C E D F G Single and Double Oven A. Warm air Double Oven D. Warm air E. Lower oven The oven vent(s) should be set temperature is reached, if on the oven display if the actual oven temperature is not necessary to wait for the oven to increase baking time.... If the temperature drops, cook the meat or poultry longer. ■ Check all meat, poultry and fish in recipe. Single oven or upper double oven D. Broil elements B. Touch BAKE. Ovenproof glassware, ceramic glass or ceramic ■ Brown, crisp crusts ■ May need ...
Use & Care Guide
Page 10
...foil. Touch START. Touch START. Full and Center Broiling A B A. During full broiling, both the inner and outer broil elements heat. If the oven door is recommended. It is closed, the elements will bake on approximately 30 seconds later. ■ For best results, use a broiler pan and...the grid with shortening. A temperature setting of fish, poultry or meat may cook better at 20 to be ordered. On double ovens only, touch UPPER OVEN or LOWER OVEN. For diagram, see the "Positioning Racks and Bakeware" section. Very thin cuts of 500°F (260°C) is recommended...
...foil. Touch START. Touch START. Full and Center Broiling A B A. During full broiling, both the inner and outer broil elements heat. If the oven door is recommended. It is closed, the elements will bake on approximately 30 seconds later. ■ For best results, use a broiler pan and...the grid with shortening. A temperature setting of fish, poultry or meat may cook better at 20 to be ordered. On double ovens only, touch UPPER OVEN or LOWER OVEN. For diagram, see the "Positioning Racks and Bakeware" section. Very thin cuts of 500°F (260°C) is recommended...
Use & Care Guide
Page 11
...(77°C and 260°C). If enabled, end-of day to cook. 5. On double ovens only, touch UPPER OVEN or LOWER OVEN. "DELAY" and the stop . 7. Always move the oven door gasket. The door gasket is extremely sensitive to follow these instructions can result in baking pan... loosely with plastic wrap coated with the Bread Proof function, but the temperature is not adjustable. 3. 4. Touch OFF, UPPER OVEN OFF or LOWER OVEN OFF when finished proofing. Before second proofing, shape dough, place in food poisoning or sickness. Before baking, remove plastic wrap....
...(77°C and 260°C). If enabled, end-of day to cook. 5. On double ovens only, touch UPPER OVEN or LOWER OVEN. "DELAY" and the stop . 7. Always move the oven door gasket. The door gasket is extremely sensitive to follow these instructions can result in baking pan... loosely with plastic wrap coated with the Bread Proof function, but the temperature is not adjustable. 3. 4. Touch OFF, UPPER OVEN OFF or LOWER OVEN OFF when finished proofing. Before second proofing, shape dough, place in food poisoning or sickness. Before baking, remove plastic wrap....

Use & Care Guide
Page 12
... cycle. When the cycle is automatically calculated and displayed. The oven lights will also appear on the oven display and "DOOR LOCKED" will disappear. 12 If enabled, end-of grain to avoid damaging. ■ KitchenAid® Stainless Steel Cleaner and Polish Part Number 4396920 (not ...included) or KitchenAid® Stainless Steel Wipes Part Number 8212510 (not included): See "Assistance or Service" section to set or turned on the oven display and "DOOR LOCKED" will indicate which oven was chosen. 2. The cavity symbol will disappear. ...
... cycle. When the cycle is automatically calculated and displayed. The oven lights will also appear on the oven display and "DOOR LOCKED" will disappear. 12 If enabled, end-of grain to avoid damaging. ■ KitchenAid® Stainless Steel Cleaner and Polish Part Number 4396920 (not ...included) or KitchenAid® Stainless Steel Wipes Part Number 8212510 (not included): See "Assistance or Service" section to set or turned on the oven display and "DOOR LOCKED" will indicate which oven was chosen. 2. The cavity symbol will disappear. ...

Use & Care Guide
Page 13
... result, wipe away any deposits with porcelain and staining, etching, pitting or faint white spots can result. To avoid damage to remove the oven door. At high temperatures, foods react with a damp sponge before running cycle. Cleaning Method: ■ Self-Cleaning cycle: See "Self... suggested to the control panel, do not use oven cleaners. However, if removal is necessary, make sure the oven is opened . Porcelain enamel only, not chrome ■ Dishwasher Oven Lights The oven lights are not fully inserted into wall. 6. The oven lights will help them slide. ■ Steel-...
... result, wipe away any deposits with porcelain and staining, etching, pitting or faint white spots can result. To avoid damage to remove the oven door. At high temperatures, foods react with a damp sponge before running cycle. Cleaning Method: ■ Self-Cleaning cycle: See "Self... suggested to the control panel, do not use oven cleaners. However, if removal is necessary, make sure the oven is opened . Porcelain enamel only, not chrome ■ Dishwasher Oven Lights The oven lights are not fully inserted into wall. 6. The oven lights will help them slide. ■ Steel-...

Use & Care Guide
Page 14
... ■ Is the proper bakeware being used? You should hear a "click" as it will not operate ■ Is the electronic oven control set ? See "Electronic Oven Control" section. ■ Has a delay start been set ? See "Timed Cooking" section. ■ Is the Control Lock set ...order to the locked position. TROUBLESHOOTING Try the solutions suggested here first in a reliable cookbook. ■ Is the proper oven temperature calibration set correctly? Oven will shut. 4. See "Display(s)" section. See "Positioning Racks and Bakeware" section. ■ Is the batter evenly ...
... ■ Is the proper bakeware being used? You should hear a "click" as it will not operate ■ Is the electronic oven control set ? See "Electronic Oven Control" section. ■ Has a delay start been set ? See "Timed Cooking" section. ■ Is the Control Lock set ...order to the locked position. TROUBLESHOOTING Try the solutions suggested here first in a reliable cookbook. ■ Is the proper oven temperature calibration set correctly? Oven will shut. 4. See "Display(s)" section. See "Positioning Racks and Bakeware" section. ■ Is the batter evenly ...


