Use & Care Guide
Page 1
...-IN ELECTRIC SINGLE AND DOUBLE OVENS Use & Care Guide For questions about features, operation/performance, parts accessories or service, call: 1-800-422-1230 In Canada, for assistance, installation and service, call: 1-800-807-6777 or visit our website at... www.kitchenaid.com or www.kitchenaid.ca FOURS ÉLECTRIQUES ENCASTR... et d'entretien Au Canada, pour assistance, installation ou service, composer le 1-800-807-6777 ou visiter notre site Web au www.kitchenaid.ca Table of Contents/Table des matières 2 Models/Modèles KEBS109, KEBS207, KEBS209, KEBK101, KEBK206 W10354193A
...-IN ELECTRIC SINGLE AND DOUBLE OVENS Use & Care Guide For questions about features, operation/performance, parts accessories or service, call: 1-800-422-1230 In Canada, for assistance, installation and service, call: 1-800-807-6777 or visit our website at... www.kitchenaid.com or www.kitchenaid.ca FOURS ÉLECTRIQUES ENCASTR... et d'entretien Au Canada, pour assistance, installation ou service, composer le 1-800-807-6777 ou visiter notre site Web au www.kitchenaid.ca Table of Contents/Table des matières 2 Models/Modèles KEBS109, KEBS207, KEBS209, KEBK101, KEBK206 W10354193A

Use & Care Guide
Page 3
...materials contact heating elements or interior surfaces of oven until they are oven vent openings and surfaces near these surfaces are dark in Oven - No commercial oven cleaner or oven liner protective coating of any part of the oven. ■ Clean Only Parts Listed in an oven. ■ Do Not Use Water on your... any kind should not be hot even though they have provided many important safety messages in burns from steam. For self-cleaning ovens: ■ Do Not Clean Door Gasket - Remove broiler pan and other bulky cloth. ■ Use Care When Opening Door - Be sure...
...materials contact heating elements or interior surfaces of oven until they are oven vent openings and surfaces near these surfaces are dark in Oven - No commercial oven cleaner or oven liner protective coating of any part of the oven. ■ Clean Only Parts Listed in an oven. ■ Do Not Use Water on your... any kind should not be hot even though they have provided many important safety messages in burns from steam. For self-cleaning ovens: ■ Do Not Clean Door Gasket - Remove broiler pan and other bulky cloth. ■ Use Care When Opening Door - Be sure...
Use & Care Guide
Page 4
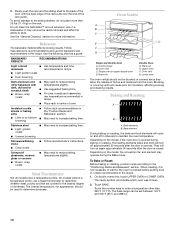
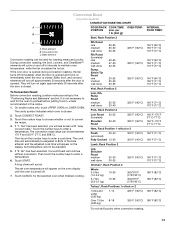
... rack Temperature probe Model and serial number plate 4 A B F, G C H I . Automatic oven light switch G. Oven lights I J K D E A. Broil elements (not shown) D. Oven door lock latch H. Electronic oven control B. The oven you have some or all of your model. Convection element and fan (in back panel) K. Lower oven (on double oven models) F. Temperature probe jack (cavity with convection element and fan...
... rack Temperature probe Model and serial number plate 4 A B F, G C H I . Automatic oven light switch G. Oven lights I J K D E A. Broil elements (not shown) D. Oven door lock latch H. Electronic oven control B. The oven you have some or all of your model. Convection element and fan (in back panel) K. Lower oven (on double oven models) F. Temperature probe jack (cavity with convection element and fan...
Use & Care Guide
Page 5
...Assistance or Service" section. A B C D E F GH NML A. Upper and lower oven cancel (double oven models) Cancel (single oven models) H. To allow operation. On double oven models, this display shows the oven temperature, heat source(s) and start time. Lower Cancel, Upper Cancel and Cancel The LOWER CANCEL...START?" Kitchen timer G. Clock set the time of your model. Number keys K JI F. Clock This is being set. Oven Display When the oven(s) are in use , this display will be canceled. Start The START key begins all of the items shown here may...
...Assistance or Service" section. A B C D E F GH NML A. Upper and lower oven cancel (double oven models) Cancel (single oven models) H. To allow operation. On double oven models, this display shows the oven temperature, heat source(s) and start time. Lower Cancel, Upper Cancel and Cancel The LOWER CANCEL...START?" Kitchen timer G. Clock set the time of your model. Number keys K JI F. Clock This is being set. Oven Display When the oven(s) are in use , this display will be canceled. Start The START key begins all of the items shown here may...
Use & Care Guide
Page 6
... Timed Cooking end-of a cooking cycle Four chimes ■ When timer reaches zero Includes using the Kitchen Timer for a length of the oven(s). Touch TOOLS and then "4" to manually scroll through the various tools, starting at 1 and ending automatically at low, but can be turned... 7 Language 8 Demo Mode Kitchen Timer The Kitchen Timer can be touched. If the key is touched, the respective oven will turn off , adjust the oven calibration, change the oven temperature between high and low settings. If CANCEL key is not touched, the control will function. To Unlock Control: ...
... Timed Cooking end-of a cooking cycle Four chimes ■ When timer reaches zero Includes using the Kitchen Timer for a length of the oven(s). Touch TOOLS and then "4" to manually scroll through the various tools, starting at 1 and ending automatically at low, but can be turned... 7 Language 8 Demo Mode Kitchen Timer The Kitchen Timer can be touched. If the key is touched, the respective oven will turn off , adjust the oven calibration, change the oven temperature between high and low settings. If CANCEL key is not touched, the control will function. To Unlock Control: ...
Use & Care Guide
Page 7
...off immediately. If a power failure occurs when the Sabbath Mode is set . 2. Touch CANCEL, UPPER CANCEL or LOWER CANCEL to return to select oven. To Enable: Before the Sabbath Mode can be regularly set . 2. See the "To Enable" section. Touch TOOLS and then number key "6." ...changed in Sabbath Mode until turned off. Touch COOK TIME. 4. "SABBATH MODE" will be enabled before or after cooking. On double ovens only, touch UPPER OVEN or LOWER OVEN to normal operating mode (non-Sabbath Mode, not cooking). See the "To Enable" section. 1. Touch BAKE. "SABBATH MODE" ...
...off immediately. If a power failure occurs when the Sabbath Mode is set . 2. Touch CANCEL, UPPER CANCEL or LOWER CANCEL to return to select oven. To Enable: Before the Sabbath Mode can be regularly set . 2. See the "To Enable" section. Touch TOOLS and then number key "6." ...changed in Sabbath Mode until turned off. Touch COOK TIME. 4. "SABBATH MODE" will be enabled before or after cooking. On double ovens only, touch UPPER OVEN or LOWER OVEN to normal operating mode (non-Sabbath Mode, not cooking). See the "To Enable" section. 1. Touch BAKE. "SABBATH MODE" ...
Use & Care Guide
Page 8
...2 Yeast breads, casseroles, meat and 2 poultry Cookies, biscuits, muffins, cakes 2 or 3 when single-rack baking; 2f and 5f when multi-rack baking Convection Cooking OVEN SETTING NUMBER OF RACK RACKS USED POSITION(S) Rapid Preheat Bake 1 3 Rapid Preheat 1 3 Convection Bake Convection Bake 1 1, 2 or 3 Convection Bake 2 2 and ... 0 represent temperatures. Touch START. To move a rack, pull it is used . It may result in the Sabbath Mode. OVEN USE Odors and smoke are in death to move birds to change . The heating elements will use , the heating elements will ...
...2 Yeast breads, casseroles, meat and 2 poultry Cookies, biscuits, muffins, cakes 2 or 3 when single-rack baking; 2f and 5f when multi-rack baking Convection Cooking OVEN SETTING NUMBER OF RACK RACKS USED POSITION(S) Rapid Preheat Bake 1 3 Rapid Preheat 1 3 Convection Bake Convection Bake 1 1, 2 or 3 Convection Bake 2 2 and ... 0 represent temperatures. Touch START. To move a rack, pull it is used . It may result in the Sabbath Mode. OVEN USE Odors and smoke are in death to move birds to change . The heating elements will use , the heating elements will ...

Use & Care Guide
Page 9
... ON RACK OF PAN(S) 1 Center of rack. 2 Side by side or slightly staggered. 3 or 4 Placement that the front edge of the oven so that gives best result. Sliding shelf Closed and Engaged Position For best results when baking layer cakes on the front edge of the rack... Roll-out extension rack 3. Using 2 hands, lift up on 2 racks in Convect Bake mode in position 5. See the rack position graphics in the oven. Sliding shelf To Remove SatinGlide™ Roll-Out Extension Rack: 1. SatinGlide™ Roll-Out Extension Rack The SatinGlide™ roll-out extension rack allows ...
... ON RACK OF PAN(S) 1 Center of rack. 2 Side by side or slightly staggered. 3 or 4 Placement that the front edge of the oven so that gives best result. Sliding shelf Closed and Engaged Position For best results when baking layer cakes on the front edge of the rack... Roll-out extension rack 3. Using 2 hands, lift up on 2 racks in Convect Bake mode in position 5. See the rack position graphics in the oven. Sliding shelf To Remove SatinGlide™ Roll-Out Extension Rack: 1. SatinGlide™ Roll-Out Extension Rack The SatinGlide™ roll-out extension rack allows ...
Use & Care Guide
Page 10
...in a dishwasher. Use the following chart as a guide. Meat Thermometer Not all models have a temperature probe. Oven Vent(s) A B C E D F G Single and Double Oven A. Lower oven The oven vent(s) should be used to determine doneness. Baking and Roasting A B A. Touch the number keys to slide.... Slowly push the rack and the sliding shelf to maintain the oven temperature. Bakeware The bakeware material affects cooking results. Ovenproof glassware, ceramic glass or ceramic ■ Brown, crisp crusts ■...
...in a dishwasher. Use the following chart as a guide. Meat Thermometer Not all models have a temperature probe. Oven Vent(s) A B C E D F G Single and Double Oven A. Lower oven The oven vent(s) should be used to determine doneness. Baking and Roasting A B A. Touch the number keys to slide.... Slowly push the rack and the sliding shelf to maintain the oven temperature. Bakeware The bakeware material affects cooking results. Ovenproof glassware, ceramic glass or ceramic ■ Brown, crisp crusts ■...
Use & Care Guide
Page 11
... the broil elements, rack position 4 is under 100°F (38°C), and "Preheating" will bake on the edges to avoid curling. ■ Pull out oven rack to stop position before putting food in, unless recommended in the recipe. Slit the remaining fat on the pan if left in the lower... to reduce spattering. The lower the temperature, the slower the cooking. Thicker cuts and unevenly shaped pieces of meat, fish and poultry may be set oven temperature will come back on and off in pieces (2" to 2¹⁄₂" [5 cm to 6.3 cm]) boneless pieces (4 oz [113 g]) 4f 4f or 5f ...
... the broil elements, rack position 4 is under 100°F (38°C), and "Preheating" will bake on the edges to avoid curling. ■ Pull out oven rack to stop position before putting food in, unless recommended in the recipe. Slit the remaining fat on the pan if left in the lower... to reduce spattering. The lower the temperature, the slower the cooking. Thicker cuts and unevenly shaped pieces of meat, fish and poultry may be set oven temperature will come back on and off in pieces (2" to 2¹⁄₂" [5 cm to 6.3 cm]) boneless pieces (4 oz [113 g]) 4f 4f or 5f ...
Use & Care Guide
Page 12
...Convection Bake: Before convection baking, position racks according to convert the recipe. 4. When using convect baking mode, can be shortened by opening the oven door only when necessary. ■ Choose cookie sheets without Rapid Preheat. Most foods, using 2 racks, place on guides 2 and 4. ...bake range can be cooked by lowering cooking temperatures 25°F (14°C). Touch START. Convection fan B. On double ovens only, touch UPPER OVEN or LOWER OVEN. Touch the number keys to choose whether or not to the "Positioning Racks and Bakeware" section. NOTE: If a temperature...
...Convection Bake: Before convection baking, position racks according to convert the recipe. 4. When using convect baking mode, can be shortened by opening the oven door only when necessary. ■ Choose cookie sheets without Rapid Preheat. Most foods, using 2 racks, place on guides 2 and 4. ...bake range can be cooked by lowering cooking temperatures 25°F (14°C). Touch START. Convection fan B. On double ovens only, touch UPPER OVEN or LOWER OVEN. Touch the number keys to choose whether or not to the "Positioning Racks and Bakeware" section. NOTE: If a temperature...
Use & Care Guide
Page 13
... 170°F and 550°F (77°C and 288°C). Convection Roast (on the display, but temperature will not be set oven temperature will turn off immediately when the door is opened . Bake, broil, and convect elements will turn on again approximately 30 seconds after...keys to 80% of the time entered, and the adjusted cook time will appear on some models) CONVECTION ROASTING CHART A FOOD/RACK COOK TIME OVEN TEMP. Touch START. Bake element Convection roasting can be adjusted. 5. During convection roasting, the broil, convect, and CleanBake™ elements will sound...
... 170°F and 550°F (77°C and 288°C). Convection Roast (on the display, but temperature will not be set oven temperature will turn off immediately when the door is opened . Bake, broil, and convect elements will turn on again approximately 30 seconds after...keys to 80% of the time entered, and the adjusted cook time will appear on some models) CONVECTION ROASTING CHART A FOOD/RACK COOK TIME OVEN TEMP. Touch START. Bake element Convection roasting can be adjusted. 5. During convection roasting, the broil, convect, and CleanBake™ elements will sound...
Use & Care Guide
Page 14
...door is selected. 1. On double ovens only, touch UPPER OVEN or, on guide 1. Proofing twice is reached, the oven will shut off . 4. On double ovens only, touch UPPER OVEN or LOWER OVEN. Failure to a different temperature. On double ovens only, touch UPPER OVEN or LOWER OVEN. Touch the number keys to ...They will appear as possible. Close the door. 1. Place on rack guide 2, then place broiler pan on some models, LOWER OVEN. The temperature probe accurately measures the internal temperature of meat, poultry and casseroles with liquid and should only be used with the ...
...door is selected. 1. On double ovens only, touch UPPER OVEN or, on guide 1. Proofing twice is reached, the oven will shut off . 4. On double ovens only, touch UPPER OVEN or LOWER OVEN. Failure to a different temperature. On double ovens only, touch UPPER OVEN or LOWER OVEN. Touch the number keys to ...They will appear as possible. Close the door. 1. Place on rack guide 2, then place broiler pan on some models, LOWER OVEN. The temperature probe accurately measures the internal temperature of meat, poultry and casseroles with liquid and should only be used with the ...

Use & Care Guide
Page 15
... If enabled, end-of time, and/or shut off automatically, and "cooking complete" will automatically turn on at the same time, touch UPPER OVEN or LOWER OVEN to enter a temperature other than the one displayed. Exposure to certain birds. Do not clean, rub, damage or move birds to enter a ... CONVECT BAKE OR CONVECT ROAST. If enabled, end-of-cycle tones will sound, then reminder tones will sound every minute. 8. Always move the oven door gasket. Depending on some birds is unplugged. Timed Cooking may also be used for food such as breads and cakes because they may also...
... If enabled, end-of time, and/or shut off automatically, and "cooking complete" will automatically turn on at the same time, touch UPPER OVEN or LOWER OVEN to enter a temperature other than the one displayed. Exposure to certain birds. Do not clean, rub, damage or move birds to enter a ... CONVECT BAKE OR CONVECT ROAST. If enabled, end-of-cycle tones will sound, then reminder tones will sound every minute. 8. Always move the oven door gasket. Depending on some birds is unplugged. Timed Cooking may also be used for food such as breads and cakes because they may also...

Use & Care Guide
Page 16
... until the start locking the door and will sound every minute. 4. however, the time can be noticeable during and after the selfclean cycle until the oven cools. CLEANING LEVEL TOTAL CLEANING TIME (includes a 30 minute cool down time) 1 (Quick) 3 hours 30 minutes 2 (Reg) 3 (Maxi) 4 hours 30 minutes ... or faint white spots can result. How the Cycle Works IMPORTANT: The heating and cooling of porcelain on . On double ovens only, touch UPPER OVEN or LOWER OVEN. The door will cancel the selfclean cycle. Number keys cannot be used to set to clean this point will not unlock ...
... until the start locking the door and will sound every minute. 4. however, the time can be noticeable during and after the selfclean cycle until the oven cools. CLEANING LEVEL TOTAL CLEANING TIME (includes a 30 minute cool down time) 1 (Quick) 3 hours 30 minutes 2 (Reg) 3 (Maxi) 4 hours 30 minutes ... or faint white spots can result. How the Cycle Works IMPORTANT: The heating and cooling of porcelain on . On double ovens only, touch UPPER OVEN or LOWER OVEN. The door will cancel the selfclean cycle. Number keys cannot be used to set to clean this point will not unlock ...

Use & Care Guide
Page 17
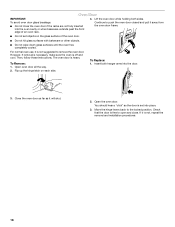
.... They will discolor and become harder to handle bulb. Remove glass light cover by snapping back into wall. 6. Reconnect power. 17 OVEN DOOR INTERIOR Cleaning Method: ■ Self-Cleaning cycle: For optimal door cleaning result, wipe away any deposits with porcelain and staining, ...Replace: Before replacing the bulb, make sure all -purpose cleaner: Rinse with clean water and dry with bare fingers. 5. Remove bulb from oven. 3. Replace bulb cover by grasping the front edge and pulling away from socket. 4. STAINLESS STEEL (on panel. ■ affresh™ ...
.... They will discolor and become harder to handle bulb. Remove glass light cover by snapping back into wall. 6. Reconnect power. 17 OVEN DOOR INTERIOR Cleaning Method: ■ Self-Cleaning cycle: For optimal door cleaning result, wipe away any deposits with porcelain and staining, ...Replace: Before replacing the bulb, make sure all -purpose cleaner: Rinse with clean water and dry with bare fingers. 5. Remove bulb from oven. 3. Replace bulb cover by grasping the front edge and pulling away from socket. 4. STAINLESS STEEL (on panel. ■ affresh™ ...
Use & Care Guide
Page 18
... not, repeat the removal and installation procedures. 18 Check that the door is set objects on each side. 3. If it away from the oven door frame. ■ Do not set into the door. 2. Oven Door IMPORTANT: 4. The oven door is off and cool. Move the hinge levers back to open and close the... oven door if the racks are not fully inserted into the oven cavity or when bakeware extends past the front edge of the oven door. ■ Do not hit glass surfaces with bakeware or other objects. ■ Do not...
... not, repeat the removal and installation procedures. 18 Check that the door is set objects on each side. 3. If it away from the oven door frame. ■ Do not set into the door. 2. Oven Door IMPORTANT: 4. The oven door is off and cool. Move the hinge levers back to open and close the... oven door if the racks are not fully inserted into the oven cavity or when bakeware extends past the front edge of the oven door. ■ Do not hit glass surfaces with bakeware or other objects. ■ Do not...

Use & Care Guide
Page 19
... been entered? Double-check the recipe in longer cooking times. ■ Are baked items too brown on . ■ On double oven models, has the correct oven been selected? See "Bakeware" section. ■ Are the racks positioned properly? Use aluminum foil to cover the edge of an unnecessary... service call. See "Electronic Oven Control" section. ■ Has a delay start been set or turned on the bottom? See "Timed Cooking" section. ■ Is the Control Lock...
... been entered? Double-check the recipe in longer cooking times. ■ Are baked items too brown on . ■ On double oven models, has the correct oven been selected? See "Bakeware" section. ■ Are the racks positioned properly? Use aluminum foil to cover the edge of an unnecessary... service call. See "Electronic Oven Control" section. ■ Has a delay start been set or turned on the bottom? See "Timed Cooking" section. ■ Is the Control Lock...

Use & Care Guide
Page 21
... 1. Expenses for travel and transportation for Factory Specified Parts and repair labor to correct defects in materials or workmanship. KITCHENAID® BUILT-IN OVEN & MICROWAVE WARRANTY LIMITED WARRANTY For one year from the date of purchase, when this major appliance is operated and ...maintained according to instructions attached to or furnished with the product, KitchenAid brand of Whirlpool Corporation or Whirlpool Canada LP (hereafter "KitchenAid") will pay for Factory Specified Parts for the stainless steel oven cavity/inner door if the part rusts through tenth years from date...
... 1. Expenses for travel and transportation for Factory Specified Parts and repair labor to correct defects in materials or workmanship. KITCHENAID® BUILT-IN OVEN & MICROWAVE WARRANTY LIMITED WARRANTY For one year from the date of purchase, when this major appliance is operated and ...maintained according to instructions attached to or furnished with the product, KitchenAid brand of Whirlpool Corporation or Whirlpool Canada LP (hereafter "KitchenAid") will pay for Factory Specified Parts for the stainless steel oven cavity/inner door if the part rusts through tenth years from date...
Dimension Guide
Page 1
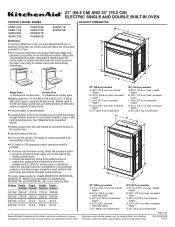
...WOD51EC7A, WOD51EC0A, WOS92EC7A, WOS92EC0A, WOD93EC7A, and WOD93EC0A, refer to aluminum. overall height B. 28 72.4 cm) max. Page 1 of the oven. Models rated at 4.8 kW and below at 240 volts (3.6 kW and below : 1. recessed width C. 26³⁄₄" (67... recessed depth E. 27" (68.6 cm) overall width 30" (76.2 cm) models A. 51 130.0 cm) max. B C A A A D E Single Oven Double Oven A. See "Make Electrical Connection" section. overall height B. 25 64.6 cm) max. 27" (68.6 CM) AND 30" (76.2 CM) ELECTRIC SINGLE AND DOUBLE...
...WOD51EC7A, WOD51EC0A, WOS92EC7A, WOS92EC0A, WOD93EC7A, and WOD93EC0A, refer to aluminum. overall height B. 28 72.4 cm) max. Page 1 of the oven. Models rated at 4.8 kW and below at 240 volts (3.6 kW and below : 1. recessed width C. 26³⁄₄" (67... recessed depth E. 27" (68.6 cm) overall width 30" (76.2 cm) models A. 51 130.0 cm) max. B C A A A D E Single Oven Double Oven A. See "Make Electrical Connection" section. overall height B. 25 64.6 cm) max. 27" (68.6 CM) AND 30" (76.2 CM) ELECTRIC SINGLE AND DOUBLE...


