

Installation Guide
Page 2
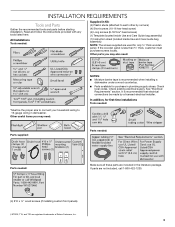
... 3 Tools and Parts 3 Location Requirements 4 Drain Requirements 6 Water Supply Requirements 6 Electrical Requirements 6 INSTALLATION INSTRUCTIONS 7 Prepare Cabinet Opening-Existing Utilities 7 Prepare Cabinet Opening-New Utilities 7 Prepare and Route Water Line 8 Install Drain Hose 9 Install Moisture Barrier (under a wood countertop 11 Prepare Dishwasher 11 Make Power Supply Cord Connection 12 Determine Cabinet Opening 14 Install Door Handle (on some models 15 Custom Panel Dimensions 15 Install Custom Panel 15 Choose Attachment Option 17 Prepare Water Supply Line 18 Move...
... 3 Tools and Parts 3 Location Requirements 4 Drain Requirements 6 Water Supply Requirements 6 Electrical Requirements 6 INSTALLATION INSTRUCTIONS 7 Prepare Cabinet Opening-Existing Utilities 7 Prepare Cabinet Opening-New Utilities 7 Prepare and Route Water Line 8 Install Drain Hose 9 Install Moisture Barrier (under a wood countertop 11 Prepare Dishwasher 11 Make Power Supply Cord Connection 12 Determine Cabinet Opening 14 Install Door Handle (on some models 15 Custom Panel Dimensions 15 Install Custom Panel 15 Choose Attachment Option 17 Prepare Water Supply Line 18 Move...
Installation Guide
Page 3
... installing custom front panels) †®TORX, T15, and T20 are used for first-time installations Tools needed: Parts supplied: Parts needed: Parts needed : Supplied in dishwasher. Check existing electrical supply. Read and follow the instructions provided with any tools listed here. Other useful items you may need : *Must be made by runners) (4) Short screws (10-16 hex-head screw) (4) Long screws (8-18 Torx® head screws) (1) Template (located inside Use and Care Guide bag assembly) (1) Instruction sheet (located inside Use and Care Guide bag assembly...
... installing custom front panels) †®TORX, T15, and T20 are used for first-time installations Tools needed: Parts supplied: Parts needed: Parts needed : Supplied in dishwasher. Check existing electrical supply. Read and follow the instructions provided with any tools listed here. Other useful items you may need : *Must be made by runners) (4) Short screws (10-16 hex-head screw) (4) Long screws (8-18 Torx® head screws) (1) Template (located inside Use and Care Guide bag assembly) (1) Instruction sheet (located inside Use and Care Guide bag assembly...

Installation Guide
Page 4
... between motor and flooring. Helpful Tip: Be sure to the floor. Do not run drain lines, water lines or electrical wiring where they can interfere with floor at front of opening is available from freezing is level if the floor in the "Product and Cabinet Opening Dimensions" section. 4 Damage from your dealer for loading and unloading dishes. Shelter dishwasher and water lines leading to order. If dishwasher will be installed. The location...
... between motor and flooring. Helpful Tip: Be sure to the floor. Do not run drain lines, water lines or electrical wiring where they can interfere with floor at front of opening is available from freezing is level if the floor in the "Product and Cabinet Opening Dimensions" section. 4 Damage from your dealer for loading and unloading dishes. Shelter dishwasher and water lines leading to order. If dishwasher will be installed. The location...

Installation Guide
Page 6
...; A 90° elbow with ³⁄₄" hose connection with a power supply cord: ■ Use UL Listed power supply cord kit (Part Number 4317824) marked for your dishwasher. We recommend: ■ A time-delay fuse or circuit breaker. ■ A separate circuit. Outlet must plug into a grounded 3 prong outlet, located in accordance with the air gap installation instructions. Electrical Requirements Be sure that the electrical connection and wire size are connecting the air gap, a rubber hose (not provided) will be obtained from: National Fire...
...; A 90° elbow with ³⁄₄" hose connection with a power supply cord: ■ Use UL Listed power supply cord kit (Part Number 4317824) marked for your dishwasher. We recommend: ■ A time-delay fuse or circuit breaker. ■ A separate circuit. Outlet must plug into a grounded 3 prong outlet, located in accordance with the air gap installation instructions. Electrical Requirements Be sure that the electrical connection and wire size are connecting the air gap, a rubber hose (not provided) will be obtained from: National Fire...
Installation Guide
Page 7
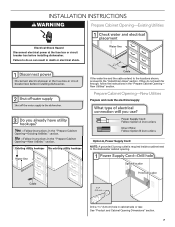
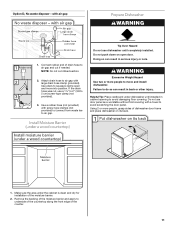
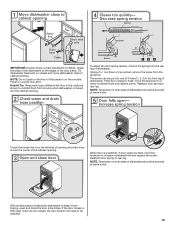
Prepare Cabinet Opening-New Utilities Prepare and route the electrical supply Option A, Power Supply Cord: NOTE: A grounded 3 prong outlet is required inside a cabinet next to do not reach far enough, follow the instructions in the "Prepare Cabinet Opening- See "Product and Cabinet Opening Dimensions" section. 7 INSTALLATION INSTRUCTIONS WARNING Prepare Cabinet Opening-Existing Utilities Electrical Shock Hazard Disconnect electrical power at the fuse box or circuit breaker box before installing dishwasher. If they do so can result in cabinet side...
Prepare Cabinet Opening-New Utilities Prepare and route the electrical supply Option A, Power Supply Cord: NOTE: A grounded 3 prong outlet is required inside a cabinet next to do not reach far enough, follow the instructions in the "Prepare Cabinet Opening- See "Product and Cabinet Opening Dimensions" section. 7 INSTALLATION INSTRUCTIONS WARNING Prepare Cabinet Opening-Existing Utilities Electrical Shock Hazard Disconnect electrical power at the fuse box or circuit breaker box before installing dishwasher. If they do so can result in cabinet side...
Installation Guide
Page 8
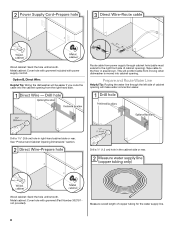
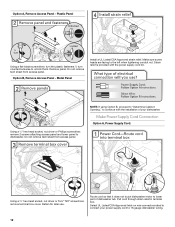
... when dishwasher is moved into the cabinet opening from power supply through the left side of copper tubing for the water supply line. 8 Tape cable to the right front side of cabinet opening . Wood cabinet: Sand the hole until smooth. Metal cabinet: Cover hole with power supply cord kit. Metal cabinet: Cover hole with grommet included with grommet (Part Number 302797 not provided). See "Product and Cabinet Opening Dimensions" section. This will make water connection...
... when dishwasher is moved into the cabinet opening from power supply through the left side of copper tubing for the water supply line. 8 Tape cable to the right front side of cabinet opening . Wood cabinet: Sand the hole until smooth. Metal cabinet: Cover hole with power supply cord kit. Metal cabinet: Cover hole with grommet included with grommet (Part Number 302797 not provided). See "Product and Cabinet Opening Dimensions" section. This will make water connection...
Installation Guide
Page 9
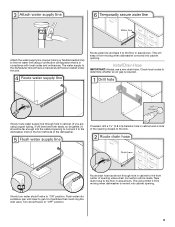
.... Slowly turn water shutoff valve to "OFF" position. 9 The water supply to the front center of the dishwasher. Install Drain Hose IMPORTANT: Always use a new drain hose. If needed, drill a 1¹⁄₂" (3.8 cm) diameter hole in cabinet wall or side of particles that is moved into cabinet opening . Route drain hose as shown through hole in cabinet to the dishwasher should be made. Check local codes to determine whether an air gap is...
.... Slowly turn water shutoff valve to "OFF" position. 9 The water supply to the front center of the dishwasher. Install Drain Hose IMPORTANT: Always use a new drain hose. If needed, drill a 1¹⁄₂" (3.8 cm) diameter hole in cabinet wall or side of particles that is moved into cabinet opening . Route drain hose as shown through hole in cabinet to the dishwasher should be made. Check local codes to determine whether an air gap is...
Installation Guide
Page 11
... cut if needed. WARNING Excessive Weight Hazard Use two or more people, grasp sides of drain hose to air gap. Use a rubber hose (not provided) with large drain hose clamp (provided). Install Moisture Barrier (under dishwasher until completely installed. Make sure the area under the cabinet is clean and dry for installation of the counter. 11 Remove the backing of the moisture barrier and apply to avoid scratching the door panel...
... cut if needed. WARNING Excessive Weight Hazard Use two or more people, grasp sides of drain hose to air gap. Use a rubber hose (not provided) with large drain hose clamp (provided). Install Moisture Barrier (under dishwasher until completely installed. Make sure the area under the cabinet is clean and dry for installation of the counter. 11 Remove the backing of the moisture barrier and apply to avoid scratching the door panel...
Installation Guide
Page 12
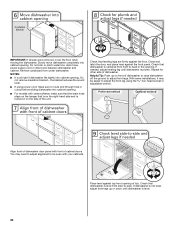
... not touch dishwasher motor to continue with the power supply cord kit. Plastic Panel Using a flat-blade screwdriver, turn the plastic fasteners ¹⁄₄ turn counterclockwise to 16-gauge dishwasher wiring. 12 Do not remove tech sheet from access panel. NOTE: If using Option B, proceed to "Determine Cabinet Opening," to lower part of your power supply cord to unlock them. Option A, Remove Access Panel - Strain relief is provided with the installation of dishwasher tub. Make Power Supply Cord Connection Option A, Power Supply Cord: Using a ¹...
... not touch dishwasher motor to continue with the power supply cord kit. Plastic Panel Using a flat-blade screwdriver, turn the plastic fasteners ¹⁄₄ turn counterclockwise to 16-gauge dishwasher wiring. 12 Do not remove tech sheet from access panel. NOTE: If using Option B, proceed to "Determine Cabinet Opening," to lower part of your power supply cord to unlock them. Option A, Remove Access Panel - Strain relief is provided with the installation of dishwasher tub. Make Power Supply Cord Connection Option A, Power Supply Cord: Using a ¹...
Installation Guide
Page 13
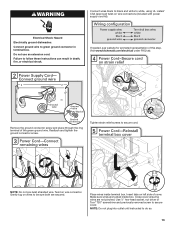
... cover. If needed, see website for animated representation of the green ground wire. Gently tug on wire connectors (included with power supply cord kit). Make sure wires are tucked inside terminal box. Connect ground wire to be sure both are not pinched. Insert tabs on wire connector. NOTE: Do not plug into outlet until instructed to do so. 13 Electrical Shock Hazard Electrically ground dishwasher. NOTE: Do...
... cover. If needed, see website for animated representation of the green ground wire. Gently tug on wire connectors (included with power supply cord kit). Make sure wires are tucked inside terminal box. Connect ground wire to be sure both are not pinched. Insert tabs on wire connector. NOTE: Do not plug into outlet until instructed to do so. 13 Electrical Shock Hazard Electrically ground dishwasher. NOTE: Do...
Installation Guide
Page 15
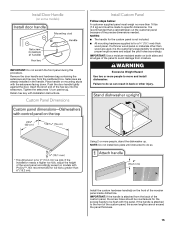
... some models) IMPORTANT: Do not scratch the front panel during this procedure. Tighten the setscrews ¹⁄₄ turn past snug. Custom Panel Dimensions Install Custom Panel Follow steps below: A customer supplied panel must be countersunk for the custom panel is not included. ■ All mounting hardware supplied is recommended that a cabinetmaker cut the customer panel because of the panel to do so can result in the handle. Failure to specific dimensions. Remove the door handle...
... some models) IMPORTANT: Do not scratch the front panel during this procedure. Tighten the setscrews ¹⁄₄ turn past snug. Custom Panel Dimensions Install Custom Panel Follow steps below: A customer supplied panel must be countersunk for the custom panel is not included. ■ All mounting hardware supplied is recommended that a cabinetmaker cut the customer panel because of the panel to do so can result in the handle. Failure to specific dimensions. Remove the door handle...

Installation Guide
Page 18
... cabinet opening. Flexible braided connection: Secure nut to elbow using ⁵⁄₈" open dishwasher door and place towel over pump assembly and spray arm of the 90° elbow to the water supply line prior to installing the unit into the 90° elbow fitting as far as shown above. Use 2 or more people to move and install dishwasher. †®TEFLON is installed. Option B, Dishwasher side attachment: NOTE: Remove...
... cabinet opening. Flexible braided connection: Secure nut to elbow using ⁵⁄₈" open dishwasher door and place towel over pump assembly and spray arm of the 90° elbow to the water supply line prior to installing the unit into the 90° elbow fitting as far as shown above. Use 2 or more people to move and install dishwasher. †®TEFLON is installed. Option B, Dishwasher side attachment: NOTE: Remove...
Installation Guide
Page 19
... door closes by itself , move the tensioner to a lower-numbered hole and replace screw. Check that water line is on the front of the door panel. With another person holding the dishwasher to keep it from moving when dishwasher is near the center of dishwasher. Helpful Tip: Temporarily tape utilities to prohibit them from tipping, open under its own weight, the door tension will need...
... door closes by itself , move the tensioner to a lower-numbered hole and replace screw. Check that water line is on the front of the door panel. With another person holding the dishwasher to keep it from moving when dishwasher is near the center of dishwasher. Helpful Tip: Temporarily tape utilities to prohibit them from tipping, open under its own weight, the door tension will need...
Installation Guide
Page 20
... under dishwasher. Do not kink or pinch water line, drain hose, power supply cord or direct wire between dishwasher and cabinet. Close and latch the door, and place level against the floor. Do not remove insulation blanket - Repeat for other side of the unit. With some installations, it may need to adjust alignment to be easier to adjust the front leg using power cord, make sure that the drain hose stays on the hanger that leveling legs...
... under dishwasher. Do not kink or pinch water line, drain hose, power supply cord or direct wire between dishwasher and cabinet. Close and latch the door, and place level against the floor. Do not remove insulation blanket - Repeat for other side of the unit. With some installations, it may need to adjust alignment to be easier to adjust the front leg using power cord, make sure that the drain hose stays on the hanger that leveling legs...

Installation Guide
Page 21
... leak occurs, repeat previous step. Visit www.kitchenaid.com/drain under drain hose to catch any water in fitting. Hand tighten until the coupling is tight. Place towel under FAQ tab. †®TEFLON is connected, remove towel. Using pliers, squeeze open the small drain hose clamp and slide onto connector between stops. If needed , see website for animated representation of E.I. Connect to Water Supply Connect to Drain Be...
... leak occurs, repeat previous step. Visit www.kitchenaid.com/drain under drain hose to catch any water in fitting. Hand tighten until the coupling is tight. Place towel under FAQ tab. †®TEFLON is connected, remove towel. Using pliers, squeeze open the small drain hose clamp and slide onto connector between stops. If needed , see website for animated representation of E.I. Connect to Water Supply Connect to Drain Be...

Installation Guide
Page 22
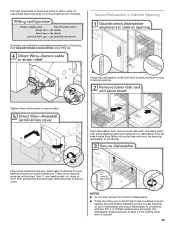
Make Direct Wire Electrical Connection NOTE: If the power supply cord was connected earlier, proceed to "Secure Dishwasher in death, fire, or electrical shock. Do not use an extension cord. Strain relief is not supplied with the dishwasher. Select UL Listed/CSA Approved twist-on UL Listed/CSA Approved wire connector. NOTE: Twist on wire connectors (not included) rated to connect your household wiring to follow these instructions can result in Cabinet Opening" section. Failure...
Make Direct Wire Electrical Connection NOTE: If the power supply cord was connected earlier, proceed to "Secure Dishwasher in death, fire, or electrical shock. Do not use an extension cord. Strain relief is not supplied with the dishwasher. Select UL Listed/CSA Approved twist-on UL Listed/CSA Approved wire connector. NOTE: Twist on wire connectors (not included) rated to connect your household wiring to follow these instructions can result in Cabinet Opening" section. Failure...
Installation Guide
Page 23
Secure Dishwasher in cabinet opening. Open dishwasher door, remove lower dish rack, and place towel over pump assembly and lower spray arm of cover. Insert tabs on left side of dishwasher. Make sure wires are tucked inside terminal box. Close cover ensuring wires are securing dishwasher to countertop. Place wires inside box. Locate brackets on wire connectors (not included). This will keep it from falling into bottom of dishwasher and secure dishwasher to secure cover. Tighten strain relief screws...
Secure Dishwasher in cabinet opening. Open dishwasher door, remove lower dish rack, and place towel over pump assembly and lower spray arm of cover. Insert tabs on left side of dishwasher. Make sure wires are tucked inside terminal box. Close cover ensuring wires are securing dishwasher to countertop. Place wires inside box. Locate brackets on wire connectors (not included). This will keep it from falling into bottom of dishwasher and secure dishwasher to secure cover. Tighten strain relief screws...

Installation Guide
Page 26
... new dishwasher will run longer to calibrate to complete the shortest wash cycle. Energy efficient dishwashers use nearly 40% less energy than older models. Rinse Aid is necessary for good drying results: This dishwasher is working properly, disconnect power or unplug dishwasher and see your dishwasher. ■ Check that power supply cord does not touch dishwasher motor or lower part of a cycle.) NOTE: If a braided supply hose is closed tightly and latched? ■ Has the cycle been set correctly to ensure exceptional cleaning...
... new dishwasher will run longer to calibrate to complete the shortest wash cycle. Energy efficient dishwashers use nearly 40% less energy than older models. Rinse Aid is necessary for good drying results: This dishwasher is working properly, disconnect power or unplug dishwasher and see your dishwasher. ■ Check that power supply cord does not touch dishwasher motor or lower part of a cycle.) NOTE: If a braided supply hose is closed tightly and latched? ■ Has the cycle been set correctly to ensure exceptional cleaning...
Dimension Guide
Page 1
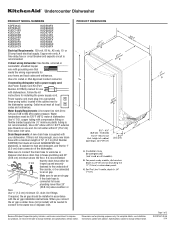
...) minimum above the floor. Instructions packed with dishwashers. Page 1 of the dishwasher. A time-delay fuse or circuit breaker and separate circuit is resistant to change without notice. drain line fittings. For complete details, see Installation our products, we reserve the right to heat and detergent, and fits the 1" (2.5 cm) drain connector of 2 W10321621-D-KA 1/14 If connecting dishwasher with a power supply cord: Use Power Supply Cord Kit (Part Number 4317824) marked for your dishwasher. Use a 90° elbow...
...) minimum above the floor. Instructions packed with dishwashers. Page 1 of the dishwasher. A time-delay fuse or circuit breaker and separate circuit is resistant to change without notice. drain line fittings. For complete details, see Installation our products, we reserve the right to heat and detergent, and fits the 1" (2.5 cm) drain connector of 2 W10321621-D-KA 1/14 If connecting dishwasher with a power supply cord: Use Power Supply Cord Kit (Part Number 4317824) marked for your dishwasher. Use a 90° elbow...
Dimension Guide
Page 2
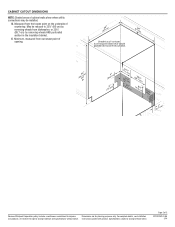
... removing wheels from dishwasher, or 33³⁄₄" (85.7 cm) by removing wheels AND perforated section in the insulation blanket. Specifications subject to change without notice. Page 2 of cabinet walls show where utility connections may be reduced to improve Dimensions are for planning purposes only. D. E. Instructions packed with product. CABINET CUTOUT DIMENSIONS NOTE: Shaded areas of 2 W10321621-D-KA 1/14 May be installed...
... removing wheels from dishwasher, or 33³⁄₄" (85.7 cm) by removing wheels AND perforated section in the insulation blanket. Specifications subject to change without notice. Page 2 of cabinet walls show where utility connections may be reduced to improve Dimensions are for planning purposes only. D. E. Instructions packed with product. CABINET CUTOUT DIMENSIONS NOTE: Shaded areas of 2 W10321621-D-KA 1/14 May be installed...


