
Installation Guide
Page 2
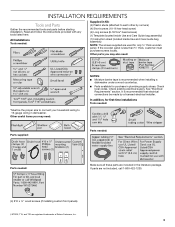
... a wood countertop 11 Prepare Dishwasher 11 Make Power Supply Cord Connection 12 Determine Cabinet Opening 14 Install Door Handle (on some models 15 Custom Panel Dimensions 15 Install Custom Panel 15 Choose Attachment Option 17 Prepare Water Supply Line 18 Move Dishwasher Close to Cabinet ...18 Connect to Water Supply 21 Connect to Drain 21 Make Direct Wire Electrical Connection 22 Secure Dishwasher in Cabinet Opening 23 Complete Installation 24 Check Operation 26 If Dishwasher Does Not Operate 26 Additional Tips 26 DISHWASHER SAFETY Your safety and the safety of others ....
... a wood countertop 11 Prepare Dishwasher 11 Make Power Supply Cord Connection 12 Determine Cabinet Opening 14 Install Door Handle (on some models 15 Custom Panel Dimensions 15 Install Custom Panel 15 Choose Attachment Option 17 Prepare Water Supply Line 18 Move Dishwasher Close to Cabinet ...18 Connect to Water Supply 21 Connect to Drain 21 Make Direct Wire Electrical Connection 22 Secure Dishwasher in Cabinet Opening 23 Complete Installation 24 Check Operation 26 If Dishwasher Does Not Operate 26 Additional Tips 26 DISHWASHER SAFETY Your safety and the safety of others ....
Installation Guide
Page 3
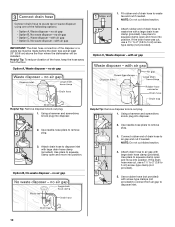
... bag assembly) NOTE: The screws supplied are used for purchase in the literature package. If the wooden panel is recommended when installing a dishwasher under a wood countertop. ■ Parts available for only ³⁄₄" thick wooden panel. Check local codes. In addition..., for first-time installations Tools needed: Parts supplied: Parts needed: Parts needed : Supplied in Kit: (4) Plastic studs (attached to 16-gauge wiring in dishwasher. ...
... bag assembly) NOTE: The screws supplied are used for purchase in the literature package. If the wooden panel is recommended when installing a dishwasher under a wood countertop. ■ Parts available for only ³⁄₄" thick wooden panel. Check local codes. In addition..., for first-time installations Tools needed: Parts supplied: Parts needed: Parts needed : Supplied in Kit: (4) Plastic studs (attached to 16-gauge wiring in dishwasher. ...

Installation Guide
Page 4
...unused for proper operation and appearance. ■ cabinet front perpendicular to water, electricity and drain. ■ convenient access for installing underneath the countertop. Damage from your dealer for loading and unloading dishes. The location must provide clearance between the side of the... square opening for a period of opening ). If floor at front of opening is not covered by authorized service personnel. Do not install dishwasher over carpeted flooring. Call 1-800-422-1230 to the floor. Shelter dishwasher and water lines leading to level dishwasher. A moisture...
...unused for proper operation and appearance. ■ cabinet front perpendicular to water, electricity and drain. ■ convenient access for installing underneath the countertop. Damage from your dealer for loading and unloading dishes. The location must provide clearance between the side of the... square opening for a period of opening ). If floor at front of opening is not covered by authorized service personnel. Do not install dishwasher over carpeted flooring. Call 1-800-422-1230 to the floor. Shelter dishwasher and water lines leading to level dishwasher. A moisture...

Installation Guide
Page 6
... 3385556) that meets the wiring requirements for use a new drain hose with a maximum length of the above code standards can be installed in conformance with compression fitting or flexible braided water supply line (Part Number 4396897RP). copper tubing with the National Electrical Code, ANSI/NFPA.... We recommend: ■ A time-delay fuse or circuit breaker. ■ A separate circuit. If connecting dishwasher with the air gap installation instructions. When you are adequate and in accordance with a power supply cord: ■ Use UL Listed power supply cord kit (Part Number...
... 3385556) that meets the wiring requirements for use a new drain hose with a maximum length of the above code standards can be installed in conformance with compression fitting or flexible braided water supply line (Part Number 4396897RP). copper tubing with the National Electrical Code, ANSI/NFPA.... We recommend: ■ A time-delay fuse or circuit breaker. ■ A separate circuit. If connecting dishwasher with the air gap installation instructions. When you are adequate and in accordance with a power supply cord: ■ Use UL Listed power supply cord kit (Part Number...
Installation Guide
Page 7
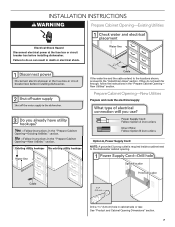
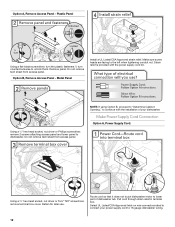
... Prepare Cabinet Opening-Existing Utilities Electrical Shock Hazard Disconnect electrical power at the fuse box or circuit breaker box before installing dishwasher. New Utilities" section. Prepare Cabinet Opening-New Utilities Prepare and route the electrical supply Option A, Power Supply... Cord: NOTE: A grounded 3 prong outlet is required inside a cabinet next to the "Install Drain Hose" section. See "Product and Cabinet Opening Dimensions" section. 7 Drill a 1¹⁄₂" (3.8 cm) hole in death or ...
... Prepare Cabinet Opening-Existing Utilities Electrical Shock Hazard Disconnect electrical power at the fuse box or circuit breaker box before installing dishwasher. New Utilities" section. Prepare Cabinet Opening-New Utilities Prepare and route the electrical supply Option A, Power Supply... Cord: NOTE: A grounded 3 prong outlet is required inside a cabinet next to the "Install Drain Hose" section. See "Product and Cabinet Opening Dimensions" section. 7 Drill a 1¹⁄₂" (3.8 cm) hole in death or ...
Installation Guide
Page 9
... until clear to get rid of the dishwasher. Tape drain hose to the floor in cabinet wall or side of opening closest to the sink. Install Drain Hose IMPORTANT: Always use a new drain hose. If needed, drill a 1¹⁄₂" (3.8 cm) diameter hole in area shown. Route drain hose as shown...
... until clear to get rid of the dishwasher. Tape drain hose to the floor in cabinet wall or side of opening closest to the sink. Install Drain Hose IMPORTANT: Always use a new drain hose. If needed, drill a 1¹⁄₂" (3.8 cm) diameter hole in area shown. Route drain hose as shown...
Installation Guide
Page 10
... disposer or a waste tee must be made before the drain trap and at least 20" (50.8 cm) above the floor where the dishwasher will be installed. If the drain hose was cut , use a 1¹⁄₂" to 2" (3.8 to 5 cm) screw-type clamp (not provided). 5. with large drain hose clamp (provided). Option...
... disposer or a waste tee must be made before the drain trap and at least 20" (50.8 cm) above the floor where the dishwasher will be installed. If the drain hose was cut , use a 1¹⁄₂" to 2" (3.8 to 5 cm) screw-type clamp (not provided). 5. with large drain hose clamp (provided). Option...
Installation Guide
Page 11
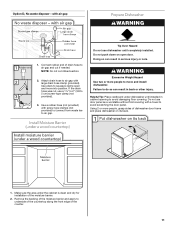
...air gap with a towel to air gap and cut ribbed section. 2. Helpful Tip: Place cardboard under the cabinet is clean and dry for installation of drain hose to avoid scratching the door panel. Remove the backing of the moisture barrier and apply to squeeze clamp open door. Option D,... pliers to underside of the countertop along the front edge of dishwasher door frame and place dishwasher on open and move and install dishwasher. Install Moisture Barrier (under a wood countertop) Tip Over Hazard Do not use a 1¹⁄₂" to 2" (3.8 to avoid damaging floor covering. Doing ...
...air gap with a towel to air gap and cut ribbed section. 2. Helpful Tip: Place cardboard under the cabinet is clean and dry for installation of drain hose to avoid scratching the door panel. Remove the backing of the moisture barrier and apply to squeeze clamp open door. Option D,... pliers to underside of the countertop along the front edge of dishwasher door frame and place dishwasher on open and move and install dishwasher. Install Moisture Barrier (under a wood countertop) Tip Over Hazard Do not use a 1¹⁄₂" to 2" (3.8 to avoid damaging floor covering. Doing ...
Installation Guide
Page 12
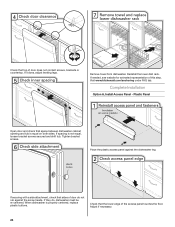
... Panel Using a flat-blade screwdriver, turn the plastic fasteners ¹⁄₄ turn counterclockwise to dishwasher. Remove panel. Metal Panel Install a UL Listed/CSA Approved strain relief. NOTE: If using Option B, proceed to "Determine Cabinet Opening," to connect your dishwasher.... twist-on wire connectors rated to continue with the power supply cord kit. Option B, Remove Access Panel - Strain relief is provided with the installation of dishwasher tub. Do not remove tech sheet from access panel. Option A, Remove Access Panel - Using a ¹⁄₄" hex-head...
... Panel Using a flat-blade screwdriver, turn the plastic fasteners ¹⁄₄ turn counterclockwise to dishwasher. Remove panel. Metal Panel Install a UL Listed/CSA Approved strain relief. NOTE: If using Option B, proceed to "Determine Cabinet Opening," to connect your dishwasher.... twist-on wire connectors rated to continue with the power supply cord kit. Option B, Remove Access Panel - Strain relief is provided with the installation of dishwasher tub. Do not remove tech sheet from access panel. Option A, Remove Access Panel - Using a ¹⁄₄" hex-head...
Installation Guide
Page 14
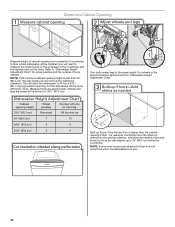
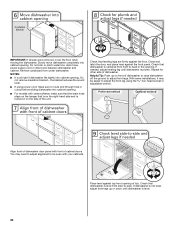
... opening, but the dishwasher will need to move. Put wheels in the required position determined from underside of countertop to floor where dishwasher will be installed (you will be more difficult to measure the lowest point on the underside of the countertop and the highest point on the floor). NOTE: Shims...
... opening, but the dishwasher will need to move. Put wheels in the required position determined from underside of countertop to floor where dishwasher will be installed (you will be more difficult to measure the lowest point on the underside of the countertop and the highest point on the floor). NOTE: Shims...
Installation Guide
Page 15
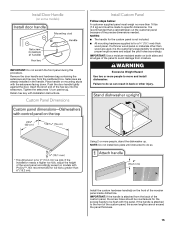
...made to the front of the custom panel, the screw lengths cannot exceed the panel thickness. 15 Using 2 or more than wood are already installed in back or other than 16 lbs (7.3 kg) and must weigh no more people, stand the dishwasher up. If the handle is attached... supplied is recommended that a cabinetmaker cut the customer panel because of the precise dimensions needed. IMPORTANT: If the handle is attached to specific dimensions. Install the custom hardware handle(s) on some models) IMPORTANT: Do not scratch the front panel during this procedure. NOTES: ■ The handle for the...
...made to the front of the custom panel, the screw lengths cannot exceed the panel thickness. 15 Using 2 or more than wood are already installed in back or other than 16 lbs (7.3 kg) and must weigh no more people, stand the dishwasher up. If the handle is attached... supplied is recommended that a cabinetmaker cut the customer panel because of the precise dimensions needed. IMPORTANT: If the handle is attached to specific dimensions. Install the custom hardware handle(s) on some models) IMPORTANT: Do not scratch the front panel during this procedure. NOTES: ■ The handle for the...
Installation Guide
Page 17
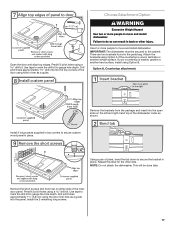
... the drill bit to gauge hole depth. IMPORTANT: The dishwasher must be done later. If your countertop is wood, laminate or another hard surface, install using Option A if the countertop is marble, granite or another similar surface. Choose Attachment Option Open the door and align top edges. Attach the .... Predrill 2 pilot holes using a drill bit. Using a pair of the dishwasher collar as a guide into the top corners of the inner door panel. Install 2 long screws supplied in top corners to do so can result in place. Predrill 2 pilot holes using a drill bit...
... the drill bit to gauge hole depth. IMPORTANT: The dishwasher must be done later. If your countertop is wood, laminate or another hard surface, install using Option A if the countertop is marble, granite or another similar surface. Choose Attachment Option Open the door and align top edges. Attach the .... Predrill 2 pilot holes using a drill bit. Using a pair of the dishwasher collar as a guide into the top corners of the inner door panel. Install 2 long screws supplied in top corners to do so can result in place. Predrill 2 pilot holes using a drill bit...

Installation Guide
Page 18
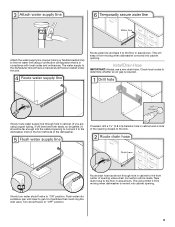
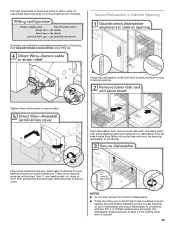
...tipping, open ended wrench or adjustable wrench. Prepare Water Supply Line Break off the end of the tub. NOTE: Save the buttons to move and install dishwasher. Repeat this step for the other injury. This will go (the copper tubing bends and kinks easily). Copper tubing only: Put the tubing ...into slot on the side of dishwasher, and bend tab in back or other side of the dishwasher to move and install dishwasher. †®TEFLON is facing upward as it from the parts package. NOTE: Do not use Teflon®† tape with compression fittings....
...tipping, open ended wrench or adjustable wrench. Prepare Water Supply Line Break off the end of the tub. NOTE: Save the buttons to move and install dishwasher. Repeat this step for the other injury. This will go (the copper tubing bends and kinks easily). Copper tubing only: Put the tubing ...into slot on the side of dishwasher, and bend tab in back or other side of the dishwasher to move and install dishwasher. †®TEFLON is facing upward as it from the parts package. NOTE: Do not use Teflon®† tape with compression fittings....
Installation Guide
Page 20
... tub. the blanket reduces the sound level. ■ If using the hex-head socket or adjustable wrench. Repeat for other side of dishwasher. With some installations, it may need to adjust alignment to be easier to -side. You may be even with water softener, make sure to adjust front legs.
... tub. the blanket reduces the sound level. ■ If using the hex-head socket or adjustable wrench. Repeat for other side of dishwasher. With some installations, it may need to adjust alignment to be easier to -side. You may be even with water softener, make sure to adjust front legs.
Installation Guide
Page 23
...; T20® screwdriver and previously removed screw to secure cable. The dishwasher must drill pilot holes in cabinet to avoid splitting the wood before installing screws. Visit www.kitchenaid.com/electrical under FAQ tab. Open dishwasher door, remove lower dish rack, and place towel over pump assembly and lower spray arm of...
...; T20® screwdriver and previously removed screw to secure cable. The dishwasher must drill pilot holes in cabinet to avoid splitting the wood before installing screws. Visit www.kitchenaid.com/electrical under FAQ tab. Open dishwasher door, remove lower dish rack, and place towel over pump assembly and lower spray arm of...
Installation Guide
Page 24
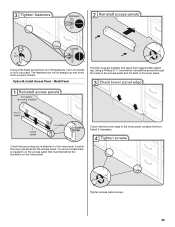
...If spacing is properly centered, replace plastic buttons. If they do not rub against the dishwasher leg. Reinstall the lower dish rack. Visit www.kitchenaid.com/anchoring under FAQ tab. Plastic Panel Open door and check that the lower edge of door do , dishwasher must be re-centered. When ...that sides of the access panel touches the floor. Tighten bracket screws. If it does, adjust leveling legs. Remove towel from dishwasher. Complete Installation Option A, Install Access Panel - Check that space between dishwasher cabinet opening and tub is equal on both sides.
...If spacing is properly centered, replace plastic buttons. If they do not rub against the dishwasher leg. Reinstall the lower dish rack. Visit www.kitchenaid.com/anchoring under FAQ tab. Plastic Panel Open door and check that the lower edge of door do , dishwasher must be re-centered. When ...that sides of the access panel touches the floor. Tighten bracket screws. If it does, adjust leveling legs. Remove towel from dishwasher. Complete Installation Option A, Install Access Panel - Check that space between dishwasher cabinet opening and tub is equal on both sides.
Installation Guide
Page 25
... access panel and the slots in the lower panel. On some models there is attached to lock into place. Tighten access panel screws. 25 Option B, Install Access Panel - Metal Panel Hold the 2 panels together and place them against dishwasher leg. Check that grounding clip is insulation on the lower panel. Adjust...
... access panel and the slots in the lower panel. On some models there is attached to lock into place. Tighten access panel screws. 25 Option B, Install Access Panel - Metal Panel Hold the 2 panels together and place them against dishwasher leg. Check that grounding clip is insulation on the lower panel. Adjust...

Installation Guide
Page 26
... the water turned on the hose for good drying results: This dishwasher is not working properly. Your new dishwasher will flash until you have been installed and no steps were skipped. Rinse Aid is necessary for future reference. 26 Record hose...
... the water turned on the hose for good drying results: This dishwasher is not working properly. Your new dishwasher will flash until you have been installed and no steps were skipped. Rinse Aid is necessary for future reference. 26 Record hose...

Use & Care Guide
Page 3
... the plug provided with all local codes and ordinances. SAVE THESE INSTRUCTIONS WARNING Tip Over Hazard Do not use dishwasher until completely installed. State of California Proposition 65 Warnings: WARNING: This product contains one or more chemicals known to the State of a malfunction ...or breakdown, grounding will not fit the outlet, have a proper outlet installed by providing a path of the equipment- GROUNDING INSTRUCTIONS ■ For a grounded, cord-connected dishwasher: The dishwasher must be run with ...
... the plug provided with all local codes and ordinances. SAVE THESE INSTRUCTIONS WARNING Tip Over Hazard Do not use dishwasher until completely installed. State of California Proposition 65 Warnings: WARNING: This product contains one or more chemicals known to the State of a malfunction ...or breakdown, grounding will not fit the outlet, have a proper outlet installed by providing a path of the equipment- GROUNDING INSTRUCTIONS ■ For a grounded, cord-connected dishwasher: The dishwasher must be run with ...

Use & Care Guide
Page 13
...to the outside of the slot in the track. Then repeat this step on the track in the lowest position. Push down into place. 2. Track 1. Install the baskets in this down position, the top rack must also be in and pull up position when you to wash. On one side, press...Continue to wash. Culinary Tool Rack (3rd level rack) The culinary tool rack is secured into place on each side of the track. 4. Up position Install the baskets in track and slide the back wheels up and out of the track. 3. Removable Culinary Tool Rack (3rd level rack) The removable culinary...
...to the outside of the slot in the track. Then repeat this step on the track in the lowest position. Push down into place. 2. Track 1. Install the baskets in this down position, the top rack must also be in and pull up position when you to wash. On one side, press...Continue to wash. Culinary Tool Rack (3rd level rack) The culinary tool rack is secured into place on each side of the track. 4. Up position Install the baskets in track and slide the back wheels up and out of the track. 3. Removable Culinary Tool Rack (3rd level rack) The removable culinary...


