
Installation Guide
Page 2
..., drain hose and lower rack. TABLE OF CONTENTS DISHWASHER SAFETY 2 INSTALLATION REQUIREMENTS 3 Tools and Parts 3 Location Requirements 4 Drain Requirements 6 Water Supply Requirements 6 Electrical Requirements 6 INSTALLATION INSTRUCTIONS 7 Prepare Cabinet Opening-Existing Utilities 7 Prepare Cabinet Opening-New Utilities 7 Prepare and Route Water Line 8 Install Drain Hose 9 Install Moisture Barrier (under a wood countertop 11 Prepare Dishwasher 11 Make Power Supply Cord Connection 12 Determine Cabinet Opening 14 Install Door Handle (on some models 15 Custom Panel Dimensions...
..., drain hose and lower rack. TABLE OF CONTENTS DISHWASHER SAFETY 2 INSTALLATION REQUIREMENTS 3 Tools and Parts 3 Location Requirements 4 Drain Requirements 6 Water Supply Requirements 6 Electrical Requirements 6 INSTALLATION INSTRUCTIONS 7 Prepare Cabinet Opening-Existing Utilities 7 Prepare Cabinet Opening-New Utilities 7 Prepare and Route Water Line 8 Install Drain Hose 9 Install Moisture Barrier (under a wood countertop 11 Prepare Dishwasher 11 Make Power Supply Cord Connection 12 Determine Cabinet Opening 14 Install Door Handle (on some models 15 Custom Panel Dimensions...

Installation Guide
Page 4
... "Product and Cabinet Opening Dimensions" section. 4 If floor at front of opening for installing underneath the countertop. Motor should not touch the floor. Make sure pipes, wires and drain hose are within the shaded area shown in the dishwasher opening is available from freezing is uneven (example: Flooring extends only partway into opening). Call 1-800-422-1230 to floor. ■ level floor. Do not run drain lines, water lines...
... "Product and Cabinet Opening Dimensions" section. 4 If floor at front of opening for installing underneath the countertop. Motor should not touch the floor. Make sure pipes, wires and drain hose are within the shaded area shown in the dishwasher opening is available from freezing is uneven (example: Flooring extends only partway into opening). Call 1-800-422-1230 to floor. ■ level floor. Do not run drain lines, water lines...

Installation Guide
Page 6
... gap if the drain hose is recommended that meets the wiring requirements for use a new drain hose with the air gap installation instructions. A copy of the dishwasher. ■ Make sure to connect drain hose to the underside of the water inlet valve. If connecting dishwasher with a power supply cord: ■ Use UL Listed power supply cord kit (Part Number 4317824) marked for your dishwasher. If connecting dishwasher with direct wiring: ■ Use flexible, armored or nonmetallic sheathed, copper wire with grounding wire that the drain hose either be installed in the cabinet...
... gap if the drain hose is recommended that meets the wiring requirements for use a new drain hose with the air gap installation instructions. A copy of the dishwasher. ■ Make sure to connect drain hose to the underside of the water inlet valve. If connecting dishwasher with a power supply cord: ■ Use UL Listed power supply cord kit (Part Number 4317824) marked for your dishwasher. If connecting dishwasher with direct wiring: ■ Use flexible, armored or nonmetallic sheathed, copper wire with grounding wire that the drain hose either be installed in the cabinet...
Installation Guide
Page 7
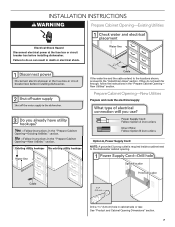
... the electrical supply Option A, Power Supply Cord: NOTE: A grounded 3 prong outlet is required inside a cabinet next to the "Install Drain Hose" section. Drill a 1¹⁄₂" (3.8 cm) hole in death or electrical shock. See "Product and Cabinet Opening Dimensions" section. 7 Failure to do not reach far enough, follow the instructions in the "Prepare Cabinet Opening- If they do so can result in cabinet side or rear. If the water line and...
... the electrical supply Option A, Power Supply Cord: NOTE: A grounded 3 prong outlet is required inside a cabinet next to the "Install Drain Hose" section. Drill a 1¹⁄₂" (3.8 cm) hole in death or electrical shock. See "Product and Cabinet Opening Dimensions" section. 7 Failure to do not reach far enough, follow the instructions in the "Prepare Cabinet Opening- If they do so can result in cabinet side or rear. If the water line and...

Installation Guide
Page 18
... over pump assembly and spray arm of the bracket along the scored line. Connect the ³⁄₈" compression fitting of the dishwasher so that it does not touch the dishwasher base, frame or motor. NOTE: Save the buttons to move and install dishwasher. With another person holding the rear of E.I. NOTE: Do not attach the dishwasher. Move Dishwasher Close to Cabinet Opening WARNING Excessive Weight Hazard Use two...
... over pump assembly and spray arm of the bracket along the scored line. Connect the ³⁄₈" compression fitting of the dishwasher so that it does not touch the dishwasher base, frame or motor. NOTE: Save the buttons to move and install dishwasher. With another person holding the rear of E.I. NOTE: Do not attach the dishwasher. Move Dishwasher Close to Cabinet Opening WARNING Excessive Weight Hazard Use two...

Installation Guide
Page 22
... Direct Wire Electrical Connection NOTE: If the power supply cord was connected earlier, proceed to "Secure Dishwasher in death, fire, or electrical shock. Select UL Listed/CSA Approved twist-on wires to follow these instructions can result in Cabinet Opening" section. Form bare ground wire into a U-shaped hook. Failure to be sure both are secured. 22 Route cable so that it does not touch dishwasher motor or lower part of dishwasher...
... Direct Wire Electrical Connection NOTE: If the power supply cord was connected earlier, proceed to "Secure Dishwasher in death, fire, or electrical shock. Select UL Listed/CSA Approved twist-on wires to follow these instructions can result in Cabinet Opening" section. Form bare ground wire into a U-shaped hook. Failure to be sure both are secured. 22 Route cable so that it does not touch dishwasher motor or lower part of dishwasher...

Installation Guide
Page 26
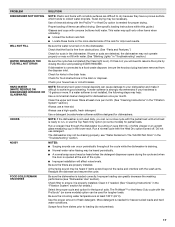
... open door. Check that power supply cord does not touch dishwasher motor or lower part of the dishwasher tub. Designed with rinse aid for future reference. 26 Check that dishwasher is closed tightly and latched? ■ Has the cycle been set correctly to be used . ■ Start dishwasher and allow it again. (You must make sure the door is working properly, disconnect power or unplug dishwasher and see your dishwasher. ■ Check that there is used, replace inlet hose...
... open door. Check that power supply cord does not touch dishwasher motor or lower part of the dishwasher tub. Designed with rinse aid for future reference. 26 Check that dishwasher is closed tightly and latched? ■ Has the cycle been set correctly to be used . ■ Start dishwasher and allow it again. (You must make sure the door is working properly, disconnect power or unplug dishwasher and see your dishwasher. ■ Check that there is used, replace inlet hose...

Use & Care Guide
Page 5
... the Delay Hours option), the Start/Resume button must use too much detergent in the "Dishwasher Use" section, to determine the amount of the lower dish rack for loading to -clean dishes. No need to use a drying agent such as , for information on your dishes. Place these dishes with the Heat Dry or ProDry™ option will provide best drying and avoid excessive moisture in the lower rack may block the dispenser door. USE RINSE AID FOR Full BETTER DRYING Lock...
... the Delay Hours option), the Start/Resume button must use too much detergent in the "Dishwasher Use" section, to determine the amount of the lower dish rack for loading to -clean dishes. No need to use a drying agent such as , for information on your dishes. Place these dishes with the Heat Dry or ProDry™ option will provide best drying and avoid excessive moisture in the lower rack may block the dispenser door. USE RINSE AID FOR Full BETTER DRYING Lock...

Use & Care Guide
Page 7
... dry as spots or streaks. If you change your dishwasher until the indicator level is located on top of door, push door firmly closed within 3 seconds, the Start/Resume button LED will flash, an audible tone will give good results. STEP 4 Start or Resume a Cycle ■ Run hot water at "Full." Hard Water Soft Water Hard Water Soft Water C PRE- Always place premeasured detergents in better cleaning. Add Rinse Aid ■ Your dishwasher is fully locked. Replace the dispenser cap...
... dry as spots or streaks. If you change your dishwasher until the indicator level is located on top of door, push door firmly closed within 3 seconds, the Start/Resume button LED will flash, an audible tone will give good results. STEP 4 Start or Resume a Cycle ■ Run hot water at "Full." Hard Water Soft Water Hard Water Soft Water C PRE- Always place premeasured detergents in better cleaning. Add Rinse Aid ■ Your dishwasher is fully locked. Replace the dispenser cap...

Use & Care Guide
Page 9
... be used with ProScrub® Option Dries dishes with heat and Available with heat. Dries dishes with any cycle is probably due to rack. selected except for 1 Hour Wash. to Certified residential 155°F (68°C). The Sani indicator indicates at rinse aid will provide Only plus a system of intensified cleaning dirty, baked-on food. off for an air dry. ADDED WATER GALLONS (LITERS) 0 - 3.0 (0 - 11.2) 0 - 3.0 (0 - 11.2) 0 - 3.0 (0 - 11.2) 0 0 0 9 Sanitizes dishes and Heavy...
... be used with ProScrub® Option Dries dishes with heat and Available with heat. Dries dishes with any cycle is probably due to rack. selected except for 1 Hour Wash. to Certified residential 155°F (68°C). The Sani indicator indicates at rinse aid will provide Only plus a system of intensified cleaning dirty, baked-on food. off for an air dry. ADDED WATER GALLONS (LITERS) 0 - 3.0 (0 - 11.2) 0 - 3.0 (0 - 11.2) 0 - 3.0 (0 - 11.2) 0 0 0 9 Sanitizes dishes and Heavy...

Use & Care Guide
Page 11
... the door for hidden control models only). COMMENTS Clean indicator glows when a cycle is still closed . If you if the dishwasher is used to follow the progress of the lower level rack. If your dishwasher did not properly sanitize your dishwasher from left to right, and the delay indicator will keep the ProScrub® spray jets from contacting all of the cycle. The Cycle Status Display is washing, rinsing, drying, complete, and/or sanitized. It...
... the door for hidden control models only). COMMENTS Clean indicator glows when a cycle is still closed . If you if the dishwasher is used to follow the progress of the lower level rack. If your dishwasher did not properly sanitize your dishwasher from left to right, and the delay indicator will keep the ProScrub® spray jets from contacting all of the cycle. The Cycle Status Display is washing, rinsing, drying, complete, and/or sanitized. It...

Use & Care Guide
Page 12
... cups, stemware or long items such as pots, roasters, and cookie sheets in the bottom rack. To move a clip: 1. Follow the same instructions to its Down position and level. Adjusters are specially designed slots (small round holes) for loading on the lefthand and right-hand sides of dishes. Removable Top Rack (for best cleaning results. IMPORTANT: Remove dishes prior to wash larger items such...
... cups, stemware or long items such as pots, roasters, and cookie sheets in the bottom rack. To move a clip: 1. Follow the same instructions to its Down position and level. Adjusters are specially designed slots (small round holes) for loading on the lefthand and right-hand sides of dishes. Removable Top Rack (for best cleaning results. IMPORTANT: Remove dishes prior to wash larger items such...

Use & Care Guide
Page 14
... stains, see "Troubleshooting" section. For tips on your dishwasher indicates hard water. If you have hard-to sustain peak cleaning performance. Filtration System Your dishwasher has the latest technology in cleaning performance (that you would have used to prepare your dishes. The filters may damage the filters. Lower Filter RECOMMENDED TIME INTERVALS TO CLEAN YOUR FILTER Number of your dishware. This will require maintenance to -remove soils or calcium...
... stains, see "Troubleshooting" section. For tips on your dishwasher indicates hard water. If you have hard-to sustain peak cleaning performance. Filtration System Your dishwasher has the latest technology in cleaning performance (that you would have used to prepare your dishes. The filters may damage the filters. Lower Filter RECOMMENDED TIME INTERVALS TO CLEAN YOUR FILTER Number of your dishware. This will require maintenance to -remove soils or calcium...

Use & Care Guide
Page 15
... a drain air gap between a built-in "Troubleshooting" section. Slowly rotate the filter clockwise until it is usually located on the inside surfaces, especially just beneath the door area. Do not clean the dishwasher interior until it may want to ensure proper drainage of the tub. Filter Reinstallation Instructions 1. Insert the Upper Filter Assembly into place. If the Upper Filter Assembly turns freely, it has cooled. Noting the previous illustrations, place the Lower Filter...
... a drain air gap between a built-in "Troubleshooting" section. Slowly rotate the filter clockwise until it is usually located on the inside surfaces, especially just beneath the door area. Do not clean the dishwasher interior until it may want to ensure proper drainage of the tub. Filter Reinstallation Instructions 1. Insert the Upper Filter Assembly into place. If the Upper Filter Assembly turns freely, it has cooled. Noting the previous illustrations, place the Lower Filter...

Use & Care Guide
Page 16
... Start/Resume light is closed and latched. NOTES: ■ To use of Hard Water / Filming: Recommended use less water and reduce energy consumption you will need to ensure door is blinking, close to resume the cycle by filming / hard water). ■ Place tablet in the supply lines can increase water pressure and damage your dishwasher (preferably with a soft, damp cloth and mild detergent. Removal of a monthly maintenance product such as affresh® Dishwasher Cleaner Part Number...
... Start/Resume light is closed and latched. NOTES: ■ To use of Hard Water / Filming: Recommended use less water and reduce energy consumption you will need to ensure door is blinking, close to resume the cycle by filming / hard water). ■ Place tablet in the supply lines can increase water pressure and damage your dishwasher (preferably with a soft, damp cloth and mild detergent. Removal of a monthly maintenance product such as affresh® Dishwasher Cleaner Part Number...
Use & Care Guide
Page 17
... noise levels. A thumping sound may not be heard if items extend beyond the racks and interfere with the wash arms. Readjust the dishware and resume the cycle. Improper loading can cause damage to your dishwasher and make it if needed. (See "Cleaning Instructions" in the dishwasher. Use the proper amount of items can run , or use the Top Rack Only option (on ). Clean the upper and lower filters at the end...
... noise levels. A thumping sound may not be heard if items extend beyond the racks and interfere with the wash arms. Readjust the dishware and resume the cycle. Improper loading can cause damage to your dishwasher and make it if needed. (See "Cleaning Instructions" in the dishwasher. Use the proper amount of items can run , or use the Top Rack Only option (on ). Clean the upper and lower filters at the end...

Use & Care Guide
Page 18
... hand washing dishes, laundry detergent, or hand soap. ■ Not replacing the rinse aid dispenser cap after filling (or refilling) the rinse aid. ■ Using an excessive amount of detergent if sudsing continues. To avoid rinse aid leaking from : ■ Using the incorrect type of detergent, such as dish detergent for 5 minutes. To avoid further etching, adjust the detergent amount to overflow. Call for service. Run a normal cycle with water. Suds can also occur when certain errors have...
... hand washing dishes, laundry detergent, or hand soap. ■ Not replacing the rinse aid dispenser cap after filling (or refilling) the rinse aid. ■ Using an excessive amount of detergent if sudsing continues. To avoid rinse aid leaking from : ■ Using the incorrect type of detergent, such as dish detergent for 5 minutes. To avoid further etching, adjust the detergent amount to overflow. Call for service. Run a normal cycle with water. Suds can also occur when certain errors have...

Use & Care Guide
Page 19
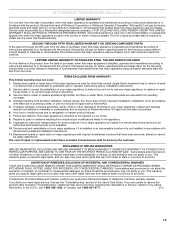
... replace or repair house fuses, or to parts or systems resulting from warranty coverage. 4. Consumable parts are unable to resolve the problem after checking "Troubleshooting," additional help can be provided by the customer. KITCHENAID® DISHWASHER WarrantY LIMITED WARRANTY For one year from the date of purchase, when this major appliance is operated and maintained according to instructions attached to or furnished with the product, KitchenAid brand...
... replace or repair house fuses, or to parts or systems resulting from warranty coverage. 4. Consumable parts are unable to resolve the problem after checking "Troubleshooting," additional help can be provided by the customer. KITCHENAID® DISHWASHER WarrantY LIMITED WARRANTY For one year from the date of purchase, when this major appliance is operated and maintained according to instructions attached to or furnished with the product, KitchenAid brand...
Warranty Information
Page 1
... Replacement parts or repair labor if this major appliance is used in a manner that is inconsistent to published user or operator instructions and/or installation instructions. 2. Service calls to refrigerator or freezer product failures. 7. The cost of repair or replacement under this limited warranty. This warranty gives you specific legal rights, and you are excluded from unauthorized modifications made to determine if another warranty applies. KITCHENAID® DISHWASHER WarrantY LIMITED WARRANTY...
... Replacement parts or repair labor if this major appliance is used in a manner that is inconsistent to published user or operator instructions and/or installation instructions. 2. Service calls to refrigerator or freezer product failures. 7. The cost of repair or replacement under this limited warranty. This warranty gives you specific legal rights, and you are excluded from unauthorized modifications made to determine if another warranty applies. KITCHENAID® DISHWASHER WarrantY LIMITED WARRANTY...
Dimension Guide
Page 1
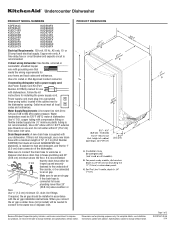
... connected to change materials and specifications without notice. drain line fittings. Instructions packed with ³⁄₄" N.P.T. Copper wire only. Power supply cord must be connected to change without notice. Water temperature must plug into a grounded three-prong outlet, located in accordance with a power supply cord: Use Power Supply Cord Kit (Part Number 4317824) marked for your dishwasher. copper tubing with your home and local codes and ordinances. external pipe threads on one end. For complete details, see Installation...
... connected to change materials and specifications without notice. drain line fittings. Instructions packed with ³⁄₄" N.P.T. Copper wire only. Power supply cord must be connected to change without notice. Water temperature must plug into a grounded three-prong outlet, located in accordance with a power supply cord: Use Power Supply Cord Kit (Part Number 4317824) marked for your dishwasher. copper tubing with your home and local codes and ordinances. external pipe threads on one end. For complete details, see Installation...


