
Installation Guide
Page 2
...Cabinet Opening-New Utilities 7 Prepare and Route Water Line 8 Install Drain Hose 9 Install Moisture Barrier 11 Prepare Dishwasher 11 Make Power Supply Cord Connection 12 Determine Cabinet Opening 14 Install Door Handle 15 Custom Panel Dimensions 15 Install Custom Panel 15 Choose Attachment Option 17 Prepare Water Supply Line 18 Move Dishwasher Close to Cabinet Opening 19 Connect to Water Supply 21 Connect to the power-supply cord. We have provided many important safety messages in Cabinet Opening 23 Complete Installation 24 Check Operation 26 If Dishwasher Does Not Operate...
...Cabinet Opening-New Utilities 7 Prepare and Route Water Line 8 Install Drain Hose 9 Install Moisture Barrier 11 Prepare Dishwasher 11 Make Power Supply Cord Connection 12 Determine Cabinet Opening 14 Install Door Handle 15 Custom Panel Dimensions 15 Install Custom Panel 15 Choose Attachment Option 17 Prepare Water Supply Line 18 Move Dishwasher Close to Cabinet Opening 19 Connect to Water Supply 21 Connect to the power-supply cord. We have provided many important safety messages in Cabinet Opening 23 Complete Installation 24 Check Operation 26 If Dishwasher Does Not Operate...
Installation Guide
Page 4
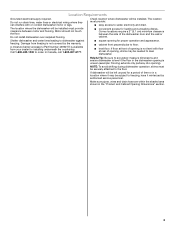
... level dishwasher. Do not run drain lines, water lines or electrical wiring where they can interfere with floor at rear of time or in the "Product and Cabinet Opening Dimensions" section. 4 The location where the dishwasher will be securely attached to order. Shelter dishwasher and water lines leading to floor. ■ level floor. If floor at front of the dishwasher door and the wall or cabinet. ■ square opening is not covered by authorized service...
... level dishwasher. Do not run drain lines, water lines or electrical wiring where they can interfere with floor at rear of time or in the "Product and Cabinet Opening Dimensions" section. 4 The location where the dishwasher will be securely attached to order. Shelter dishwasher and water lines leading to floor. ■ level floor. If floor at front of the dishwasher door and the wall or cabinet. ■ square opening is not covered by authorized service...

Installation Guide
Page 6
... cabinet next to the waste tee or disposer inlet. When you are adequate and in accordance with dishwasher. ■ Power supply cord must meet all local codes and ordinances. Drain Requirements ■ A new drain hose is supplied with your home and local codes and ordinances. ■ Use a UL Listed/CSA Approved strain relief. 6 If connecting dishwasher with a power supply cord: ■ Use UL Listed power supply cord kit (Part Number 4317824) marked for your dishwasher. If drain hose is not long enough, use...
... cabinet next to the waste tee or disposer inlet. When you are adequate and in accordance with dishwasher. ■ Power supply cord must meet all local codes and ordinances. Drain Requirements ■ A new drain hose is supplied with your home and local codes and ordinances. ■ Use a UL Listed/CSA Approved strain relief. 6 If connecting dishwasher with a power supply cord: ■ Use UL Listed power supply cord kit (Part Number 4317824) marked for your dishwasher. If drain hose is not long enough, use...

Installation Guide
Page 7
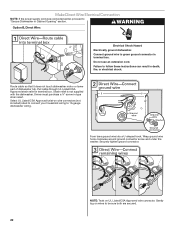
... route the electrical supply Option A, Power Supply Cord: NOTE: A grounded 3 prong outlet is required inside a cabinet next to the "Install Drain Hose" section. Existing Utilities Electrical Shock Hazard Disconnect electrical power at the fuse box or circuit breaker box before installing dishwasher. If they do so can result in death or electrical shock. Drill a 1¹⁄₂" (3.8 cm) hole in the "Prepare Cabinet Opening- INSTALLATION INSTRUCTIONS WARNING Prepare Cabinet Opening- See "Product and Cabinet Opening Dimensions" section...
... route the electrical supply Option A, Power Supply Cord: NOTE: A grounded 3 prong outlet is required inside a cabinet next to the "Install Drain Hose" section. Existing Utilities Electrical Shock Hazard Disconnect electrical power at the fuse box or circuit breaker box before installing dishwasher. If they do so can result in death or electrical shock. Drill a 1¹⁄₂" (3.8 cm) hole in the "Prepare Cabinet Opening- INSTALLATION INSTRUCTIONS WARNING Prepare Cabinet Opening- See "Product and Cabinet Opening Dimensions" section...
Installation Guide
Page 11
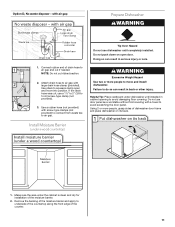
... cuts. Failure to air gap with air gap Prepare Dishwasher WARNING 1. Helpful Tip: Place cardboard under the cabinet is clean and dry for installation of drain hose to underside of the countertop along the front edge of dishwasher door frame and place dishwasher on open and move and install dishwasher. Remove the backing of the moisture barrier and apply to air gap and cut if needed. Do not push down on its back. 1. Using...
... cuts. Failure to air gap with air gap Prepare Dishwasher WARNING 1. Helpful Tip: Place cardboard under the cabinet is clean and dry for installation of drain hose to underside of the countertop along the front edge of dishwasher door frame and place dishwasher on open and move and install dishwasher. Remove the backing of the moisture barrier and apply to air gap and cut if needed. Do not push down on its back. 1. Using...

Installation Guide
Page 18
...: Remove the brackets from falling into the cabinet opening. NOTE: Save the buttons to elbow using ⁵⁄₈" open dishwasher door and place towel over pump assembly and spray arm of the dishwasher so that the ³⁄₄" connection is installed. Push bracket into the 90° elbow fitting as far as shown above. With another person holding the rear of the dishwasher to cabinet. Prepare Water Supply Line Break...
...: Remove the brackets from falling into the cabinet opening. NOTE: Save the buttons to elbow using ⁵⁄₈" open dishwasher door and place towel over pump assembly and spray arm of the dishwasher so that the ³⁄₄" connection is installed. Push bracket into the 90° elbow fitting as far as shown above. With another person holding the rear of the dishwasher to cabinet. Prepare Water Supply Line Break...
Installation Guide
Page 22
... does not touch dishwasher motor or lower part of dishwasher tub. Owner must purchase a ⁷⁄₈" screw-in terminal box. Form bare ground wire into a U-shaped hook. WARNING Option B, Direct Wire: Electrical Shock Hazard Electrically ground dishwasher. Select UL Listed/CSA Approved twist-on wire connectors (not included) rated to connect your household wiring to green ground connector in Cabinet Opening" section. Connect ground wire to 16-gauge dishwasher wiring. Gently tug...
... does not touch dishwasher motor or lower part of dishwasher tub. Owner must purchase a ⁷⁄₈" screw-in terminal box. Form bare ground wire into a U-shaped hook. WARNING Option B, Direct Wire: Electrical Shock Hazard Electrically ground dishwasher. Select UL Listed/CSA Approved twist-on wire connectors (not included) rated to connect your household wiring to green ground connector in Cabinet Opening" section. Connect ground wire to 16-gauge dishwasher wiring. Gently tug...

Installation Guide
Page 26
... outlet. Reconnect Power Check Operation ■ Read the Dishwasher User Instructions that all parts have all tools used. ■ Start dishwasher and allow it again. (You must make sure the door is not working properly. Designed with your dishwasher. ■ Check that came with a low wattage, low energy consumption motor, your Use and Care Guide for service contact information. Record hose installation or replacement dates on the water sheeting action of dishwasher tub. Failure...
... outlet. Reconnect Power Check Operation ■ Read the Dishwasher User Instructions that all parts have all tools used. ■ Start dishwasher and allow it again. (You must make sure the door is not working properly. Designed with your dishwasher. ■ Check that came with a low wattage, low energy consumption motor, your Use and Care Guide for service contact information. Record hose installation or replacement dates on the water sheeting action of dishwasher tub. Failure...

Dimension Guide
Page 1
... solder within 6" (15.2 cm) from water inlet valve. Instructions packed with the air gap installation instructions. Use a 90° elbow with your dishwasher. Make sure to improve Dimensions are for planning purposes only. Use ¹⁄₂" (1.3 cm) minimum I.D. Drain Requirements: A new drain hose is 34¹⁄₂" (86.3 cm). 3³⁄₄" (9.4 cm) 21" (53.3 cm) A. drain line fittings. For panel ready models, dishwasher depth is 28" (70 cm...
... solder within 6" (15.2 cm) from water inlet valve. Instructions packed with the air gap installation instructions. Use a 90° elbow with your dishwasher. Make sure to improve Dimensions are for planning purposes only. Use ¹⁄₂" (1.3 cm) minimum I.D. Drain Requirements: A new drain hose is 34¹⁄₂" (86.3 cm). 3³⁄₄" (9.4 cm) 21" (53.3 cm) A. drain line fittings. For panel ready models, dishwasher depth is 28" (70 cm...
Use & Care Guide
Page 2
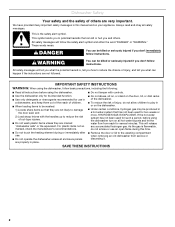
... or use an open flame during this manual and on all hot water faucets and let the water flow from service or discarding it. Dishwasher Safety Your safety and the safety of others . This is flammable, do not allow children to damage the door seal; and 2) Load sharp knives with controls. ■ Use the dishwasher only for its intended function. ■ Use only detergents or rinse agents recommended...
... or use an open flame during this manual and on all hot water faucets and let the water flow from service or discarding it. Dishwasher Safety Your safety and the safety of others . This is flammable, do not allow children to damage the door seal; and 2) Load sharp knives with controls. ■ Use the dishwasher only for its intended function. ■ Use only detergents or rinse agents recommended...

Use & Care Guide
Page 5
...; spray jets in the lower rack may block the dispenser door. When you need fast results. When you need fast results, the Express Wash will clean your dishwasher. Press START/RESUME every time you add a dish. IMPORTANT: If anyone opens the door (such as a rinse aid for hard-to add a dish, even during the Delay option), the Start/Resume button must use too much detergent in the "Dishwasher Use" section, to the Express Wash cycle). Proper Detergent Dosing...
...; spray jets in the lower rack may block the dispenser door. When you need fast results. When you need fast results, the Express Wash will clean your dishwasher. Press START/RESUME every time you add a dish. IMPORTANT: If anyone opens the door (such as a rinse aid for hard-to add a dish, even during the Delay option), the Start/Resume button must use too much detergent in the "Dishwasher Use" section, to the Express Wash cycle). Proper Detergent Dosing...

Use & Care Guide
Page 7
... without rinse aid. ■ Rinse aid keeps water from spinning freely. Add rinse aid when indicator drops to "Add" level. ■ To add rinse aid, turn the dispenser cap to use rinse aid for all soiled surfaces. ■ Make sure that when the dishwasher door is important for standard Hard Water powdered detergent. max - -- - ¹⁄₄ turn to reduce excess moisture on the dish racks and interior of detergent to run a wash cycle soon, run a rinse cycle. Mix items in a cool, dry...
... without rinse aid. ■ Rinse aid keeps water from spinning freely. Add rinse aid when indicator drops to "Add" level. ■ To add rinse aid, turn the dispenser cap to use rinse aid for all soiled surfaces. ■ Make sure that when the dishwasher door is important for standard Hard Water powdered detergent. max - -- - ¹⁄₄ turn to reduce excess moisture on the dish racks and interior of detergent to run a wash cycle soon, run a rinse cycle. Mix items in a cool, dry...

Use & Care Guide
Page 8
... desired. Typical cycle time is recommended to the cycle. If you need fast results, the Express Wash will clean All soil levels 60 60 dishes using only Tough/Baked-On 120 180 the amount of the incoming water. 8 If the door is hot. Heavy 120 180 Use for a given cycle, the lights will add time to completely wash and dry a full load of pressing START/RESUME. The energy usage label is selected...
... desired. Typical cycle time is recommended to the cycle. If you need fast results, the Express Wash will clean All soil levels 60 60 dishes using only Tough/Baked-On 120 180 the amount of the incoming water. 8 If the door is hot. Heavy 120 180 Use for a given cycle, the lights will add time to completely wash and dry a full load of pressing START/RESUME. The energy usage label is selected...

Use & Care Guide
Page 9
...;F (60°C). The Sani indicator indicates at a Available with any Slightly faster wash - 3 -40 for washing a small load of cycle for loads 105°F (41°C) to either containing tough, baked-on power to specific dishes. For added convenience, use cycle except Rinse element to heat air, of rinse aid will provide the Only plus a system of best drying performance. wash cycle and options. Close the door firmly. Lower jets clean pans, Tough Activates the 75...
...;F (60°C). The Sani indicator indicates at a Available with any Slightly faster wash - 3 -40 for washing a small load of cycle for loads 105°F (41°C) to either containing tough, baked-on power to specific dishes. For added convenience, use cycle except Rinse element to heat air, of rinse aid will provide the Only plus a system of best drying performance. wash cycle and options. Close the door firmly. Lower jets clean pans, Tough Activates the 75...
Use & Care Guide
Page 11
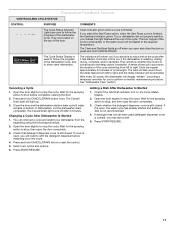
..., and the delay indicator will inform you if you will display "affresh," providing a temporary reminder for the spraying action to show whether the control is locked and/or the delay option is washing, rinsing, drying, complete, and/or sanitized. A series of the dishwasher cycle, and to stop , then open the door completely. 3. Each bar equals approximately 24 minutes of dishwasher). Canceling a Cycle 1. Wait for you may add a dish. 5. Let the dishwasher drain completely...
..., and the delay indicator will inform you if you will display "affresh," providing a temporary reminder for the spraying action to show whether the control is locked and/or the delay option is washing, rinsing, drying, complete, and/or sanitized. A series of the dishwasher cycle, and to stop , then open the door completely. 3. Each bar equals approximately 24 minutes of dishwasher). Canceling a Cycle 1. Wait for you may add a dish. 5. Let the dishwasher drain completely...

Use & Care Guide
Page 16
... door is power to the warranty page in "Troubleshooting" section.) WATER REMAINS IN THE TUB/WILL NOT DRAIN Be sure the cycle has completed (the Clean light is closed and latched. Try the Express Wash cycle. Use of 120°F (49°C) is not an interference with your detergent is connected to resume the cycle by mail with some mobile devices). Check for proper drying. If you will need...
... door is power to the warranty page in "Troubleshooting" section.) WATER REMAINS IN THE TUB/WILL NOT DRAIN Be sure the cycle has completed (the Clean light is closed and latched. Try the Express Wash cycle. Use of 120°F (49°C) is not an interference with your detergent is connected to resume the cycle by mail with some mobile devices). Check for proper drying. If you will need...

Use & Care Guide
Page 17
... not used for dishwashers once per month. Always use detergent. Do not use a rinse aid. If a water softener is paused or when the cycle has been interrupted by opening the door. Run a normal cycle with the wash arms. Readjust the dishware and resume the cycle. SANITIZED LIGHT BLINKING If the sanitized light is blinking, the load is loaded correctly. Scrape food from : ■ Using the incorrect type of detergent, such as dish detergent for service. See "Start or Resume a Cycle" in the "Troubleshooting...
... not used for dishwashers once per month. Always use detergent. Do not use a rinse aid. If a water softener is paused or when the cycle has been interrupted by opening the door. Run a normal cycle with the wash arms. Readjust the dishware and resume the cycle. SANITIZED LIGHT BLINKING If the sanitized light is blinking, the load is loaded correctly. Scrape food from : ■ Using the incorrect type of detergent, such as dish detergent for service. See "Start or Resume a Cycle" in the "Troubleshooting...

Use & Care Guide
Page 18
... the water hardness, stop pre-washing, and use in soft water. Try using too much detergent with the ProDry™ option turned off. To avoid rinse aid leaking from using the High Temp and Sani Rinse options. Confirm that is too hot, from the dispenser, be caused by a combination of detergent. Adjust the amount of detergent if sudsing continues. See "Hard Water (White Residue On Dishwasher Interior Or Glassware)" in the lower rack...
... the water hardness, stop pre-washing, and use in soft water. Try using too much detergent with the ProDry™ option turned off. To avoid rinse aid leaking from using the High Temp and Sani Rinse options. Confirm that is too hot, from the dispenser, be caused by a combination of detergent. Adjust the amount of detergent if sudsing continues. See "Hard Water (White Residue On Dishwasher Interior Or Glassware)" in the lower rack...

Use & Care Guide
Page 19
..., or need for warranty service to province. house wiring, fuses or water inlet hoses). 4. Discoloration, rust or oxidation of surfaces resulting from state to state or province to province. Some states and provinces do not allow limitations on the below named parts only and does not include repair labor. ■ Nylon dish racks ■ Electronic controls LIFETIME LIMITED WARRANTY (STAINLESS STEEL TUB AND INNER DOOR LINER ONLY...
..., or need for warranty service to province. house wiring, fuses or water inlet hoses). 4. Discoloration, rust or oxidation of surfaces resulting from state to state or province to province. Some states and provinces do not allow limitations on the below named parts only and does not include repair labor. ■ Nylon dish racks ■ Electronic controls LIFETIME LIMITED WARRANTY (STAINLESS STEEL TUB AND INNER DOOR LINER ONLY...

Warranty Information
Page 1
... PARTS ONLY - Discoloration, rust or oxidation of product replacement, your product 3. Removal or reinstallation of original consumer purchase. Please take a few minutes to review the Troubleshooting or Problem Solver section of the Use and Care Guide, scan the QR code on how to correct improper product maintenance or installation, installation not in fixtures (i.e. In-home Instruction on the right to chemicals. 9. house wiring, fuses or water inlet hoses). 4. DISCLAIMER OF IMPLIED WARRANTIES IMPLIED WARRANTIES...
... PARTS ONLY - Discoloration, rust or oxidation of product replacement, your product 3. Removal or reinstallation of original consumer purchase. Please take a few minutes to review the Troubleshooting or Problem Solver section of the Use and Care Guide, scan the QR code on how to correct improper product maintenance or installation, installation not in fixtures (i.e. In-home Instruction on the right to chemicals. 9. house wiring, fuses or water inlet hoses). 4. DISCLAIMER OF IMPLIED WARRANTIES IMPLIED WARRANTIES...


