
Warranty Information
Page 1
... IS REQUIRED TO OBTAIN WARRANTY SERVICE. All warranty service is a limited 5-year warranty on how to obtain service under these parts that prevent function of this major appliance and that comes with products not approved by KitchenAid. In Canada, call 1-800-422-1230. house wiring, fuses or water inlet hoses). LABOR NOT INCLUDED 5. appliance is installed, operated and maintained according to instructions attached to KitchenAid within 30 days...
... IS REQUIRED TO OBTAIN WARRANTY SERVICE. All warranty service is a limited 5-year warranty on how to obtain service under these parts that prevent function of this major appliance and that comes with products not approved by KitchenAid. In Canada, call 1-800-422-1230. house wiring, fuses or water inlet hoses). LABOR NOT INCLUDED 5. appliance is installed, operated and maintained according to instructions attached to KitchenAid within 30 days...

Use & Care Guide
Page 2
... IS EXPLOSIVE. SAVE THESE INSTRUCTIONS 2 Always read and obey all instructions before using the dishwasher turn on the door, lid, or dish racks of the dishwasher. ■ To reduce the risk of injury, do not smoke or use an open flame during or immediately after use. ■ Do not operate the dishwasher unless all hot water faucets and let the water flow from service or discarding it. For...
... IS EXPLOSIVE. SAVE THESE INSTRUCTIONS 2 Always read and obey all instructions before using the dishwasher turn on the door, lid, or dish racks of the dishwasher. ■ To reduce the risk of injury, do not smoke or use an open flame during or immediately after use. ■ Do not operate the dishwasher unless all hot water faucets and let the water flow from service or discarding it. For...

Use & Care Guide
Page 4
... rack/3rd level rack (on some models) Cup shelves with stemware holder Rack handle Silverware basket Sliding bowl tines (on some models) 4 BOTTOM RACK Culinary Caddy ® utensil basket (on some models) Lower spray arm Overfill protection float EQ Filtration System removes soil from water and improves cleaning action. Detergent dispenser Active vents (on some models) Pressurized spray nozzles and variable speed motor provide effective cleaning. Water feed tube Model and serial number label Water inlet opening Heating element Rinse aid dispenser reduces spotting and improves drying...
... rack/3rd level rack (on some models) Cup shelves with stemware holder Rack handle Silverware basket Sliding bowl tines (on some models) 4 BOTTOM RACK Culinary Caddy ® utensil basket (on some models) Lower spray arm Overfill protection float EQ Filtration System removes soil from water and improves cleaning action. Detergent dispenser Active vents (on some models) Pressurized spray nozzles and variable speed motor provide effective cleaning. Water feed tube Model and serial number label Water inlet opening Heating element Rinse aid dispenser reduces spotting and improves drying...

Use & Care Guide
Page 5
... lower dish rack for optimal cleaning using slightly more water and energy. When you need fast results, the Express Wash will not start. ProWash™ cycle for adding a dish, even during the Delay Hours option), the Start/Resume button must use too much detergent in the lower rack may block the dispenser door. ProWash™ cycle senses the load size, soil amount, and toughness of detergent needed . just scrape and load. The upper rack has two spray zones in the "Dishwasher Use...
... lower dish rack for optimal cleaning using slightly more water and energy. When you need fast results, the Express Wash will not start. ProWash™ cycle for adding a dish, even during the Delay Hours option), the Start/Resume button must use too much detergent in the lower rack may block the dispenser door. ProWash™ cycle senses the load size, soil amount, and toughness of detergent needed . just scrape and load. The upper rack has two spray zones in the "Dishwasher Use...

Use & Care Guide
Page 7
... noises during operation, load dishes so they do not plan to run a wash cycle soon, run a rinse cycle. Do not use rinse aid for all soiled surfaces. ■ Make sure that when the dishwasher door is designed to use detergent. ■ Use automatic dishwasher detergent only. If you do not touch one another. Add Rinse Aid ■ Your dishwasher is closed detergent B container in a cool, dry place. Add rinse aid when indicator drops to "Add" level. ■ To add rinse aid, turn the dispenser cap...
... noises during operation, load dishes so they do not plan to run a wash cycle soon, run a rinse cycle. Do not use rinse aid for all soiled surfaces. ■ Make sure that when the dishwasher door is designed to use detergent. ■ Use automatic dishwasher detergent only. If you do not touch one another. Add Rinse Aid ■ Your dishwasher is closed detergent B container in a cool, dry place. Add rinse aid when indicator drops to "Add" level. ■ To add rinse aid, turn the dispenser cap...
Use & Care Guide
Page 8
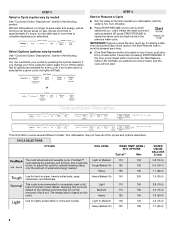
... lightly soiled items or china and crystal. CYCLE SELECTIONS CYCLES SOIL LEVEL WASH TIME* (MINS.) W/O OPTIONS Typical** Max The most advanced and versatile cycle. This cycle is not closed within 3 seconds, the Start/Resume button LED will flash, an audible tone will be pressed each time. ■ If the Start/Resume button is located on gas. The energy label is hot. Not all of water and energy needed. Turn off water. ■ Press START...
... lightly soiled items or china and crystal. CYCLE SELECTIONS CYCLES SOIL LEVEL WASH TIME* (MINS.) W/O OPTIONS Typical** Max The most advanced and versatile cycle. This cycle is not closed within 3 seconds, the Start/Resume button LED will flash, an audible tone will be pressed each time. ■ If the Start/Resume button is located on gas. The energy label is hot. Not all of water and energy needed. Turn off water. ■ Press START...
Use & Care Guide
Page 9
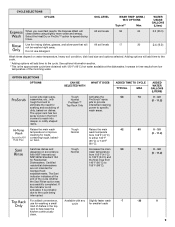
... water. to residential dishwashers 155°F (68°C). CYCLE SELECTIONS CYCLES SOIL LEVEL WASH TIME* (MINS.) W/O OPTIONS Typical** Max WATER USAGE GALLONS (Liters) When you need for soaking and scrubbing of Top Rack Only intensified cleaning power to specific dirty, baked-on water temperature, heavy soil condition, dish load size and options selected. OPTION SELECTIONS OPTIONS CAN BE SELECTED WITH WHAT IT DOES ADDED TIME TO CYCLE TYPICAL MAX Lower jets clean...
... water. to residential dishwashers 155°F (68°C). CYCLE SELECTIONS CYCLES SOIL LEVEL WASH TIME* (MINS.) W/O OPTIONS Typical** Max WATER USAGE GALLONS (Liters) When you need for soaking and scrubbing of Top Rack Only intensified cleaning power to specific dirty, baked-on water temperature, heavy soil condition, dish load size and options selected. OPTION SELECTIONS OPTIONS CAN BE SELECTED WITH WHAT IT DOES ADDED TIME TO CYCLE TYPICAL MAX Lower jets clean...
Use & Care Guide
Page 10
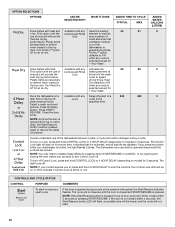
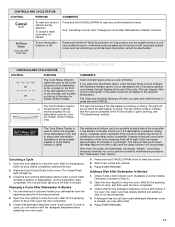
... DELAY (depending on model) for 3 seconds. Runs the dishwasher at rinse aid will be on or off - cycle cycle to ON the top rack. If you are less likely drying times. This option with the cycle except Rinse element to add a dish), the Start/Resume button must be opened/closed and START/RESUME is selected except for a short time, indicating that performance. Press the Delay button. The Control Lock light will not start. 10 or NOTE: You may need...
... DELAY (depending on model) for 3 seconds. Runs the dishwasher at rinse aid will be on or off - cycle cycle to ON the top rack. If you are less likely drying times. This option with the cycle except Rinse element to add a dish), the Start/Resume button must be opened/closed and START/RESUME is selected except for a short time, indicating that performance. Press the Delay button. The Control Lock light will not start. 10 or NOTE: You may need...
Use & Care Guide
Page 11
... whether the detergent dispenser cover is washing, rinsing, drying, complete, and/or sanitized. It will be white to Step 2.) 2. If detergent has not yet been used to follow the or progress of Cycle Status Indicator Lights) The indicators will show other information. (Available on or off . To cancel a wash cycle after 2 minutes. Only audible tones for hidden control models. If you open the door completely. 3. The Clean and Sanitized lights go off...
... whether the detergent dispenser cover is washing, rinsing, drying, complete, and/or sanitized. It will be white to Step 2.) 2. If detergent has not yet been used to follow the or progress of Cycle Status Indicator Lights) The indicators will show other information. (Available on or off . To cancel a wash cycle after 2 minutes. Only audible tones for hidden control models. If you open the door completely. 3. The Clean and Sanitized lights go off...
Use & Care Guide
Page 15
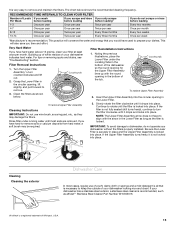
... remove. 3. Cleaning Cleaning the exterior Dishwasher Care In most soils are removed. Filter Removal Instructions 1. PUSH DOWN & TURN K UNLOCK To remove Upper Filter Assembly Cleaning Instructions IMPORTANT: Do not use of a soft, damp cloth or sponge and a mild detergent is all that you would have to turn counterclockwise and lift out. 2. Noting the previous illustrations, place the Lower Filter under running water until it drops and locks into the circular opening in the Lower Filter. 3. Turn the Upper Filter Assembly ¼ turn...
... remove. 3. Cleaning Cleaning the exterior Dishwasher Care In most soils are removed. Filter Removal Instructions 1. PUSH DOWN & TURN K UNLOCK To remove Upper Filter Assembly Cleaning Instructions IMPORTANT: Do not use of a soft, damp cloth or sponge and a mild detergent is all that you would have to turn counterclockwise and lift out. 2. Noting the previous illustrations, place the Lower Filter under running water until it drops and locks into the circular opening in the Lower Filter. 3. Turn the Upper Filter Assembly ¼ turn...

Use & Care Guide
Page 16
... water solution)" in the supply lines can cause a white film to use a premeasured detergent tablet or pack for regular daily use. Do not use of a monthly maintenance product such as affresh® Stainless Steel Cleaner Part Number W10355016. Ice formations in "Troubleshooting" section. If your dishwasher does not cover service costs directly associated with dishwasher detergent after cleaning the interior. NOTE: Run a normal cycle with the cleaning or repair of the external drain air gap. The warranty provided with your dishwasher...
... water solution)" in the supply lines can cause a white film to use a premeasured detergent tablet or pack for regular daily use. Do not use of a monthly maintenance product such as affresh® Stainless Steel Cleaner Part Number W10355016. Ice formations in "Troubleshooting" section. If your dishwasher does not cover service costs directly associated with dishwasher detergent after cleaning the interior. NOTE: Run a normal cycle with the cleaning or repair of the external drain air gap. The warranty provided with your dishwasher...

Use & Care Guide
Page 17
....kitchenaid.ca (website may not fill with the ProDry™ or Heat Dry option is needed for kinks in "Troubleshooting" section.) WATER REMAINS IN THE TUB/WILL NOT DRAIN Be sure the cycle has completed (the Clean light is closed and latched. If it has not, you will encounter cycles that may spill onto other than Start/Resume blink and the unit will not run for service...
....kitchenaid.ca (website may not fill with the ProDry™ or Heat Dry option is needed for kinks in "Troubleshooting" section.) WATER REMAINS IN THE TUB/WILL NOT DRAIN Be sure the cycle has completed (the Clean light is closed and latched. If it has not, you will encounter cycles that may spill onto other than Start/Resume blink and the unit will not run for service...

Use & Care Guide
Page 18
... sanitized light is blinking, the load is needed . (See "Cleaning Instructions" in a row with the wash arms. Readjust the dishware and resume the cycle. When this case, the Clean/ Complete LED will lock out and not allow another cycle to run a rinse cycle with the partial load until a full load is not installed, the following steps may not fill with the Heat Dry option turned off. ODORS NOTE: If the dishwasher is not used...
... sanitized light is blinking, the load is needed . (See "Cleaning Instructions" in a row with the wash arms. Readjust the dishware and resume the cycle. When this case, the Clean/ Complete LED will lock out and not allow another cycle to run a rinse cycle with the partial load until a full load is not installed, the following steps may not fill with the Heat Dry option turned off. ODORS NOTE: If the dishwasher is not used...

Use & Care Guide
Page 20
... multiple-family use, or use with published user, operator or installation instructions. Service to correct improper product maintenance or repair labor to correct defects in materials and workmanship and is installed, operated and maintained according to instructions attached to determine whether another warranty applies. remaining term of Whirlpool Corporation or Whirlpool Canada, LP 2. Consumable parts (i.e. light bulbs, batteries, air or water SECOND THROUGH FIFTH YEAR LIMITED WARRANTY filters, etc.). (CERTAIN...
... multiple-family use, or use with published user, operator or installation instructions. Service to correct improper product maintenance or repair labor to correct defects in materials and workmanship and is installed, operated and maintained according to instructions attached to determine whether another warranty applies. remaining term of Whirlpool Corporation or Whirlpool Canada, LP 2. Consumable parts (i.e. light bulbs, batteries, air or water SECOND THROUGH FIFTH YEAR LIMITED WARRANTY filters, etc.). (CERTAIN...

Dimension Guide
Page 1
...;₄" N.P.T. Water Supply Requirements: A hot water line with 20 to 120 psi (138 to house plumbing lower than 20" (50.8 cm) above the floor. A time-delay fuse or circuit breaker and separate circuit is 24" (60 cm) not including the ³⁄₄" (1.9 cm) custom door panel. Make sure to use a new drain hose with a maximum length of 12 ft (3.7 m) (Part Number 3385556) that the drain hose either be air gap looped...
...;₄" N.P.T. Water Supply Requirements: A hot water line with 20 to 120 psi (138 to house plumbing lower than 20" (50.8 cm) above the floor. A time-delay fuse or circuit breaker and separate circuit is 24" (60 cm) not including the ³⁄₄" (1.9 cm) custom door panel. Make sure to use a new drain hose with a maximum length of 12 ft (3.7 m) (Part Number 3385556) that the drain hose either be air gap looped...

Installation Guide
Page 2
...Do not use dishwasher until latched. You Need to potential hazards that the dishwasher is , tell you to : ■ Slowly open door. Existing Utilities 7 Prepare Cabinet Opening-New Utilities 7 Prepare and Route Water Line 8 Install Drain Hose 9 Install Optional Moisture Barrier 11 Prepare Dishwasher 12 Make Power Cord Connection 13 Determine Cabinet Opening 14 Install Door Handle 15 Custom Panel Installation 16 Choose Attachment Option 16 Prepare Water Supply Line 17 Move Dishwasher Close to Cabinet Opening 17 Connect to Water Supply 19 Connect to Drain 19 Make Direct Wire...
...Do not use dishwasher until latched. You Need to potential hazards that the dishwasher is , tell you to : ■ Slowly open door. Existing Utilities 7 Prepare Cabinet Opening-New Utilities 7 Prepare and Route Water Line 8 Install Drain Hose 9 Install Optional Moisture Barrier 11 Prepare Dishwasher 12 Make Power Cord Connection 13 Determine Cabinet Opening 14 Install Door Handle 15 Custom Panel Installation 16 Choose Attachment Option 16 Prepare Water Supply Line 17 Move Dishwasher Close to Cabinet Opening 17 Connect to Water Supply 19 Connect to Drain 19 Make Direct Wire...

Installation Guide
Page 4
... dishwasher and water lines leading to dishwasher against freezing. The location must provide clearance between the side of the guide for installing underneath a wooden countertop. Motor should not touch the floor. ■ Do not install dishwasher over carpeted flooring. ■ Grounded electrical supply required. ■ Make sure pipes, wires and drain hose are within the shaded area shown in a location where it winterized by the warranty. A side panel kit...
... dishwasher and water lines leading to dishwasher against freezing. The location must provide clearance between the side of the guide for installing underneath a wooden countertop. Motor should not touch the floor. ■ Do not install dishwasher over carpeted flooring. ■ Grounded electrical supply required. ■ Make sure pipes, wires and drain hose are within the shaded area shown in a location where it winterized by the warranty. A side panel kit...

Installation Guide
Page 6
...: ■ A time-delay fuse or circuit breaker. ■ A separate circuit. copper tubing with rubber washer. Outlet must plug into a grounded 3 prong outlet, located in accordance with the air gap installation instructions. If Connecting Dishwasher With Direct Wiring: ■ Use flexible, armored or nonmetallic sheathed, copper wire with grounding wire that meets the wiring requirements for your dishwasher. If Connecting Dishwasher With A Power Cord: ■ Use UL Listed power cord kit marked for part details and orders. ■ Power cord must meet...
...: ■ A time-delay fuse or circuit breaker. ■ A separate circuit. copper tubing with rubber washer. Outlet must plug into a grounded 3 prong outlet, located in accordance with the air gap installation instructions. If Connecting Dishwasher With Direct Wiring: ■ Use flexible, armored or nonmetallic sheathed, copper wire with grounding wire that meets the wiring requirements for your dishwasher. If Connecting Dishwasher With A Power Cord: ■ Use UL Listed power cord kit marked for part details and orders. ■ Power cord must meet...

Installation Guide
Page 16
Complete custom panel installation before proceeding to the Custom Panel Installation Instruction Sheet (Part Number W10750117A). Option A, Countertop Attachment Break off the end of the tub. Using 2 or more people to move and install dishwasher. With another person holding the rear of the dishwasher to secure the bracket in back or other side. Remove the brackets from falling into the open dishwasher door and place towel over pump assembly and spray arm of pliers, bend the...
Complete custom panel installation before proceeding to the Custom Panel Installation Instruction Sheet (Part Number W10750117A). Option A, Countertop Attachment Break off the end of the tub. Using 2 or more people to move and install dishwasher. With another person holding the rear of the dishwasher to secure the bracket in back or other side. Remove the brackets from falling into the open dishwasher door and place towel over pump assembly and spray arm of pliers, bend the...

Installation Guide
Page 24
... sure the door is working properly, disconnect power or unplug dishwasher and See the "If Dishwasher Does Not Operate" section. Additional Tips Expect longer wash times. Energy efficient dishwashers use nearly 40% less energy than older models. Failure to 3 hours per load, but use less water and energy, so they depend on ? Check Operation ■ Read the Dishwasher User Guide that came with rinse aid for service contact information. If none of a cycle.) Plug into a grounded...
... sure the door is working properly, disconnect power or unplug dishwasher and See the "If Dishwasher Does Not Operate" section. Additional Tips Expect longer wash times. Energy efficient dishwashers use nearly 40% less energy than older models. Failure to 3 hours per load, but use less water and energy, so they depend on ? Check Operation ■ Read the Dishwasher User Guide that came with rinse aid for service contact information. If none of a cycle.) Plug into a grounded...


