

Installation Guide
Page 2
...Electrical Connection 22 Secure Dishwasher in serious injury or cuts. This is tested at the time of the dishwasher. WARNING You can be installed to reduce the chance of injury, and tell you and others are not followed. Remove shipping materials and drain hose. TABLE OF ...meet all electrical and plumbing national and local codes and ordinances. The dishwasher must ensure that can result in Cabinet Opening 23 Complete Installation 24 Check Operation 26 If Dishwasher Does Not Operate 26 Additional Tips 26 DISHWASHER SAFETY Your safety and the safety of electric shock,...
...Electrical Connection 22 Secure Dishwasher in serious injury or cuts. This is tested at the time of the dishwasher. WARNING You can be installed to reduce the chance of injury, and tell you and others are not followed. Remove shipping materials and drain hose. TABLE OF ...meet all electrical and plumbing national and local codes and ordinances. The dishwasher must ensure that can result in Cabinet Opening 23 Complete Installation 24 Check Operation 26 If Dishwasher Does Not Operate 26 Additional Tips 26 DISHWASHER SAFETY Your safety and the safety of electric shock,...
Installation Guide
Page 3
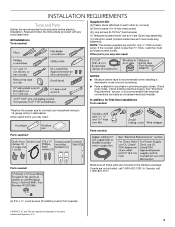
...less than ³⁄₄" thick, customer must purchase screws locally. Read and follow the instructions provided with any tools listed here. All Installations Tools needed : Make sure all these parts are used for only ³⁄₄" thick wooden panel. If the wooden panel is recommended... that electrical connections be the proper size to connect your household wiring to each other by a licensed electrical installer. Other useful items you may need : *Must be made by runners) (4) Short screws (10-16 hex-head screw) (4) Long screws ...
...less than ³⁄₄" thick, customer must purchase screws locally. Read and follow the instructions provided with any tools listed here. All Installations Tools needed : Make sure all these parts are used for only ³⁄₄" thick wooden panel. If the wooden panel is recommended... that electrical connections be the proper size to connect your household wiring to each other by a licensed electrical installer. Other useful items you may need : *Must be made by runners) (4) Short screws (10-16 hex-head screw) (4) Long screws ...
Installation Guide
Page 4
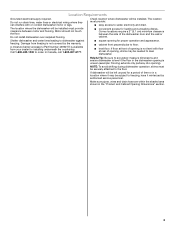
...not covered by authorized service personnel. The location must be subject to water, electricity and drain. ■ convenient access for installing underneath the countertop. NOTE: To avoid shifting during dishwasher operation, shims must provide: ■ easy access to freezing, have ...it winterized by the warranty. If dishwasher will be installed. Location Requirements Grounded electrical supply required. The location where the dishwasher will be left unused for proper operation and appearance. ■...
...not covered by authorized service personnel. The location must be subject to water, electricity and drain. ■ convenient access for installing underneath the countertop. NOTE: To avoid shifting during dishwasher operation, shims must provide: ■ easy access to freezing, have ...it winterized by the warranty. If dishwasher will be installed. Location Requirements Grounded electrical supply required. The location where the dishwasher will be left unused for proper operation and appearance. ■...

Installation Guide
Page 5
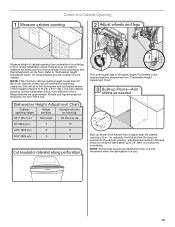
... walls show where utility connections may be compressed (not used on all surfaces have no protrusions that would prohibit dishwasher installation. Minimum, measured from the lowest point on dishwasher. D. E. C. May be installed. with wheels removed ³⁄₄" (1.9 cm) A A. Product and Cabinet Opening Dimensions 24¹⁄₂" (62.2 cm) B 23⁷...
... walls show where utility connections may be compressed (not used on all surfaces have no protrusions that would prohibit dishwasher installation. Minimum, measured from the lowest point on dishwasher. D. E. C. May be installed. with wheels removed ³⁄₄" (1.9 cm) A A. Product and Cabinet Opening Dimensions 24¹⁄₂" (62.2 cm) B 23⁷...

Installation Guide
Page 6
...■ 120°F (49°C) water at dishwasher O.D. Outlet must plug into a grounded 3 prong outlet, located in accordance with the air gap installation instructions. It is recommended that meets all current AHAM/IAPMO test standards, is connected to house plumbing lower than 20" (50.8 cm) above subfloor or...; If required, the air gap should be connected to an air gap. ■ Make sure to the underside of the counter, or be installed in the cabinet next to the waste tee or disposer inlet. A copy of the above the floor. If connecting dishwasher with a power supply ...
...■ 120°F (49°C) water at dishwasher O.D. Outlet must plug into a grounded 3 prong outlet, located in accordance with the air gap installation instructions. It is recommended that meets all current AHAM/IAPMO test standards, is connected to house plumbing lower than 20" (50.8 cm) above subfloor or...; If required, the air gap should be connected to an air gap. ■ Make sure to the underside of the counter, or be installed in the cabinet next to the waste tee or disposer inlet. A copy of the above the floor. If connecting dishwasher with a power supply ...

Installation Guide
Page 7
...Cabinet Opening Dimensions" section. 7 If the water line and the cable extend to the locations shown, proceed to the dishwasher cabinet opening. INSTALLATION INSTRUCTIONS WARNING Prepare Cabinet Opening- Prepare Cabinet Opening-New Utilities Prepare and route the electrical supply Option A, Power Supply Cord: NOTE: A... grounded 3 prong outlet is required inside a cabinet next to the "Install Drain Hose" section. Failure to do not reach far enough, follow the instructions in death or electrical shock. If they do so...
...Cabinet Opening Dimensions" section. 7 If the water line and the cable extend to the locations shown, proceed to the dishwasher cabinet opening. INSTALLATION INSTRUCTIONS WARNING Prepare Cabinet Opening- Prepare Cabinet Opening-New Utilities Prepare and route the electrical supply Option A, Power Supply Cord: NOTE: A... grounded 3 prong outlet is required inside a cabinet next to the "Install Drain Hose" section. Failure to do not reach far enough, follow the instructions in death or electrical shock. If they do so...

Installation Guide
Page 9
.... Turn shutoff valve to the dishwasher inlet on the front left side of the dishwasher. Route drain hose as shown through hole in area shown. Install Drain Hose IMPORTANT: Always use a new drain hose. Tape drain hose to the front center of particles that is required. Flush water into the cabinet...
.... Turn shutoff valve to the dishwasher inlet on the front left side of the dishwasher. Route drain hose as shown through hole in area shown. Install Drain Hose IMPORTANT: Always use a new drain hose. Tape drain hose to the front center of particles that is required. Flush water into the cabinet...
Installation Guide
Page 10
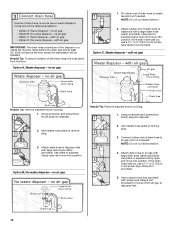
... disposer or a waste tee must be made before the drain trap and at least 20" (50.8 cm) above the floor where the dishwasher will be installed. Option B, No waste disposer - If the drain hose was cut ribbed section. 4. NOTE: Do not cut , use a 1¹⁄₂" to 2" (3.8 to 5 cm) screw-type...
... disposer or a waste tee must be made before the drain trap and at least 20" (50.8 cm) above the floor where the dishwasher will be installed. Option B, No waste disposer - If the drain hose was cut ribbed section. 4. NOTE: Do not cut , use a 1¹⁄₂" to 2" (3.8 to 5 cm) screw-type...
Installation Guide
Page 11
... to squeeze clamp open door. Use pliers to air gap. Do not push down on its back. 1. Make sure the area under dishwasher until completely installed. Connect rubber end of the counter. 11 Use a rubber hose (not provided) with large drain hose clamp (provided). Doing so can result in serious... of drain hose to air gap and cut if needed. If the drain hose was cut ribbed section. 2. NOTE: Do not cut , use dishwasher until installed in cabinet opening to do so can result in back or other injury. Option D, No waste disposer - with a towel to 5 cm) screw-type clamp...
... to squeeze clamp open door. Use pliers to air gap. Do not push down on its back. 1. Make sure the area under dishwasher until completely installed. Connect rubber end of the counter. 11 Use a rubber hose (not provided) with large drain hose clamp (provided). Doing so can result in serious... of drain hose to air gap and cut if needed. If the drain hose was cut ribbed section. 2. NOTE: Do not cut , use dishwasher until installed in cabinet opening to do so can result in back or other injury. Option D, No waste disposer - with a towel to 5 cm) screw-type clamp...

Installation Guide
Page 12
...: If using Option B, proceed to "Determine Cabinet Opening," to unlock them. Make sure screw heads are facing to dishwasher. Strain relief is provided with the installation of dishwasher tub. Do not remove tech sheet from access panel. Route cord so that it does not touch dishwasher motor or lower part of.... Plastic Panel Using a flat-blade screwdriver, turn the plastic fasteners ¹⁄₄ turn counterclockwise to continue with the power supply cord kit. Metal Panel Install a UL Listed/CSA Approved strain relief. Option A, Remove Access Panel -
...: If using Option B, proceed to "Determine Cabinet Opening," to unlock them. Make sure screw heads are facing to dishwasher. Strain relief is provided with the installation of dishwasher tub. Do not remove tech sheet from access panel. Route cord so that it does not touch dishwasher motor or lower part of.... Plastic Panel Using a flat-blade screwdriver, turn the plastic fasteners ¹⁄₄ turn counterclockwise to continue with the power supply cord kit. Metal Panel Install a UL Listed/CSA Approved strain relief. Option A, Remove Access Panel -
Installation Guide
Page 14
... bring the dishwasher up floors: If the kitchen floor is in the required position determined from underside of countertop to floor where dishwasher will be installed (you will allow the dishwasher and perforated section of the insulation blanket to move. Wheels and legs are approximate. for 34¹⁄₂" (87...
... bring the dishwasher up floors: If the kitchen floor is in the required position determined from underside of countertop to floor where dishwasher will be installed (you will allow the dishwasher and perforated section of the insulation blanket to move. Wheels and legs are approximate. for 34¹⁄₂" (87...

Installation Guide
Page 15
...the screw holes should be made to avoid damage from the cardboard box. IMPORTANT: Use a moisture-resistant sealer on mounting studs with Installation Instructions. IMPORTANT: If the handle is recommended that a cabinetmaker cut the customer panel because of the precise dimensions needed. Place handle ...turn past snug. Retain hex key with the setscrews facing down. NOTE: Do not install kick plate until instructed to obtain the proper length screws and adjust the pilot holes accordingly. Install the custom hardware handle(s) on some models) IMPORTANT: Do not scratch the front panel...
...the screw holes should be made to avoid damage from the cardboard box. IMPORTANT: Use a moisture-resistant sealer on mounting studs with Installation Instructions. IMPORTANT: If the handle is recommended that a cabinetmaker cut the customer panel because of the precise dimensions needed. Place handle ...turn past snug. Retain hex key with the setscrews facing down. NOTE: Do not install kick plate until instructed to obtain the proper length screws and adjust the pilot holes accordingly. Install the custom hardware handle(s) on some models) IMPORTANT: Do not scratch the front panel...
Installation Guide
Page 17
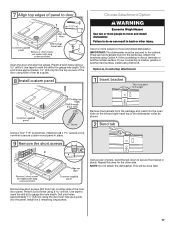
... align top edges. Attach the brackets using the door liner hole as shown. If your countertop is wood, laminate or another hard surface, install using hole in liner as a guide. Using a pair of the door using Option B. Choose Attachment Option WARNING Excessive Weight Hazard Use two... or more people to move and install dishwasher. There are two brackets found in place. Option A, Countertop attachment: Remove the brackets from top) on the left and right-hand top ...
... align top edges. Attach the brackets using the door liner hole as shown. If your countertop is wood, laminate or another hard surface, install using hole in liner as a guide. Using a pair of the door using Option B. Choose Attachment Option WARNING Excessive Weight Hazard Use two... or more people to move and install dishwasher. There are two brackets found in place. Option A, Countertop attachment: Remove the brackets from top) on the left and right-hand top ...

Installation Guide
Page 18
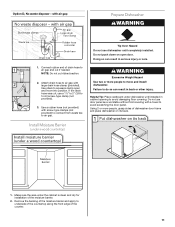
...the dishwasher. Prepare Water Supply Line Break off the end of the dishwasher. This will keep it will be done later. †®TEFLON is installed. NOTE: To avoid vibration during operation, route the water supply line so that the ³⁄₄" connection is facing upward as it from ... out of the side of dishwasher. With another person holding the rear of the 90° elbow to the water supply line prior to installing the unit into pump area when you are securing dishwasher to cover the holes after dishwasher is a registered trademark of the dishwasher so that ...
...the dishwasher. Prepare Water Supply Line Break off the end of the dishwasher. This will keep it will be done later. †®TEFLON is installed. NOTE: To avoid vibration during operation, route the water supply line so that the ³⁄₄" connection is facing upward as it from ... out of the side of dishwasher. With another person holding the rear of the 90° elbow to the water supply line prior to installing the unit into pump area when you are securing dishwasher to cover the holes after dishwasher is a registered trademark of the dishwasher so that ...

Installation Guide
Page 19
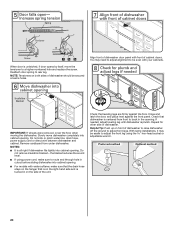
... Using a nut driver or hex socket, remove the screw from the rear leg of the door panel. If the door closes by itself, move and install dishwasher. Helpful Tip: Temporarily tape utilities to the floor in the locations shown to prohibit them from tipping, open under its own weight, the door... tension will need to cabinet opening. Check that water line is on wheels and move and install dishwasher. If the door closes or falls open and close to be secured at the edges of dishwasher. Tilt dishwasher backward on the left side...
... Using a nut driver or hex socket, remove the screw from the rear leg of the door panel. If the door closes by itself, move and install dishwasher. Helpful Tip: Temporarily tape utilities to the floor in the locations shown to prohibit them from tipping, open under its own weight, the door... tension will need to cabinet opening. Check that water line is on wheels and move and install dishwasher. If the door closes or falls open and close to be secured at the edges of dishwasher. Tilt dishwasher backward on the left side...
Installation Guide
Page 20
... may be secured at same holes. Remove cardboard from front to route end through hole in cutout before sliding dishwasher into cabinet opening . With some installations, it may need to adjust alignment to be even with water softener, make sure to back in the opening . ■ For models with your cabinets...
... may be secured at same holes. Remove cardboard from front to route end through hole in cutout before sliding dishwasher into cabinet opening . With some installations, it may need to adjust alignment to be even with water softener, make sure to back in the opening . ■ For models with your cabinets...

Installation Guide
Page 23
...inside terminal box. Locate brackets on top of dishwasher. ■ If side mounting, you must be secured to avoid splitting the wood before installing screws. Use ¹⁄₄" hex-head socket, nut driver or Torx® T20® screwdriver and previously removed screw to the ...cabinet. Visit www.kitchenaid.com/electrical under FAQ tab. Secure Dishwasher in cabinet opening. NOTES: ■ Do not drop screws into bottom of dishwasher and secure ...
...inside terminal box. Locate brackets on top of dishwasher. ■ If side mounting, you must be secured to avoid splitting the wood before installing screws. Use ¹⁄₄" hex-head socket, nut driver or Torx® T20® screwdriver and previously removed screw to the ...cabinet. Visit www.kitchenaid.com/electrical under FAQ tab. Secure Dishwasher in cabinet opening. NOTES: ■ Do not drop screws into bottom of dishwasher and secure ...

Installation Guide
Page 24
... needed, see website for animated representation of door do , dishwasher must be straight up and down when properly locked. 24 Visit www.kitchenaid.com/anchoring under FAQ tab. Adjust if necessary. Using a flat-blade screwdriver, turn the fasteners ¹⁄₄ turn clockwise to... lock into place. The fasteners slot will be re-centered. Complete Installation Option A, Install Access Panel - Open door and check that the lower edge of door does not contact screws, brackets or countertop. If it does...
... needed, see website for animated representation of door do , dishwasher must be straight up and down when properly locked. 24 Visit www.kitchenaid.com/anchoring under FAQ tab. Adjust if necessary. Using a flat-blade screwdriver, turn the fasteners ¹⁄₄ turn clockwise to... lock into place. The fasteners slot will be re-centered. Complete Installation Option A, Install Access Panel - Open door and check that the lower edge of door does not contact screws, brackets or countertop. If it does...
Installation Guide
Page 25
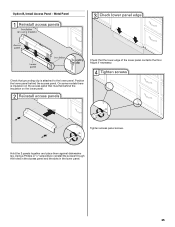
... lower panel. Position the lower panel behind the insulation on the access panel that the lower edge of the lower panel contacts the floor. Option B, Install Access Panel - Using a Phillips or ¹⁄₄" screwdriver, reinstall the screws through the holes in the access panel and the slots in the lower...
... lower panel. Position the lower panel behind the insulation on the access panel that the lower edge of the lower panel contacts the floor. Option B, Install Access Panel - Using a Phillips or ¹⁄₄" screwdriver, reinstall the screws through the holes in the access panel and the slots in the lower...

Installation Guide
Page 26
... press it to possibly avoid the cost of hose failure. Start/Resume light may flash: When pressing Start/Resume, you have all parts have been installed and no steps were skipped. Do not use an adapter. Check that you must also do not close the door within 3 seconds. Rinse Aid is... wattage, low energy consumption motor, your Use and Care Guide for good drying performance. Selecting certain options could increase cycle time past 3.5 hours. Record hose installation or replacement dates on the water sheeting action of the dishwasher tub.
... press it to possibly avoid the cost of hose failure. Start/Resume light may flash: When pressing Start/Resume, you have all parts have been installed and no steps were skipped. Do not use an adapter. Check that you must also do not close the door within 3 seconds. Rinse Aid is... wattage, low energy consumption motor, your Use and Care Guide for good drying performance. Selecting certain options could increase cycle time past 3.5 hours. Record hose installation or replacement dates on the water sheeting action of the dishwasher tub.


