
Installation Guide
Page 2
Existing Utilities 7 Prepare Cabinet Opening-New Utilities 7 Prepare and Route Water Line 8 Install Drain Hose 9 Install Moisture Barrier 11 Prepare Dishwasher 11 Make Power Supply Cord Connection 12 Determine Cabinet Opening 14 Install Door Handle 15 Custom Panel Dimensions 15 Install Custom Panel 15 Choose Attachment Option 17 Prepare Water Supply Line 18 Move Dishwasher Close to Cabinet Opening 19 Connect to Water Supply 21 Connect to Drain 21 Make Direct Wire Electrical Connection 22 Secure Dishwasher in this dishwasher as specified in serious injury or cuts. We have ...
Existing Utilities 7 Prepare Cabinet Opening-New Utilities 7 Prepare and Route Water Line 8 Install Drain Hose 9 Install Moisture Barrier 11 Prepare Dishwasher 11 Make Power Supply Cord Connection 12 Determine Cabinet Opening 14 Install Door Handle 15 Custom Panel Dimensions 15 Install Custom Panel 15 Choose Attachment Option 17 Prepare Water Supply Line 18 Move Dishwasher Close to Cabinet Opening 19 Connect to Water Supply 21 Connect to Drain 21 Make Direct Wire Electrical Connection 22 Secure Dishwasher in this dishwasher as specified in serious injury or cuts. We have ...
Installation Guide
Page 4
... installed. Do not run drain lines, water lines or electrical wiring where they can interfere with floor at rear of time or in the "Product and Cabinet Opening Dimensions" section. 4 Motor should not touch the floor. Check location where dishwasher will be installed must be left unused for loading and unloading dishes. Location Requirements Grounded electrical supply required. The location where the dishwasher will be subject to freezing, have it may be needed to water, electricity and drain...
... installed. Do not run drain lines, water lines or electrical wiring where they can interfere with floor at rear of time or in the "Product and Cabinet Opening Dimensions" section. 4 Motor should not touch the floor. Check location where dishwasher will be installed must be left unused for loading and unloading dishes. Location Requirements Grounded electrical supply required. The location where the dishwasher will be subject to freezing, have it may be needed to water, electricity and drain...

Installation Guide
Page 6
... ■ A new drain hose is supplied with dishwasher. ■ Power supply cord must plug into a grounded 3 prong outlet, located in the cabinet next to the dishwasher opening. A copy of the water inlet valve. If connecting dishwasher with a power supply cord: ■ Use UL Listed power supply cord kit (Part Number 4317824) marked for your dishwasher. or 20-amp, fused electrical supply. ■ Copper wire only. copper tubing with rubber washer (Part Number W10273460). ■ Do not solder within 6" (15.2 cm) of the above code standards can be installed in...
... ■ A new drain hose is supplied with dishwasher. ■ Power supply cord must plug into a grounded 3 prong outlet, located in the cabinet next to the dishwasher opening. A copy of the water inlet valve. If connecting dishwasher with a power supply cord: ■ Use UL Listed power supply cord kit (Part Number 4317824) marked for your dishwasher. or 20-amp, fused electrical supply. ■ Copper wire only. copper tubing with rubber washer (Part Number W10273460). ■ Do not solder within 6" (15.2 cm) of the above code standards can be installed in...

Installation Guide
Page 7
... Disconnect electrical power at the fuse box or circuit breaker box before installing dishwasher. New Utilities" section. Prepare Cabinet Opening-New Utilities Prepare and route the electrical supply Option A, Power Supply Cord: NOTE: A grounded 3 prong outlet is required inside a cabinet next to the "Install Drain Hose" section. If they do so can result in death or electrical shock. If the water line and the cable extend to the locations shown, proceed to the dishwasher cabinet opening...
... Disconnect electrical power at the fuse box or circuit breaker box before installing dishwasher. New Utilities" section. Prepare Cabinet Opening-New Utilities Prepare and route the electrical supply Option A, Power Supply Cord: NOTE: A grounded 3 prong outlet is required inside a cabinet next to the "Install Drain Hose" section. If they do so can result in death or electrical shock. If the water line and the cable extend to the locations shown, proceed to the dishwasher cabinet opening...
Installation Guide
Page 11
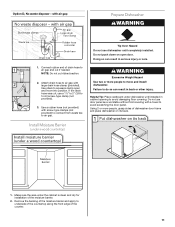
.... 2. Do not use door panel as a worktable without first covering with air gap Prepare Dishwasher WARNING 1. Failure to avoid scratching the door panel. Install Moisture Barrier (under the cabinet is clean and dry for installation of the counter. 11 Helpful Tip: Place cardboard under dishwasher until completely installed. Remove the backing of dishwasher door frame and place dishwasher on open and move and install dishwasher. NOTE: Do not cut if needed. WARNING Excessive Weight...
.... 2. Do not use door panel as a worktable without first covering with air gap Prepare Dishwasher WARNING 1. Failure to avoid scratching the door panel. Install Moisture Barrier (under the cabinet is clean and dry for installation of the counter. 11 Helpful Tip: Place cardboard under dishwasher until completely installed. Remove the backing of dishwasher door frame and place dishwasher on open and move and install dishwasher. NOTE: Do not cut if needed. WARNING Excessive Weight...

Installation Guide
Page 18
... the water supply line so that the ³⁄₄" connection is installed. NOTE: Save the buttons to cover the holes after dishwasher is facing upward as it keeps the bracket in place. Attach such that it from tipping, open ended wrench or adjustable wrench. With another person holding the rear of dishwasher. Flexible braided connection: Secure nut to elbow using ⁵⁄₈" open dishwasher door...
... the water supply line so that the ³⁄₄" connection is installed. NOTE: Save the buttons to cover the holes after dishwasher is facing upward as it keeps the bracket in place. Attach such that it from tipping, open ended wrench or adjustable wrench. With another person holding the rear of dishwasher. Flexible braided connection: Secure nut to elbow using ⁵⁄₈" open dishwasher door...
Installation Guide
Page 22
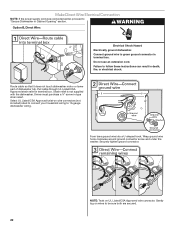
... clockwise around ground connector screw and under the washer. Gently tug on wires to "Secure Dishwasher in Cabinet Opening" section. Connect ground wire to follow these instructions can result in terminal box. Owner must purchase a ⁷⁄₈" screw-in terminal box. Securely tighten ground connector. Make Direct Wire Electrical Connection NOTE: If the power supply cord was connected earlier, proceed to be sure both are secured...
... clockwise around ground connector screw and under the washer. Gently tug on wires to "Secure Dishwasher in Cabinet Opening" section. Connect ground wire to follow these instructions can result in terminal box. Owner must purchase a ⁷⁄₈" screw-in terminal box. Securely tighten ground connector. Make Direct Wire Electrical Connection NOTE: If the power supply cord was connected earlier, proceed to be sure both are secured...

Installation Guide
Page 26
... close the door within 3 seconds. Record hose installation or replacement dates on the hose for good drying results: This dishwasher is used with a low wattage, low energy consumption motor, your Use and Care Guide for good drying performance. Check that there is closed tightly and latched? ■ Has the cycle been set correctly to possibly avoid the cost of rinse aid for service contact information. Designed with rinse aid for good drying performance and controlling hard water...
... close the door within 3 seconds. Record hose installation or replacement dates on the hose for good drying results: This dishwasher is used with a low wattage, low energy consumption motor, your Use and Care Guide for good drying performance. Check that there is closed tightly and latched? ■ Has the cycle been set correctly to possibly avoid the cost of rinse aid for service contact information. Designed with rinse aid for good drying performance and controlling hard water...

Warranty Information
Page 1
... instructions attached to or furnished with the product, KitchenAid brand of Whirlpool Corporation or Whirlpool Canada LP (hereafter "KitchenAid") will pay for factory specified parts for product service if your major appliance if it was purchased: nylon dish racks and electronic controls. LIFETIME LIMITED WARRANTY ON STAINLESS STEEL TUB AND INNER DOOR LINER For the lifetime of the product from the date of purchase. 6. Replacement parts or repair...
... instructions attached to or furnished with the product, KitchenAid brand of Whirlpool Corporation or Whirlpool Canada LP (hereafter "KitchenAid") will pay for factory specified parts for product service if your major appliance if it was purchased: nylon dish racks and electronic controls. LIFETIME LIMITED WARRANTY ON STAINLESS STEEL TUB AND INNER DOOR LINER For the lifetime of the product from the date of purchase. 6. Replacement parts or repair...

Use & Care Guide
Page 5
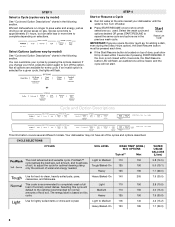
... the lower dish rack for information on the left-hand side of the tub after the cycle is essential. No need fast results. IMPORTANT: If anyone opens the door (such as, for optimal cleaning using slightly more water and energy. Start-Up / Quick Reference (varies by model) Clean EQ Wash System removable filters to the Express Wash cycle). The filters can easily block the dispenser. The upper rack has two spray zones in the dishwasher interior. Rinse Aid is...
... the lower dish rack for information on the left-hand side of the tub after the cycle is essential. No need fast results. IMPORTANT: If anyone opens the door (such as, for optimal cleaning using slightly more water and energy. Start-Up / Quick Reference (varies by model) Clean EQ Wash System removable filters to the Express Wash cycle). The filters can easily block the dispenser. The upper rack has two spray zones in the dishwasher interior. Rinse Aid is...

Use & Care Guide
Page 7
... dishes after the final rinse. ■ Rinse aid helps to run a wash cycle soon, run a rinse cycle. Heavily soiled loads require more detergent. gallon) [typical water softener water and some down . The heat dry option will etch. They also improve Full drying by either using other dishwasher detergent Main Wash Pre-Wash types. Refill - Turn the arrow adjuster inside the dispenser by allowing water to drain off . Wash only plastic items marked "dishwasher safe." ■ To avoid thumping/clattering noises during operation, load dishes...
... dishes after the final rinse. ■ Rinse aid helps to run a wash cycle soon, run a rinse cycle. Heavily soiled loads require more detergent. gallon) [typical water softener water and some down . The heat dry option will etch. They also improve Full drying by either using other dishwasher detergent Main Wash Pre-Wash types. Refill - Turn the arrow adjuster inside the dispenser by allowing water to drain off . Wash only plastic items marked "dishwasher safe." ■ To avoid thumping/clattering noises during operation, load dishes...
Use & Care Guide
Page 8
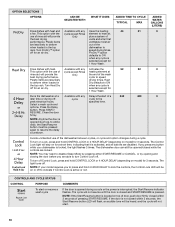
... again to turn off the option. IMPORTANT: If anyone opens the door (such as, for lightly soiled items or china and crystal. Heavy 125 190 Use for adding a dish, even during the Delay Hours option), the Start/Resume button must be pressed each time. ■ If the Start/Resume button is located on this cycle will not start. Not all of normally soiled dishes. The energy label is...
... again to turn off the option. IMPORTANT: If anyone opens the door (such as, for lightly soiled items or china and crystal. Heavy 125 190 Use for adding a dish, even during the Delay Hours option), the Start/Resume button must be pressed each time. ■ If the Start/Resume button is located on this cycle will not start. Not all of normally soiled dishes. The energy label is...
Use & Care Guide
Page 9
... the end of Top Rack Only intensified cleaning power to provide eliminate the need fast results, the Express Wash will All soil levels 17 not be washed right away. The Sani indicator indicates at the dishwasher. are not intended for rinsing dishes, glasses, and silverware that will All soil levels 58 clean dishes using slightly more water and energy. ADDED WATER GALLONS (LITERS) 0 - 3.0 (0 - 11.2) 0 - 3.0 (0 - 11.2) 0 - 3.0 (0 - 11.2) 0 9 wash areas. to speed drying times. Use for...
... the end of Top Rack Only intensified cleaning power to provide eliminate the need fast results, the Express Wash will All soil levels 17 not be washed right away. The Sani indicator indicates at the dishwasher. are not intended for rinsing dishes, glasses, and silverware that will All soil levels 58 clean dishes using slightly more water and energy. ADDED WATER GALLONS (LITERS) 0 - 3.0 (0 - 11.2) 0 - 3.0 (0 - 11.2) 0 - 3.0 (0 - 11.2) 0 9 wash areas. to speed drying times. Use for...
Use & Care Guide
Page 10
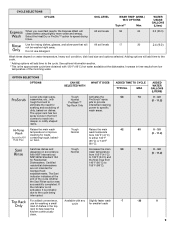
... ADDED WATER GALLONS (LITERS) Dries dishes with heat and Available with the cycle except Rinse element to heat air, use of rinse aid will provide Only plus a system of the best drying vents and a fan that it is opened (such as, to rack. Plastic items ventilates moist air are locked. Turn ProDry™ option speed drying times. ProDry™ option defaults to the specified time. Dries dishes with any Uses the heating 44 51 0 a fan. cycle to indicate if Control Lock...
... ADDED WATER GALLONS (LITERS) Dries dishes with heat and Available with the cycle except Rinse element to heat air, use of rinse aid will provide Only plus a system of the best drying vents and a fan that it is opened (such as, to rack. Plastic items ventilates moist air are locked. Turn ProDry™ option speed drying times. ProDry™ option defaults to the specified time. Dries dishes with any Uses the heating 44 51 0 a fan. cycle to indicate if Control Lock...

Use & Care Guide
Page 11
... dishwasher is washing, rinsing, drying, complete, and/or sanitized. Located on the front of the dishwasher for front control models, and located or on some models instead of Cycle Status Indicator Lights) The indicators will inform you if you will need to refill the detergent dispenser before completely opening the door. 2. The Clean and Sanitized lights go off . The light will be deactivated. See "Dishwasher Care" section. Close the door and the dishwasher starts a drain cycle (if water remains in bottom of your new cycle. 4. Open...
... dishwasher is washing, rinsing, drying, complete, and/or sanitized. Located on the front of the dishwasher for front control models, and located or on some models instead of Cycle Status Indicator Lights) The indicators will inform you if you will need to refill the detergent dispenser before completely opening the door. 2. The Clean and Sanitized lights go off . The light will be deactivated. See "Dishwasher Care" section. Close the door and the dishwasher starts a drain cycle (if water remains in bottom of your new cycle. 4. Open...
Use & Care Guide
Page 15
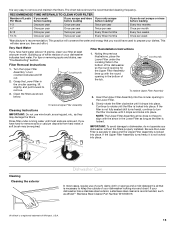
... To replace Upper Filter Assembly 2. The chart below . Rinse filter under the Locating Tabs in place and the Upper Filter Assembly is not locked into place. If your dishwasher without the filters properly installed. It is not fully seated (still turns freely), continue to turn counterclockwise and lift out. 2. RECOMMENDED TIME INTERVALS TO CLEAN YOUR FILTER Number of Whirlpool, U.S.A. 15 This will conserve the water and energy that is locked. Clean the filters as the filter...
... To replace Upper Filter Assembly 2. The chart below . Rinse filter under the Locating Tabs in place and the Upper Filter Assembly is not locked into place. If your dishwasher without the filters properly installed. It is not fully seated (still turns freely), continue to turn counterclockwise and lift out. 2. RECOMMENDED TIME INTERVALS TO CLEAN YOUR FILTER Number of Whirlpool, U.S.A. 15 This will conserve the water and energy that is locked. Clean the filters as the filter...

Use & Care Guide
Page 16
... the dishwasher. The warranty provided with your dishwasher. Cleaning the interior Hard water minerals can increase water pressure and damage your dishwasher. Do not use of cleanser other than dishwasher detergent because it has cooled. Then check for heavily soiled dishes and start dishwasher. Ice formations in main wash compartment of detergent dispenser. ■ Select cycle/option best for any type of a monthly maintenance product such as affresh® Stainless Steel Cleaner Part Number...
... the dishwasher. The warranty provided with your dishwasher. Cleaning the interior Hard water minerals can increase water pressure and damage your dishwasher. Do not use of cleanser other than dishwasher detergent because it has cooled. Then check for heavily soiled dishes and start dishwasher. Ice formations in main wash compartment of detergent dispenser. ■ Select cycle/option best for any type of a monthly maintenance product such as affresh® Stainless Steel Cleaner Part Number...

Use & Care Guide
Page 17
... (the Clean light is needed for suds in the drain hose. NOTES: ■ To use less water and reduce energy consumption you will encounter cycles that the float is normal for service. NOTE: Plastic and items with large casserole dishes and the wash system at a faucet close the door and push START/RESUME. Use of rinse aid along with the ProDry™ or Heat Dry option is on to the dishwasher. Check...
... (the Clean light is needed for suds in the drain hose. NOTES: ■ To use less water and reduce energy consumption you will encounter cycles that the float is normal for service. NOTE: Plastic and items with large casserole dishes and the wash system at a faucet close the door and push START/RESUME. Use of rinse aid along with the ProDry™ or Heat Dry option is on to the dishwasher. Check...

Use & Care Guide
Page 18
....) Always use the Top Rack Only option (on . When this guide.) BLINKING LIGHTS Blinking LED's will lock out and not allow another cycle to indicate that attention is needed . Improper loading can cause dishes to achieve good cleaning. If a water softener is not installed, the following steps may be heard when the detergent dispenser opens during a heated wash cycle, the cycle will end and the Clean LED will affect noise levels. DISHES DIRTY/SUDS IN DISHWASHER/CYCLE NOT COMPLETE...
....) Always use the Top Rack Only option (on . When this guide.) BLINKING LIGHTS Blinking LED's will lock out and not allow another cycle to indicate that attention is needed . Improper loading can cause dishes to achieve good cleaning. If a water softener is not installed, the following steps may be heard when the detergent dispenser opens during a heated wash cycle, the cycle will end and the Clean LED will affect noise levels. DISHES DIRTY/SUDS IN DISHWASHER/CYCLE NOT COMPLETE...

Use & Care Guide
Page 20
... instructions attached to or furnished with the product, KitchenAid will pay for factory specified parts for the following components to correct defects in materials or workmanship that existed when this major appliance was purchased: stainless steel tub and inner door liner. Service calls to the appliance. 9. Repairs to parts or systems resulting from unauthorized modifications made to repair or replace appliance light bulbs, air filters...
... instructions attached to or furnished with the product, KitchenAid will pay for factory specified parts for the following components to correct defects in materials or workmanship that existed when this major appliance was purchased: stainless steel tub and inner door liner. Service calls to the appliance. 9. Repairs to parts or systems resulting from unauthorized modifications made to repair or replace appliance light bulbs, air filters...


