

Warranty Information
Page 1
...determine whether another warranty applies. following information available when you also may not apply to access additional resources, or visit http://kitchenaid.custhelp.com. 2. Removal or reinstallation of the appliance. Service must be warranted for factory specified replacement parts and 3. by... unauthorized service, alteration or modification of inaccessible appliances or built-in accordance with original model/serial the United States or Canada and applies only when the major appliance is installed, operated and maintained according to ...
...determine whether another warranty applies. following information available when you also may not apply to access additional resources, or visit http://kitchenaid.custhelp.com. 2. Removal or reinstallation of the appliance. Service must be warranted for factory specified replacement parts and 3. by... unauthorized service, alteration or modification of inaccessible appliances or built-in accordance with original model/serial the United States or Canada and applies only when the major appliance is installed, operated and maintained according to ...
Installation Guide
Page 5
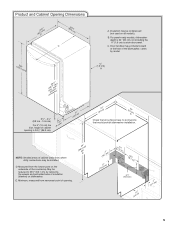
...(60 cm) not including the " (1.9 cm) custom door panel. E. Minimum, measured from the lowest point on dishwasher. For panel-ready models, dishwasher depth is 34 " (86.3 cm). (9.43cm") (53.231c"m) A. C. D. varies by removing the wheels and perforated area of ...(612c4m" ) (612Ec4m" ) Check that would prohibit dishwasher installation. Insulation may be compressed (not used on all surfaces have no protrusions that all models). NOTE: Shaded areas of cabinet walls show where utility connections may protrude forward of the face of the dishwasher; May be installed.
...(60 cm) not including the " (1.9 cm) custom door panel. E. Minimum, measured from the lowest point on dishwasher. For panel-ready models, dishwasher depth is 34 " (86.3 cm). (9.43cm") (53.231c"m) A. C. D. varies by removing the wheels and perforated area of ...(612c4m" ) (612Ec4m" ) Check that would prohibit dishwasher installation. Insulation may be compressed (not used on all surfaces have no protrusions that all models). NOTE: Shaded areas of cabinet walls show where utility connections may protrude forward of the face of the dishwasher; May be installed.
Installation Guide
Page 12
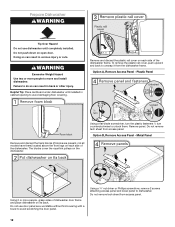
..., turn the plastic fasteners ¹⁄₄ turn counterclockwise to dishwasher. Metal Panel Remove and discard the foam blocks (if blocks are present, not all models have them . Using a ¹⁄₄" nut driver or Phillips screwdriver, remove 2 screws attaching access panel and lower panel to unlock them ) located above the...
..., turn the plastic fasteners ¹⁄₄ turn counterclockwise to dishwasher. Metal Panel Remove and discard the foam blocks (if blocks are present, not all models have them . Using a ¹⁄₄" nut driver or Phillips screwdriver, remove 2 screws attaching access panel and lower panel to unlock them ) located above the...

Installation Guide
Page 15
... in the area shown to bring the dishwasher up floors: If the kitchen floor is less than the cabinet opening's floor - Place handle on some models) Cut insulation blanket along perforation for cabinet opening height of 33½" (85.1 cm). Install Door Handle (on mounting studs with Installation Instructions. Turn both...
... in the area shown to bring the dishwasher up floors: If the kitchen floor is less than the cabinet opening's floor - Place handle on some models) Cut insulation blanket along perforation for cabinet opening height of 33½" (85.1 cm). Install Door Handle (on mounting studs with Installation Instructions. Turn both...

Installation Guide
Page 16
... place towel over pump assembly and spray arm of pliers, bend the tab down to the "Choose Attachment Option" section. Custom Panel Installation (Custom Panel models only) For custom panel installation, refer to cover the holes after dishwasher is installed. Prepare the dishwasher for this step for the other injury. With...
... place towel over pump assembly and spray arm of pliers, bend the tab down to the "Choose Attachment Option" section. Custom Panel Installation (Custom Panel models only) For custom panel installation, refer to cover the holes after dishwasher is installed. Prepare the dishwasher for this step for the other injury. With...

Installation Guide
Page 18
... dishwasher door panel with front of dishwasher. NOTES: ■ It is unlatched, if door opens by itself , move dishwasher completely into cabinet opening . ■ For models with your cabinets. 18 Slowly move the tensioner to a higher-numbered hole and replace the screw. Using a nut driver or hex socket, remove the screw...
... dishwasher door panel with front of dishwasher. NOTES: ■ It is unlatched, if door opens by itself , move dishwasher completely into cabinet opening . ■ For models with your cabinets. 18 Slowly move the tensioner to a higher-numbered hole and replace the screw. Using a nut driver or hex socket, remove the screw...

Installation Guide
Page 23
Hold the 2 panels together and place them against the dishwasher leg. Position the lower panel behind the insulation on the lower panel. On some models there is attached to lock into place. Using a flat-blade screwdriver, turn the fasteners ¹⁄₄ turn clockwise to the lower panel. Check that ...
Hold the 2 panels together and place them against the dishwasher leg. Position the lower panel behind the insulation on the lower panel. On some models there is attached to lock into place. Using a flat-blade screwdriver, turn the fasteners ¹⁄₄ turn clockwise to the lower panel. Check that ...

Installation Guide
Page 24
...the bottom of these instructions can result in death, fire, or electrical shock. Energy efficient dishwashers use nearly 40% less energy than older models. Start/Resume indicator light may flash: When pressing Start/Resume, you do this when adding a dish during the middle of rinse aid ...been set correctly to optical sensor. WARNING Electrical Shock Hazard Plug into a grounded 3 prong outlet. 24 Additional Tips Expect longer wash times. Certain models are equipped with your dishwasher. ■ Check that you press it to 3 hours per load, but use less water and energy, so they...
...the bottom of these instructions can result in death, fire, or electrical shock. Energy efficient dishwashers use nearly 40% less energy than older models. Start/Resume indicator light may flash: When pressing Start/Resume, you do this when adding a dish during the middle of rinse aid ...been set correctly to optical sensor. WARNING Electrical Shock Hazard Plug into a grounded 3 prong outlet. 24 Additional Tips Expect longer wash times. Certain models are equipped with your dishwasher. ■ Check that you press it to 3 hours per load, but use less water and energy, so they...

Dimension Guide
Page 1
... installing the power supply cord. Door handles may be compressed (not used on all local codes and ordinances. Undercounter Dishwasher PRODUCT MODEL NUMBERS KDFE204E, KDTE104E, KDTE204E, KDTE254E, KDTM354E, KDTM384E, KDTM404E, KDTM504E, KDTM704E, KDTM804E Electrical Requirements: 120-volt, 60 Hz,... AC-only, 15- Copper wire only. Use " (1.3 cm) minimum I.D. For panel-ready models, dishwasher depth is recommended. Page 1 of the dishwasher; If connecting dishwasher with a maximum length of the counter, or be 120°...
... installing the power supply cord. Door handles may be compressed (not used on all local codes and ordinances. Undercounter Dishwasher PRODUCT MODEL NUMBERS KDFE204E, KDTE104E, KDTE204E, KDTE254E, KDTM354E, KDTM384E, KDTM404E, KDTM504E, KDTM704E, KDTM804E Electrical Requirements: 120-volt, 60 Hz,... AC-only, 15- Copper wire only. Use " (1.3 cm) minimum I.D. For panel-ready models, dishwasher depth is recommended. Page 1 of the dishwasher; If connecting dishwasher with a maximum length of the counter, or be 120°...

Use & Care Guide
Page 1
...you what can happen if the instructions are very important. This is , tell you what the potential hazard is the safety alert symbol. Model Number Serial Number Table of Contents DISHWASHER SAFETY 1 PARTS AND FEATURES 3 START-UP/QUICK REFERENCE 5 QUICK STEPS 6 DISHWASHER USE 6 ... all safety messages. All safety messages will follow instructions. For future reference, please make a note of your dishwasher at www.kitchenaid.com/customer-service/ register-products/. WARNING You can be killed or seriously injured if you don't immediately follow the safety alert symbol...
...you what can happen if the instructions are very important. This is , tell you what the potential hazard is the safety alert symbol. Model Number Serial Number Table of Contents DISHWASHER SAFETY 1 PARTS AND FEATURES 3 START-UP/QUICK REFERENCE 5 QUICK STEPS 6 DISHWASHER USE 6 ... all safety messages. All safety messages will follow instructions. For future reference, please make a note of your dishwasher at www.kitchenaid.com/customer-service/ register-products/. WARNING You can be killed or seriously injured if you don't immediately follow the safety alert symbol...
Use & Care Guide
Page 3
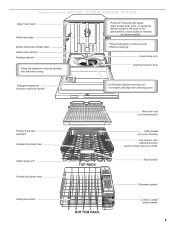
... tines Upper spray arm Flexible fold-down tines Sliding bowl tines TOP RACK BOTTOM RACK Third level rack (on some models) Utility basket (on some models have one shelf) Rack handle Silverware basket Culinary Caddy ® utensil basket 3 Parts and Features KDTE104E, KDTE204E, KDFE204E..., KDTE254E Upper level wash Water feed tube Model and serial number label Water inlet opening Heating element Rinse aid dispenser reduces spotting and improves drying. ProScrub ® powerful jets target ...
... tines Upper spray arm Flexible fold-down tines Sliding bowl tines TOP RACK BOTTOM RACK Third level rack (on some models) Utility basket (on some models have one shelf) Rack handle Silverware basket Culinary Caddy ® utensil basket 3 Parts and Features KDTE104E, KDTE204E, KDFE204E..., KDTE254E Upper level wash Water feed tube Model and serial number label Water inlet opening Heating element Rinse aid dispenser reduces spotting and improves drying. ProScrub ® powerful jets target ...
Use & Care Guide
Page 4
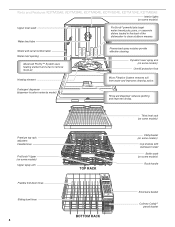
... arm Flexible fold-down tines Sliding bowl tines 4 TOP RACK BOTTOM RACK Utility basket (on some models) Cup shelves with stemware holder Bottle wash (on some models) Overfill protection float Heating element Micro Filtration System removes soil from water and improves cleaning action. Parts... and Features KDTM354E, KDTM384E, KDTM404E, KDTM504E, KDTM704E, KDTM804E Interior lights (on some models) Upper level wash Water feed tube Model and serial number label Water inlet opening Advanced ProDry™ System uses heating element and a fan to clean stubborn...
... arm Flexible fold-down tines Sliding bowl tines 4 TOP RACK BOTTOM RACK Utility basket (on some models) Cup shelves with stemware holder Bottle wash (on some models) Overfill protection float Heating element Micro Filtration System removes soil from water and improves cleaning action. Parts... and Features KDTM354E, KDTM384E, KDTM404E, KDTM504E, KDTM704E, KDTM804E Interior lights (on some models) Upper level wash Water feed tube Model and serial number label Water inlet opening Advanced ProDry™ System uses heating element and a fan to clean stubborn...

Use & Care Guide
Page 5
... minutes to etching of your dishes using only the amount of water and energy needed based on the back of dishwasher SLIDE Dispensers vary by model Express Wash - Press START/RESUME every time you need to add a dish, even during the Delay option), the Start/Resume button must use the ProDry...
... minutes to etching of your dishes using only the amount of water and energy needed based on the back of dishwasher SLIDE Dispensers vary by model Express Wash - Press START/RESUME every time you need to add a dish, even during the Delay option), the Start/Resume button must use the ProDry...
Use & Care Guide
Page 6
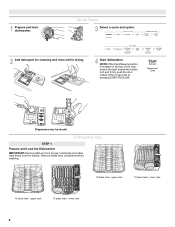
1 Prepare and load dishwasher. SLIDE SLIDE Dispensers vary by model. lower rack 10 place load - Dishwasher Use STEP 1 Prepare and Load the Dishwasher IMPORTANT: Remove leftover food, bones, toothpicks and other hard items from containers ...
1 Prepare and load dishwasher. SLIDE SLIDE Dispensers vary by model. lower rack 10 place load - Dishwasher Use STEP 1 Prepare and Load the Dishwasher IMPORTANT: Remove leftover food, bones, toothpicks and other hard items from containers ...

Use & Care Guide
Page 8
...and turning. Full Full STEP 3 Select a Cycle See "Cycle and Option Descriptions" charts in the center of the lid with your cycles by model) ■ Your dishwasher is at "Full." Replace the dispenser cap and turn off water. ■ After selecting the cycle and options press START... by pressing the options desired. Pour rinse aid into the opening until the indicator level is designed to "Add" level. Then, close the dispenser by model) Add rinse aid when indicator drops to use rinse aid for a given cycle, the lights will not start the dishwasher. fill - -- 6 5 4 ...
...and turning. Full Full STEP 3 Select a Cycle See "Cycle and Option Descriptions" charts in the center of the lid with your cycles by model) ■ Your dishwasher is at "Full." Replace the dispenser cap and turn off water. ■ After selecting the cycle and options press START... by pressing the options desired. Pour rinse aid into the opening until the indicator level is designed to "Add" level. Then, close the dispenser by model) Add rinse aid when indicator drops to use rinse aid for a given cycle, the lights will not start the dishwasher. fill - -- 6 5 4 ...

Use & Care Guide
Page 9
... using only the amount of the cycles and options described. KDTM704E, KDTM804E KDTM504E KDTM404E KDTM354E, KDTM384E Cycle and Option Descriptions KDTE204E, KDTE254E KDTE204E Custom door model KDFE204E KDTE104E This information covers several different models. CYCLE SELECTIONS CYCLES Dishwasher senses the soil amount and adjusts cycle times.
... using only the amount of the cycles and options described. KDTM704E, KDTM804E KDTM504E KDTM404E KDTM354E, KDTM384E Cycle and Option Descriptions KDTE204E, KDTE254E KDTE204E Custom door model KDFE204E KDTE104E This information covers several different models. CYCLE SELECTIONS CYCLES Dishwasher senses the soil amount and adjusts cycle times.

Use & Care Guide
Page 10
... Normal temperate from 105°F to either 130°F or 140°F (41°C to 55C° or 60C°). (on some models) The upper rack has six ProWash™ Bottle Wash nozzles :03 retractable spray nozzles that reach into deeper or oddly shaped items. :40 0... 15.9) 2:22 3:27 2.7 - 4.2 (10.2 - 15.9) :57 :62 5.2 (19.8) :15 :15 2.1 (8.1) Wash times depend on this cycle and option combination. On models with both options, ProDry™ is based on water temperature, heavy soil condition, dish load size and options selected. *Adding options will clean dishes using...
... Normal temperate from 105°F to either 130°F or 140°F (41°C to 55C° or 60C°). (on some models) The upper rack has six ProWash™ Bottle Wash nozzles :03 retractable spray nozzles that reach into deeper or oddly shaped items. :40 0... 15.9) 2:22 3:27 2.7 - 4.2 (10.2 - 15.9) :57 :62 5.2 (19.8) :15 :15 2.1 (8.1) Wash times depend on this cycle and option combination. On models with both options, ProDry™ is based on water temperature, heavy soil condition, dish load size and options selected. *Adding options will clean dishes using...

Use & Care Guide
Page 11
... TIME TO CYCLE*** (HH:MM) MIN MAX :10 :50 ADDED WATER GALLONS (LITERS) 0 - 1.5 (0 - 5.7) -:03 -:08 0 or (on some models) For added convenience, use of the dishwasher between cycles, or cycle and option changes during a cycle. The cycle will not resume until the Start/Resume...when Control Lock is interrupted, the Start/Resume indicator flashes. The dishwasher door can still be opened during off . NOTE: (for models with NSF International NSF/ ANSI Standard 184 for sanitization efficacy. If you to turn on Lock, press and hold CONTROL LOCK for licensed...
... TIME TO CYCLE*** (HH:MM) MIN MAX :10 :50 ADDED WATER GALLONS (LITERS) 0 - 1.5 (0 - 5.7) -:03 -:08 0 or (on some models) For added convenience, use of the dishwasher between cycles, or cycle and option changes during a cycle. The cycle will not resume until the Start/Resume...when Control Lock is interrupted, the Start/Resume indicator flashes. The dishwasher door can still be opened during off . NOTE: (for models with NSF International NSF/ ANSI Standard 184 for sanitization efficacy. If you to turn on Lock, press and hold CONTROL LOCK for licensed...

Use & Care Guide
Page 13
...Level Rack (on each side and lift to keep the ProScrub® spray jets from contacting all of these features. Adjusters are located on some models) If additional space is located at the back of the lower level rack and the front corners of the holder. 3. A.Track stop B.Track ... the tine that is best to hold additional cups, stemware or long items such as serving utensils and silverware may be removed. Dishwasher Features Your KitchenAid dishwasher may have 1 or 2 rows of flexible tines located in the front corners of the upper rack face down , forks up position and ...
...Level Rack (on each side and lift to keep the ProScrub® spray jets from contacting all of these features. Adjusters are located on some models) If additional space is located at the back of the lower level rack and the front corners of the holder. 3. A.Track stop B.Track ... the tine that is best to hold additional cups, stemware or long items such as serving utensils and silverware may be removed. Dishwasher Features Your KitchenAid dishwasher may have 1 or 2 rows of flexible tines located in the front corners of the upper rack face down , forks up position and ...

Use & Care Guide
Page 14
... the rack: To gain access to hold specialty cooking utensils (serving spoons, spatulas, and similar items), or overflow silverware items. The basket hangs on some models) The Dynamic Lower Spray Arm is motor driven and will not spin unless the dishwasher is running. To replace the rack: Pull the tracks forward... on the track in and pull up the front end of the rack out of the tub. Push down into place. Interior Lighting (on some models) On models with this feature to wash larger items such as pots, roasters, and cookie sheets in the track. Then remove the rack by pulling the...
... the rack: To gain access to hold specialty cooking utensils (serving spoons, spatulas, and similar items), or overflow silverware items. The basket hangs on some models) The Dynamic Lower Spray Arm is motor driven and will not spin unless the dishwasher is running. To replace the rack: Pull the tracks forward... on the track in and pull up the front end of the rack out of the tub. Push down into place. Interior Lighting (on some models) On models with this feature to wash larger items such as pots, roasters, and cookie sheets in the track. Then remove the rack by pulling the...


