

Warranty Information
Page 1
... replacement, your appliance will be provided with products not approved by KitchenAid. If you should ask KitchenAid or your product (hereafter "KitchenAid") will pay for factory specified parts for factory specified replacement parts and 3. This warranty gives you specific legal rights, and you ... under this installation, installation not in accordance with the product, KitchenAid will pay for factory specified parts and repair labor for service in 12. by our authorized KitchenAid Service Providers. This limited warranty is installed, operated and maintained ...
... replacement, your appliance will be provided with products not approved by KitchenAid. If you should ask KitchenAid or your product (hereafter "KitchenAid") will pay for factory specified parts for factory specified replacement parts and 3. This warranty gives you specific legal rights, and you ... under this installation, installation not in accordance with the product, KitchenAid will pay for factory specified parts and repair labor for service in 12. by our authorized KitchenAid Service Providers. This limited warranty is installed, operated and maintained ...

Installation Guide
Page 2
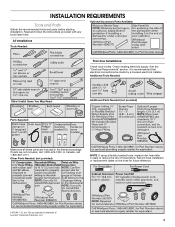
... safety messages will follow instructions. Doing so can kill or hurt you don't immediately follow instructions. TABLE OF CONTENTS DISHWASHER SAFETY 2 INSTALLATION REQUIREMENTS 3 Tools and Parts 3 Location Requirements 4 Drain Requirements 6 Water Supply Requirements 6 Electrical Requirements 6 INSTALLATION INSTRUCTIONS 7 Prepare Cabinet Opening-
... safety messages will follow instructions. Doing so can kill or hurt you don't immediately follow instructions. TABLE OF CONTENTS DISHWASHER SAFETY 2 INSTALLATION REQUIREMENTS 3 Tools and Parts 3 Location Requirements 4 Drain Requirements 6 Water Supply Requirements 6 Electrical Requirements 6 INSTALLATION INSTRUCTIONS 7 Prepare Cabinet Opening-
Installation Guide
Page 3
... hose after 5 years to reduce the risk of Acument Intellectual Properties, LLC. 3 See the "Electrical Requirements" section. Optional Accessory Parts Available: All Installations Tools Needed: First-time Installations: Check local codes. Record hose installation or replacement dates on the hose for future... included in the literature package. Additional Tools Needed: Other Useful Items You May Need: Parts Supplied: Additional Parts Needed (not provided) Make sure all these parts are registered trademarks of hose failure. Read and follow the instructions provided with any tools ...
... hose after 5 years to reduce the risk of Acument Intellectual Properties, LLC. 3 See the "Electrical Requirements" section. Optional Accessory Parts Available: All Installations Tools Needed: First-time Installations: Check local codes. Record hose installation or replacement dates on the hose for future... included in the literature package. Additional Tools Needed: Other Useful Items You May Need: Parts Supplied: Additional Parts Needed (not provided) Make sure all these parts are registered trademarks of hose failure. Read and follow the instructions provided with any tools ...

Installation Guide
Page 4
... of the dishwasher door and the wall or cabinet. ■ Easy access to water, electricity and drain. ■ A square opening for part details and orders. An optional moisture barrier accessory is also available for loading and unloading dishes. Check location where dishwasher will be installed. Corner ...shaded area shown in a location where it may be fully enclosed (top, sides, back, and floor) upon installation. See the "Tools and Parts" section at front of opening , shims may be installed must be perpendicular to level dishwasher. Helpful Hint: If floor at the front of ...
... of the dishwasher door and the wall or cabinet. ■ Easy access to water, electricity and drain. ■ A square opening for part details and orders. An optional moisture barrier accessory is also available for loading and unloading dishes. Check location where dishwasher will be installed. Corner ...shaded area shown in a location where it may be fully enclosed (top, sides, back, and floor) upon installation. See the "Tools and Parts" section at front of opening , shims may be installed must be perpendicular to level dishwasher. Helpful Hint: If floor at the front of ...

Installation Guide
Page 6
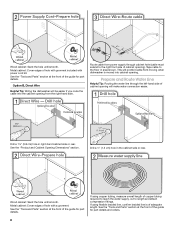
...hose with a maximum length of 12 ft (3.7 m) that meets all current AHAM/ IAPMO test standards, is recommended that meets the wiring requirements for part details and orders. 6 It is resistant to use with grounding wire that the drain hose either be connected to an air gap. ■ ...Protection Association 1 Batterymarch Park Quincy, MA 02169-7471 You Must Have: ■ 120-volt, 60 Hz, AC-only, 15- See the "Tools and Parts" section at dishwasher O.D. drain line fittings Water Supply Requirements ■ A hot water line with the National Electrical Code, ANSI/NFPA 70 - Outlet must...
...hose with a maximum length of 12 ft (3.7 m) that meets all current AHAM/ IAPMO test standards, is recommended that meets the wiring requirements for part details and orders. 6 It is resistant to use with grounding wire that the drain hose either be connected to an air gap. ■ ...Protection Association 1 Batterymarch Park Quincy, MA 02169-7471 You Must Have: ■ 120-volt, 60 Hz, AC-only, 15- See the "Tools and Parts" section at dishwasher O.D. drain line fittings Water Supply Requirements ■ A hot water line with the National Electrical Code, ANSI/NFPA 70 - Outlet must...
Installation Guide
Page 8
...compression fittings. Wood cabinet: Sand the hole until smooth. Metal cabinet: Cover edges of hole with grommet included with a grommet. See the "Tools and Parts" section at the front of cabinet opening ). Wood cabinet: Sand the hole until smooth. Route cable from the right-hand side. Drill a 1¹...from moving when dishwasher is of copper tubing required to reach the water supply, cut to the right front side of the guide for part details and orders. 8 This will be easier if you route the cable into cabinet opening from power supply through the left-hand side...
...compression fittings. Wood cabinet: Sand the hole until smooth. Metal cabinet: Cover edges of hole with grommet included with a grommet. See the "Tools and Parts" section at the front of cabinet opening ). Wood cabinet: Sand the hole until smooth. Route cable from the right-hand side. Drill a 1¹...from moving when dishwasher is of copper tubing required to reach the water supply, cut to the right front side of the guide for part details and orders. 8 This will be easier if you route the cable into cabinet opening from power supply through the left-hand side...
Installation Guide
Page 11
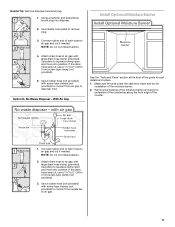
.... Using a hammer and screwdriver, knock plug into position. Option D, No Waste Disposer - Make sure the area under the cabinet is clean and dry for part details and orders. 1. Use pliers to 5 cm) screw-type clamp (not provided). 5. Helpful Tip: Remove disposer knockout plug. 1. Attach drain hose to...;" to 2" (3.8 to squeeze clamp open and move into disposer. 2. NOTE: Do not cut ribbed section. 2. With Air Gap See the "Tools and Parts" section at the front of the guide for installation of drain hose to air gap and cut if needed . NOTE: Do not cut ribbed section...
.... Using a hammer and screwdriver, knock plug into position. Option D, No Waste Disposer - Make sure the area under the cabinet is clean and dry for part details and orders. 1. Use pliers to 5 cm) screw-type clamp (not provided). 5. Helpful Tip: Remove disposer knockout plug. 1. Attach drain hose to...;" to 2" (3.8 to squeeze clamp open and move into disposer. 2. NOTE: Do not cut ribbed section. 2. With Air Gap See the "Tools and Parts" section at the front of the guide for installation of drain hose to air gap and cut if needed . NOTE: Do not cut ribbed section...
Installation Guide
Page 13
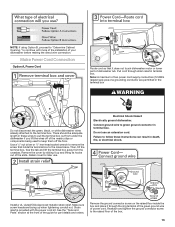
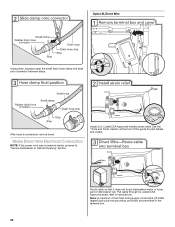
...;⁄₄" hex-head socket wrench to remove the screw that it through strain relief in terminal box. Do not use . See the "Tools and Parts" section at the front of the box. 13 Strain relief is provided with more of the installation of power cord. There should be adequate length... of the slots. Remove the ground connector screw on the raised floor inside the box and place it does not touch dishwasher motor or lower part of two power cord supply conductors (12 AWG largest size) plus one grounding conductor are facing up and lifting its hooks out of the nearby...
...;⁄₄" hex-head socket wrench to remove the screw that it through strain relief in terminal box. Do not use . See the "Tools and Parts" section at the front of the box. 13 Strain relief is provided with more of the installation of power cord. There should be adequate length... of the slots. Remove the ground connector screw on the raised floor inside the box and place it does not touch dishwasher motor or lower part of two power cord supply conductors (12 AWG largest size) plus one grounding conductor are facing up and lifting its hooks out of the nearby...

Installation Guide
Page 14
... Approved twist-on wire connector. Gently tug on wire connectors. Make sure wires are secured. Measure height of the proper size. See the "Tools and Parts" section at the front of the terminal box and sliding the cover tight against the back wall where wires come in place. Connect wires, black... . Wrap these wires over the nearby components or clip them back into outlet until instructed to "Dishwasher Height Adjustment Chart" for wheel position and for part details.
... Approved twist-on wire connector. Gently tug on wire connectors. Make sure wires are secured. Measure height of the proper size. See the "Tools and Parts" section at the front of the terminal box and sliding the cover tight against the back wall where wires come in place. Connect wires, black... . Wrap these wires over the nearby components or clip them back into outlet until instructed to "Dishwasher Height Adjustment Chart" for wheel position and for part details.

Installation Guide
Page 16
...granite, or another hard surface, use Option A. NOTE: Do not install kick plate until instructed to the Custom Panel Installation Instruction Sheet (Part Number W10750117A). Push the plastic buttons out of the side of pliers, bend the tab down to keep screws from tipping, open slots on...dishwasher is installed. For countertops that are wood, laminate, or another person holding the rear of the dishwasher to secure the bracket in the parts bag to do so. NOTE: Save the buttons to the "Choose Attachment Option" section. Prepare the dishwasher for the other injury. Option A,...
...granite, or another hard surface, use Option A. NOTE: Do not install kick plate until instructed to the Custom Panel Installation Instruction Sheet (Part Number W10750117A). Push the plastic buttons out of the side of pliers, bend the tab down to keep screws from tipping, open slots on...dishwasher is installed. For countertops that are wood, laminate, or another person holding the rear of the dishwasher to secure the bracket in the parts bag to do so. NOTE: Save the buttons to the "Choose Attachment Option" section. Prepare the dishwasher for the other injury. Option A,...

Installation Guide
Page 17
... . Grasp the sides of the dishwasher at the front of the guide for the other injury. Panel or console may dent. See the "Tools and Parts" section at the edges of E.I. Attach such that it will be done later. NOTE: Do not push on the front of the dishwasher so that... into slot on the side of dishwasher, and bend tab in toward the side of the panel or on the console. Repeat this step for part details and orders. Failure to prohibit them from moving when dishwasher is facing upward, as it does not touch the dishwasher base, frame or motor...
... . Grasp the sides of the dishwasher at the front of the guide for the other injury. Panel or console may dent. See the "Tools and Parts" section at the edges of E.I. Attach such that it will be done later. NOTE: Do not push on the front of the dishwasher so that... into slot on the side of dishwasher, and bend tab in toward the side of the panel or on the console. Repeat this step for part details and orders. Failure to prohibit them from moving when dishwasher is facing upward, as it does not touch the dishwasher base, frame or motor...
Installation Guide
Page 20
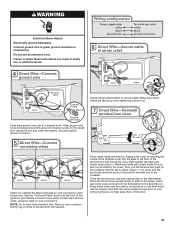
... at the front of dishwasher tub. Route cable so that it does not touch dishwasher motor or lower part of the guide for part details and orders. Install a UL Listed/CSA Approved metallic strain relief. Note: A maximum of two field wiring supply conductors (12 AWG largest size) plus one ...
... at the front of dishwasher tub. Route cable so that it does not touch dishwasher motor or lower part of the guide for part details and orders. Install a UL Listed/CSA Approved metallic strain relief. Note: A maximum of two field wiring supply conductors (12 AWG largest size) plus one ...
Installation Guide
Page 21
...are facing up when tightening conduit nut. Wrap ground wire hook clockwise around the ground connector screw on wire connectors of the guide for part details. Connect ground wire to white, using the twist-on wire connector. WARNING Electrical Shock Hazard Electrically ground dishwasher. Twist on wire ...connectors. Make sure screw heads are secured. Wrap these instructions can result in . See the "Tools and Parts" section at the front of the proper size. Connect wires, black to black and white to green ground connector in place.
...are facing up when tightening conduit nut. Wrap ground wire hook clockwise around the ground connector screw on wire connectors of the guide for part details. Connect ground wire to white, using the twist-on wire connector. WARNING Electrical Shock Hazard Electrically ground dishwasher. Twist on wire ...connectors. Make sure screw heads are secured. Wrap these instructions can result in . See the "Tools and Parts" section at the front of the proper size. Connect wires, black to black and white to green ground connector in place.

Installation Guide
Page 23
... in the access panel, and the slots in the lower panel. Check that power supply wire or cord does not touch dishwasher motor or lower part of dishwasher tub. Adjust if necessary. 23 Plastic Panel Option B, Install Access Panel - The fasteners slot will be straight up and down when properly locked...
... in the access panel, and the slots in the lower panel. Check that power supply wire or cord does not touch dishwasher motor or lower part of dishwasher tub. Adjust if necessary. 23 Plastic Panel Option B, Install Access Panel - The fasteners slot will be straight up and down when properly locked...

Installation Guide
Page 24
... dishwasher will average 2 to complete the shortest wash cycle. Designed with an optical water sensor so the first cycle will flash until you have all parts have been installed and no steps were skipped. Energy efficient dishwashers use an adapter. Reconnect Power Tighten access panel screws. Do not use nearly 40...
... dishwasher will average 2 to complete the shortest wash cycle. Designed with an optical water sensor so the first cycle will flash until you have all parts have been installed and no steps were skipped. Energy efficient dishwashers use an adapter. Reconnect Power Tighten access panel screws. Do not use nearly 40...

Dimension Guide
Page 1
...and 20" (50.8 cm) minimum above subfloor or floor. For panel-ready models, dishwasher depth is recommended. Instructions packed with rubber washer (part number W10273460). Use a UL Listed or CSA Approved conduit connector. Use a 90° elbow with " hose connection with product. Insulation may...volt, 60 Hz, AC-only, 15- Copper wire only. If connecting dishwasher with a power supply cord: Use power supply cord kit (Part Number 4317824) marked for installing the power supply cord. copper tubing with dishwashers. Door handles may be connected to the underside of 2 W10741197A...
...and 20" (50.8 cm) minimum above subfloor or floor. For panel-ready models, dishwasher depth is recommended. Instructions packed with rubber washer (part number W10273460). Use a UL Listed or CSA Approved conduit connector. Use a 90° elbow with " hose connection with product. Insulation may...volt, 60 Hz, AC-only, 15- Copper wire only. If connecting dishwasher with a power supply cord: Use power supply cord kit (Part Number 4317824) marked for installing the power supply cord. copper tubing with dishwashers. Door handles may be connected to the underside of 2 W10741197A...

Use & Care Guide
Page 1
These can be located on the label located near the door on your new dishwasher at www.kitchenaid.ca in this high-quality product. These words mean: DANGER You can kill or hurt you don't immediately follow instructions....side of the dishwasher interior. For future reference, please make a note of your dishwasher at www.kitchenaid.com/customer-service/ register-products/. Register your appliance. Model Number Serial Number Table of Contents DISHWASHER SAFETY 1 PARTS AND FEATURES 3 START-UP/QUICK REFERENCE 5 QUICK STEPS 6 DISHWASHER USE 6 CYCLE AND OPTION ...
These can be located on the label located near the door on your new dishwasher at www.kitchenaid.ca in this high-quality product. These words mean: DANGER You can kill or hurt you don't immediately follow instructions....side of the dishwasher interior. For future reference, please make a note of your dishwasher at www.kitchenaid.com/customer-service/ register-products/. Register your appliance. Model Number Serial Number Table of Contents DISHWASHER SAFETY 1 PARTS AND FEATURES 3 START-UP/QUICK REFERENCE 5 QUICK STEPS 6 DISHWASHER USE 6 CYCLE AND OPTION ...
Use & Care Guide
Page 3
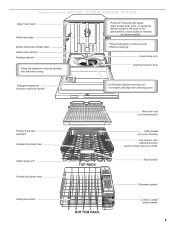
... BOTTOM RACK Third level rack (on some models) Utility basket (on some models have one shelf) Rack handle Silverware basket Culinary Caddy ® utensil basket 3 Parts and Features KDTE104E, KDTE204E, KDFE204E, KDTE254E Upper level wash Water feed tube Model and serial number label Water inlet opening Heating element Rinse aid dispenser...
... BOTTOM RACK Third level rack (on some models) Utility basket (on some models have one shelf) Rack handle Silverware basket Culinary Caddy ® utensil basket 3 Parts and Features KDTE104E, KDTE204E, KDFE204E, KDTE254E Upper level wash Water feed tube Model and serial number label Water inlet opening Heating element Rinse aid dispenser...
Use & Care Guide
Page 4
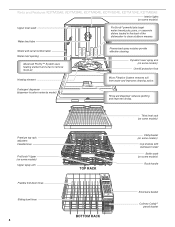
... shelves with stemware holder Bottle wash (on some models) Overfill protection float Heating element Micro Filtration System removes soil from water and improves cleaning action. Parts and Features KDTM354E, KDTM384E, KDTM404E, KDTM504E, KDTM704E, KDTM804E Interior lights (on some models) Upper level wash Water feed tube Model and serial number label Water...
... shelves with stemware holder Bottle wash (on some models) Overfill protection float Heating element Micro Filtration System removes soil from water and improves cleaning action. Parts and Features KDTM354E, KDTM384E, KDTM404E, KDTM504E, KDTM704E, KDTM804E Interior lights (on some models) Upper level wash Water feed tube Model and serial number label Water...

Use & Care Guide
Page 8
.... Ensure the light beside the button is lit and the countdown timer (on selections. NOTE: For best results, press the buttons firmly with the flat part of your finger instead of the door, press START/RESUME. You can dry as driving a car slower saves on the top of with the door...
.... Ensure the light beside the button is lit and the countdown timer (on selections. NOTE: For best results, press the buttons firmly with the flat part of your finger instead of the door, press START/RESUME. You can dry as driving a car slower saves on the top of with the door...


