

Warranty Information
Page 1
... gives you specific legal rights, and you . KITCHENAID® DISHWASHER LIMITED WARRANTY ATTACH YOUR RECEIPT HERE. Commercial, non-residential or multiple-family use, or use For one year from the date of original purchase, when this installation, installation not in materials and workmanship and is installed, operated and maintained according to instructions attached to...
... gives you specific legal rights, and you . KITCHENAID® DISHWASHER LIMITED WARRANTY ATTACH YOUR RECEIPT HERE. Commercial, non-residential or multiple-family use, or use For one year from the date of original purchase, when this installation, installation not in materials and workmanship and is installed, operated and maintained according to instructions attached to...

Installation Guide
Page 2
... on your appliance. Remove shipping materials and drain hose. We have provided many important safety messages in Cabinet Opening 22 Complete Installation 23 Check Operation 24 If Dishwasher Does Not Operate 24 Additional Tips 24 DISHWASHER SAFETY Your safety and the safety of the ... instructions. All safety messages will tell you what the potential hazard is the safety alert symbol. Close dishwasher door until completely installed. You Need to Drain 19 Make Direct Wire Electrical Connection 20 Secure Dishwasher in this dishwasher as specified in serious injury or...
... on your appliance. Remove shipping materials and drain hose. We have provided many important safety messages in Cabinet Opening 22 Complete Installation 23 Check Operation 24 If Dishwasher Does Not Operate 24 Additional Tips 24 DISHWASHER SAFETY Your safety and the safety of the ... instructions. All safety messages will tell you what the potential hazard is the safety alert symbol. Close dishwasher door until completely installed. You Need to Drain 19 Make Direct Wire Electrical Connection 20 Secure Dishwasher in this dishwasher as specified in serious injury or...
Installation Guide
Page 3
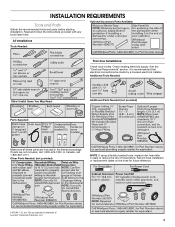
.... It is recommended that electrical connections be made by a licensed electrical installer. If parts are registered trademarks of hose failure. In Canada, call 1-800-422-1230. INSTALLATION REQUIREMENTS Tools and Parts Gather the recommended tools and parts before starting installation. Record hose installation or replacement dates on the hose for future reference. . †®...
.... It is recommended that electrical connections be made by a licensed electrical installer. If parts are registered trademarks of hose failure. In Canada, call 1-800-422-1230. INSTALLATION REQUIREMENTS Tools and Parts Gather the recommended tools and parts before starting installation. Record hose installation or replacement dates on the hose for future reference. . †®...

Installation Guide
Page 4
...: If dishwasher will be subject to freezing, have it may be perpendicular to dishwasher against freezing. Location Requirements Dishwasher must be installed. NOTE: To avoid shifting during dishwasher operation, shims must be securely attached to the floor. ■ The location where the...drain. ■ A square opening is not covered by authorized service personnel. 4 Motor should not touch the floor. ■ Do not install dishwasher over carpeted flooring. ■ Grounded electrical supply required. ■ Make sure pipes, wires and drain hose are within the shaded area ...
...: If dishwasher will be subject to freezing, have it may be perpendicular to dishwasher against freezing. Location Requirements Dishwasher must be installed. NOTE: To avoid shifting during dishwasher operation, shims must be securely attached to the floor. ■ The location where the...drain. ■ A square opening is not covered by authorized service personnel. 4 Motor should not touch the floor. ■ Do not install dishwasher over carpeted flooring. ■ Grounded electrical supply required. ■ Make sure pipes, wires and drain hose are within the shaded area ...
Installation Guide
Page 5
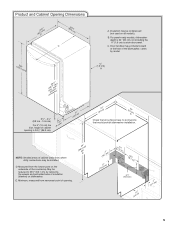
... and perforated area of insulation (blanket) on all surfaces have no protrusions that all models). " (1.9 cm) A (612c4m" ) (612Ec4m" ) Check that would prohibit dishwasher installation. E. D. Insulation may be installed. Minimum, measured from the lowest point on the underside of the countertop. NOTE: Shaded areas of cabinet walls show where utility connections may protrude...
... and perforated area of insulation (blanket) on all surfaces have no protrusions that all models). " (1.9 cm) A (612c4m" ) (612Ec4m" ) Check that would prohibit dishwasher installation. E. D. Insulation may be installed. Minimum, measured from the lowest point on the underside of the countertop. NOTE: Shaded areas of cabinet walls show where utility connections may protrude...

Installation Guide
Page 6
... 12 ft (3.7 m) that the electrical connection and wire size are adequate and in house plumbing and 20" (50.8 cm) minimum above code standards can be installed in accordance with the National Electrical Code, ANSI/NFPA 70 - See the "Tools and Parts" section at the front of the dishwasher. NOTE: ¹⁄... kPa) water pressure can be needed to connect to house plumbing lower than 20" (50.8 cm) above drain trap in conformance with the air gap installation instructions.
... 12 ft (3.7 m) that the electrical connection and wire size are adequate and in house plumbing and 20" (50.8 cm) minimum above code standards can be installed in accordance with the National Electrical Code, ANSI/NFPA 70 - See the "Tools and Parts" section at the front of the dishwasher. NOTE: ¹⁄... kPa) water pressure can be needed to connect to house plumbing lower than 20" (50.8 cm) above drain trap in conformance with the air gap installation instructions.

Installation Guide
Page 7
...and Cabinet Opening Dimensions" section. 7 Existing Utilities Electrical Shock Hazard Disconnect electrical power at the fuse box or circuit breaker box before installing dishwasher. When removing a previous dishwasher, be sure to avoid damaging the existing power cord, drain line, and water line connected to the... "Install Drain Hose" section. If they do so can result in death or electrical shock. Failure to the dishwasher cabinet opening. Prepare ...
...and Cabinet Opening Dimensions" section. 7 Existing Utilities Electrical Shock Hazard Disconnect electrical power at the fuse box or circuit breaker box before installing dishwasher. When removing a previous dishwasher, be sure to avoid damaging the existing power cord, drain line, and water line connected to the... "Install Drain Hose" section. If they do so can result in death or electrical shock. Failure to the dishwasher cabinet opening. Prepare ...

Installation Guide
Page 9
...of the dishwasher. NOTE: If using a connection configuration that could clog the inlet valve. Flush water into cabinet opening closest to the sink. Install Drain Hose IMPORTANT: Always use a new drain hose. Slowly route water supply line through hole in cabinet to the floor in compliance with ... inlet hose after 5 years to determine whether an air gap is in area shown. The water supply to "ON" position. Record hose installation or replacement dates on the front left side of the opening . Tape drain hose to the front center of opening where drain connection will ...
...of the dishwasher. NOTE: If using a connection configuration that could clog the inlet valve. Flush water into cabinet opening closest to the sink. Install Drain Hose IMPORTANT: Always use a new drain hose. Slowly route water supply line through hole in cabinet to the floor in compliance with ... inlet hose after 5 years to determine whether an air gap is in area shown. The water supply to "ON" position. Record hose installation or replacement dates on the front left side of the opening . Tape drain hose to the front center of opening where drain connection will ...

Installation Guide
Page 10
... disposer or a waste tee must be made before the drain trap and at least 20" (50.8 cm) above the floor where the dishwasher will be installed.
... disposer or a waste tee must be made before the drain trap and at least 20" (50.8 cm) above the floor where the dishwasher will be installed.
Installation Guide
Page 11
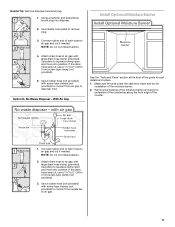
Install Optional Moisture Barrier 3. NOTE: Do not cut ribbed section. 2. Use pliers to 5 cm) screw-type clamp (not provided). 3. With Air Gap See the "Tools and ... at the front of the moisture barrier. 2. Connect rubber end of the counter. 1. Make sure the area under the cabinet is clean and dry for installation of the guide for part details and orders. 1. Use a rubber hose (not provided) with large drain hose clamp (provided). Attach drain hose to air gap...
Install Optional Moisture Barrier 3. NOTE: Do not cut ribbed section. 2. Use pliers to 5 cm) screw-type clamp (not provided). 3. With Air Gap See the "Tools and ... at the front of the moisture barrier. 2. Connect rubber end of the counter. 1. Make sure the area under the cabinet is clean and dry for installation of the guide for part details and orders. 1. Use a rubber hose (not provided) with large drain hose clamp (provided). Attach drain hose to air gap...
Installation Guide
Page 12
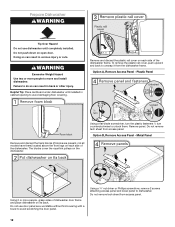
... from the dishwasher frame. The blocks cover the rope/link pulleys on open door. Remove panel. Using 2 or more people to move and install dishwasher. Using a ¹⁄₄" nut driver or Phillips screwdriver, remove 2 screws attaching access panel and lower panel to dishwasher. Metal ...unsnap it from access panel. Do not remove tech sheet from access panel. 12 Helpful Tip: Place cardboard under dishwasher until completely installed. Prepare Dishwasher WARNING Tip Over Hazard Do not use door panel as a worktable without first covering with a towel to avoid scratching ...
... from the dishwasher frame. The blocks cover the rope/link pulleys on open door. Remove panel. Using 2 or more people to move and install dishwasher. Using a ¹⁄₄" nut driver or Phillips screwdriver, remove 2 screws attaching access panel and lower panel to dishwasher. Metal ...unsnap it from access panel. Do not remove tech sheet from access panel. 12 Helpful Tip: Place cardboard under dishwasher until completely installed. Prepare Dishwasher WARNING Tip Over Hazard Do not use door panel as a worktable without first covering with a towel to avoid scratching ...
Installation Guide
Page 13
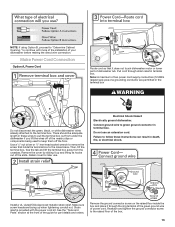
... continue with the power cord kit. Remove the cover by sliding it up when tightening conduit nut. Strain relief is provided with more of the installation of power cord. Remove the ground connector screw on the raised floor inside the box and place it does not touch dishwasher motor or lower..., tilt the terminal box, free the tab and lift the terminal box away from under the dishwasher if you lift the wires off the floor. Install a UL Listed/CSA Approved metallic strain relief. See the "Tools and Parts" section at the front of dishwasher tub.
... continue with the power cord kit. Remove the cover by sliding it up when tightening conduit nut. Strain relief is provided with more of the installation of power cord. Remove the ground connector screw on the raised floor inside the box and place it does not touch dishwasher motor or lower..., tilt the terminal box, free the tab and lift the terminal box away from under the dishwasher if you lift the wires off the floor. Install a UL Listed/CSA Approved metallic strain relief. See the "Tools and Parts" section at the front of dishwasher tub.

Installation Guide
Page 14
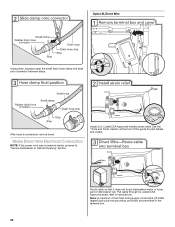
... back on the crossbar with the tab in the green, black, and white wires coming from underside of countertop to floor where dishwasher will be installed (you will need to measure the lowest point on the dishwasher, there should be sure both are tucked inside terminal box. Connect wires, black to...
... back on the crossbar with the tab in the green, black, and white wires coming from underside of countertop to floor where dishwasher will be installed (you will need to measure the lowest point on the dishwasher, there should be sure both are tucked inside terminal box. Connect wires, black to...

Installation Guide
Page 15
Measurements are preset at the factory for additional clearance. for cabinet opening - Setscrews are already installed in the area shown to bring the dishwasher up floors: If the kitchen floor is higher than 34" (86.4 cm), the rear wheels can be ... height is less than the cabinet opening heights, do not cut. Put wheels in use. add shims as needed in the handle. Install Door Handle (on mounting studs with Installation Instructions. This will allow the dishwasher and perforated section of 33½" (85.1 cm). Turn both leveler legs to the same height...
Measurements are preset at the factory for additional clearance. for cabinet opening - Setscrews are already installed in the area shown to bring the dishwasher up floors: If the kitchen floor is higher than 34" (86.4 cm), the rear wheels can be ... height is less than the cabinet opening heights, do not cut. Put wheels in use. add shims as needed in the handle. Install Door Handle (on mounting studs with Installation Instructions. This will allow the dishwasher and perforated section of 33½" (85.1 cm). Turn both leveler legs to the same height...

Installation Guide
Page 16
...With another person holding the rear of the dishwasher collar, as one of pliers, bend the tab down to the Custom Panel Installation Instruction Sheet (Part Number W10750117A). Remove the brackets from falling into the open dishwasher door and place towel over pump assembly and ... wood, laminate, or another hard surface, use Option A. This will be secured to the "Choose Attachment Option" section. Complete custom panel installation before proceeding to the cabinet as shown. 16 Choose Attachment Option IMPORTANT: The dishwasher must be done later. NOTE: Save the buttons to ...
...With another person holding the rear of the dishwasher collar, as one of pliers, bend the tab down to the Custom Panel Installation Instruction Sheet (Part Number W10750117A). Remove the brackets from falling into the open dishwasher door and place towel over pump assembly and ... wood, laminate, or another hard surface, use Option A. This will be secured to the "Choose Attachment Option" section. Complete custom panel installation before proceeding to the cabinet as shown. 16 Choose Attachment Option IMPORTANT: The dishwasher must be done later. NOTE: Save the buttons to ...

Installation Guide
Page 17
Use 2 or more people to move and install dishwasher. Panel or console may dent. See the "Tools and Parts" section at the edges of the door panel. Slide ... correct placement of the dishwasher. NOTE: Do not push on the front of the panel or on wheels and move dishwasher close to installing the unit into the cabinet opening . Check that the ³⁄₄" connection is moved into the cabinet opening . Du Pont De...vibration during operation, route the water supply line so that it keeps the bracket in the locations shown to move and install dishwasher.
Use 2 or more people to move and install dishwasher. Panel or console may dent. See the "Tools and Parts" section at the edges of the door panel. Slide ... correct placement of the dishwasher. NOTE: Do not push on the front of the panel or on wheels and move dishwasher close to installing the unit into the cabinet opening . Check that the ³⁄₄" connection is moved into the cabinet opening . Du Pont De...vibration during operation, route the water supply line so that it keeps the bracket in the locations shown to move and install dishwasher.

Installation Guide
Page 19
... level from front to seal the rubber gasket. Du Pont De Nemours and Company. 19 Slide the ³⁄₄" fitting of dishwasher. With some installations, it may be easier to catch any water in drain hose. NOTE: Do not use Teflon®† tape with compression fittings. Check that dishwasher...
... level from front to seal the rubber gasket. Du Pont De Nemours and Company. 19 Slide the ³⁄₄" fitting of dishwasher. With some installations, it may be easier to catch any water in drain hose. NOTE: Do not use Teflon®† tape with compression fittings. Check that dishwasher...
Installation Guide
Page 20
... the terminal box. 20 Route cable so that it does not touch dishwasher motor or lower part of the guide for part details and orders. Install a UL Listed/CSA Approved metallic strain relief. See the "Tools and Parts" section at the front of dishwasher tub. Note: A maximum of two field wiring...
... the terminal box. 20 Route cable so that it does not touch dishwasher motor or lower part of the guide for part details and orders. Install a UL Listed/CSA Approved metallic strain relief. See the "Tools and Parts" section at the front of dishwasher tub. Note: A maximum of two field wiring...
Installation Guide
Page 22
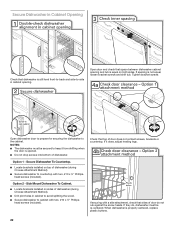
NOTES: ■ The dishwasher must be secured to cabinet with two, #10 x ½" Phillips- Side Mount Dishwasher To Cabinet. ■ Locate brackets installed on sides of dishwasher (during Choose Attachment Method) ■ Secure dishwasher to countertop with a side attachment, check that sides of dishwasher. If it from shifting ... in Cabinet Opening Check that dishwasher is still level front-to-back and side-to the cabinet. Option 2 - Secure Dishwasher To Countertop. ■ Locate brackets installed on both sides.
NOTES: ■ The dishwasher must be secured to cabinet with two, #10 x ½" Phillips- Side Mount Dishwasher To Cabinet. ■ Locate brackets installed on sides of dishwasher (during Choose Attachment Method) ■ Secure dishwasher to countertop with a side attachment, check that sides of dishwasher. If it from shifting ... in Cabinet Opening Check that dishwasher is still level front-to-back and side-to the cabinet. Option 2 - Secure Dishwasher To Countertop. ■ Locate brackets installed on both sides.

Installation Guide
Page 23
... turn the fasteners ¹⁄₄ turn clockwise to the lower panel. On some models there is attached to lock into place. Complete Installation Check that power supply wire or cord does not touch dishwasher motor or lower part of the lower panel contacts the floor. The fasteners slot... will be straight up and down when properly locked. Plastic Panel Option B, Install Access Panel - Check that the lower edge of the access panel touches the floor. Hold the 2 panels together and place them against the ...
... turn the fasteners ¹⁄₄ turn clockwise to the lower panel. On some models there is attached to lock into place. Complete Installation Check that power supply wire or cord does not touch dishwasher motor or lower part of the lower panel contacts the floor. The fasteners slot... will be straight up and down when properly locked. Plastic Panel Option B, Install Access Panel - Check that the lower edge of the access panel touches the floor. Hold the 2 panels together and place them against the ...


