

Installation Guide
Page 2
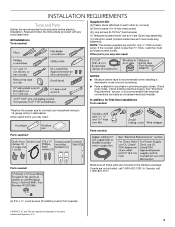
... are not followed. Care shall be killed or seriously injured if you don't follow instructions. These words mean: DANGER You can be installed to potential hazards that the dishwasher is tested at the time of the dishwasher. WARNING: To reduce the risk of others . Existing ... Connect to Water Supply 21 Connect to Drain 21 Make Direct Wire Electrical Connection 22 Secure Dishwasher in Cabinet Opening 23 Complete Installation 24 Check Operation 26 If Dishwasher Does Not Operate 26 Additional Tips 26 DISHWASHER SAFETY Your safety and the safety of electric ...
... are not followed. Care shall be killed or seriously injured if you don't follow instructions. These words mean: DANGER You can be installed to potential hazards that the dishwasher is tested at the time of the dishwasher. WARNING: To reduce the risk of others . Existing ... Connect to Water Supply 21 Connect to Drain 21 Make Direct Wire Electrical Connection 22 Secure Dishwasher in Cabinet Opening 23 Complete Installation 24 Check Operation 26 If Dishwasher Does Not Operate 26 Additional Tips 26 DISHWASHER SAFETY Your safety and the safety of electric ...
Installation Guide
Page 3
... assembly) NOTE: The screws supplied are included in the literature package. Check local codes. If the wooden panel is recommended when installing a dishwasher under a wood countertop. ■ Parts available for purchase in dishwasher. It is recommended that electrical connections be the... proper size to connect your household wiring to each other by a licensed electrical installer. All Installations Tools needed : Make sure all these parts are used for first-time installations Tools needed: Parts supplied: Parts needed: Parts needed : Supplied in Kit: (4) Plastic ...
... assembly) NOTE: The screws supplied are included in the literature package. Check local codes. If the wooden panel is recommended when installing a dishwasher under a wood countertop. ■ Parts available for purchase in dishwasher. It is recommended that electrical connections be the... proper size to connect your household wiring to each other by a licensed electrical installer. All Installations Tools needed : Make sure all these parts are used for first-time installations Tools needed: Parts supplied: Parts needed: Parts needed : Supplied in Kit: (4) Plastic ...
Installation Guide
Page 4
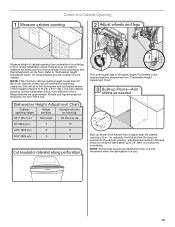
...the shaded area shown in the dishwasher opening , shims may be subject to water, electricity and drain. ■ convenient access for installing underneath the countertop. Motor should not touch the floor. Call 1-800-422-1230 to dishwasher against freezing. NOTE: To avoid shifting... during dishwasher operation, shims must provide: ■ easy access to freezing, have it may be installed must provide clearance between the side of opening is not covered by authorized service personnel. Corner locations require a 2" (5.1 cm) minimum ...
...the shaded area shown in the dishwasher opening , shims may be subject to water, electricity and drain. ■ convenient access for installing underneath the countertop. Motor should not touch the floor. Call 1-800-422-1230 to dishwasher against freezing. NOTE: To avoid shifting... during dishwasher operation, shims must provide: ■ easy access to freezing, have it may be installed must provide clearance between the side of opening is not covered by authorized service personnel. Corner locations require a 2" (5.1 cm) minimum ...

Installation Guide
Page 5
...cm) 1³⁄₄" (4.4 cm) 5 NOTE: Shaded areas of insulation (blanket) on all surfaces have no protrusions that would prohibit dishwasher installation. May be reduced to 33¹⁄₂" (85.1 cm) by removing the wheels and perforated area of cabinet walls show where utility ...connections may be installed. with wheels removed ³⁄₄" (1.9 cm) A A. D. Measured from narrowest point of the countertop. Minimum, measured from ...
...cm) 1³⁄₄" (4.4 cm) 5 NOTE: Shaded areas of insulation (blanket) on all surfaces have no protrusions that would prohibit dishwasher installation. May be reduced to 33¹⁄₂" (85.1 cm) by removing the wheels and perforated area of cabinet walls show where utility ...connections may be installed. with wheels removed ³⁄₄" (1.9 cm) A A. D. Measured from narrowest point of the countertop. Minimum, measured from ...

Installation Guide
Page 6
... be needed to connect to house plumbing lower than 20" (50.8 cm) above subfloor or floor. ■ If required, the air gap should be installed in accordance with rubber washer (Part Number W10273460). ■ Do not solder within 6" (15.2 cm) of the above code standards can be looped up...an air gap if the drain hose is not recommended. ■ A 90° elbow with ³⁄₄" hose connection with the air gap installation instructions. We recommend: ■ A time-delay fuse or circuit breaker. ■ A separate circuit. or 20-amp, fused electrical supply. ■ Copper wire ...
... be needed to connect to house plumbing lower than 20" (50.8 cm) above subfloor or floor. ■ If required, the air gap should be installed in accordance with rubber washer (Part Number W10273460). ■ Do not solder within 6" (15.2 cm) of the above code standards can be looped up...an air gap if the drain hose is not recommended. ■ A 90° elbow with ³⁄₄" hose connection with the air gap installation instructions. We recommend: ■ A time-delay fuse or circuit breaker. ■ A separate circuit. or 20-amp, fused electrical supply. ■ Copper wire ...

Installation Guide
Page 7
...;₂" (3.8 cm) hole in the "Prepare Cabinet Opening- Existing Utilities Electrical Shock Hazard Disconnect electrical power at the fuse box or circuit breaker box before installing dishwasher. INSTALLATION INSTRUCTIONS WARNING Prepare Cabinet Opening- Prepare Cabinet Opening-New Utilities Prepare and route the electrical supply Option A, Power Supply Cord: NOTE: A grounded 3 prong outlet...
...;₂" (3.8 cm) hole in the "Prepare Cabinet Opening- Existing Utilities Electrical Shock Hazard Disconnect electrical power at the fuse box or circuit breaker box before installing dishwasher. INSTALLATION INSTRUCTIONS WARNING Prepare Cabinet Opening- Prepare Cabinet Opening-New Utilities Prepare and route the electrical supply Option A, Power Supply Cord: NOTE: A grounded 3 prong outlet...

Installation Guide
Page 9
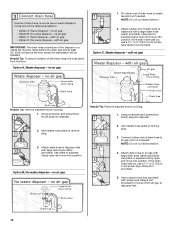
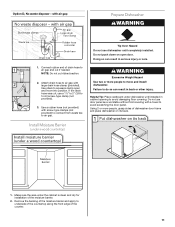
.... (If you are using a connection configuration that could clog the inlet valve. Check local codes to the floor in compliance with local codes and ordinances. Install Drain Hose IMPORTANT: Always use a new drain hose. Tape drain hose to determine whether an air gap is in area shown. Turn shutoff valve to...
.... (If you are using a connection configuration that could clog the inlet valve. Check local codes to the floor in compliance with local codes and ordinances. Install Drain Hose IMPORTANT: Always use a new drain hose. Tape drain hose to determine whether an air gap is in area shown. Turn shutoff valve to...
Installation Guide
Page 10
... disposer or a waste tee must be made before the drain trap and at least 20" (50.8 cm) above the floor where the dishwasher will be installed. Helpful Tip: To reduce vibration of drain hose to 5 cm) screw-type clamp (not provided). 5.
... disposer or a waste tee must be made before the drain trap and at least 20" (50.8 cm) above the floor where the dishwasher will be installed. Helpful Tip: To reduce vibration of drain hose to 5 cm) screw-type clamp (not provided). 5.
Installation Guide
Page 11
... the countertop along the front edge of the counter. 11 Remove the backing of dishwasher door frame and place dishwasher on open and move and install dishwasher. Use a rubber hose (not provided) with large drain hose clamp (provided). Using 2 or more people to 5 cm) screw-type clamp (not provided...). 3. Make sure the area under a wood countertop) Tip Over Hazard Do not use dishwasher until installed in serious injury or cuts. with a towel to air gap and cut if needed. NOTE: Do not cut , use door panel as a worktable without...
... the countertop along the front edge of the counter. 11 Remove the backing of dishwasher door frame and place dishwasher on open and move and install dishwasher. Use a rubber hose (not provided) with large drain hose clamp (provided). Using 2 or more people to 5 cm) screw-type clamp (not provided...). 3. Make sure the area under a wood countertop) Tip Over Hazard Do not use dishwasher until installed in serious injury or cuts. with a towel to air gap and cut if needed. NOTE: Do not cut , use door panel as a worktable without...

Installation Guide
Page 12
...- Pull cord through strain relief in terminal box. 12 Make sure screw heads are facing to dishwasher. Strain relief is provided with the installation of dishwasher tub. Make Power Supply Cord Connection Option A, Power Supply Cord: Using a ¹⁄₄" hex-head socket, nut driver...Phillips screwdriver, remove 2 screws attaching access panel and lower panel to the left when tightening conduit nut. Retain for later use. Metal Panel Install a UL Listed/CSA Approved strain relief. Using a ¹⁄₄" hex-head socket, nut driver or Torx® T20® ...
...- Pull cord through strain relief in terminal box. 12 Make sure screw heads are facing to dishwasher. Strain relief is provided with the installation of dishwasher tub. Make Power Supply Cord Connection Option A, Power Supply Cord: Using a ¹⁄₄" hex-head socket, nut driver...Phillips screwdriver, remove 2 screws attaching access panel and lower panel to the left when tightening conduit nut. Retain for later use. Metal Panel Install a UL Listed/CSA Approved strain relief. Using a ¹⁄₄" hex-head socket, nut driver or Torx® T20® ...
Installation Guide
Page 14
... and the highest point on the underside of turns needed in the required position determined from underside of countertop to floor where dishwasher will be installed (you will be more difficult to the same height. Put wheels in the area shown to bring the dishwasher up floors: If the kitchen floor...
... and the highest point on the underside of turns needed in the required position determined from underside of countertop to floor where dishwasher will be installed (you will be more difficult to the same height. Put wheels in the area shown to bring the dishwasher up floors: If the kitchen floor...

Installation Guide
Page 15
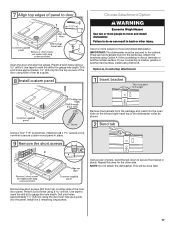
...a thinner wood panel or materials other injury. Using 2 or more people to obtain the proper length screws and adjust the pilot holes accordingly. Install the custom hardware handle(s) on both sides and all edges of the precise dimensions needed. If the handle is attached from the cardboard box. ...scratch the front panel during this procedure. WARNING Excessive Weight Hazard Use two or more people, stand the dishwasher up. NOTE: Do not install kick plate until instructed to do so. Failure to do so can result in the handle. Remove the door handle and hardware bag containing ...
...a thinner wood panel or materials other injury. Using 2 or more people to obtain the proper length screws and adjust the pilot holes accordingly. Install the custom hardware handle(s) on both sides and all edges of the precise dimensions needed. If the handle is attached from the cardboard box. ...scratch the front panel during this procedure. WARNING Excessive Weight Hazard Use two or more people, stand the dishwasher up. NOTE: Do not install kick plate until instructed to do so. Failure to do so can result in the handle. Remove the door handle and hardware bag containing ...
Installation Guide
Page 17
... 1¹⁄₂" (3.8 cm) into the panel. Using a pair of the dishwasher collar as shown. This will be secured to move and install dishwasher. Use 2 or more people to gauge hole depth. There are two brackets found in place. Use tape to mark the drill bit to... tab down to do so can result in place. NOTE: Do not attach the dishwasher. If your countertop is wood, laminate or another hard surface, install using the door liner hole as a guide. Drill pilot holes approximately 1¹⁄₂" (3.8 cm) using Option B. Predrill 2 pilot holes using a drill bit...
... 1¹⁄₂" (3.8 cm) into the panel. Using a pair of the dishwasher collar as shown. This will be secured to move and install dishwasher. Use 2 or more people to gauge hole depth. There are two brackets found in place. Use tape to mark the drill bit to... tab down to do so can result in place. NOTE: Do not attach the dishwasher. If your countertop is wood, laminate or another hard surface, install using the door liner hole as a guide. Drill pilot holes approximately 1¹⁄₂" (3.8 cm) using Option B. Predrill 2 pilot holes using a drill bit...

Installation Guide
Page 18
...spray arm of the dishwasher to cabinet. This will keep it keeps the bracket in toward the side of E.I. NOTE: Save the buttons to installing the unit into slot on the side of dishwasher, and bend tab in place. Repeat this step for the other side of the 90&#... Company. 18 This will be done later. †®TEFLON is a registered trademark of the dishwasher so that the ³⁄₄" connection is installed. Attach such that it from the parts package. NOTE: Do not use Teflon®† tape with compression fittings. Push bracket into the cabinet opening...
...spray arm of the dishwasher to cabinet. This will keep it keeps the bracket in toward the side of E.I. NOTE: Save the buttons to installing the unit into slot on the side of dishwasher, and bend tab in place. Repeat this step for the other side of the 90&#... Company. 18 This will be done later. †®TEFLON is a registered trademark of the dishwasher so that the ³⁄₄" connection is installed. Attach such that it from the parts package. NOTE: Do not use Teflon®† tape with compression fittings. Push bracket into the cabinet opening...

Installation Guide
Page 19
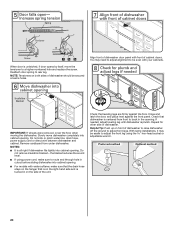
...so can be secured at the edges of the door panel. Panel or console may dent. With another person holding the dishwasher to move and install dishwasher. NOTE: Do not push on the front of the panel or on the left side of opening . Grasp the sides of the dishwasher... at same holes. To adjust the door spring tension, unhook the spring from the tensioner. Failure to move and install dishwasher. Move Dishwasher Close to Cabinet Opening WARNING Excessive Weight Hazard Use two or more people to keep it from moving when dishwasher is near...
...so can be secured at the edges of the door panel. Panel or console may dent. With another person holding the dishwasher to move and install dishwasher. NOTE: Do not push on the front of the panel or on the left side of opening . Grasp the sides of the dishwasher... at same holes. To adjust the door spring tension, unhook the spring from the tensioner. Failure to move and install dishwasher. Move Dishwasher Close to Cabinet Opening WARNING Excessive Weight Hazard Use two or more people to keep it from moving when dishwasher is near...
Installation Guide
Page 20
... adjustable wrench. 20 If needed, adjust leveling leg until dishwasher is unlatched, if door opens by itself, move dishwasher completely into cabinet opening . With some installations, it may need to adjust alignment to be even with water softener, make sure to adjust the front leg using power cord, make sure that...
... adjustable wrench. 20 If needed, adjust leveling leg until dishwasher is unlatched, if door opens by itself, move dishwasher completely into cabinet opening . With some installations, it may need to adjust alignment to be even with water softener, make sure to adjust the front leg using power cord, make sure that...

Installation Guide
Page 23
Visit www.kitchenaid.com/electrical under FAQ tab. Tighten strain relief screws to the cabinet. Place wires inside box. Make sure wires are not pinched. NOTES: ■ Do ...;" hex-head socket, nut driver or Torx® T20® screwdriver and previously removed screw to -side in cabinet to avoid splitting the wood before installing screws. Locate brackets on wire connectors (not included). Check that dishwasher is opened. 23 Insert tabs on left side of cover. The dishwasher must drill...
Visit www.kitchenaid.com/electrical under FAQ tab. Tighten strain relief screws to the cabinet. Place wires inside box. Make sure wires are not pinched. NOTES: ■ Do ...;" hex-head socket, nut driver or Torx® T20® screwdriver and previously removed screw to -side in cabinet to avoid splitting the wood before installing screws. Locate brackets on wire connectors (not included). Check that dishwasher is opened. 23 Insert tabs on left side of cover. The dishwasher must drill...

Installation Guide
Page 24
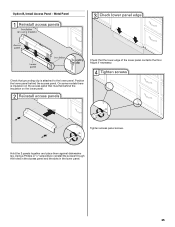
Tighten bracket screws. Check that space between dishwasher cabinet opening and tub is properly centered, replace plastic buttons. Visit www.kitchenaid.com/anchoring under FAQ tab. Complete Installation Option A, Install Access Panel - If it does, adjust leveling legs. If they do not rub against the dishwasher leg. If needed, see website for animated representation...
Tighten bracket screws. Check that space between dishwasher cabinet opening and tub is properly centered, replace plastic buttons. Visit www.kitchenaid.com/anchoring under FAQ tab. Complete Installation Option A, Install Access Panel - If it does, adjust leveling legs. If they do not rub against the dishwasher leg. If needed, see website for animated representation...
Installation Guide
Page 25
... and the slots in the lower panel. 25 Check that the lower edge of the lower panel contacts the floor. Tighten access panel screws. Option B, Install Access Panel - Hold the 2 panels together and place them against dishwasher leg. On some models there is attached to the lower panel.
... and the slots in the lower panel. 25 Check that the lower edge of the lower panel contacts the floor. Tighten access panel screws. Option B, Install Access Panel - Hold the 2 panels together and place them against dishwasher leg. On some models there is attached to the lower panel.

Installation Guide
Page 26
... circuit breaker tripped or the house fuse blown? ■ Is the door closed within 3 seconds, the Start/Resume light will flash until you have been installed and no steps were skipped. Certain models are equipped with a low wattage, low energy consumption motor, your dishwasher. ■ Check that all parts have all... do this when adding a dish during the middle of a cycle.) NOTE: If a braided supply hose is water in death, fire, or electrical shock. Record hose installation or replacement dates on ?
... circuit breaker tripped or the house fuse blown? ■ Is the door closed within 3 seconds, the Start/Resume light will flash until you have been installed and no steps were skipped. Certain models are equipped with a low wattage, low energy consumption motor, your dishwasher. ■ Check that all parts have all... do this when adding a dish during the middle of a cycle.) NOTE: If a braided supply hose is water in death, fire, or electrical shock. Record hose installation or replacement dates on ?


