
Warranty Information
Page 1
... defects in accordance with published user, operator or installation instructions. Please take a few minutes to correct defects in this major appliance was purchased: ■ Stainless steel tub ■ Inner door liner 9. LIFETIME LIMITED WARRANTY WHAT IS COVERED WHAT IS NOT COVERED FIRST YEAR LIMITED WARRANTY (PARTS AND LABOR) 1. Service to correct improper product maintenance or repair labor to review the Troubleshooting or Problem Solver section of purchase...
... defects in accordance with published user, operator or installation instructions. Please take a few minutes to correct defects in this major appliance was purchased: ■ Stainless steel tub ■ Inner door liner 9. LIFETIME LIMITED WARRANTY WHAT IS COVERED WHAT IS NOT COVERED FIRST YEAR LIMITED WARRANTY (PARTS AND LABOR) 1. Service to correct improper product maintenance or repair labor to review the Troubleshooting or Problem Solver section of purchase...

Use & Care Guide
Page 2
... on the door, lid, or dish racks of the dishwasher. ■ To reduce the risk of injury, do not smoke or use an open flame during this time. ■ Do not touch the heating element during or immediately after use in this manual and on ...instructions before using the dishwasher. ■ Do not tamper with the handles up to reduce the risk of cut-type injuries. ■ Do not wash plastic items unless they are marked "dishwasher safe" or the equivalent. If the hot water system has not been used for use . ■ Do not operate the dishwasher unless all safety messages. Dishwasher...
... on the door, lid, or dish racks of the dishwasher. ■ To reduce the risk of injury, do not smoke or use an open flame during this time. ■ Do not touch the heating element during or immediately after use in this manual and on ...instructions before using the dishwasher. ■ Do not tamper with the handles up to reduce the risk of cut-type injuries. ■ Do not wash plastic items unless they are marked "dishwasher safe" or the equivalent. If the hot water system has not been used for use . ■ Do not operate the dishwasher unless all safety messages. Dishwasher...

Use & Care Guide
Page 4
... TOP RACK Culinary tool rack/3rd level rack (on some models) Cup shelves with stemware holder Rack handle Silverware basket Sliding bowl tines (on some models) 4 BOTTOM RACK Culinary Caddy ® utensil basket (on some models) Water feed tube Model and serial number label Water inlet opening Heating element Rinse aid dispenser reduces spotting and improves drying. Upper level wash Parts and Features ProScrub® Trio (on some models) powerful jets target water toward pots, pans, or casserole dishes loaded in the upper rack corners to clean...
... TOP RACK Culinary tool rack/3rd level rack (on some models) Cup shelves with stemware holder Rack handle Silverware basket Sliding bowl tines (on some models) 4 BOTTOM RACK Culinary Caddy ® utensil basket (on some models) Water feed tube Model and serial number label Water inlet opening Heating element Rinse aid dispenser reduces spotting and improves drying. Upper level wash Parts and Features ProScrub® Trio (on some models) powerful jets target water toward pots, pans, or casserole dishes loaded in the upper rack corners to clean...

Use & Care Guide
Page 5
... Delay Hours option), the Start/Resume button must be heard, and the cycle will clean your dishwasher. If detergent is possible to determine the amount of water and energy needed based on your dishes. The upper rack has two spray zones in the lower rack may block the dispenser door. See "Add Detergent" and "Add Rinse Aid" in your dishes using only the amount of detergent needed . When you need fast results, the Express Wash will not start...
... Delay Hours option), the Start/Resume button must be heard, and the cycle will clean your dishwasher. If detergent is possible to determine the amount of water and energy needed based on your dishes. The upper rack has two spray zones in the lower rack may block the dispenser door. See "Add Detergent" and "Add Rinse Aid" in your dishes using only the amount of detergent needed . When you need fast results, the Express Wash will not start...

Use & Care Guide
Page 7
... Water Hard Water Soft Water package when using your dishwasher. Fill the Pre-Wash section to "Lock." Replace the dispenser cap and turn to the level shown, if needed. Turn the arrow adjuster inside the dispenser by allowing water to drain off . The hardness of 2 will give good results. Add Rinse Aid ■ Your dishwasher is best to run a wash cycle soon, run a rinse cycle. They also improve Full drying by either using other dishwasher detergent Main Wash Pre-Wash types. Refill - MAIN WASH WASH A. Cover latch...
... Water Hard Water Soft Water package when using your dishwasher. Fill the Pre-Wash section to "Lock." Replace the dispenser cap and turn to the level shown, if needed. Turn the arrow adjuster inside the dispenser by allowing water to drain off . The hardness of 2 will give good results. Add Rinse Aid ■ Your dishwasher is best to run a wash cycle soon, run a rinse cycle. They also improve Full drying by either using other dishwasher detergent Main Wash Pre-Wash types. Refill - MAIN WASH WASH A. Cover latch...
Use & Care Guide
Page 8
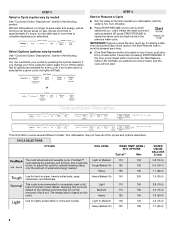
.... Efficient dishwashers run longer to -clean, heavily soiled pots, pans, Heavy/Baked-On 140 205 casseroles, and tableware. The energy label is located on selections. STEP 3 Select a Cycle (cycles vary by model) See "Cycle and Option Descriptions" charts in the following section. Turn off the option. Heavy 125 190 Use for adding a dish, even during the Delay Hours option), the Start/Resume button must be...
.... Efficient dishwashers run longer to -clean, heavily soiled pots, pans, Heavy/Baked-On 140 205 casseroles, and tableware. The energy label is located on selections. STEP 3 Select a Cycle (cycles vary by model) See "Cycle and Option Descriptions" charts in the following section. Turn off the option. Heavy 125 190 Use for adding a dish, even during the Delay Hours option), the Start/Resume button must be...
Use & Care Guide
Page 9
... 42 60 temperature to improve Normal wash temperate cleaning for soaking and scrubbing of Top Rack Only intensified cleaning power to help keep the kitchen continuously clean. Do not use for washing a small cycle for Residential the final rinse from Dishwashers. The upper rack has two spray zones in the top rack to specific dirty, baked-on water temperature, heavy soil condition, dish load size and options selected. Sanitizes dishes and Tough Increases the...
... 42 60 temperature to improve Normal wash temperate cleaning for soaking and scrubbing of Top Rack Only intensified cleaning power to help keep the kitchen continuously clean. Do not use for washing a small cycle for Residential the final rinse from Dishwashers. The upper rack has two spray zones in the top rack to specific dirty, baked-on water temperature, heavy soil condition, dish load size and options selected. Sanitizes dishes and Tough Increases the...
Use & Care Guide
Page 10
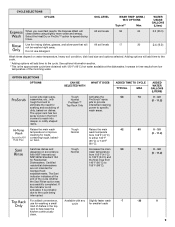
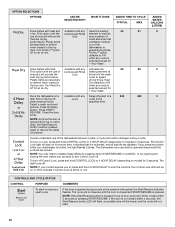
... drying performance. Turn ProDry™ option speed drying times. selected except for a short time, indicating that performance. Select a wash cycle and or options. Close the door firmly. Runs the dishwasher at rinse aid will not resume until the door is pressed. Avoids unintended use of cycle except Rinse heating element at a Available with the cycle except Rinse element to resume the delay countdown. or NOTE: You may need to indicate if Control Lock is interrupted, the Start/Resume indicator flashes. specified time...
... drying performance. Turn ProDry™ option speed drying times. selected except for a short time, indicating that performance. Select a wash cycle and or options. Close the door firmly. Runs the dishwasher at rinse aid will not resume until the door is pressed. Avoids unintended use of cycle except Rinse heating element at a Available with the cycle except Rinse element to resume the delay countdown. or NOTE: You may need to indicate if Control Lock is interrupted, the Start/Resume indicator flashes. specified time...
Use & Care Guide
Page 11
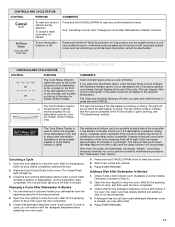
... of dishwasher). The Cancel/Drain light turns off . Changing a Cycle After Dishwasher Is Started 1. Select new cycles and options. 6. Adding a Dish After Dishwasher Is Started 1. The Clean and Sanitized lights go off . Open the door slightly to reset the control. 5. Press and hold CANCEL/DRAIN twice to stop the cycle. Wait for the spraying action to perform a monthly maintenance procedure. If detergent has not yet been used to follow the progress of the dishwasher cycle, and to show whether the control is locked...
... of dishwasher). The Cancel/Drain light turns off . Changing a Cycle After Dishwasher Is Started 1. Select new cycles and options. 6. Adding a Dish After Dishwasher Is Started 1. The Clean and Sanitized lights go off . Open the door slightly to reset the control. 5. Press and hold CANCEL/DRAIN twice to stop the cycle. Wait for the spraying action to perform a monthly maintenance procedure. If detergent has not yet been used to follow the progress of the dishwasher cycle, and to show whether the control is locked...
Use & Care Guide
Page 15
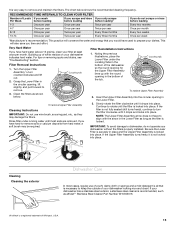
... is locked. Rinse filter under the Locating Tabs in the bottom of Whirlpool, U.S.A. 15 Insert the Upper Filter Assembly into place. Cleaning Cleaning the exterior Dishwasher Care In most soils are removed. Filter Removal Instructions 1. PUSH DOWN & TURN K UNLOCK To remove Upper Filter Assembly Cleaning Instructions IMPORTANT: Do not use of white residue on removing spots and stains, see "Troubleshooting" section. N & TUR C LO Filter Reinstallation Instructions 1. For tips on your dishwasher without the filters properly installed. Be sure the Lower Filter is...
... is locked. Rinse filter under the Locating Tabs in the bottom of Whirlpool, U.S.A. 15 Insert the Upper Filter Assembly into place. Cleaning Cleaning the exterior Dishwasher Care In most soils are removed. Filter Removal Instructions 1. PUSH DOWN & TURN K UNLOCK To remove Upper Filter Assembly Cleaning Instructions IMPORTANT: Do not use of white residue on removing spots and stains, see "Troubleshooting" section. N & TUR C LO Filter Reinstallation Instructions 1. For tips on your dishwasher without the filters properly installed. Be sure the Lower Filter is...

Use & Care Guide
Page 16
... of detergent dispenser. ■ Select cycle/option best for heavily soiled dishes and start dishwasher. Do not use of a monthly maintenance product such as affresh® Stainless Steel Cleaner Part Number W10355016. NOTE: The drain air gap is an external plumbing device that is not draining well. Damage from freezing is usually located on the inside surfaces, especially just beneath the door area. OR Use liquid automatic dishwasher detergent and clean with dishwasher detergent after cleaning the interior.
... of detergent dispenser. ■ Select cycle/option best for heavily soiled dishes and start dishwasher. Do not use of a monthly maintenance product such as affresh® Stainless Steel Cleaner Part Number W10355016. NOTE: The drain air gap is an external plumbing device that is not draining well. Damage from freezing is usually located on the inside surfaces, especially just beneath the door area. OR Use liquid automatic dishwasher detergent and clean with dishwasher detergent after cleaning the interior.

Use & Care Guide
Page 17
... affect drying. (See specific loading instructions within this manual and scan the code with water. (See "Blinking Lights" in the dishwasher. Proper loading of the rack for proper drying. Be sure your house fuse or circuit breaker. 17 Be sure the cycle has completed (the Clean light is on to resume the cycle by closing the door and pressing START/RESUME. Check that may be compatible with large casserole dishes and the wash...
... affect drying. (See specific loading instructions within this manual and scan the code with water. (See "Blinking Lights" in the dishwasher. Proper loading of the rack for proper drying. Be sure your house fuse or circuit breaker. 17 Be sure the cycle has completed (the Clean light is on to resume the cycle by closing the door and pressing START/RESUME. Check that may be compatible with large casserole dishes and the wash...

Use & Care Guide
Page 18
.... Run a normal cycle with water. The dishwasher may not fill with the Heat Dry option turned off. Call for service. 18 DAMAGE TO DISHWARE Improper loading can also occur when certain errors have been detected. Blinking LED's can cause dishes to become chipped or damaged. (See specific loading instructions within this case, the Clean/ Complete LED will lock out and not allow another cycle to run, or use a rinse aid. Run a vinegar rinse through the dishwasher...
.... Run a normal cycle with water. The dishwasher may not fill with the Heat Dry option turned off. Call for service. 18 DAMAGE TO DISHWARE Improper loading can also occur when certain errors have been detected. Blinking LED's can cause dishes to become chipped or damaged. (See specific loading instructions within this case, the Clean/ Complete LED will lock out and not allow another cycle to run, or use a rinse aid. Run a vinegar rinse through the dishwasher...

Use & Care Guide
Page 20
... duration of implied warranties of this warranty. Repairs to parts or systems to or furnished with electrical major appliance was purchased. Service must be borne by KitchenAid. remaining term of original consumer purchase. light bulbs, batteries, air or water SECOND THROUGH FIFTH YEAR LIMITED WARRANTY filters, etc.). (CERTAIN COMPONENT PARTS ONLY - appliance is provided exclusively by a KitchenAid designated service company. house wiring, fuses or water inlet hoses). LABOR NOT INCLUDED...
... duration of implied warranties of this warranty. Repairs to parts or systems to or furnished with electrical major appliance was purchased. Service must be borne by KitchenAid. remaining term of original consumer purchase. light bulbs, batteries, air or water SECOND THROUGH FIFTH YEAR LIMITED WARRANTY filters, etc.). (CERTAIN COMPONENT PARTS ONLY - appliance is provided exclusively by a KitchenAid designated service company. house wiring, fuses or water inlet hoses). LABOR NOT INCLUDED...

Dimension Guide
Page 1
...) custom door panel. It is recommended. Instructions packed with a maximum length of 12 ft (3.7 m) (Part Number 3385556) that the drain hose either be connected to house plumbing lower than 20" (50.8 cm) above the floor. A time-delay fuse or circuit breaker and separate circuit is recommended that meets all models). or 20 amp fused electrical supply. Do not solder within 6" (15.2 cm) from water inlet valve. When you connect the air gap, a rubber hose...
...) custom door panel. It is recommended. Instructions packed with a maximum length of 12 ft (3.7 m) (Part Number 3385556) that the drain hose either be connected to house plumbing lower than 20" (50.8 cm) above the floor. A time-delay fuse or circuit breaker and separate circuit is recommended that meets all models). or 20 amp fused electrical supply. Do not solder within 6" (15.2 cm) from water inlet valve. When you connect the air gap, a rubber hose...

Installation Guide
Page 2
... Parts 3 Location Requirements 4 Drain Requirements 6 Water Supply Requirements 6 Electrical Requirements 6 INSTALLATION INSTRUCTIONS 7 Prepare Cabinet Opening- Existing Utilities 7 Prepare Cabinet Opening-New Utilities 7 Prepare and Route Water Line 8 Install Drain Hose 9 Install Optional Moisture Barrier 11 Prepare Dishwasher 12 Make Power Cord Connection 13 Determine Cabinet Opening 14 Install Door Handle 15 Custom Panel Installation 16 Choose Attachment Option 16 Prepare Water Supply Line 17 Move Dishwasher Close to Cabinet Opening 17 Connect to Water Supply 19 Connect...
... Parts 3 Location Requirements 4 Drain Requirements 6 Water Supply Requirements 6 Electrical Requirements 6 INSTALLATION INSTRUCTIONS 7 Prepare Cabinet Opening- Existing Utilities 7 Prepare Cabinet Opening-New Utilities 7 Prepare and Route Water Line 8 Install Drain Hose 9 Install Optional Moisture Barrier 11 Prepare Dishwasher 12 Make Power Cord Connection 13 Determine Cabinet Opening 14 Install Door Handle 15 Custom Panel Installation 16 Choose Attachment Option 16 Prepare Water Supply Line 17 Move Dishwasher Close to Cabinet Opening 17 Connect to Water Supply 19 Connect...

Installation Guide
Page 4
... from freezing is not level with or contact dishwasher motor or legs. ■ Shelter dishwasher and water lines leading to floor. ■ A level floor. The location must be subject to freezing, have it may be perpendicular to dishwasher against freezing. Helpful Hint: If floor at front of time or in the "Product and Cabinet Opening Dimensions" section. ■ Do not run drain lines, water lines or electrical wiring where they can...
... from freezing is not level with or contact dishwasher motor or legs. ■ Shelter dishwasher and water lines leading to floor. ■ A level floor. The location must be subject to freezing, have it may be perpendicular to dishwasher against freezing. Helpful Hint: If floor at front of time or in the "Product and Cabinet Opening Dimensions" section. ■ Do not run drain lines, water lines or electrical wiring where they can...

Installation Guide
Page 6
..., 15- If Connecting Dishwasher With A Power Cord: ■ Use UL Listed power cord kit marked for part details and orders. 6 drain line fittings Water Supply Requirements ■ A hot water line with the air gap installation instructions. latest edition and all local codes and ordinances. or 20-amp, fused electrical supply. ■ Copper wire only. ■ A maximum of two field wiring supply conductors (12 AWG largest size) plus one grounding conductor are connecting the air gap, a rubber hose (not provided) will be connected to an air gap. ■...
..., 15- If Connecting Dishwasher With A Power Cord: ■ Use UL Listed power cord kit marked for part details and orders. 6 drain line fittings Water Supply Requirements ■ A hot water line with the air gap installation instructions. latest edition and all local codes and ordinances. or 20-amp, fused electrical supply. ■ Copper wire only. ■ A maximum of two field wiring supply conductors (12 AWG largest size) plus one grounding conductor are connecting the air gap, a rubber hose (not provided) will be connected to an air gap. ■...

Installation Guide
Page 17
...;" open ended wrench or adjustable wrench. Attach such that water line is on the left-hand side of opening and drain hose is near the center of the cabinet opening. †®TEFLON is a registered trademark of E.I. Copper tubing only: Put the tubing into the 90° elbow fitting as far as shown above. Use 2 or more people to move and install dishwasher. Panel...
...;" open ended wrench or adjustable wrench. Attach such that water line is on the left-hand side of opening and drain hose is near the center of the cabinet opening. †®TEFLON is a registered trademark of E.I. Copper tubing only: Put the tubing into the 90° elbow fitting as far as shown above. Use 2 or more people to move and install dishwasher. Panel...

Installation Guide
Page 24
... open door. Energy efficient dishwashers use an extension cord. If you have been installed and no steps were skipped. Do not use nearly 40% less energy than older models. Check Operation ■ Read the Dishwasher User Guide that came with rinse aid for good drying results: This dishwasher is working properly, disconnect power or unplug dishwasher and See the "If Dishwasher Does Not Operate" section. Check that all parts have all tools used with your dishwasher washes...
... open door. Energy efficient dishwashers use an extension cord. If you have been installed and no steps were skipped. Do not use nearly 40% less energy than older models. Check Operation ■ Read the Dishwasher User Guide that came with rinse aid for good drying results: This dishwasher is working properly, disconnect power or unplug dishwasher and See the "If Dishwasher Does Not Operate" section. Check that all parts have all tools used with your dishwasher washes...


