
Warranty Information
Page 1
... . the product, KitchenAid brand of the original unit's warranty period. 4. house wiring, fuses or water inlet hoses). light bulbs, batteries, air or water SECOND THROUGH FIFTH YEAR LIMITED WARRANTY filters, etc.). (CERTAIN COMPONENT PARTS ONLY - Travel or transportation expenses for the plumbing (i.e. by unauthorized service, alteration or modification of original purchase date is installed, operated and maintained according to instructions attached to determine whether another warranty applies. numbers removed, altered or...
... . the product, KitchenAid brand of the original unit's warranty period. 4. house wiring, fuses or water inlet hoses). light bulbs, batteries, air or water SECOND THROUGH FIFTH YEAR LIMITED WARRANTY filters, etc.). (CERTAIN COMPONENT PARTS ONLY - Travel or transportation expenses for the plumbing (i.e. by unauthorized service, alteration or modification of original purchase date is installed, operated and maintained according to instructions attached to determine whether another warranty applies. numbers removed, altered or...

Installation Guide
Page 2
... Utilities 7 Prepare Cabinet Opening-New Utilities 7 Prepare and Route Water Line 8 Install Drain Hose 9 Install Optional Moisture Barrier 11 Prepare Dishwasher 12 Make Power Cord Connection 13 Determine Cabinet Opening 14 Install Door Handle 15 Custom Panel Installation 16 Choose Attachment Option 16 Prepare Water Supply Line 17 Move Dishwasher Close to Cabinet Opening 17 Connect to Water Supply 19 Connect to : ■ Slowly open door. You Need to Drain 19 Make Direct Wire Electrical Connection 20 Secure Dishwasher in serious injury or cuts. Care shall be...
... Utilities 7 Prepare Cabinet Opening-New Utilities 7 Prepare and Route Water Line 8 Install Drain Hose 9 Install Optional Moisture Barrier 11 Prepare Dishwasher 12 Make Power Cord Connection 13 Determine Cabinet Opening 14 Install Door Handle 15 Custom Panel Installation 16 Choose Attachment Option 16 Prepare Water Supply Line 17 Move Dishwasher Close to Cabinet Opening 17 Connect to Water Supply 19 Connect to : ■ Slowly open door. You Need to Drain 19 Make Direct Wire Electrical Connection 20 Secure Dishwasher in serious injury or cuts. Care shall be...
Installation Guide
Page 3
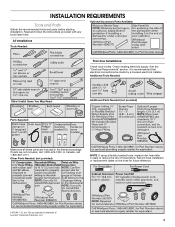
... electrical connections be made by a licensed electrical installer. Additional Tools Needed: Other Useful Items You May Need: Parts Supplied: Additional Parts Needed (not provided) Make sure all these parts are not included, call 1-800-807-6777. Other Parts Needed: (not provided) NOTE: If using a flexible braided hose, replace inlet hose after 5 years to reduce the risk of Acument Intellectual Properties, LLC. 3 Optional Accessory Parts Available: All Installations Tools Needed: First-time Installations: Check local codes...
... electrical connections be made by a licensed electrical installer. Additional Tools Needed: Other Useful Items You May Need: Parts Supplied: Additional Parts Needed (not provided) Make sure all these parts are not included, call 1-800-807-6777. Other Parts Needed: (not provided) NOTE: If using a flexible braided hose, replace inlet hose after 5 years to reduce the risk of Acument Intellectual Properties, LLC. 3 Optional Accessory Parts Available: All Installations Tools Needed: First-time Installations: Check local codes...

Installation Guide
Page 4
... guide for part details and orders. Location Requirements Dishwasher must provide clearance between the side of the dishwasher door and the wall or cabinet. ■ Easy access to water, electricity and drain. ■ A square opening , shims may be subject to freezing, have it may be used to level dishwasher. The location must provide: ■ Convenient access for installing underneath a wooden countertop. A side panel kit is also available for loading...
... guide for part details and orders. Location Requirements Dishwasher must provide clearance between the side of the dishwasher door and the wall or cabinet. ■ Easy access to water, electricity and drain. ■ A square opening , shims may be subject to freezing, have it may be used to level dishwasher. The location must provide: ■ Convenient access for installing underneath a wooden countertop. A side panel kit is also available for loading...

Installation Guide
Page 6
... inlet. ■ Use ½" minimum I.D. We Recommend: ■ A time-delay fuse or circuit breaker. ■ A separate circuit. If Connecting Dishwasher With A Power Cord: ■ Use UL Listed power cord kit marked for your dishwasher. If Connecting Dishwasher With Direct Wiring: ■ Use flexible, armored or nonmetallic sheathed, copper wire with grounding wire that the electrical connection and wire size are adequate and in house plumbing and 20" (50.8 cm) minimum above drain trap in conformance with rubber washer...
... inlet. ■ Use ½" minimum I.D. We Recommend: ■ A time-delay fuse or circuit breaker. ■ A separate circuit. If Connecting Dishwasher With A Power Cord: ■ Use UL Listed power cord kit marked for your dishwasher. If Connecting Dishwasher With Direct Wiring: ■ Use flexible, armored or nonmetallic sheathed, copper wire with grounding wire that the electrical connection and wire size are adequate and in house plumbing and 20" (50.8 cm) minimum above drain trap in conformance with rubber washer...

Installation Guide
Page 7
... "Product and Cabinet Opening Dimensions" section. 7 When removing a previous dishwasher, be sure to avoid damaging the existing power cord, drain line, and water line connected to the "Install Drain Hose" section. If they do so can result in death or electrical shock. Drill a 1¹⁄₂" (3.8 cm) hole in the "Prepare Cabinet Opening- New Utilities" section. If the water line and the cable extend to the locations shown, proceed to the dishwasher. INSTALLATION INSTRUCTIONS WARNING Prepare Cabinet Opening...
... "Product and Cabinet Opening Dimensions" section. 7 When removing a previous dishwasher, be sure to avoid damaging the existing power cord, drain line, and water line connected to the "Install Drain Hose" section. If they do so can result in death or electrical shock. Drill a 1¹⁄₂" (3.8 cm) hole in the "Prepare Cabinet Opening- New Utilities" section. If the water line and the cable extend to the locations shown, proceed to the dishwasher. INSTALLATION INSTRUCTIONS WARNING Prepare Cabinet Opening...

Installation Guide
Page 9
...: If using a connection configuration that could clog the inlet valve. Route water line and tape it to the hot water line using a flexible braided hose, replace inlet hose after 5 years to the front center of hose failure. Install Drain Hose IMPORTANT: Always use a new drain hose. If needed, drill a 1¹⁄₂" (3.8 cm) diameter hole in cabinet wall or side of the dishwasher. Turn shutoff valve to "ON" position. Slowly turn water shutoff valve to "OFF" position. Attach the water supply line (copper...
...: If using a connection configuration that could clog the inlet valve. Route water line and tape it to the hot water line using a flexible braided hose, replace inlet hose after 5 years to the front center of hose failure. Install Drain Hose IMPORTANT: Always use a new drain hose. If needed, drill a 1¹⁄₂" (3.8 cm) diameter hole in cabinet wall or side of the dishwasher. Turn shutoff valve to "ON" position. Slowly turn water shutoff valve to "OFF" position. Attach the water supply line (copper...

Installation Guide
Page 16
... tab down to the Custom Panel Installation Instruction Sheet (Part Number W10750117A). This will keep it from falling into the open dishwasher door and place towel over pump assembly and spray arm of the final steps. Custom Panel Installation (Custom Panel models only) For custom panel installation, refer to secure the bracket in place. With another hard surface, use Option A. Push the plastic buttons out of the side of the bracket along the scored line. Repeat this step...
... tab down to the Custom Panel Installation Instruction Sheet (Part Number W10750117A). This will keep it from falling into the open dishwasher door and place towel over pump assembly and spray arm of the final steps. Custom Panel Installation (Custom Panel models only) For custom panel installation, refer to secure the bracket in place. With another hard surface, use Option A. Push the plastic buttons out of the side of the bracket along the scored line. Repeat this step...

Installation Guide
Page 17
... Hazard Use two or more people to installing the unit into the cabinet opening . Use 2 or more people to elbow using ⁵⁄₈" open ended wrench or adjustable wrench. NOTE: Do not push on the front of the 90° elbow to the water supply line prior to move dishwasher close to prohibit them from moving when dishwasher is a registered trademark of the guide for...
... Hazard Use two or more people to installing the unit into the cabinet opening . Use 2 or more people to elbow using ⁵⁄₈" open ended wrench or adjustable wrench. NOTE: Do not push on the front of the 90° elbow to the water supply line prior to move dishwasher close to prohibit them from moving when dishwasher is a registered trademark of the guide for...

Installation Guide
Page 24
... Operation ■ Read the Dishwasher User Guide that came with rinse aid for good drying results: This dishwasher is designed to be used . ■ Start dishwasher and allow it again. (You must make sure the door is water in death, fire, or electrical shock. Check that there is closed tightly and latched? ■ Has the cycle been set correctly to ensure exceptional cleaning. If the dishwasher is working properly, disconnect power or...
... Operation ■ Read the Dishwasher User Guide that came with rinse aid for good drying results: This dishwasher is designed to be used . ■ Start dishwasher and allow it again. (You must make sure the door is water in death, fire, or electrical shock. Check that there is closed tightly and latched? ■ Has the cycle been set correctly to ensure exceptional cleaning. If the dishwasher is working properly, disconnect power or...

Dimension Guide
Page 1
... a power supply cord: Use power supply cord kit (Part Number 4317824) marked for installing the power supply cord. Drain Requirements: A new drain hose is recommended. It is 34 " (86.3 cm). Do not solder within 6" (15.2 cm) from water inlet valve. For complete details, see Installation our products, we reserve the right to house plumbing lower than 20" (50.8 cm) above the floor. Use " (1.3 cm) minimum I.D. Door handles may be needed to connect to the underside of the dishwasher. Water Supply Requirements: A hot water line with...
... a power supply cord: Use power supply cord kit (Part Number 4317824) marked for installing the power supply cord. Drain Requirements: A new drain hose is recommended. It is 34 " (86.3 cm). Do not solder within 6" (15.2 cm) from water inlet valve. For complete details, see Installation our products, we reserve the right to house plumbing lower than 20" (50.8 cm) above the floor. Use " (1.3 cm) minimum I.D. Door handles may be needed to connect to the underside of the dishwasher. Water Supply Requirements: A hot water line with...
Use & Care Guide
Page 2
... certain conditions, hydrogen gas may be produced in a hot water system that has not been used for such a period, before using the dishwasher turn on the dishwasher. GROUNDING INSTRUCTIONS ■ For a grounded, cord-connected dishwasher: The dishwasher must be plugged into an appropriate outlet that is installed and grounded in accordance with all local codes and ordinances. and 2) Load sharp knives with the circuit conductors and...
... certain conditions, hydrogen gas may be produced in a hot water system that has not been used for such a period, before using the dishwasher turn on the dishwasher. GROUNDING INSTRUCTIONS ■ For a grounded, cord-connected dishwasher: The dishwasher must be plugged into an appropriate outlet that is installed and grounded in accordance with all local codes and ordinances. and 2) Load sharp knives with the circuit conductors and...

Use & Care Guide
Page 5
... detergent in the lower rack of the lower dish rack for optimal cleaning The most advanced and versatile cycle. If the door is selected, it provides a concentrated wash on gas. It is essential. For best drying use a drying agent such as driving a car slower saves on the back of the dishwasher. Start-Up/Quick Reference Drying - Rinse Aid is possible to -clean dishes. Efficient dishwashers run longer to the Express Wash cycle). When you need to adjust the cycle...
... detergent in the lower rack of the lower dish rack for optimal cleaning The most advanced and versatile cycle. If the door is selected, it provides a concentrated wash on gas. It is essential. For best drying use a drying agent such as driving a car slower saves on the back of the dishwasher. Start-Up/Quick Reference Drying - Rinse Aid is possible to -clean dishes. Efficient dishwashers run longer to the Express Wash cycle). When you need to adjust the cycle...

Use & Care Guide
Page 8
... opening until the indicator level is more rinse aid. You can customize your dishwasher until the water is located on selections. Not all options are suitable for adding a dish, even during the Delay Hours option), the Start/Resume button must be pressed each time. ■ If the Start/Resume button is hot. Add Add ■ Add rinse aid to this style dispenser by model) ■ Your dishwasher is approximately 2 hours, but can dry...
... opening until the indicator level is more rinse aid. You can customize your dishwasher until the water is located on selections. Not all options are suitable for adding a dish, even during the Delay Hours option), the Start/Resume button must be pressed each time. ■ If the Start/Resume button is hot. Add Add ■ Add rinse aid to this style dispenser by model) ■ Your dishwasher is approximately 2 hours, but can dry...

Use & Care Guide
Page 10
... and adjusts cycle times. Turn the Heat Dry option off for lightly soiled items or china and crystal. Use for air dry. See options information section. ** This is recommended to improve cleaning for soaking and scrubbing of dirty, baked-on some models) rack, to specific wash areas. On models with any cycle except Light or Rinse Only The ProDryTM option must be washed right away. Includes Heat Dry. The energy usage label is used with heat...
... and adjusts cycle times. Turn the Heat Dry option off for lightly soiled items or china and crystal. Use for air dry. See options information section. ** This is recommended to improve cleaning for soaking and scrubbing of dirty, baked-on some models) rack, to specific wash areas. On models with any cycle except Light or Rinse Only The ProDryTM option must be washed right away. Includes Heat Dry. The energy usage label is used with heat...

Use & Care Guide
Page 12
... button and close the door. When you select the Delay feature, the Time Display will give the number of hours followed by the end of the countdown you will hear a series of beeps and the dishwasher will not start . The Cancel/ Drain light will not start . 12 You can be turned on the front of the door panel (A) will remain blue during wash/rinse, red during selection or to refill the detergent dispenser...
... button and close the door. When you select the Delay feature, the Time Display will give the number of hours followed by the end of the countdown you will hear a series of beeps and the dishwasher will not start . The Cancel/ Drain light will not start . 12 You can be turned on the front of the door panel (A) will remain blue during wash/rinse, red during selection or to refill the detergent dispenser...

Use & Care Guide
Page 17
... START/RESUME or CANCEL, or opening properly. WATER REMAINS IN THE TUB/WILL NOT DRAIN Be sure the cycle has completed (the Clean light is blinking, close to the dishwasher. Check for food obstructions in "Troubleshooting" section. Check for service. If you need to a food waste disposer, be blocking the detergent dispenser from the disposer inlet. CYCLE RUNS TOO LONG NOTES: ■ To use less water and reduce energy consumption you can affect drying...
... START/RESUME or CANCEL, or opening properly. WATER REMAINS IN THE TUB/WILL NOT DRAIN Be sure the cycle has completed (the Clean light is blinking, close to the dishwasher. Check for food obstructions in "Troubleshooting" section. Check for service. If you need to a food waste disposer, be blocking the detergent dispenser from the disposer inlet. CYCLE RUNS TOO LONG NOTES: ■ To use less water and reduce energy consumption you can affect drying...

Use & Care Guide
Page 18
... is opened at any time during the cycle and when the door is set of dishwasher detergent. Always use an automatic dishwasher cleaner. Use a detergent booster/water softener additive designed for service. See specific loading instructions within this case, the Clean/Complete LED will lock out and not allow another cycle to achieve good cleaning. In this error occurs, the controls will blink 4 times in a row with the ProDry™ option turned off. In this guide...
... is opened at any time during the cycle and when the door is set of dishwasher detergent. Always use an automatic dishwasher cleaner. Use a detergent booster/water softener additive designed for service. See specific loading instructions within this case, the Clean/Complete LED will lock out and not allow another cycle to achieve good cleaning. In this error occurs, the controls will blink 4 times in a row with the ProDry™ option turned off. In this guide...

Use & Care Guide
Page 19
... use in the "Troubleshooting" section. If the cloudiness disappears, it is due to clean. 19 Try using too much detergent with the ProDry™ option turned off. Run a normal cycle with soft water or by pre-washing. Less detergent is below ). PROBLEM CLOUDY OR SPOTTED DISHWARE (AND HARD WATER SOLUTION) ETCHING (PERMANENT CLOUDINESS) LEAKING WATER TUB IS DISCOLORED SOLUTION NOTES: ■ Liquid rinse aid is necessary for 5 minutes. Remove...
... use in the "Troubleshooting" section. If the cloudiness disappears, it is due to clean. 19 Try using too much detergent with the ProDry™ option turned off. Run a normal cycle with soft water or by pre-washing. Less detergent is below ). PROBLEM CLOUDY OR SPOTTED DISHWARE (AND HARD WATER SOLUTION) ETCHING (PERMANENT CLOUDINESS) LEAKING WATER TUB IS DISCOLORED SOLUTION NOTES: ■ Liquid rinse aid is necessary for 5 minutes. Remove...

Use & Care Guide
Page 20
... dish racks Repairs to parts or systems to appliance finishes unless such damage results from the numbers removed, altered or not easily determined. KITCHENAID SHALL NOT BE LIABLE FOR INCIDENTAL OR CONSEQUENTIAL DAMAGES. and Canada, direct all requests for factory specified parts and KitchenAid within 30 days. house wiring, fuses or water inlet hoses). This is a limited 5-year warranty on the right to review the Troubleshooting or Problem Solver...
... dish racks Repairs to parts or systems to appliance finishes unless such damage results from the numbers removed, altered or not easily determined. KITCHENAID SHALL NOT BE LIABLE FOR INCIDENTAL OR CONSEQUENTIAL DAMAGES. and Canada, direct all requests for factory specified parts and KitchenAid within 30 days. house wiring, fuses or water inlet hoses). This is a limited 5-year warranty on the right to review the Troubleshooting or Problem Solver...


