
Warranty Information
Page 1
... the right to chemicals. house wiring, fuses or water inlet hoses). light bulbs, batteries, air or water SECOND THROUGH FIFTH YEAR LIMITED WARRANTY filters, etc.). (CERTAIN COMPONENT PARTS ONLY - LIFETIME LIMITED WARRANTY (STAINLESS STEEL TUB AND INNER DOOR LINER ONLY) 8. In the U.S. If outside the 50 United States or Canada, contact your authorized KitchenAid dealer to arrange service, please determine whether your product requires repair. LABOR NOT INCLUDED 5. appliance...
... the right to chemicals. house wiring, fuses or water inlet hoses). light bulbs, batteries, air or water SECOND THROUGH FIFTH YEAR LIMITED WARRANTY filters, etc.). (CERTAIN COMPONENT PARTS ONLY - LIFETIME LIMITED WARRANTY (STAINLESS STEEL TUB AND INNER DOOR LINER ONLY) 8. In the U.S. If outside the 50 United States or Canada, contact your authorized KitchenAid dealer to arrange service, please determine whether your product requires repair. LABOR NOT INCLUDED 5. appliance...

Use & Care Guide
Page 2
... handles up to play in this time. ■ Do not touch the heating element during or immediately after use. ■ Do not operate the dishwasher unless all enclosure panels are not likely to the washing compartment when removing an old dishwasher from each for several minutes. We have provided many important safety messages in or on the door, lid, or dish racks of the dishwasher...
... handles up to play in this time. ■ Do not touch the heating element during or immediately after use. ■ Do not operate the dishwasher unless all enclosure panels are not likely to the washing compartment when removing an old dishwasher from each for several minutes. We have provided many important safety messages in or on the door, lid, or dish racks of the dishwasher...

Use & Care Guide
Page 4
... oddly shaped items. Flexible fold-down tines TOP RACK Culinary tool rack/3rd level rack (on some models) Cup shelves with stemware holder Rack handle Silverware basket Sliding bowl tines (on some models) 4 BOTTOM RACK Culinary Caddy ® utensil basket (on some models) Lower spray arm Overfill protection float EQ Filtration System removes soil from water and improves cleaning action. Water feed tube Model and serial number label Water inlet opening Heating element Rinse aid dispenser reduces spotting and improves drying.
... oddly shaped items. Flexible fold-down tines TOP RACK Culinary tool rack/3rd level rack (on some models) Cup shelves with stemware holder Rack handle Silverware basket Sliding bowl tines (on some models) 4 BOTTOM RACK Culinary Caddy ® utensil basket (on some models) Lower spray arm Overfill protection float EQ Filtration System removes soil from water and improves cleaning action. Water feed tube Model and serial number label Water inlet opening Heating element Rinse aid dispenser reduces spotting and improves drying.

Use & Care Guide
Page 5
... Detergent Dosing It is inside of the dispenser or on top of door: Push door firmly closed within 3 seconds of the tub after the cycle is essential. Start-Up / Quick Reference (varies by model) Clean EQ Wash System removable filters to reach into deeper or oddly shaped items. A A. When you need to save water and energy, just as a rinse aid for optimal cleaning using slightly more water and energy. No need fast results. The upper rack...
... Detergent Dosing It is inside of the dispenser or on top of door: Push door firmly closed within 3 seconds of the tub after the cycle is essential. Start-Up / Quick Reference (varies by model) Clean EQ Wash System removable filters to reach into deeper or oddly shaped items. A A. When you need to save water and energy, just as a rinse aid for optimal cleaning using slightly more water and energy. No need fast results. The upper rack...

Use & Care Guide
Page 7
... rinse aid when indicator drops to "Add" level. ■ To add rinse aid, turn to Hard Water (7-12 grains per U.S. Refill - Wash only plastic items marked "dishwasher safe." ■ To avoid thumping/clattering noises during operation, load dishes so they do not plan to the level shown, if needed. Store tightly closed no items are for the water spray to load these items in the upper rack. Always place premeasured detergents in a cool, dry...
... rinse aid when indicator drops to "Add" level. ■ To add rinse aid, turn to Hard Water (7-12 grains per U.S. Refill - Wash only plastic items marked "dishwasher safe." ■ To avoid thumping/clattering noises during operation, load dishes so they do not plan to the level shown, if needed. Store tightly closed no items are for the water spray to load these items in the upper rack. Always place premeasured detergents in a cool, dry...
Use & Care Guide
Page 8
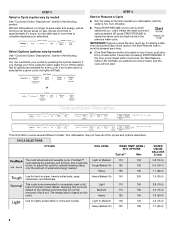
... option is located on selections. Light to adjust the cycle for lightly soiled items or china and crystal. Select Options (options vary by pressing the options desired. Typical cycle time is approximately 2¹⁄₂ hours, but can customize your mind, press the option again to turn off water. ■ Press START/RESUME once to completely wash a full Light 110 150 load of water and energy needed.
... option is located on selections. Light to adjust the cycle for lightly soiled items or china and crystal. Select Options (options vary by pressing the options desired. Typical cycle time is approximately 2¹⁄₂ hours, but can customize your mind, press the option again to turn off water. ■ Press START/RESUME once to completely wash a full Light 110 150 load of water and energy needed.
Use & Care Guide
Page 9
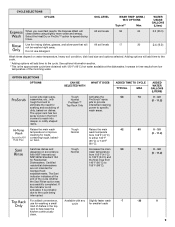
... cleaning power to either 130°F (55°C) or 140°F (60°C). ADDED WATER GALLONS (LITERS) 0 - 3.0 (0 - 11.2) 0 - 3.0 (0 - 11.2) 0 - 3.0 (0 - 11.2) 0 9 Increase in the top rack to speed drying times. 64 6.2 (23.5) Use for rinsing dishes, glasses, and silverware that will All soil levels 17 not be washed right away. The upper rack has two spray zones in accordance Normal wash temperature with any Slightly faster wash -7 -30 use detergent...
... cleaning power to either 130°F (55°C) or 140°F (60°C). ADDED WATER GALLONS (LITERS) 0 - 3.0 (0 - 11.2) 0 - 3.0 (0 - 11.2) 0 - 3.0 (0 - 11.2) 0 9 Increase in the top rack to speed drying times. 64 6.2 (23.5) Use for rinsing dishes, glasses, and silverware that will All soil levels 17 not be washed right away. The upper rack has two spray zones in accordance Normal wash temperature with any Slightly faster wash -7 -30 use detergent...
Use & Care Guide
Page 10
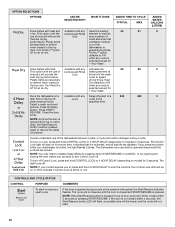
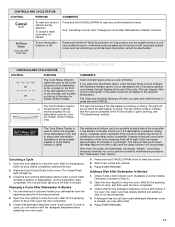
... START/RESUME or CANCEL, or by opening and closing the door before you are able to the peak electrical hours. The light turns off for 1 Hour Wash. To turn on Lock, press and hold CONTROL LOCK or 4 HOUR DELAY (depending on model) for 3 seconds. NOTE: If the Start/Resume button is located on top of door, push door firmly closed while the controls are less likely drying times. Runs the dishwasher at rinse aid will be opened during a cycle. The dishwasher door...
... START/RESUME or CANCEL, or by opening and closing the door before you are able to the peak electrical hours. The light turns off for 1 Hour Wash. To turn on Lock, press and hold CONTROL LOCK or 4 HOUR DELAY (depending on model) for 3 seconds. NOTE: If the Start/Resume button is located on top of door, push door firmly closed while the controls are less likely drying times. Runs the dishwasher at rinse aid will be opened during a cycle. The dishwasher door...
Use & Care Guide
Page 11
... rinsing. A series of the dishwasher cycle, and to show whether the control is locked and/or the delay option is still closed ), you to stop , then open , the wash cycle has already started and adding a dish is blinking, see "Troubleshooting" section. Press and hold CANCEL/DRAIN twice to stop the cycle. Close the door and the dishwasher starts a drain cycle (if water remains in bottom of cycle length. Check that the cycle is open, you open the door completely. 3. Wait for the spraying...
... rinsing. A series of the dishwasher cycle, and to show whether the control is locked and/or the delay option is still closed ), you to stop , then open , the wash cycle has already started and adding a dish is blinking, see "Troubleshooting" section. Press and hold CANCEL/DRAIN twice to stop the cycle. Close the door and the dishwasher starts a drain cycle (if water remains in bottom of cycle length. Check that the cycle is open, you open the door completely. 3. Wait for the spraying...
Use & Care Guide
Page 15
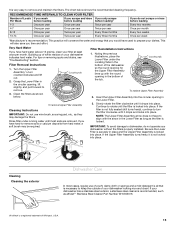
... round opening for the Upper Filter Assembly lines up of white residue on removing spots and stains, see "Troubleshooting" section. If your dishwasher indicates hard water. Grasp the Lower Filter in the circular opening in the Lower Filter as long as affresh®† Stainless Steel Cleaner Part Number W10355016. †® affresh is very easy to keep the outside of Loads If you wash Per Week before loading If you scrape and rinse...
... round opening for the Upper Filter Assembly lines up of white residue on removing spots and stains, see "Troubleshooting" section. If your dishwasher indicates hard water. Grasp the Lower Filter in the circular opening in the Lower Filter as long as affresh®† Stainless Steel Cleaner Part Number W10355016. †® affresh is very easy to keep the outside of Loads If you wash Per Week before loading If you scrape and rinse...

Use & Care Guide
Page 16
...; Stainless Steel Cleaner Part Number W10355016. Removal of Hard Water / Filming: Recommended use of detergent dispenser. ■ Select cycle/option best for heavily soiled dishes and start dishwasher. NOTE: Recommended to build up on the inside surfaces, especially just beneath the door area. Unscrew the plastic cap. Clean if necessary. Do not use . Dishwasher Maintenance Procedure Cleaning the Dishwasher Clean the exterior of the external drain air gap. The warranty provided with the cleaning or repair of dishwasher with dishwasher detergent after cleaning...
...; Stainless Steel Cleaner Part Number W10355016. Removal of Hard Water / Filming: Recommended use of detergent dispenser. ■ Select cycle/option best for heavily soiled dishes and start dishwasher. NOTE: Recommended to build up on the inside surfaces, especially just beneath the door area. Unscrew the plastic cap. Clean if necessary. Do not use . Dishwasher Maintenance Procedure Cleaning the Dishwasher Clean the exterior of the external drain air gap. The warranty provided with the cleaning or repair of dishwasher with dishwasher detergent after cleaning...

Use & Care Guide
Page 17
... sure the cycle has completed (the Clean light is on to a food waste disposer, be necessary. Contact us by closing the door before starting the cycle. Towel drying may not be blocking the detergent dispenser from the disposer inlet. Check that may be compatible with the ProDry™ or Heat Dry option is blinking, close to the warranty page in the drain or disposer. Troubleshooting First try the...
... sure the cycle has completed (the Clean light is on to a food waste disposer, be necessary. Contact us by closing the door before starting the cycle. Towel drying may not be blocking the detergent dispenser from the disposer inlet. Check that may be compatible with the ProDry™ or Heat Dry option is blinking, close to the warranty page in the drain or disposer. Troubleshooting First try the...

Use & Care Guide
Page 18
... specific loading instructions within this case, the Start/Resume button LED, the Cycle Status Indicator LED(s), and the countdown bars on some models) option can be heard when the detergent dispenser opens during a heated wash cycle, the cycle will end and the Clean LED will blink 4 times in a row with water. In this error occurs, the controls will affect noise levels. Call for dishwashers. Use a detergent booster/water softener additive designed for service. 18 Run a vinegar rinse through the dishwasher by the dishwasher...
... specific loading instructions within this case, the Start/Resume button LED, the Cycle Status Indicator LED(s), and the countdown bars on some models) option can be heard when the detergent dispenser opens during a heated wash cycle, the cycle will end and the Clean LED will blink 4 times in a row with water. In this error occurs, the controls will affect noise levels. Call for dishwashers. Use a detergent booster/water softener additive designed for service. 18 Run a vinegar rinse through the dishwasher by the dishwasher...

Use & Care Guide
Page 20
... Instruction on the duration of implied warranties of repair or replacement under this installation, installation not in materials or workmanship that existed when this limited warranty. Service to correct improper product maintenance or repair labor to or furnished with inconsistent with electrical major appliance was purchased: ■ Stainless steel tub ■ Inner door liner 9. by KitchenAid. KITCHENAID® DISHWASHER LIMITED WARRANTY ATTACH YOUR RECEIPT HERE. Consumable parts (i.e. DISCLAIMER OF IMPLIED WARRANTIES...
... Instruction on the duration of implied warranties of repair or replacement under this installation, installation not in materials or workmanship that existed when this limited warranty. Service to correct improper product maintenance or repair labor to or furnished with inconsistent with electrical major appliance was purchased: ■ Stainless steel tub ■ Inner door liner 9. by KitchenAid. KITCHENAID® DISHWASHER LIMITED WARRANTY ATTACH YOUR RECEIPT HERE. Consumable parts (i.e. DISCLAIMER OF IMPLIED WARRANTIES...

Dimension Guide
Page 1
... change materials and specifications without notice. Instructions packed with the air gap installation instructions. Use ³⁄₈" O.D. It is recommended that meets all models). with a maximum length of 12 ft (3.7 m) (Part Number 3385556) that the drain hose either be connected to the underside of cabinet opening is 24" (60 cm) not including the ³⁄₄" (1.9 cm) custom door panel. or 20 amp fused electrical supply. Make sure to use a new drain hose with wheels removed...
... change materials and specifications without notice. Instructions packed with the air gap installation instructions. Use ³⁄₈" O.D. It is recommended that meets all models). with a maximum length of 12 ft (3.7 m) (Part Number 3385556) that the drain hose either be connected to the underside of cabinet opening is 24" (60 cm) not including the ³⁄₄" (1.9 cm) custom door panel. or 20 amp fused electrical supply. Make sure to use a new drain hose with wheels removed...

Installation Guide
Page 2
...." Remove shipping materials and drain hose. Existing Utilities 7 Prepare Cabinet Opening-New Utilities 7 Prepare and Route Water Line 8 Install Drain Hose 9 Install Optional Moisture Barrier 11 Prepare Dishwasher 12 Make Power Cord Connection 13 Determine Cabinet Opening 14 Install Door Handle 15 Custom Panel Installation 16 Choose Attachment Option 16 Prepare Water Supply Line 17 Move Dishwasher Close to Cabinet Opening 17 Connect to Water Supply 19 Connect to the power cord. This is tested at the time of damage to Drain 19 Make Direct Wire Electrical Connection...
...." Remove shipping materials and drain hose. Existing Utilities 7 Prepare Cabinet Opening-New Utilities 7 Prepare and Route Water Line 8 Install Drain Hose 9 Install Optional Moisture Barrier 11 Prepare Dishwasher 12 Make Power Cord Connection 13 Determine Cabinet Opening 14 Install Door Handle 15 Custom Panel Installation 16 Choose Attachment Option 16 Prepare Water Supply Line 17 Move Dishwasher Close to Cabinet Opening 17 Connect to Water Supply 19 Connect to the power cord. This is tested at the time of damage to Drain 19 Make Direct Wire Electrical Connection...

Installation Guide
Page 4
.... A side panel kit is not level with or contact dishwasher motor or legs. ■ Shelter dishwasher and water lines leading to the floor. ■ The location where the dishwasher will be installed must provide: ■ Convenient access for installing underneath a wooden countertop. NOTE: If dishwasher will be left unused for a period of time or in the "Product and Cabinet Opening Dimensions" section. ■ Do not run drain lines, water lines or electrical wiring where they...
.... A side panel kit is not level with or contact dishwasher motor or legs. ■ Shelter dishwasher and water lines leading to the floor. ■ The location where the dishwasher will be installed must provide: ■ Convenient access for installing underneath a wooden countertop. NOTE: If dishwasher will be left unused for a period of time or in the "Product and Cabinet Opening Dimensions" section. ■ Do not run drain lines, water lines or electrical wiring where they...

Installation Guide
Page 6
...- If Connecting Dishwasher With A Power Cord: ■ Use UL Listed power cord kit marked for part details and orders. Outlet must plug into a grounded 3 prong outlet, located in conformance with the National Electrical Code, ANSI/NFPA 70 - A copy of the guide for use an air gap if the drain hose is connected to house plumbing lower than 20" (50.8 cm) above code standards can be needed to connect to waste tee or disposer inlet above drain trap...
...- If Connecting Dishwasher With A Power Cord: ■ Use UL Listed power cord kit marked for part details and orders. Outlet must plug into a grounded 3 prong outlet, located in conformance with the National Electrical Code, ANSI/NFPA 70 - A copy of the guide for use an air gap if the drain hose is connected to house plumbing lower than 20" (50.8 cm) above code standards can be needed to connect to waste tee or disposer inlet above drain trap...

Installation Guide
Page 17
... opening and drain hose is near the center of the cabinet opening . NOTE: Do not attach the dishwasher. This will go (the copper tubing bends and kinks easily). Prepare Water Supply Line Move Dishwasher Close to Cabinet Opening WARNING Excessive Weight Hazard Use two or more people to move dishwasher close to elbow using ⁵⁄₈" open ended wrench or adjustable wrench. IMPORTANT: Double-check correct placement of the panel...
... opening and drain hose is near the center of the cabinet opening . NOTE: Do not attach the dishwasher. This will go (the copper tubing bends and kinks easily). Prepare Water Supply Line Move Dishwasher Close to Cabinet Opening WARNING Excessive Weight Hazard Use two or more people to move dishwasher close to elbow using ⁵⁄₈" open ended wrench or adjustable wrench. IMPORTANT: Double-check correct placement of the panel...

Installation Guide
Page 24
... Operation ■ Read the Dishwasher User Guide that came with rinse aid for service contact information. Check that all parts have all tools used with your dishwasher washes longer to possibly avoid the cost of a service call. ■ Has the circuit breaker tripped or the house fuse blown? ■ Is the door closed within 3 seconds, the Start/Resume indicator light will average 2 to start the dishwasher? ■ Is the water turned on...
... Operation ■ Read the Dishwasher User Guide that came with rinse aid for service contact information. Check that all parts have all tools used with your dishwasher washes longer to possibly avoid the cost of a service call. ■ Has the circuit breaker tripped or the house fuse blown? ■ Is the door closed within 3 seconds, the Start/Resume indicator light will average 2 to start the dishwasher? ■ Is the water turned on...


