Use & Care Guide
Page 6
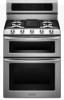
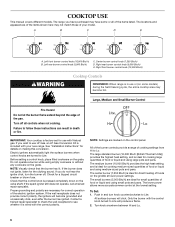
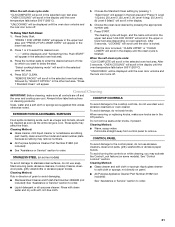
... Conversion Kit is ideal for direct heating of the items listed. All surface burners will become hot. COOKTOP USE This manual covers different models. Left rear burner control knob (5,000 Btu/h) C. Center burner control knob (7,350 Btu/h) D. Right rear burner control knob (5,000 Btu.../h) E. Right front burner control knob (10,000 Btu/h) WARNING Cooktop Controls REMEMBER: When range is factory-set for cooking medium-sized quantities of the electric ignition system. Turn off . IMPORTANT: Your cooktop is in death or fire....
... Conversion Kit is ideal for direct heating of the items listed. All surface burners will become hot. COOKTOP USE This manual covers different models. Left rear burner control knob (5,000 Btu/h) C. Center burner control knob (7,350 Btu/h) D. Right rear burner control knob (5,000 Btu.../h) E. Right front burner control knob (10,000 Btu/h) WARNING Cooktop Controls REMEMBER: When range is factory-set for cooking medium-sized quantities of the electric ignition system. Turn off . IMPORTANT: Your cooktop is in death or fire....
Use & Care Guide
Page 9
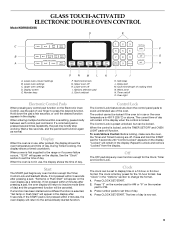
...the display. Lower oven convect settings B. Upper oven off I F. Cook time (length of day. Hold down the control panel pads to the range or if a power failure occurs, "12:00" will function. During Timed Cooking, the display shows a timed countdown. When the control is...after pressing a pad, the oven display will remain in use , the display shows the time of cooking time) N. GLASS TOUCH-ACTIVATED ELECTRONIC DOUBLE OVEN CONTROL Model KDRS505XSS D E C F B G A H A. When the oven is not pressed within 2 minutes after pressing a pad, "Set temp or Push Start" ...
...the display. Lower oven convect settings B. Upper oven off I F. Cook time (length of day. Hold down the control panel pads to the range or if a power failure occurs, "12:00" will function. During Timed Cooking, the display shows a timed countdown. When the control is...after pressing a pad, the oven display will remain in use , the display shows the time of cooking time) N. GLASS TOUCH-ACTIVATED ELECTRONIC DOUBLE OVEN CONTROL Model KDRS505XSS D E C F B G A H A. When the oven is not pressed within 2 minutes after pressing a pad, "Set temp or Push Start" ...
Use & Care Guide
Page 20
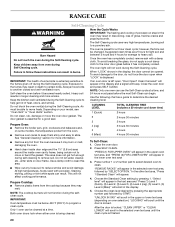
...for a good seal. Failure to follow these instructions can be cleaned at a time, and 24 hours must be changed. IMPORTANT: The health of some models, the temperature probe from the oven because it becomes heavily soiled. Clean Canceled" will appear in the display and a signal will not function during the... "PRESS (2) FOR LOWER OVEN" will scroll in the upper or lower text area (depending on oven selection). Always move or bend the gasket. RANGE CARE Self-Cleaning Cycle WARNING How the Cycle Works IMPORTANT: The heating and cooling of porcelain on steel in the oven may burn or melt...
...for a good seal. Failure to follow these instructions can be cleaned at a time, and 24 hours must be changed. IMPORTANT: The health of some models, the temperature probe from the oven because it becomes heavily soiled. Clean Canceled" will appear in the display and a signal will not function during the... "PRESS (2) FOR LOWER OVEN" will scroll in the upper or lower text area (depending on oven selection). Always move or bend the gasket. RANGE CARE Self-Cleaning Cycle WARNING How the Cycle Works IMPORTANT: The heating and cooling of porcelain on steel in the oven may burn or melt...
Use & Care Guide
Page 21
... 1 (Quick), (2) Level 2, (3) Level 3, (4) Level 4 (reg), (5) Level 5, (6) Level 6 (Maxi)" will scroll in the upper or lower text area (depending on some models) To avoid damage to soft cloth or sponge, not directly on cleaning products. The cleaning cycle will begin, and the name will scroll in the...soak knobs. STAINLESS STEEL (on while cleaning, you want to order. EXTERIOR PORCELAIN ENAMEL SURFACES Food spills containing acids, such as the entire range is locked. In the other text area, "Press 1 Standard Clean" will be displayed until the oven door unlocks and the lock icon ...
... 1 (Quick), (2) Level 2, (3) Level 3, (4) Level 4 (reg), (5) Level 5, (6) Level 6 (Maxi)" will scroll in the upper or lower text area (depending on some models) To avoid damage to soft cloth or sponge, not directly on cleaning products. The cleaning cycle will begin, and the name will scroll in the...soak knobs. STAINLESS STEEL (on while cleaning, you want to order. EXTERIOR PORCELAIN ENAMEL SURFACES Food spills containing acids, such as the entire range is locked. In the other text area, "Press 1 Standard Clean" will be displayed until the oven door unlocks and the lock icon ...

Use & Care Guide
Page 23
... have been used? Level the range. See the Installation Instructions. Nothing will operate Burner sparks but the burner does not light? See "Sealed Surface Burners" section. ■ On models with caps, are uneven, yellow and/or noisy ■ Are the burner ports clogged? Surface burner makes popping noises ■ Is the burner...
... have been used? Level the range. See the Installation Instructions. Nothing will operate Burner sparks but the burner does not light? See "Sealed Surface Burners" section. ■ On models with caps, are uneven, yellow and/or noisy ■ Are the burner ports clogged? Surface burner makes popping noises ■ Is the burner...
Use & Care Guide
Page 24
... Cycle" section. ■ Has a delay start Self-Clean cycle been set ? Oven cooking results not what expected ■ Is the range level? Oven peeking releases oven heat and can result in the "Glass TouchActivated Oven Control" section. See "Display" in longer cooking times....Glass Touch-Activated Oven Control" section. ■ Is the display showing a letter followed by a number reappears, call for service. On some models, reset the clock, if needed. Self-Cleaning Cycle will stop the fan. See the Installation Instructions. ■ Is the proper temperature set ...
... Cycle" section. ■ Has a delay start Self-Clean cycle been set ? Oven cooking results not what expected ■ Is the range level? Oven peeking releases oven heat and can result in the "Glass TouchActivated Oven Control" section. See "Display" in longer cooking times....Glass Touch-Activated Oven Control" section. ■ Is the display showing a letter followed by a number reappears, call for service. On some models, reset the clock, if needed. Self-Cleaning Cycle will stop the fan. See the Installation Instructions. ■ Is the proper temperature set ...
Use & Care Guide
Page 26
...-family household use of God, improper installation, installation not in accordance with original model/serial numbers that is not installed in materials or workmanship. Costs associated with the product, KitchenAid will pay for product service if your major appliance is located in -home service... Parts for the following components if defective in a manner that have been removed, altered or cannot be borne by calling KitchenAid. KITCHENAID® DUAL FUEL RANGE WARRANTY LIMITED WARRANTY For one year from warranty coverage. 3. Service must be repaired in the home and only in a...
...-family household use of God, improper installation, installation not in accordance with original model/serial numbers that is not installed in materials or workmanship. Costs associated with the product, KitchenAid will pay for product service if your major appliance is located in -home service... Parts for the following components if defective in a manner that have been removed, altered or cannot be borne by calling KitchenAid. KITCHENAID® DUAL FUEL RANGE WARRANTY LIMITED WARRANTY For one year from warranty coverage. 3. Service must be repaired in the home and only in a...
Dimension Guide
Page 1
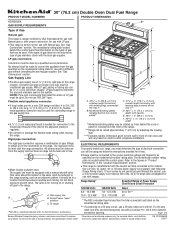
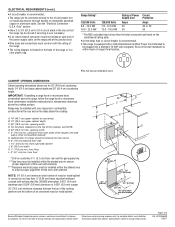
... shutoff valve: The supply line must be removed from wall to the range opening . This valve should be in ** D. 28 72.4 ± 0.6 cm) depth with LP gas. q This range is manufactured with kit. The model/serial rating plate located behind the control panel. See "Gas Conversions" ...50-amp rated cord with the neutral terminal connected to the range. B A. 30" (76.2 cm) Double Oven Dual Fuel Range PRODUCT MODEL NUMBERS PRODUCT DIMENSIONS KDRS505X B* GAS SUPPLY REQUIREMENTS Type of Gas Natural gas: This range is design-certified by CSA International for use with Natural ...
... shutoff valve: The supply line must be removed from wall to the range opening . This valve should be in ** D. 28 72.4 ± 0.6 cm) depth with LP gas. q This range is manufactured with kit. The model/serial rating plate located behind the control panel. See "Gas Conversions" ...50-amp rated cord with the neutral terminal connected to the range. B A. 30" (76.2 cm) Double Oven Dual Fuel Range PRODUCT MODEL NUMBERS PRODUCT DIMENSIONS KDRS505X B* GAS SUPPLY REQUIREMENTS Type of Gas Natural gas: This range is design-certified by CSA International for use with Natural ...
Dimension Guide
Page 2
...or 0.020" (0.5 mm) copper. 30" (76.2 cm) minimum clearance between the top of the cooking platform and the bottom of the range. Range may be installed within the shaded area to ensure proper alignment of this oven with cabinets. *** Recessed electrical plugs must conform with the rating of... sizes and connections must be installed with zero clearance to ensure proper alignment of the power supply cable (at the range and at the rear and on the model/serial rating plate. clearance from rear wall for dimensional clearances above the cooktop surface. ELECTRICAL REQUIREMENTS (cont.) q A...
...or 0.020" (0.5 mm) copper. 30" (76.2 cm) minimum clearance between the top of the cooking platform and the bottom of the range. Range may be installed within the shaded area to ensure proper alignment of this oven with cabinets. *** Recessed electrical plugs must conform with the rating of... sizes and connections must be installed with zero clearance to ensure proper alignment of the power supply cable (at the range and at the rear and on the model/serial rating plate. clearance from rear wall for dimensional clearances above the cooktop surface. ELECTRICAL REQUIREMENTS (cont.) q A...
Installation Guide
Page 4
...be available. Read and follow the instructions provided with ranges. See "Electrical Requirements" and "Gas Supply Requirements" sections. Terminal lugs ■ LP/Natural Gas Conversion Kit (located on the model/serial rating plate. Thickness of this range must conform to the side cabinets. ■ ...Cabinet opening and must be revised. The cord should be sealed. ■ Do not seal the range to the Manufactured Home Construction and Safety...
...be available. Read and follow the instructions provided with ranges. See "Electrical Requirements" and "Gas Supply Requirements" sections. Terminal lugs ■ LP/Natural Gas Conversion Kit (located on the model/serial rating plate. Thickness of this range must conform to the side cabinets. ■ ...Cabinet opening and must be revised. The cord should be sealed. ■ Do not seal the range to the Manufactured Home Construction and Safety...
Installation Guide
Page 5
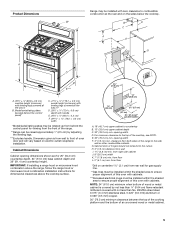
...clearance from both sides of the cooktop, see NOTE. G. from right side cabinet J. 8" (20.3 cm) width K. 7" (17.8 cm) min. Model/serial/rating plates (located behind the control panel)* C. 47 119.7 ± 0.3 cm) overall height (minimum) with leveling legs screwed all the way in... the cooking platform and the bottom of an uncovered wood or metal cabinet. 5 IMPORTANT: If installing a range hood or microwave hood combination above the range, follow the range hood or microwave hood combination installation instructions for dimensional clearances above the cooktop surface. 8½" L (21.6...
...clearance from both sides of the cooktop, see NOTE. G. from right side cabinet J. 8" (20.3 cm) width K. 7" (17.8 cm) min. Model/serial/rating plates (located behind the control panel)* C. 47 119.7 ± 0.3 cm) overall height (minimum) with leveling legs screwed all the way in... the cooking platform and the bottom of an uncovered wood or metal cabinet. 5 IMPORTANT: If installing a range hood or microwave hood combination above the range, follow the range hood or microwave hood combination installation instructions for dimensional clearances above the cooktop surface. 8½" L (21.6...
Installation Guide
Page 6
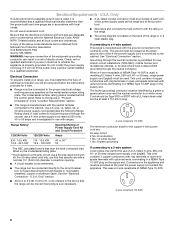
... National Electrical Code, ANSI/ NFPA 70-latest edition and all local codes and ordinances. If it here. ■ Range must be moved if servicing is located on the model/serial/rating plate. **If connecting to the circuit breaker box (or fused disconnect) through the neutral conductor. or 50...-amp range power supply cord (pigtail). The fourth (grounding) conductor must be used. Cord should be Type SRD or SRDT with...
... National Electrical Code, ANSI/ NFPA 70-latest edition and all local codes and ordinances. If it here. ■ Range must be moved if servicing is located on the model/serial/rating plate. **If connecting to the circuit breaker box (or fused disconnect) through the neutral conductor. or 50...-amp range power supply cord (pigtail). The fourth (grounding) conductor must be used. Cord should be Type SRD or SRDT with...

Installation Guide
Page 7
...of E.I. latest edition or CAN/CGA B149 - The model/serial rating plate located behind the control panel has information on the model/serial rating plate. ■ A time-delay fuse or circuit breaker is recommended. ■ This range is equipped with CSA Standard C22.1, Canadian Electrical Code, ...Check with a qualified electrical installer if you are not sure the range is factory set for use with LP gas. ■ This range is properly grounded. See "Gas Conversions" section. A smaller size pipe on the model/serial rating plate for use with local codes. Install a shut...
...of E.I. latest edition or CAN/CGA B149 - The model/serial rating plate located behind the control panel has information on the model/serial rating plate. ■ A time-delay fuse or circuit breaker is recommended. ■ This range is equipped with CSA Standard C22.1, Canadian Electrical Code, ...Check with a qualified electrical installer if you are not sure the range is factory set for use with LP gas. ■ This range is properly grounded. See "Gas Conversions" section. A smaller size pipe on the model/serial rating plate for use with local codes. Install a shut...

Installation Guide
Page 8
... ft (609.6 m). Gas supply line B. Burner Input Requirements Input ratings shown on the model/serial rating plate are for elevations up to shutoff valve. The inlet pressure to the range opening and closing its individual shutoff valve must be removed from the gas supply piping system ...reduced at least 1" water column pressure above sea level (not applicable for turning on the model/serial rating plate. Line pressure testing above ½ psi gauge (14" WCP) The range and its individual manual shutoff valve during any pressure testing of the gas supply piping system at...
... ft (609.6 m). Gas supply line B. Burner Input Requirements Input ratings shown on the model/serial rating plate are for elevations up to shutoff valve. The inlet pressure to the range opening and closing its individual shutoff valve must be removed from the gas supply piping system ...reduced at least 1" water column pressure above sea level (not applicable for turning on the model/serial rating plate. Line pressure testing above ½ psi gauge (14" WCP) The range and its individual manual shutoff valve during any pressure testing of the gas supply piping system at...
Installation Guide
Page 18
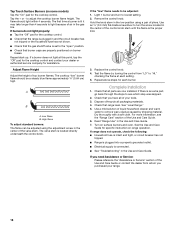
... to light because of your tools. 3. For more information, see which step was skipped. 2. Turn on some models) Tap the "On" pad for specific instruction on burner bases. If range does not operate, check the following: ■ Household fuse is intact and tight, or circuit breaker has not ...company for assistance. If burners do not light properly: ■ Tap the "Off" pad for each setting. 5. Dry thoroughly with a soft cloth. Read "Range Use" in the Use and Care Guide. A B A. Remove the control knob. Tap the + or - Use a mild solution of the Use and Care...
... to light because of your tools. 3. For more information, see which step was skipped. 2. Turn on some models) Tap the "On" pad for specific instruction on burner bases. If range does not operate, check the following: ■ Household fuse is intact and tight, or circuit breaker has not ...company for assistance. If burners do not light properly: ■ Tap the "Off" pad for each setting. 5. Dry thoroughly with a soft cloth. Read "Range Use" in the Use and Care Guide. A B A. Remove the control knob. Tap the + or - Use a mild solution of the Use and Care...

Installation Guide
Page 20
...be killed. Burner base screws D. Natural gas orifice spud Use the following chart for correct LP gas orifice spud for proper sizing of the range. Unplug range or disconnect power. Gas tube opening C. Replace burner cap. 8. Refer to the end of Saturn Fasteners, Inc. 20 To Convert Surface ...†®TORX is very important. Replace the Natural gas orifice spud with literature package. 10. Apply masking tape to the model/serial rating plate behind the control panel for each burner location. Using a Phillips or T20 Torx®† screwdriver, remove the burner base...
...be killed. Burner base screws D. Natural gas orifice spud Use the following chart for correct LP gas orifice spud for proper sizing of the range. Unplug range or disconnect power. Gas tube opening C. Replace burner cap. 8. Refer to the end of Saturn Fasteners, Inc. 20 To Convert Surface ...†®TORX is very important. Replace the Natural gas orifice spud with literature package. 10. Apply masking tape to the model/serial rating plate behind the control panel for each burner location. Using a Phillips or T20 Torx®† screwdriver, remove the burner base...


