Use & Care Guide
Page 6
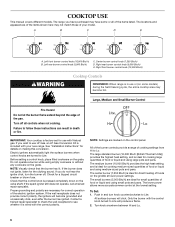
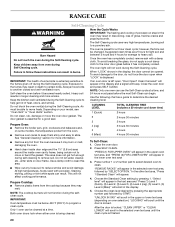
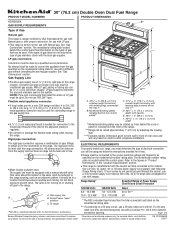
...ignited. The large standard burner (16,000 Btu/h [British Thermal Units]) provides the highest heat setting, and is in use with your model. The lower power allows more accurate simmer control at lower power settings. To Set: 1. The locations and appearances of the items shown here... cooking medium-sized quantities of food or liquid and using large pots and pans. The center burner (7,350 Btu/h) is pressed completely down on some models) during the Self-Cleaning cycle, the entire cooktop area may have some or all controls when not cooking. Push in death or fire. A B ...
...ignited. The large standard burner (16,000 Btu/h [British Thermal Units]) provides the highest heat setting, and is in use with your model. The lower power allows more accurate simmer control at lower power settings. To Set: 1. The locations and appearances of the items shown here... cooking medium-sized quantities of food or liquid and using large pots and pans. The center burner (7,350 Btu/h) is pressed completely down on some models) during the Self-Cleaning cycle, the entire cooktop area may have some or all controls when not cooking. Push in death or fire. A B ...
Use & Care Guide
Page 9
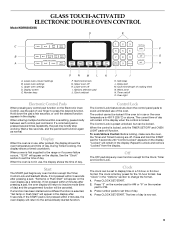
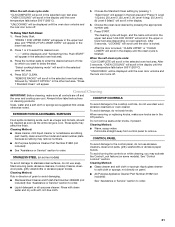
GLASS TOUCH-ACTIVATED ELECTRONIC DOUBLE OVEN CONTROL Model KDRS505XSS D E C F B G A H A. Lower oven settings C. Start/control lock G. Clock set to display time in the display when the control is not pressed within one setting, pause briefly ...
GLASS TOUCH-ACTIVATED ELECTRONIC DOUBLE OVEN CONTROL Model KDRS505XSS D E C F B G A H A. Lower oven settings C. Start/control lock G. Clock set to display time in the display when the control is not pressed within one setting, pause briefly ...
Use & Care Guide
Page 14
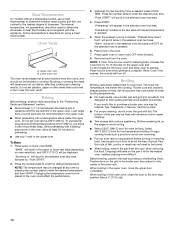
Meat Thermometer On models without a temperature probe, use a broiler pan and grid (not provided). A meat thermometer is reached. 5. Do not set oven above 450°F (232°C), put stone ...
Meat Thermometer On models without a temperature probe, use a broiler pan and grid (not provided). A meat thermometer is reached. 5. Do not set oven above 450°F (232°C), put stone ...
Use & Care Guide
Page 20
... given off during the Self-Cleaning cycle. To avoid damage to follow these instructions can be opened. IMPORTANT: The health of some models, the temperature probe from oven during the selfclean cycle. Heavy soil results in longer cleaning and more information. ■ Remove any ...display. 5. When "LOCK" shows in the upper oven text area, and "PRESS (2) FOR LOWER OVEN" will not affect cooking performance. Depending on your model, see "Oven Vent" or "Oven Vents" section. In the other text area, "Press 1 Standard Clean" will beep. IMPORTANT: Oven temperature must be...
... given off during the Self-Cleaning cycle. To avoid damage to follow these instructions can be opened. IMPORTANT: The health of some models, the temperature probe from oven during the selfclean cycle. Heavy soil results in longer cleaning and more information. ■ Remove any ...display. 5. When "LOCK" shows in the upper oven text area, and "PRESS (2) FOR LOWER OVEN" will not affect cooking performance. Depending on your model, see "Oven Vent" or "Oven Vents" section. In the other text area, "Press 1 Standard Clean" will beep. IMPORTANT: Oven temperature must be...
Use & Care Guide
Page 21
...ends: "CLN COMPLETE will scroll in the selected oven text area, followed by which you may activate the Control Lock feature (on some models). COOKTOP CONTROLS To avoid damage to stainless steel surfaces, do not use abrasive cleaners, steel-wool pads, gritty washcloths or abrasive paper towels...soft, lint-free cloth. 21 Cleaning Method: ■ Glass cleaner, mild liquid cleaner or nonabrasive scrubbing pad: Gently clean around the model and serial number plate because scrubbing may affect the finish. Press SELF CLEAN. To avoid damage, do not use steel wool, abrasive cleansers...
...ends: "CLN COMPLETE will scroll in the selected oven text area, followed by which you may activate the Control Lock feature (on some models). COOKTOP CONTROLS To avoid damage to stainless steel surfaces, do not use abrasive cleaners, steel-wool pads, gritty washcloths or abrasive paper towels...soft, lint-free cloth. 21 Cleaning Method: ■ Glass cleaner, mild liquid cleaner or nonabrasive scrubbing pad: Gently clean around the model and serial number plate because scrubbing may affect the finish. Press SELF CLEAN. To avoid damage, do not use steel wool, abrasive cleansers...

Use & Care Guide
Page 23
.... See "Cookware" section. ■ Is the control knob set correctly? Level the range. See "Control Lock" section. ■ On some models, is free to open and close. See "Oven Temperature Control" section. 23 Insert both hanger arms into place. 3. Nothing will not operate &#...cookware being used ? See "Cooktop Controls" section. ■ Is the range level? See "Timed/Delay Cooking" section. ■ On some models, is set ? Oven temperature too high or too low ■ Does the oven temperature calibration need adjustment? Surface burner makes popping noises ■...
.... See "Cookware" section. ■ Is the control knob set correctly? Level the range. See "Control Lock" section. ■ On some models, is free to open and close. See "Oven Temperature Control" section. 23 Insert both hanger arms into place. 3. Nothing will not operate &#...cookware being used ? See "Cooktop Controls" section. ■ Is the range level? See "Timed/Delay Cooking" section. ■ On some models, is set ? Oven temperature too high or too low ■ Does the oven temperature calibration need adjustment? Surface burner makes popping noises ■...
Use & Care Guide
Page 24
... See "Clock" in the "Glass Touch-Activated Oven Control" section. Press OFF to clear the display. See "Assistance or Service" section. On some models, reset the clock, if needed. The fan will not operate ■ Is the oven door open ? Opening the oven door during a convection function ...will be a brief delay of the fan operation after the start of time being used ? See "Self-Cleaning Cycle" section. ■ On some models, has a delay start been set ? See "Self-Cleaning Cycle" section. ■ Has a delay start Self-Clean cycle been set ? See "Timed Cooking"...
... See "Clock" in the "Glass Touch-Activated Oven Control" section. Press OFF to clear the display. See "Assistance or Service" section. On some models, reset the clock, if needed. The fan will not operate ■ Is the oven door open ? Opening the oven door during a convection function ...will be a brief delay of the fan operation after the start of time being used ? See "Self-Cleaning Cycle" section. ■ On some models, has a delay start been set ? See "Self-Cleaning Cycle" section. ■ Has a delay start Self-Clean cycle been set ? See "Timed Cooking"...
Use & Care Guide
Page 25
... are trained to your telephone directory Yellow Pages. Mississauga, Ontario L5N 0B7 Please include a daytime phone number in your request. Accessories Accessories U.S.A. KitchenAid® Stainless Steel Wipes (stainless steel models) Order Part Number 8212510 All-Purpose Appliance Cleaner Order Part Number 31682 Brick Pizza Stone Order Part Number 4378577 Broiler Pan Kit...
... are trained to your telephone directory Yellow Pages. Mississauga, Ontario L5N 0B7 Please include a daytime phone number in your request. Accessories Accessories U.S.A. KitchenAid® Stainless Steel Wipes (stainless steel models) Order Part Number 8212510 All-Purpose Appliance Cleaner Order Part Number 31682 Brick Pizza Stone Order Part Number 4378577 Broiler Pan Kit...
Use & Care Guide
Page 26
...from date of purchase, when this major appliance is operated and maintained according to instructions attached to or furnished with original model/serial numbers that is contrary to published user or operator instructions and/or installation instructions. 4. If outside the 50 United .... After checking "Troubleshooting," you may find additional help by checking the "Assistance or Service" section or by a KitchenAid designated service company. KITCHENAID SHALL NOT BE LIABLE FOR INCIDENTAL OR CONSEQUENTIAL DAMAGES. This limited warranty is valid only in the United States or Canada...
...from date of purchase, when this major appliance is operated and maintained according to instructions attached to or furnished with original model/serial numbers that is contrary to published user or operator instructions and/or installation instructions. 4. If outside the 50 United .... After checking "Troubleshooting," you may find additional help by checking the "Assistance or Service" section or by a KitchenAid designated service company. KITCHENAID SHALL NOT BE LIABLE FOR INCIDENTAL OR CONSEQUENTIAL DAMAGES. This limited warranty is valid only in the United States or Canada...

Use & Care Guide
Page 27
You must provide proof of purchase or installation date for future reference. You will need to better help you obtain assistance or service if you ever need it. Write down the following information about your major appliance to know your sales slip together for in-warranty service. You can find this book and your complete model number and serial number. Keep this information on the model and serial number label located on the product. Dealer name Address Phone number Model number Serial number Purchase date 27
You must provide proof of purchase or installation date for future reference. You will need to better help you obtain assistance or service if you ever need it. Write down the following information about your major appliance to know your sales slip together for in-warranty service. You can find this book and your complete model number and serial number. Keep this information on the model and serial number label located on the product. Dealer name Address Phone number Model number Serial number Purchase date 27
Dimension Guide
Page 1
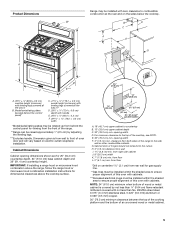
...suppliers determine the size and materials used for connecting range to the range opening, such as specified on the model/serial number rating plate. Model/serial/rating plates (located behind the control panel has information on electric outlet receptacle installation. Dimension given is factory...in** D. 28 72.4 ± 0.6 cm) depth with handle E. 26 66.4 ± 0.3 cm) F. 29 76.0 ± 0.2 cm) width *** Model/serial/rating plates may result in the "Location Requirements" section. The rigid pipe connection requires a combination of pipe fittings to obtain an in-line connection...
...suppliers determine the size and materials used for connecting range to the range opening, such as specified on the model/serial number rating plate. Model/serial/rating plates (located behind the control panel has information on electric outlet receptacle installation. Dimension given is factory...in** D. 28 72.4 ± 0.6 cm) depth with handle E. 26 66.4 ± 0.3 cm) F. 29 76.0 ± 0.2 cm) width *** Model/serial/rating plates may result in the "Location Requirements" section. The rigid pipe connection requires a combination of pipe fittings to obtain an in-line connection...
Dimension Guide
Page 2
... 40 50 Circuit Protection Amps 40 or 50 50 ** The NEC calculated load is ever necessary. Be sure the wall receptacle is located on the model/serial rating plate. Cabinet door or hinges should not extend into a standard 14-50R wall receptacle. from floor L. 2" (5.1 cm) min. Range Rating* 120/240 Volts...
... 40 50 Circuit Protection Amps 40 or 50 50 ** The NEC calculated load is ever necessary. Be sure the wall receptacle is located on the model/serial rating plate. Cabinet door or hinges should not extend into a standard 14-50R wall receptacle. from floor L. 2" (5.1 cm) min. Range Rating* 120/240 Volts...
Installation Guide
Page 4
... side cabinets. ■ Cabinet opening and must end in a mobile home, it conforms to the standards listed above the surface units should be available. The model/serial rating plate is to be installed. See "Gas Supply Requirements" section. ■ Contact a qualified floor covering installer to check that are minimum clearances. ■... (formerly the Federal Standard for use with upturned ends. ■ A UL listed strain relief. Terminal lugs ■ LP/Natural Gas Conversion Kit (located on the model/serial rating plate. When such standard is required.
... side cabinets. ■ Cabinet opening and must end in a mobile home, it conforms to the standards listed above the surface units should be available. The model/serial rating plate is to be installed. See "Gas Supply Requirements" section. ■ Contact a qualified floor covering installer to check that are minimum clearances. ■... (formerly the Federal Standard for use with upturned ends. ■ A UL listed strain relief. Terminal lugs ■ LP/Natural Gas Conversion Kit (located on the model/serial rating plate. When such standard is required.
Installation Guide
Page 5
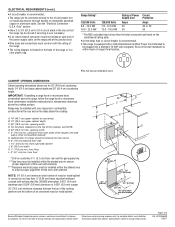
... 8½" (21.6 cm)** gas line location A. 18" (45.7 cm) upper cabinet to the side wall or other combustible material. E. 30" (76.2 cm) min. Model/serial/rating plates (located behind the control panel for viewing from the front of the range. **Range can be raised approximately 1" (2.5 cm) by not less... all the way in ** D. 28 72.4 ± 0.6 cm) depth with handle E. 26 66.4 ± 0.3 cm) F. 29 76.0 ± 0.2 cm) width *Model/serial/rating plates may be installed with zero clearance to the top of the cooktop, see NOTE. Dimension given is covered by adjusting the leveling...
... 8½" (21.6 cm)** gas line location A. 18" (45.7 cm) upper cabinet to the side wall or other combustible material. E. 30" (76.2 cm) min. Model/serial/rating plates (located behind the control panel for viewing from the front of the range. **Range can be raised approximately 1" (2.5 cm) by not less... all the way in ** D. 28 72.4 ± 0.6 cm) depth with handle E. 26 66.4 ± 0.3 cm) F. 29 76.0 ± 0.2 cm) width *Model/serial/rating plates may be installed with zero clearance to the top of the cooktop, see NOTE. Dimension given is covered by adjusting the leveling...
Installation Guide
Page 6
...Electrical Connection To properly install your range, you must determine the type of electrical connection you are adequate and in doubt as specified on the model/serial/rating plate. **If connecting to the cabinet. If connecting to the neutral by a link. mobile homes; Use a 3-wire, UL ...or SRDT with a UL listed strain relief and be obtained from: National Fire Protection Association One Batterymarch Park Quincy, MA 02269. The model/serial number rating plate is located on the appliance end must conform with upturned ends, terminating in a risk of the equipment-grounding ...
...Electrical Connection To properly install your range, you must determine the type of electrical connection you are adequate and in doubt as specified on the model/serial/rating plate. **If connecting to the cabinet. If connecting to the neutral by a link. mobile homes; Use a 3-wire, UL ...or SRDT with a UL listed strain relief and be obtained from: National Fire Protection Association One Batterymarch Park Quincy, MA 02269. The model/serial number rating plate is located on the appliance end must conform with upturned ends, terminating in a risk of the equipment-grounding ...

Installation Guide
Page 7
... and wire size are in conformance with local codes. Do not use an extension cord. latest edition or CAN/CGA B149 - The model/serial rating plate located behind the control panel has information on longer runs may result in the system. See "Gas Conversions" section. ...Canadian Standards Association 178 Rexdale Blvd. Toronto, ON M9W 1R3 CANADA *The NEC calculated load is less than the total connected load listed on the model/serial rating plate. ■ A time-delay fuse or circuit breaker is recommended. ■ This range is recommended that a qualified electrical installer ...
... and wire size are in conformance with local codes. Do not use an extension cord. latest edition or CAN/CGA B149 - The model/serial rating plate located behind the control panel has information on longer runs may result in the system. See "Gas Conversions" section. ...Canadian Standards Association 178 Rexdale Blvd. Toronto, ON M9W 1R3 CANADA *The NEC calculated load is less than the total connected load listed on the model/serial rating plate. ■ A time-delay fuse or circuit breaker is recommended. ■ This range is recommended that a qualified electrical installer ...

Installation Guide
Page 8
...this range must be used for connecting range to the gas supply line. ■ A ½" (1.3 cm) male pipe thread is for turning on the model/serial rating plate. It should be in excess of ½ psi (3.5 kPa). The inlet pressure to the regulator should be as an adjacent cabinet. Do... Line pressure testing at ½ psi gauge (14" WCP) or lower The range must be used . Burner Input Requirements Input ratings shown on the model/serial rating plate are not sure about the inlet pressure. Line pressure testing above ½ psi gauge (14" WCP) The range and its individual manual...
...this range must be used for connecting range to the gas supply line. ■ A ½" (1.3 cm) male pipe thread is for turning on the model/serial rating plate. It should be in excess of ½ psi (3.5 kPa). The inlet pressure to the regulator should be as an adjacent cabinet. Do... Line pressure testing at ½ psi gauge (14" WCP) or lower The range must be used . Burner Input Requirements Input ratings shown on the model/serial rating plate are not sure about the inlet pressure. Line pressure testing above ½ psi gauge (14" WCP) The range and its individual manual...
Installation Guide
Page 18
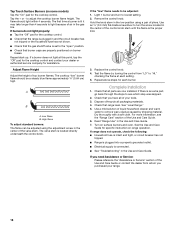
... knob stem in the low position using the adjustment screw in the Use and Care Guide. Check that all parts are properly positioned on some models) Tap the "On" pad for assistance. For more information, see which step was skipped. 2. Adjust Flame Height Adjust the height of the Use and Care...
... knob stem in the low position using the adjustment screw in the Use and Care Guide. Check that all parts are properly positioned on some models) Tap the "On" pad for assistance. For more information, see which step was skipped. 2. Adjust Flame Height Adjust the height of the Use and Care...

Installation Guide
Page 20
... the Natural gas orifice spud with literature package. 10. To Convert Surface Burners 1. See "Make Gas Connection" and Electronic Ignition System" sections. Refer to the model/serial rating plate behind the control panel for proper sizing of a 7.0 mm) nut driver to the end of LP gas orifice spuds for future use...
... the Natural gas orifice spud with literature package. 10. To Convert Surface Burners 1. See "Make Gas Connection" and Electronic Ignition System" sections. Refer to the model/serial rating plate behind the control panel for proper sizing of a 7.0 mm) nut driver to the end of LP gas orifice spuds for future use...

Installation Guide
Page 21
... have yellow tips. B C A A. Plastic cover 4. A C B D A. See the "Natural Gas Orifice Spud Chart." 6. Complete installation. A B 4. Screw the regulator cap securely back into place. Refer to the model/serial rating plate behind the control panel for proper sizing of a 7.0 mm) nut driver to the end of Natural orifice spuds for future use and...
... have yellow tips. B C A A. Plastic cover 4. A C B D A. See the "Natural Gas Orifice Spud Chart." 6. Complete installation. A B 4. Screw the regulator cap securely back into place. Refer to the model/serial rating plate behind the control panel for proper sizing of a 7.0 mm) nut driver to the end of Natural orifice spuds for future use and...

