User Guide
Page 3
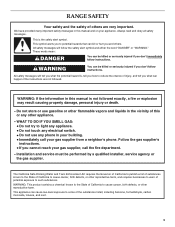
... a neighbor's phone. This appliance can cause low-level exposure to potential hazards that can be performed by a qualified installer, service agency or the gas supplier. RANGE SAFETY Your safety and the safety of others . All safety messages will follow the safety alert symbol and either the word "DANGER" or "WARNING." The...
... a neighbor's phone. This appliance can cause low-level exposure to potential hazards that can be performed by a qualified installer, service agency or the gas supplier. RANGE SAFETY Your safety and the safety of others . All safety messages will follow the safety alert symbol and either the word "DANGER" or "WARNING." The...

User Guide
Page 4
...bracket to children and adults. Failure to follow these instructions can result in death or serious burns to wall behind range. • Slide range completely back, so anti-tip bracket is over rear brace of range. 4 Making sure the anti-tip bracket is moved. Reconnect the anti-tip bracket, if the... Anti-Tip Bracket WARNING Tip Over Hazard A child or adult can tip if you apply too much force or weight to wall behind range. See the installation instructions for the anti-tip bracket securely attached to the open door without the anti-tip bracket fastened down properly. The...
...bracket to children and adults. Failure to follow these instructions can result in death or serious burns to wall behind range. • Slide range completely back, so anti-tip bracket is over rear brace of range. 4 Making sure the anti-tip bracket is moved. Reconnect the anti-tip bracket, if the... Anti-Tip Bracket WARNING Tip Over Hazard A child or adult can tip if you apply too much force or weight to wall behind range. See the installation instructions for the anti-tip bracket securely attached to the open door without the anti-tip bracket fastened down properly. The...
User Guide
Page 5
... monoxide poisoning and overheating of the oven. s Do Not Leave Children Alone - Children should not be left alone or unattended in area where the range is hot, do not touch, or let clothing or other bulky cloth. s Clean Cooktop With Caution - Build-up of pressure may result from ...should never be allowed to rub, damage, or move the gasket. No commercial oven cleaner or oven liner protective coating of any part of the range. s Clean Only Parts Listed in desired location while oven is properly installed and grounded by a qualified technician. s CAUTION: Do not store items...
... monoxide poisoning and overheating of the oven. s Do Not Leave Children Alone - Children should not be left alone or unattended in area where the range is hot, do not touch, or let clothing or other bulky cloth. s Clean Cooktop With Caution - Build-up of pressure may result from ...should never be allowed to rub, damage, or move the gasket. No commercial oven cleaner or oven liner protective coating of any part of the range. s Clean Only Parts Listed in desired location while oven is properly installed and grounded by a qualified technician. s CAUTION: Do not store items...
User Guide
Page 6
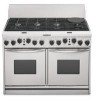
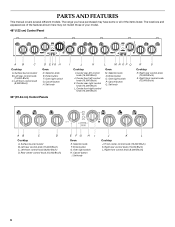
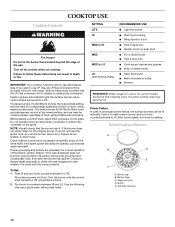
... Btu/h) D. Right rear control knob (15,000 Btu/h) L. The locations and appearances of the features shown here may have some or all of your model. 48" (122 cm) Control Panel AB C Cooktop A. Set knob 36" (91.44 cm) Control Panels I J K L M NOP Q Cooktop I . Enter... knob F. Front center control knob (15,000 Btu/h) K. Selector knob E. Cancel button H. Right rear control knob (15,000 Btu/h) S. The range you have purchased may not match those of the items listed. Enter button F. Enter button G. PARTS AND FEATURES This manual covers several different models. ...
... Btu/h) D. Right rear control knob (15,000 Btu/h) L. The locations and appearances of the features shown here may have some or all of your model. 48" (122 cm) Control Panel AB C Cooktop A. Set knob 36" (91.44 cm) Control Panels I J K L M NOP Q Cooktop I . Enter... knob F. Front center control knob (15,000 Btu/h) K. Selector knob E. Cancel button H. Right rear control knob (15,000 Btu/h) S. The range you have purchased may not match those of the items listed. Enter button F. Enter button G. PARTS AND FEATURES This manual covers several different models. ...

User Guide
Page 8
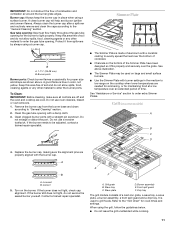
... (not visible) J. Electronic oven control display P. Center rear right surface burner M. Center front left surface burner B. Gas regulator (located in rear of range) H. Pin connector (located in rear of range, for factory testing only) K. Oven rack S. Left rear surface burner C. Center rear left surface burner D. Right rear surface burner L. Control panel F. Model...
... (not visible) J. Electronic oven control display P. Center rear right surface burner M. Center front left surface burner B. Gas regulator (located in rear of range) H. Pin connector (located in rear of range, for factory testing only) K. Oven rack S. Left rear surface burner C. Center rear left surface burner D. Right rear surface burner L. Control panel F. Model...

User Guide
Page 9
Range A B C D E F G Oven Interior A B H I . Surface burner B. Oven vent E. Bake element (not visible) H. 2-pin connector (not shown; Grill, griddle, center burners or filler grate K. Broil element (not shown) N....ring element (not visible) D. Oven cavity sensor C. Control panel D. Door gasket G. Broil element B. Stainless steel backguard (island trim not shown) J. Self-cleaning latch M. rear of range) F. Electronic oven control display L. for consumer use - Model and serial number plate (located on the right-hand side oven trim) A. Gas regulator (rear of...
Range A B C D E F G Oven Interior A B H I . Surface burner B. Oven vent E. Bake element (not visible) H. 2-pin connector (not shown; Grill, griddle, center burners or filler grate K. Broil element (not shown) N....ring element (not visible) D. Oven cavity sensor C. Control panel D. Door gasket G. Broil element B. Stainless steel backguard (island trim not shown) J. Self-cleaning latch M. rear of range) F. Electronic oven control display L. for consumer use - Model and serial number plate (located on the right-hand side oven trim) A. Gas regulator (rear of...
User Guide
Page 10
...s Cook soups, sauces and gravies. Check that the burner has lit. Burner cap B. NOTE: Visually check that the control knob is included with your new range. If the wall receptacle does not provide correct polarity, the igniter will click. s Hold a slow boil. s Melt chocolate or butter. Hold a lit ...and are ideal for details on the grate. Proper grounding and polarity are turned to LO LO (with the correct polarity. REMEMBER: When range is in use LP Gas, an LP Gas Conversion Kit is pressed completely down on the grate. s Start food cooking. After burner ...
...s Cook soups, sauces and gravies. Check that the burner has lit. Burner cap B. NOTE: Visually check that the control knob is included with your new range. If the wall receptacle does not provide correct polarity, the igniter will click. s Hold a slow boil. s Melt chocolate or butter. Hold a lit ...and are ideal for details on the grate. Proper grounding and polarity are turned to LO LO (with the correct polarity. REMEMBER: When range is in use LP Gas, an LP Gas Conversion Kit is pressed completely down on the grate. s Start food cooking. After burner ...
User Guide
Page 11
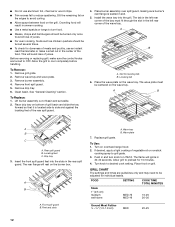
... to light properly. Wave plate D. A clean burner cap will help avoid poor ignition and uneven flames. s Use the Simmer Plate with a nonstick coating to low range on the cooktop when lower temperatures are needed for simmering, or for proper size and shape as shown. Turn on somemodels) A B C D 4. A. Refer to order extra...
... to light properly. Wave plate D. A clean burner cap will help avoid poor ignition and uneven flames. s Use the Simmer Plate with a nonstick coating to low range on the cooktop when lower temperatures are needed for simmering, or for proper size and shape as shown. Turn on somemodels) A B C D 4. A. Refer to order extra...
User Guide
Page 12
... slide the tray forward so that it is seated in slot. 5. A B A. Feet and slots A. Wave plate 7. Replace grill grate. s Allow space between food on overhead range hood. 2. Remove grill grate. 2. Install the wave tray into the slots in 30-40 seconds. Locating tab 6. A B A B C A. A B A. To Use: 1. Turn on the grill. Place food...
... slide the tray forward so that it is seated in slot. 5. A B A. Feet and slots A. Wave plate 7. Replace grill grate. s Allow space between food on overhead range hood. 2. Remove grill grate. 2. Install the wave tray into the slots in 30-40 seconds. Locating tab 6. A B A B C A. A B A. To Use: 1. Turn on the grill. Place food...

User Guide
Page 16
A meat thermometer is not supplied with the range. When roasting, it into the center of the thickest portion of the meat or inner thigh or breast of the thermometer should be used to ... better at lower broiling temperatures. s After broiling, remove the pan from the oven. If the temperature drops, cook the meat or poultry longer. The bake range can be blocked or covered since it in 2 or 3 different places. Thicker cuts and unevenly shaped pieces of the oven rack. "HI" will cause poor...
A meat thermometer is not supplied with the range. When roasting, it into the center of the thickest portion of the meat or inner thigh or breast of the thermometer should be used to ... better at lower broiling temperatures. s After broiling, remove the pan from the oven. If the temperature drops, cook the meat or poultry longer. The bake range can be blocked or covered since it in 2 or 3 different places. Thicker cuts and unevenly shaped pieces of the oven rack. "HI" will cause poor...

User Guide
Page 17
... oven door is full, extra cooking time may need to move freely around the food. The cook time may be reduced also. The convection bake range can be set between the cookware and the sides of air in pieces 3 boneless breasts 4 HI 34-40 HI 22-32 Fish Fillets 0.6-1.3 cm) thick...
... oven door is full, extra cooking time may need to move freely around the food. The cook time may be reduced also. The convection bake range can be set between the cookware and the sides of air in pieces 3 boneless breasts 4 HI 34-40 HI 22-32 Fish Fillets 0.6-1.3 cm) thick...

User Guide
Page 18
... for roasting meats and poultry, or for the oven to preheat before putting food in, unless recommended in intervals to CONVECT ROAST. The convection roast range can be reduced also. They will come back on top of the broiler pan and grid. Rib Roast rare medium well-done Rib Roast (boneless...
... for roasting meats and poultry, or for the oven to preheat before putting food in, unless recommended in intervals to CONVECT ROAST. The convection roast range can be reduced also. They will come back on top of the broiler pan and grid. Rib Roast rare medium well-done Rib Roast (boneless...
User Guide
Page 20
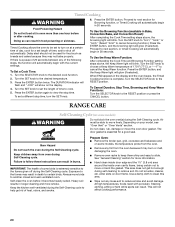
... Timed Cooking will automatically begin in 20 seconds. Proceed to view the stop time, turn on at a certain time of day, cook for more smoke. RANGE CARE Self-Cleaning Cycle (onsome models) WARNING Do not block the oven vent(s) during the Self-Cleaning cycle. Failure to help get hot enough during...
... Timed Cooking will automatically begin in 20 seconds. Proceed to view the stop time, turn on at a certain time of day, cook for more smoke. RANGE CARE Self-Cleaning Cycle (onsome models) WARNING Do not block the oven vent(s) during the Self-Cleaning cycle. Failure to help get hot enough during...
User Guide
Page 23
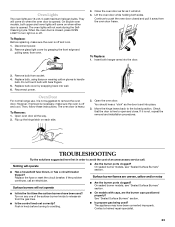
... off and cool. 1. Continue to remove the oven door. Do not touch bulb with caps, are the burner caps positioned properly? Oven Door For normal range use, it is heavy. Open oven door all the way. 2. If it is set correctly? TROUBLESHOOTING Try the solutions suggested to push the oven door...
... off and cool. 1. Continue to remove the oven door. Do not touch bulb with caps, are the burner caps positioned properly? Oven Door For normal range use, it is heavy. Open oven door all the way. 2. If it is set correctly? TROUBLESHOOTING Try the solutions suggested to push the oven door...
User Guide
Page 26
KITCHENAID® DUAL FUEL RANGE WARRANTY LIMITED WARRANTY For one year from the date of purchase, when this major appliance is operated and maintained according to instructions attached to or furnished with the product, KitchenAid brand of original purchase date is required to obtain service under these excluded circumstances shall be borne by an authorized KitchenAid... appliance is operated and maintained according to instructions attached to or furnished with the product, KitchenAid will pay for Factory Specified Parts for future reference. This warranty is operated and maintained ...
KITCHENAID® DUAL FUEL RANGE WARRANTY LIMITED WARRANTY For one year from the date of purchase, when this major appliance is operated and maintained according to instructions attached to or furnished with the product, KitchenAid brand of original purchase date is required to obtain service under these excluded circumstances shall be borne by an authorized KitchenAid... appliance is operated and maintained according to instructions attached to or furnished with the product, KitchenAid will pay for Factory Specified Parts for future reference. This warranty is operated and maintained ...


