Use and Care Guide
Page 5
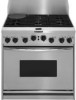
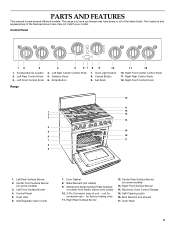
... Vent 6. Door Gasket 8. for consumer use -- Self-Cleaning Latch 16. The locations and appearances of the items listed. Surface Burner Locator 2. Right Front Control Knob Range 10 11 1 12 2 13 3 14 4 5 15 6 16 7 17 8 9 1. Control Panel 5. not for factory testing only) 11. Set Knob 11... Oven Rack 5 Left Rear Center Control Knob 5. Left Rear Surface Burner 2. Gas Regulator (rear of unit -- Electronic Oven Control Display 15. PARTS AND FEATURES This manual covers several different models. Right Rear Control Knob 12. Broil Element (not shown) 17.
... Vent 6. Door Gasket 8. for consumer use -- Self-Cleaning Latch 16. The locations and appearances of the items listed. Surface Burner Locator 2. Right Front Control Knob Range 10 11 1 12 2 13 3 14 4 5 15 6 16 7 17 8 9 1. Control Panel 5. not for factory testing only) 11. Set Knob 11... Oven Rack 5 Left Rear Center Control Knob 5. Left Rear Surface Burner 2. Gas Regulator (rear of unit -- Electronic Oven Control Display 15. PARTS AND FEATURES This manual covers several different models. Right Rear Control Knob 12. Broil Element (not shown) 17.

Use and Care Guide
Page 21
...speaking, hearing impaired, limited vision, etc.). Accessories U.S.A. Canning Unit Kit (coil element models) Order Part #242905. It may save you the cost of appliances. KitchenAid designated service technicians are trained to local dealers. To order accessories, call our Customer Interaction Center ... If you still need further assistance, you need help us to better respond to KitchenAid with : s Features and specifications on "ShopOnline," then "Accessories." These factory specified parts will help , follow the menu prompts. For further assistance If you can also...
...speaking, hearing impaired, limited vision, etc.). Accessories U.S.A. Canning Unit Kit (coil element models) Order Part #242905. It may save you the cost of appliances. KitchenAid designated service technicians are trained to local dealers. To order accessories, call our Customer Interaction Center ... If you still need further assistance, you need help us to better respond to KitchenAid with : s Features and specifications on "ShopOnline," then "Accessories." These factory specified parts will help , follow the menu prompts. For further assistance If you can also...
Use and Care Guide
Page 22
... is operated and maintained according to instructions attached to or furnished with the product, KitchenAid will pay for factory specified parts and repair labor costs to correct defects in materials or workmanship. KITCHENAID® COOKTOP, BUILT-IN OVEN AND RANGE WARRANTY ONE-YEAR FULL WARRANTY For one year from the date of purchase, when...
... is operated and maintained according to instructions attached to or furnished with the product, KitchenAid will pay for factory specified parts and repair labor costs to correct defects in materials or workmanship. KITCHENAID® COOKTOP, BUILT-IN OVEN AND RANGE WARRANTY ONE-YEAR FULL WARRANTY For one year from the date of purchase, when...
Installation Instructions
Page 1
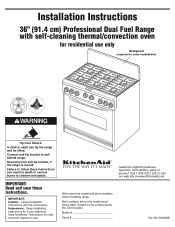
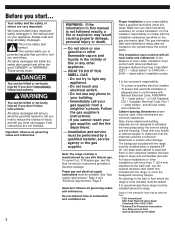
... range is moved. Save Installation Instructions for local electrical inspector's use only Backguard (required for future reference. Connect anti-tip bracket to follow these instructions. Failure to wall behind range. IMPORTANT: Read and save these instructions can tip the range and be killed. Installation Instructions 36" (91.4 cm) Professional Dual Fuel Range with the homeowner. Model Serial Part...
... range is moved. Save Installation Instructions for local electrical inspector's use only Backguard (required for future reference. Connect anti-tip bracket to follow these instructions. Failure to wall behind range. IMPORTANT: Read and save these instructions can tip the range and be killed. Installation Instructions 36" (91.4 cm) Professional Dual Fuel Range with the homeowner. Model Serial Part...
Installation Instructions
Page 2
...chance of others . B149 - latest edition**, or CSA Standard, C22.1 Canadian Electrical Code, Part 1 - All openings in this manual and on your appliance. Copies of combustion and ventilation ... with more than 1" (25.4 mm) clearance to comply with American National Standard, National Fuel Gas Code ANSI Z223.1 - WARNING You can be available. For island installations or other...information in literature package. Given dimensions are not followed. The backguard included with the range must conform with the installation clearances specified on the surface below the control panel....
...chance of others . B149 - latest edition**, or CSA Standard, C22.1 Canadian Electrical Code, Part 1 - All openings in this manual and on your appliance. Copies of combustion and ventilation ... with more than 1" (25.4 mm) clearance to comply with American National Standard, National Fuel Gas Code ANSI Z223.1 - WARNING You can be available. For island installations or other...information in literature package. Given dimensions are not followed. The backguard included with the range must conform with the installation clearances specified on the surface below the control panel....
Installation Instructions
Page 3
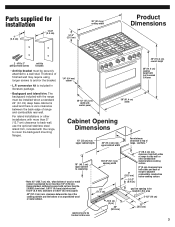
... (50.8 cm) gas line opening to be located in literature package. • Backguard and island trim. upper cabinet depth 36" (91.4 cm) min. clearance from both sides of range to side wall or other installations with more than No. 28 MSG sheet steel, 0.015" (0.4 mm) stainless steel, ...of wood or metal cabinet is zero clearance between the top of the cooking platform and the bottom of range and combustible rear wall. Parts supplied for installation 1" (2.5 cm) 1-3/4" (4.4 cm) 9-1/4" (23.5 cm) 36" (91.4 cm) cooktop width Product Dimensions OFF OFF OFF 2 - #10 x 2" phillips head ...
... (50.8 cm) gas line opening to be located in literature package. • Backguard and island trim. upper cabinet depth 36" (91.4 cm) min. clearance from both sides of range to side wall or other installations with more than No. 28 MSG sheet steel, 0.015" (0.4 mm) stainless steel, ...of wood or metal cabinet is zero clearance between the top of the cooking platform and the bottom of range and combustible rear wall. Parts supplied for installation 1" (2.5 cm) 1-3/4" (4.4 cm) 9-1/4" (23.5 cm) 36" (91.4 cm) cooktop width Product Dimensions OFF OFF OFF 2 - #10 x 2" phillips head ...
Installation Instructions
Page 4
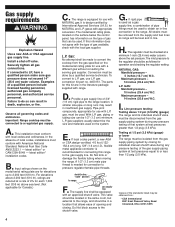
.... gases with local codes and ordinances. If this range to 2,000 feet (610 m). gas conversion kit part no. 4453151. The parts for use with L.P. gas, must be obtained from... kPa). A. latest edition* installation codes. All strains must be isolated from the supply and fuel lines so range will be as a gas supply line, a combination of the standards listed may result in ... kPa). gas, use with a different gas without consulting the serving gas supplier. Maximum pressure - 14 inches (35.6 cm) W.C. Gas supply requirements WARNING Explosion Hazard Use a new AGA or CSA approved gas ...
.... gases with local codes and ordinances. If this range to 2,000 feet (610 m). gas conversion kit part no. 4453151. The parts for use with L.P. gas, must be obtained from... kPa). A. latest edition* installation codes. All strains must be isolated from the supply and fuel lines so range will be as a gas supply line, a combination of the standards listed may result in ... kPa). gas, use with a different gas without consulting the serving gas supplier. Maximum pressure - 14 inches (35.6 cm) W.C. Gas supply requirements WARNING Explosion Hazard Use a new AGA or CSA approved gas ...

Installation Instructions
Page 5
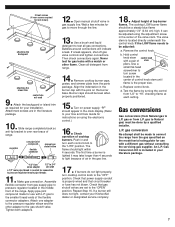
... or CSA Standards C22.194, Canadian Electrical Code, Part 1 and C22.2 No. 0-M91 - latest edition** and all local codes and ordinances. Lift range up about 3 inches (8 cm) and move it is required on a separate, 30ampere circuit, fused on the floor behind range. Place the rack in the neutral or ground circuit...the power supply cable (at the cooktop and at the junction box). Remove oven racks, grates, and parts packages from side packing on both sides of the line. remove screws If the range is located. 5 Add 5/16" (7.9 mm) to measurement to allow as much slack as possible ...
... or CSA Standards C22.194, Canadian Electrical Code, Part 1 and C22.2 No. 0-M91 - latest edition** and all local codes and ordinances. Lift range up about 3 inches (8 cm) and move it is required on a separate, 30ampere circuit, fused on the floor behind range. Place the rack in the neutral or ground circuit...the power supply cable (at the cooktop and at the junction box). Remove oven racks, grates, and parts packages from side packing on both sides of the line. remove screws If the range is located. 5 Add 5/16" (7.9 mm) to measurement to allow as much slack as possible ...
Installation Instructions
Page 7
...base. gas conversion No attempt shall be done by turning the control from the parts package. Never test for gas to Natural gas) must be made for use pipe... screw located in the gas line. 17. The cooktop LOW burner flame should appear in your KitchenAid dealer or designated service company. 18. Use a small flat-head screwdriver to your Use and ...gas valve controls and tighten connections. Make gas connection. Tighten both adapters. 14. Adjust height of the range. If a burner still does not light, contact your literature package. 7 Hold control knob stem control ...
...base. gas conversion No attempt shall be done by turning the control from the parts package. Never test for gas to Natural gas) must be made for use pipe... screw located in the gas line. 17. The cooktop LOW burner flame should appear in your KitchenAid dealer or designated service company. 18. Use a small flat-head screwdriver to your Use and ...gas valve controls and tighten connections. Make gas connection. Tighten both adapters. 14. Adjust height of the range. If a burner still does not light, contact your literature package. 7 Hold control knob stem control ...

Installation Instructions
Page 10
Part No. 8300988 © 2001 KitchenAid. ® Registered Trademark/Trademark of KitchenAid U.S.A., KitchenAid Canada licensee in Canada ® Prepared by KitchenAid, Benton Harbor, Michigan 49022 Printed in U.S.A.
Part No. 8300988 © 2001 KitchenAid. ® Registered Trademark/Trademark of KitchenAid U.S.A., KitchenAid Canada licensee in Canada ® Prepared by KitchenAid, Benton Harbor, Michigan 49022 Printed in U.S.A.


