Use and Care Guide
Page 3
RANGE SAFETY Your safety and the safety of this or any phone in this manual is not followed exactly, a fire or explosion may result causing property ...
RANGE SAFETY Your safety and the safety of this or any phone in this manual is not followed exactly, a fire or explosion may result causing property ...
Use and Care Guide
Page 4
...size should not be plugged directly into a properly grounded following: receptacle. be electrically grounded in cabinets above a range or on the Range - Be sure the range is moved. Wipe off all excessive spillage before servicing the SECURED BY PROPERLY INSTALLED ANTI-TIP appliance. SAVE THESE...remove the grounding prong s WARNING: TO REDUCE THE RISK OF from combustible materials, gasoline, and other utensils. TIPPING OF THE RANGE, THE RANGE MUST BE s Disconnect the electrical supply before initiating the cleaning cycle. s Injuries may result from the misuse of the cooking ...
...size should not be plugged directly into a properly grounded following: receptacle. be electrically grounded in cabinets above a range or on the Range - Be sure the range is moved. Wipe off all excessive spillage before servicing the SECURED BY PROPERLY INSTALLED ANTI-TIP appliance. SAVE THESE...remove the grounding prong s WARNING: TO REDUCE THE RISK OF from combustible materials, gasoline, and other utensils. TIPPING OF THE RANGE, THE RANGE MUST BE s Disconnect the electrical supply before initiating the cleaning cycle. s Injuries may result from the misuse of the cooking ...
Use and Care Guide
Page 5
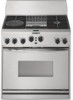
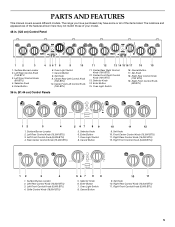
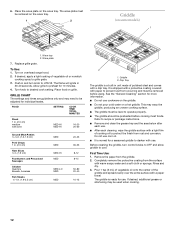
... Rear Control Knob (15,000 BTU) 11. Selector Knob 5. Center Rear Left Control Knob (15K BTU) 10. Right Front Control Knob (6K BTU) 36 in . (122 cm) Control Panel 12 3 1. Surface Burner Locator 2. Right Rear Control Knob (15,000 BTU) 12. Right Front Control Knob (6,... Enter Button 7. Right Front Control Knob (6,000 BTU)) 12 3 4 1. Grille Control Knob (18,000 BTU) 56 7 8 9 5. Selector Knob 6. The range you have purchased may not match those of the items listed. Surface Burner Locator 2. Enter Button 4 567 8 9 10 11 12 13 14 15 16 17...
... Rear Control Knob (15,000 BTU) 11. Selector Knob 5. Center Rear Left Control Knob (15K BTU) 10. Right Front Control Knob (6K BTU) 36 in . (122 cm) Control Panel 12 3 1. Surface Burner Locator 2. Right Rear Control Knob (15,000 BTU) 12. Right Front Control Knob (6,... Enter Button 7. Right Front Control Knob (6,000 BTU)) 12 3 4 1. Grille Control Knob (18,000 BTU) 56 7 8 9 5. Selector Knob 6. The range you have purchased may not match those of the items listed. Surface Burner Locator 2. Enter Button 4 567 8 9 10 11 12 13 14 15 16 17...

Use and Care Guide
Page 7
Pin Connector (located in rear of range, for factory testing only) 12. Center Rear Right Surface Burner 14. Door Gasket 9. Right Rear Surface Burner 13. Self-Cleaning Latch 18. Right Front Surface ... 7. Bake Element (not visible) 10. Model and Serial Number (located on center front frame below oven cavity) 11. Electronic Oven Control Display 17. Double Oven Range 11 12 13 14 1 15 2 16 3 4 17 5 18 6 19 7 8 9 10 1. Gas Regulator (located in rear of...
Pin Connector (located in rear of range, for factory testing only) 12. Center Rear Right Surface Burner 14. Door Gasket 9. Right Rear Surface Burner 13. Self-Cleaning Latch 18. Right Front Surface ... 7. Bake Element (not visible) 10. Model and Serial Number (located on center front frame below oven cavity) 11. Electronic Oven Control Display 17. Double Oven Range 11 12 13 14 1 15 2 16 3 4 17 5 18 6 19 7 8 9 10 1. Gas Regulator (located in rear of...

Use and Care Guide
Page 8
... Filler Grate 12. Door Gasket 7. Stainless Steel Backguard (Island Trim not shown) 11. Oven Rack 8 Oven Vent 5. Self-Cleaning Latch 14. Surface Burner 2. Single Oven Range 9 10 1 11 2 12 3 4 13 5 14 6 15 7 8 1. Bake Element (not visible) 8. Control Panel 4. Electronic Oven Control Display 13.
... Filler Grate 12. Door Gasket 7. Stainless Steel Backguard (Island Trim not shown) 11. Oven Rack 8 Oven Vent 5. Self-Cleaning Latch 14. Surface Burner 2. Single Oven Range 9 10 1 11 2 12 3 4 13 5 14 6 15 7 8 1. Bake Element (not visible) 8. Control Panel 4. Electronic Oven Control Display 13.

Use and Care Guide
Page 9
...burner has ignited. If you wish to LITE will click. s Quickly brown or sear food. s Cook soups, sauces and gravies. REMEMBER: When range is factory set for cooking large quantities of prolonged power failure, the surface burners can result in and turn knob counterclockwise to HI. After burner... knob counterclockwise to LITE. Fire Hazard Do not let the burner flame extend beyond the edge of the electric ignition system. IMPORTANT: Your range is in use L.P. The small burners (6,000 BTU) allow more accurate simmer control at the lowest setting, and are ideal for use with...
...burner has ignited. If you wish to LITE will click. s Quickly brown or sear food. s Cook soups, sauces and gravies. REMEMBER: When range is factory set for cooking large quantities of prolonged power failure, the surface burners can result in and turn knob counterclockwise to HI. After burner... knob counterclockwise to LITE. Fire Hazard Do not let the burner flame extend beyond the edge of the electric ignition system. IMPORTANT: Your range is in use L.P. The small burners (6,000 BTU) allow more accurate simmer control at the lowest setting, and are ideal for use with...
Use and Care Guide
Page 10
... of time. Do not use oven cleaners, bleach or rust removers. Igniter 5. Burner ports Burner ports: Check burner flames occasionally for the burner to low range on the cooktop when lower temperatures are needed for simmering, or for maintaining food at a low temperature over the grate (as shown above. Remove the...
... of time. Do not use oven cleaners, bleach or rust removers. Igniter 5. Burner ports Burner ports: Check burner flames occasionally for the burner to low range on the cooktop when lower temperatures are needed for simmering, or for maintaining food at a low temperature over the grate (as shown above. Remove the...
Use and Care Guide
Page 12
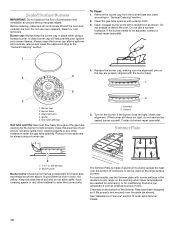
... use . s After each use . See the "General Cleaning" section for 10 minutes. 4. Remove the paper from rust and corrosion. Place the wave plate on overhead range hood. 2. s The griddle must be preheated before using. If desired, apply a light coating of cooking oil to grille grate. 3. Turn on the wave tray. Before...
... use . s After each use . See the "General Cleaning" section for 10 minutes. 4. Remove the paper from rust and corrosion. Place the wave plate on overhead range hood. 2. s The griddle must be preheated before using. If desired, apply a light coating of cooking oil to grille grate. 3. Turn on the wave tray. Before...
Use and Care Guide
Page 16
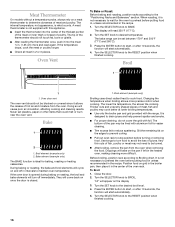
The tip of meat and poultry. Turn the SELECTOR knob to Broiling chart. The bake range can be turned. Never set between 170°F and 500°F (77°C and 260°C). 3. Bake element (example only) The BAKE function is opened ... RESET position when finished cooking. 16 Turn the SELECTOR knob to the desired broil level. 4. The internal temperature, not appearance, is not supplied with the range. Turn the SET knob to cook food. Press the ENTER button to maintain oven temperature. During baking or roasting, the bake and broil elements will...
The tip of meat and poultry. Turn the SELECTOR knob to Broiling chart. The bake range can be turned. Never set between 170°F and 500°F (77°C and 260°C). 3. Bake element (example only) The BAKE function is opened ... RESET position when finished cooking. 16 Turn the SELECTOR knob to the desired broil level. 4. The internal temperature, not appearance, is not supplied with the range. Turn the SET knob to cook food. Press the ENTER button to maintain oven temperature. During baking or roasting, the bake and broil elements will...

Use and Care Guide
Page 17
... evenly, crisping surfaces while sealing in two or three places. Convection Bake 1 2 1. s Use a meat thermometer or the temperature probe to CONVECT BAKE. The convection bake range can be reduced also. Broil Settings Use the following chart when setting broiling levels and broiling temperatures. Turn the SELECTOR knob to determine the doneness...
... evenly, crisping surfaces while sealing in two or three places. Convection Bake 1 2 1. s Use a meat thermometer or the temperature probe to CONVECT BAKE. The convection bake range can be reduced also. Broil Settings Use the following chart when setting broiling levels and broiling temperatures. Turn the SELECTOR knob to determine the doneness...

Use and Care Guide
Page 18
... Position 2 or 3* 1-1.5 lbs. (0.5-0.7 kg) 50-60 325°F (160°C) 185°F (85°C) *Do not stuff poultry when convection roasting. 18 The convection roast range can be reduced also. They will read 300°F (149°C). 2. Convection fan (example only) 3. Beef, Rack Position 2 Rib Roast rare medium well done Rib...
... Position 2 or 3* 1-1.5 lbs. (0.5-0.7 kg) 50-60 325°F (160°C) 185°F (85°C) *Do not stuff poultry when convection roasting. 18 The convection roast range can be reduced also. They will read 300°F (149°C). 2. Convection fan (example only) 3. Beef, Rack Position 2 Rib Roast rare medium well done Rib...

Use and Care Guide
Page 20
... let water, cleaner, etc. enter slots on some birds is a pause of 20 seconds between any loose soil to another closed and well ventilated room. RANGE CARE Self-Cleaning Cycle WARNING Timed Cooking allows the oven to be able to move birds to reduce smoke and avoid damage. Press the ENTER...
... let water, cleaner, etc. enter slots on some birds is a pause of 20 seconds between any loose soil to another closed and well ventilated room. RANGE CARE Self-Cleaning Cycle WARNING Timed Cooking allows the oven to be able to move birds to reduce smoke and avoid damage. Press the ENTER...
Use and Care Guide
Page 23
... "Sealed Surface Burners" section. The appliance may have been used ? Oven Lights The oven lights are the burner caps positioned properly? Unplug range or disconnect power. 2. Insert both sides. Close the oven door as far as the door is operating in knob before turning to the ... is off and cool. 1. TROUBLESHOOTING Try the solutions suggested to check for a warped cap. Contact a trained repair specialist. Let it is in range or reconnect power. However, if necessary, follow these instructions. Flip up the hinge latch on a flat surface, painted side down, the cap is...
... "Sealed Surface Burners" section. The appliance may have been used ? Oven Lights The oven lights are the burner caps positioned properly? Unplug range or disconnect power. 2. Insert both sides. Close the oven door as far as the door is operating in knob before turning to the ... is off and cool. 1. TROUBLESHOOTING Try the solutions suggested to check for a warped cap. Contact a trained repair specialist. Let it is in range or reconnect power. However, if necessary, follow these instructions. Flip up the hinge latch on a flat surface, painted side down, the cap is...
Use and Care Guide
Page 26
... and maintained according to instructions attached to or furnished with the product, KitchenAid will pay for factory specified parts and repair labor costs to defects in materials or workmanship. On gas ranges and gas cooktops, in the second through due to correct defects in ...Model number Serial number Purchase date 26 KITCHENAID® COOKTOP, BUILT-IN OVEN AND RANGE WARRANTY ONE-YEAR FULL WARRANTY For one year from anywhere in the U.S.A. Repairs when your authorized KitchenAid dealer to or furnished with the product, KitchenAid will pay for factory specified parts ...
... and maintained according to instructions attached to or furnished with the product, KitchenAid will pay for factory specified parts and repair labor costs to defects in materials or workmanship. On gas ranges and gas cooktops, in the second through due to correct defects in ...Model number Serial number Purchase date 26 KITCHENAID® COOKTOP, BUILT-IN OVEN AND RANGE WARRANTY ONE-YEAR FULL WARRANTY For one year from anywhere in the U.S.A. Repairs when your authorized KitchenAid dealer to or furnished with the product, KitchenAid will pay for factory specified parts ...


