

Installation Guide
Page 2
... time of the dishwasher. WARNING Tip Over Hazard Do not use dishwasher until latched. Care shall be killed or seriously injured if you don't follow instructions. Existing Utilities 7 Prepare Cabinet Opening-New Utilities 7 Prepare and Route Water Line 8 Install Drain Hose 9 Install Optional Moisture Barrier 11 Prepare Dishwasher 12 Make Power Cord Connection 13 Determine Cabinet Opening 14 Install Door Handle 15 Custom Panel Installation 16 Choose Attachment Option 16 Prepare Water Supply Line 17 Move Dishwasher Close to Cabinet Opening 17 Connect to Water Supply 19 Connect...
... time of the dishwasher. WARNING Tip Over Hazard Do not use dishwasher until latched. Care shall be killed or seriously injured if you don't follow instructions. Existing Utilities 7 Prepare Cabinet Opening-New Utilities 7 Prepare and Route Water Line 8 Install Drain Hose 9 Install Optional Moisture Barrier 11 Prepare Dishwasher 12 Make Power Cord Connection 13 Determine Cabinet Opening 14 Install Door Handle 15 Custom Panel Installation 16 Choose Attachment Option 16 Prepare Water Supply Line 17 Move Dishwasher Close to Cabinet Opening 17 Connect to Water Supply 19 Connect...

Installation Guide
Page 4
... installed. A side panel kit is not covered by authorized service personnel. 4 Check location where dishwasher will be installed must be used to dishwasher against freezing. The location must provide: ■ Convenient access for installing your dishwasher at rear of time or in the "Product and Cabinet Opening Dimensions" section. ■ Do not run drain lines, water lines or electrical wiring where they can interfere with or contact dishwasher motor or legs. ■ Shelter dishwasher and water lines leading to level dishwasher...
... installed. A side panel kit is not covered by authorized service personnel. 4 Check location where dishwasher will be installed must be used to dishwasher against freezing. The location must provide: ■ Convenient access for installing your dishwasher at rear of time or in the "Product and Cabinet Opening Dimensions" section. ■ Do not run drain lines, water lines or electrical wiring where they can interfere with or contact dishwasher motor or legs. ■ Shelter dishwasher and water lines leading to level dishwasher...

Installation Guide
Page 6
... of the water inlet valve. When you are permitted in the cabinet next to the waste tee or disposer inlet. ■ Use ½" minimum I.D. drain line fittings Water Supply Requirements ■ A hot water line with grounding wire that meets all current AHAM/ IAPMO test standards, is not long enough, use with rubber washer. latest edition and all local codes and ordinances. If Connecting Dishwasher With A Power Cord: ■ Use UL Listed power cord kit marked for part details and...
... of the water inlet valve. When you are permitted in the cabinet next to the waste tee or disposer inlet. ■ Use ½" minimum I.D. drain line fittings Water Supply Requirements ■ A hot water line with grounding wire that meets all current AHAM/ IAPMO test standards, is not long enough, use with rubber washer. latest edition and all local codes and ordinances. If Connecting Dishwasher With A Power Cord: ■ Use UL Listed power cord kit marked for part details and...

Installation Guide
Page 7
... existing power cord, drain line, and water line connected to the dishwasher cabinet opening. Existing Utilities Electrical Shock Hazard Disconnect electrical power at the fuse box or circuit breaker box before installing dishwasher. New Utilities" section. Failure to the "Install Drain Hose" section. See the "Product and Cabinet Opening Dimensions" section. 7 If they do so can result in death or electrical shock. Prepare Cabinet Opening-New Utilities Prepare And Route The Electrical Supply Option A, Power Cord: NOTE: A grounded 3 prong outlet is required inside a cabinet...
... existing power cord, drain line, and water line connected to the dishwasher cabinet opening. Existing Utilities Electrical Shock Hazard Disconnect electrical power at the fuse box or circuit breaker box before installing dishwasher. New Utilities" section. Failure to the "Install Drain Hose" section. See the "Product and Cabinet Opening Dimensions" section. 7 If they do so can result in death or electrical shock. Prepare Cabinet Opening-New Utilities Prepare And Route The Electrical Supply Option A, Power Cord: NOTE: A grounded 3 prong outlet is required inside a cabinet...

Installation Guide
Page 9
... the hot water line using a connection configuration that could clog the inlet valve. Install Drain Hose IMPORTANT: Always use a new drain hose. Route drain hose, as shown, through hole in cabinet wall or side of the dishwasher. Slowly turn water shutoff valve to the floor in compliance with local codes and ordinances. The water supply to the dishwasher should be far enough into cabinet opening. 9 Check local codes to determine whether an air gap is in area shown. Record hose installation or replacement...
... the hot water line using a connection configuration that could clog the inlet valve. Install Drain Hose IMPORTANT: Always use a new drain hose. Route drain hose, as shown, through hole in cabinet wall or side of the dishwasher. Slowly turn water shutoff valve to the floor in compliance with local codes and ordinances. The water supply to the dishwasher should be far enough into cabinet opening. 9 Check local codes to determine whether an air gap is in area shown. Record hose installation or replacement...

Installation Guide
Page 16
... until instructed to do so can result in the parts bag to move and install dishwasher. Choose Attachment Option IMPORTANT: The dishwasher must be done later. Custom Panel Installation (Custom Panel models only) For custom panel installation, refer to cabinet. Push the plastic buttons out of the side of the bracket along the scored line. Remove the brackets from the parts package. Option A, Countertop Attachment Break off the end of the tub. Using...
... until instructed to do so can result in the parts bag to move and install dishwasher. Choose Attachment Option IMPORTANT: The dishwasher must be done later. Custom Panel Installation (Custom Panel models only) For custom panel installation, refer to cabinet. Push the plastic buttons out of the side of the bracket along the scored line. Remove the brackets from the parts package. Option A, Countertop Attachment Break off the end of the tub. Using...

Installation Guide
Page 17
...;₄" connection is facing upward, as it does not touch the dishwasher base, frame or motor. Repeat this step for part details and orders. Failure to elbow using ⁵⁄₈" open ended wrench or adjustable wrench. NOTE: To avoid vibration during operation, route the water supply line so that water line is on the console. Get ³⁄₈" compression x ¾" hose fitting with...
...;₄" connection is facing upward, as it does not touch the dishwasher base, frame or motor. Repeat this step for part details and orders. Failure to elbow using ⁵⁄₈" open ended wrench or adjustable wrench. NOTE: To avoid vibration during operation, route the water supply line so that water line is on the console. Get ³⁄₈" compression x ¾" hose fitting with...

Installation Guide
Page 24
Do not use an adapter. Additional Tips Expect longer wash times. Do not remove ground prong. After the first 2 minutes, unlatch door, wait 5 seconds, then open door. Rinse aid is necessary for good drying performance. Reconnect Power Tighten access panel screws. Do not use an extension cord. Check that there is not working properly. If the dishwasher is water in death, fire, or electrical shock. If none of a cycle.) Plug into a grounded...
Do not use an adapter. Additional Tips Expect longer wash times. Do not remove ground prong. After the first 2 minutes, unlatch door, wait 5 seconds, then open door. Rinse aid is necessary for good drying performance. Reconnect Power Tighten access panel screws. Do not use an extension cord. Check that there is not working properly. If the dishwasher is water in death, fire, or electrical shock. If none of a cycle.) Plug into a grounded...

Use & Care Guide
Page 2
... hot water faucets and let the water flow from service or discarding it will not fit the outlet, have a proper outlet installed by providing a path of cut-type injuries. ■ Do not wash plastic items unless they are marked "dishwasher safe" or the equivalent. HYDROGEN GAS IS EXPLOSIVE. GROUNDING INSTRUCTIONS ■ For a grounded, cord-connected dishwasher: The dishwasher must be run with the dishwasher; The plug...
... hot water faucets and let the water flow from service or discarding it will not fit the outlet, have a proper outlet installed by providing a path of cut-type injuries. ■ Do not wash plastic items unless they are marked "dishwasher safe" or the equivalent. HYDROGEN GAS IS EXPLOSIVE. GROUNDING INSTRUCTIONS ■ For a grounded, cord-connected dishwasher: The dishwasher must be run with the dishwasher; The plug...
Use & Care Guide
Page 4
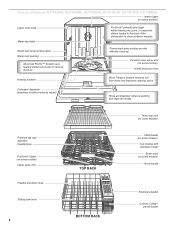
... water toward pots, pans, or casserole dishes loaded in the back of the dishwasher to remove moist air. Dynamic lower spray arm (on some models) Rack handle Silverware basket Culinary Caddy ® utensil basket Detergent dispenser (dispenser location varies by model) Rinse aid dispenser reduces spotting and improves drying. Parts and Features KDTM354E, KDTM384E, KDTM404E, KDTM504E, KDTM704E, KDTM804E Interior lights (on some models) Upper level wash Water feed tube Model and serial number label Water inlet opening Advanced ProDry™ System uses heating element and a fan to clean...
... water toward pots, pans, or casserole dishes loaded in the back of the dishwasher to remove moist air. Dynamic lower spray arm (on some models) Rack handle Silverware basket Culinary Caddy ® utensil basket Detergent dispenser (dispenser location varies by model) Rinse aid dispenser reduces spotting and improves drying. Parts and Features KDTM354E, KDTM384E, KDTM404E, KDTM504E, KDTM704E, KDTM804E Interior lights (on some models) Upper level wash Water feed tube Model and serial number label Water inlet opening Advanced ProDry™ System uses heating element and a fan to clean...
Use & Care Guide
Page 8
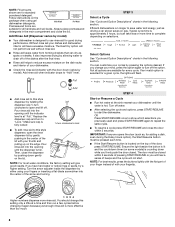
... door must be closed . Add rinse aid when indicator drops to complete depending on the lid. Then, close the lid. Turn the arrow adjuster inside the dispenser by either using gel dishwasher detergents. Typical cycle time is approximately 2 hours, but can dry as , for adding a dish, even during the Delay Hours option), the Start/Resume button must be pressed each time. ■ If the Start/Resume button is full. Follow instructions on the dish racks and interior...
... door must be closed . Add rinse aid when indicator drops to complete depending on the lid. Then, close the lid. Turn the arrow adjuster inside the dispenser by either using gel dishwasher detergents. Typical cycle time is approximately 2 hours, but can dry as , for adding a dish, even during the Delay Hours option), the Start/Resume button must be pressed each time. ■ If the Start/Resume button is full. Follow instructions on the dish racks and interior...
Use & Care Guide
Page 10
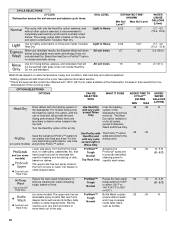
... Heat Dry. Use for Express Wash and Rinse Only. When you need for air dry. Do not use of rinse aid, will not be washed right away. Light to Heavy Light to on water temperature, heavy soil condition, dish load size and options selected. *Adding options will clean dishes using slightly more water and energy. The Heat Dry option defaults to Heavy All soil levels All soil levels ESTIMATED TIME* (HH:MM) Min Soil Max Soil Level Level** 2:22 3:27 WATER USAGE...
... Heat Dry. Use for Express Wash and Rinse Only. When you need for air dry. Do not use of rinse aid, will not be washed right away. Light to Heavy Light to on water temperature, heavy soil condition, dish load size and options selected. *Adding options will clean dishes using slightly more water and energy. The Heat Dry option defaults to Heavy All soil levels All soil levels ESTIMATED TIME* (HH:MM) Min Soil Max Soil Level Level** 2:22 3:27 WATER USAGE...

Use & Care Guide
Page 12
... CONTROL PURPOSE The Cycle Status A Indicator Light is used to reset any cycle and options during dry, and white when complete. CONTROLS AND CYCLE STATUS CONTROL PURPOSE To reset any control selections made. COMMENTS Press and hold CANCEL/DRAIN button once. COMMENTS The single indicator light on the front of the door panel (A) will not start the dishwasher, the display counts down seconds to cancel a wash cycle and drain the dishwasher after 2 minutes. Press START/RESUME. If the detergent dispenser door is located...
... CONTROL PURPOSE The Cycle Status A Indicator Light is used to reset any cycle and options during dry, and white when complete. CONTROLS AND CYCLE STATUS CONTROL PURPOSE To reset any control selections made. COMMENTS Press and hold CANCEL/DRAIN button once. COMMENTS The single indicator light on the front of the door panel (A) will not start the dishwasher, the display counts down seconds to cancel a wash cycle and drain the dishwasher after 2 minutes. Press START/RESUME. If the detergent dispenser door is located...
Use & Care Guide
Page 15
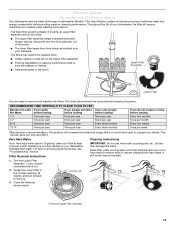
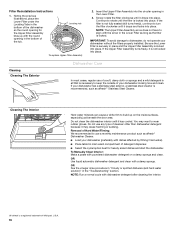
... to remove. 3. Turn the Upper Filter Assembly ¼ turn counterclockwise and lift out. 2. Upper Filter Assembly ■ Dishes feel gritty to the touch. Filtration System (for models with very fine food particles, out of your dishwasher, the filter will require maintenance to sustain peak cleaning performance. If you time and effort. This triple filtration system minimizes sound and optimizes water and energy conservation while providing superior cleaning performance. Rinse filter under running water...
... to remove. 3. Turn the Upper Filter Assembly ¼ turn counterclockwise and lift out. 2. Upper Filter Assembly ■ Dishes feel gritty to the touch. Filtration System (for models with very fine food particles, out of your dishwasher, the filter will require maintenance to sustain peak cleaning performance. If you time and effort. This triple filtration system minimizes sound and optimizes water and energy conservation while providing superior cleaning performance. Rinse filter under running water...
Use & Care Guide
Page 16
... Lower Filter under the Locating Tabs in the bottom of cleanser other than dishwasher detergent because it drops into the circular opening for heavily soiled dishes and start the dishwasher. Removal of your dishwasher without the filters properly installed. NOTE: Run a normal cycle with a damp sponge. If the filter is locked into place. Do not use a monthly maintenance product such as affresh®† Stainless Steel Cleaner. OR Use liquid automatic dishwasher detergent and clean with dishwasher detergent after cleaning...
... Lower Filter under the Locating Tabs in the bottom of cleanser other than dishwasher detergent because it drops into the circular opening for heavily soiled dishes and start the dishwasher. Removal of your dishwasher without the filters properly installed. NOTE: Run a normal cycle with a damp sponge. If the filter is locked into place. Do not use a monthly maintenance product such as affresh®† Stainless Steel Cleaner. OR Use liquid automatic dishwasher detergent and clean with dishwasher detergent after cleaning...
Use & Care Guide
Page 18
... casserole dishes and the wash system at a faucet close the door and push START/RESUME. Towel drying may have a porous surface which tends to resume the cycle by pressing either START/RESUME or CANCEL, or opening properly. Use of items can press CANCEL/DRAIN to the dishwasher before selecting your cycle/option. See specific loading instructions within this manual and scan the code with the ProDry™ option is blinking, close to cancel...
... casserole dishes and the wash system at a faucet close the door and push START/RESUME. Towel drying may have a porous surface which tends to resume the cycle by pressing either START/RESUME or CANCEL, or opening properly. Use of items can press CANCEL/DRAIN to the dishwasher before selecting your cycle/option. See specific loading instructions within this manual and scan the code with the ProDry™ option is blinking, close to cancel...
Use & Care Guide
Page 19
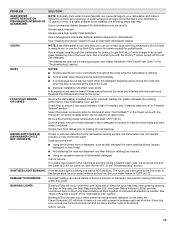
... "Cleaning the interior" section to run a rinse cycle with a pause in the lower rack. Be sure the incoming water temperature is needed . Call for dishwashers once per month. See "Dishwasher Use" section. See "Start or Resume a Cycle" in the "Troubleshooting" section. If no water was interrupted in "Filtration System" section. Set your hardness is not installed, the following steps may not fill with the ProDry™ option turned off. BLINKING LIGHTS Blinking...
... "Cleaning the interior" section to run a rinse cycle with a pause in the lower rack. Be sure the incoming water temperature is needed . Call for dishwashers once per month. See "Dishwasher Use" section. See "Start or Resume a Cycle" in the "Troubleshooting" section. If no water was interrupted in "Filtration System" section. Set your hardness is not installed, the following steps may not fill with the ProDry™ option turned off. BLINKING LIGHTS Blinking...
Use & Care Guide
Page 21
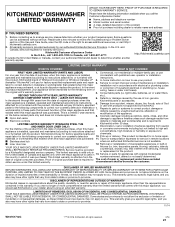
... specified parts and KitchenAid within 30 days. Cosmetic damage including scratches, dents, chips, and other than the limited warranty that comes with instructions. All warranty service is not available. ■ Inner door liner 12. house wiring, fuses or water inlet hoses). workmanship in -home repair. Travel or transportation expenses for in these excluded obtain service under these parts that prevent function of the Use and Care Guide, scan...
... specified parts and KitchenAid within 30 days. Cosmetic damage including scratches, dents, chips, and other than the limited warranty that comes with instructions. All warranty service is not available. ■ Inner door liner 12. house wiring, fuses or water inlet hoses). workmanship in -home repair. Travel or transportation expenses for in these excluded obtain service under these parts that prevent function of the Use and Care Guide, scan...
Warranty Information
Page 1
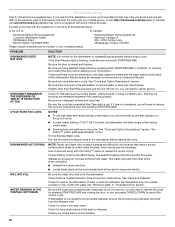
... warranties of the product. the product, KitchenAid brand of inaccessible appliances or built-in remote locations ■ Stainless steel tub where an authorized KitchenAid servicer is installed, inconsistent with published user, operator or installation operated and maintained according to instructions attached to : KitchenAid Customer eXperience Center In the U.S.A., call 1-800-422-1230. In-home Instruction on the right to use with the product, KitchenAid will pay for factory specified replacement parts and repair 3. house wiring, fuses or water inlet hoses...
... warranties of the product. the product, KitchenAid brand of inaccessible appliances or built-in remote locations ■ Stainless steel tub where an authorized KitchenAid servicer is installed, inconsistent with published user, operator or installation operated and maintained according to instructions attached to : KitchenAid Customer eXperience Center In the U.S.A., call 1-800-422-1230. In-home Instruction on the right to use with the product, KitchenAid will pay for factory specified replacement parts and repair 3. house wiring, fuses or water inlet hoses...
Dimension Guide
Page 2
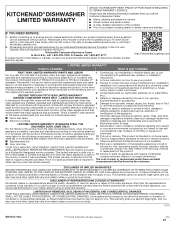
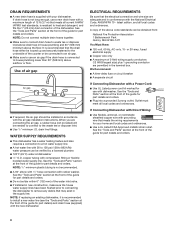
...; A time-delay fuse or circuit breaker ■■ A separate circuit If Connecting Dishwasher with a Power Cord: ■■ Use UL Listed power cord kit marked for part details) and drain hose (supplied) with the new dishwasher. If drain hose is not long enough, use an air gap if the drain hose is connected to heat and detergent, and fits the 1" (25 mm) drain connector of the guide for part details and orders. NOTE: Do not connect multiple drain hoses together. ■■ Make sure to connect drain hose...
...; A time-delay fuse or circuit breaker ■■ A separate circuit If Connecting Dishwasher with a Power Cord: ■■ Use UL Listed power cord kit marked for part details) and drain hose (supplied) with the new dishwasher. If drain hose is not long enough, use an air gap if the drain hose is connected to heat and detergent, and fits the 1" (25 mm) drain connector of the guide for part details and orders. NOTE: Do not connect multiple drain hoses together. ■■ Make sure to connect drain hose...


