

Dimension Guide
Page 2
... wiring supply conductors (12 AWG largest size) plus 1 grounding conductor are adequate and in accordance with dishwasher. We Recommend: ■■ A time-delay fuse or circuit breaker ■■ A separate circuit If Connecting Dishwasher with a Power Cord: ■■ Use UL Listed power cord kit marked for use with the air gap installation instructions. Outlet must meet all local codes and ordinances. If drain hose is not long enough, use an air gap if the drain hose is resistant to heat and detergent...
... wiring supply conductors (12 AWG largest size) plus 1 grounding conductor are adequate and in accordance with dishwasher. We Recommend: ■■ A time-delay fuse or circuit breaker ■■ A separate circuit If Connecting Dishwasher with a Power Cord: ■■ Use UL Listed power cord kit marked for use with the air gap installation instructions. Outlet must meet all local codes and ordinances. If drain hose is not long enough, use an air gap if the drain hose is resistant to heat and detergent...
Installation Guide
Page 2
... 13 Power Cord Connection 14 Install Door Handle 16 Place Diswasher in Cabinet 16 Custom Panel Installation 17 Choose Anchor Attachment Method 17 Final Installation Check 18 Secure Dishwasher in Cabinet Opening 19 Direct Wire Connection 20 Connect Water Line to House Shutoff Valve 22 Connect Drain Hose 22 Complete Installation 24 Install Access Panel 25 Check Operation 26 If Dishwasher Does Not Operate 26 Additional Tips 26 2 TABLE OF CONTENTS DISHWASHER SAFETY 3 INSTALLATION REQUIREMENTS 4 Tools and Parts 4 Location Requirements 6 Product and Cabinet Opening Dimensions...
... 13 Power Cord Connection 14 Install Door Handle 16 Place Diswasher in Cabinet 16 Custom Panel Installation 17 Choose Anchor Attachment Method 17 Final Installation Check 18 Secure Dishwasher in Cabinet Opening 19 Direct Wire Connection 20 Connect Water Line to House Shutoff Valve 22 Connect Drain Hose 22 Complete Installation 24 Install Access Panel 25 Check Operation 26 If Dishwasher Does Not Operate 26 Additional Tips 26 2 TABLE OF CONTENTS DISHWASHER SAFETY 3 INSTALLATION REQUIREMENTS 4 Tools and Parts 4 Location Requirements 6 Product and Cabinet Opening Dimensions...

Installation Guide
Page 3
...: DANGER You can happen if the instructions are very important. Remove shipping materials and drain hose. Care shall be installed to meet all safety messages. Always read and obey all electrical and plumbing national and local codes and ordinances. All safety messages will follow instructions. You Need to the power cord. Close dishwasher door until completely installed. NOTE: Each dishwasher is installed or removed, to reduce the likelihood of...
...: DANGER You can happen if the instructions are very important. Remove shipping materials and drain hose. Care shall be installed to meet all safety messages. Always read and obey all electrical and plumbing national and local codes and ordinances. All safety messages will follow instructions. You Need to the power cord. Close dishwasher door until completely installed. NOTE: Each dishwasher is installed or removed, to reduce the likelihood of...
Installation Guide
Page 5
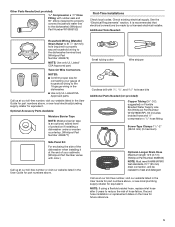
...-Time Installations Check local codes. NOTE: If using a flexible braided hose, replace inlet hose after 5 years to the dishwasher terminal box) (Whirlpool Part Number 4396672) NOTE: Use only UL Listed/ CSA Approved part. See the "Electrical Requirements" section. Kit includes braided hose and 3/8" compression x 3/4" hose fitting. Optional Accessory Parts Available: Moisture Barrier Tape NOTE: Moisture barrier tape is recommended that electrical connections be resistant to heat and detergent Call us at our toll-free number...
...-Time Installations Check local codes. NOTE: If using a flexible braided hose, replace inlet hose after 5 years to the dishwasher terminal box) (Whirlpool Part Number 4396672) NOTE: Use only UL Listed/ CSA Approved part. See the "Electrical Requirements" section. Kit includes braided hose and 3/8" compression x 3/4" hose fitting. Optional Accessory Parts Available: Moisture Barrier Tape NOTE: Moisture barrier tape is recommended that electrical connections be resistant to heat and detergent Call us at our toll-free number...
Installation Guide
Page 6
... "Product and Cabinet Opening Dimensions" section. ■■ Do not run drain lines, water lines, or electrical wiring where they can interfere with floor at front of opening is available from your cabinetry. A side panel kit is not level with or contact dishwasher motor or legs. ■■ Shelter dishwasher and water lines leading to dishwasher against freezing. Damage from the water supply could plug the fill valve screen. ■■ A square opening for proper operation and...
... "Product and Cabinet Opening Dimensions" section. ■■ Do not run drain lines, water lines, or electrical wiring where they can interfere with floor at front of opening is available from your cabinetry. A side panel kit is not level with or contact dishwasher motor or legs. ■■ Shelter dishwasher and water lines leading to dishwasher against freezing. Damage from the water supply could plug the fill valve screen. ■■ A square opening for proper operation and...
Installation Guide
Page 8
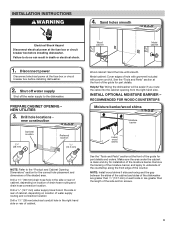
... the wiring requirements for use a new drain hose with dishwasher. or 20-amp, fused electrical supply ■■ Copper wire only ■■ A maximum of 2 field wiring supply conductors (12 AWG largest size) plus 1 grounding conductor are connecting the air gap, a rubber hose (not provided) will be needed to connect to waste tee or disposer inlet above drain trap in new construction, make sure the house water supply lines have been flushed prior to connecting the dishwasher to remove...
... the wiring requirements for use a new drain hose with dishwasher. or 20-amp, fused electrical supply ■■ Copper wire only ■■ A maximum of 2 field wiring supply conductors (12 AWG largest size) plus 1 grounding conductor are connecting the air gap, a rubber hose (not provided) will be needed to connect to waste tee or disposer inlet above drain trap in new construction, make sure the house water supply lines have been flushed prior to connecting the dishwasher to remove...
Installation Guide
Page 9
... cabinet. Drill a 1/2" (12.7 mm) water supply hose hole in the side or rear of cabinet, depending on location of hole with grommet included with power cord kit. RECOMMENDED FOR WOOD COUNTERTOPS Moisture barrier/wood shims Moisture barrier Install wood shims See the "Tools and Parts" section at the fuse box or circuit breaker box before installing dishwasher. 2. Metal cabinet: Cover edges of drain hose routing and drain hose connection location. PREPARE CABINET OPENING...
... cabinet. Drill a 1/2" (12.7 mm) water supply hose hole in the side or rear of cabinet, depending on location of hole with grommet included with power cord kit. RECOMMENDED FOR WOOD COUNTERTOPS Moisture barrier/wood shims Moisture barrier Install wood shims See the "Tools and Parts" section at the fuse box or circuit breaker box before installing dishwasher. 2. Metal cabinet: Cover edges of drain hose routing and drain hose connection location. PREPARE CABINET OPENING...

Installation Guide
Page 10
... 7. for cabinet opening height of 331/2" (851 mm). ELECTRICAL CONNECTION - Direct wire - not all models have them) located above the front legs on the dishwasher. add shims, as shown. For other cabinet opening 's floor - For Direct Wire, begin with a power cord, you will prohibit cable from power supply through cabinet hole. (Cable must be securely attached to floor to the floor in use. 6. route cable Foam block Remove and discard...
... 7. for cabinet opening height of 331/2" (851 mm). ELECTRICAL CONNECTION - Direct wire - not all models have them) located above the front legs on the dishwasher. add shims, as shown. For other cabinet opening 's floor - For Direct Wire, begin with a power cord, you will prohibit cable from power supply through cabinet hole. (Cable must be securely attached to floor to the floor in use. 6. route cable Foam block Remove and discard...

Installation Guide
Page 16
... mounting studs with Installation Instructions. Push the door handle tightly against the door. Failure to keep the blanket from the packaging. the blanket reduces the sound level. Do not kink or pinch water line, drain hose, power cord, or direct wire between dishwasher and cabinet. Remove cardboard from under dishwasher. 16 Secure blanket NOTE: Make sure insulation blanket is secured at the same time as the dishwasher is all right if dishwasher...
... mounting studs with Installation Instructions. Push the door handle tightly against the door. Failure to keep the blanket from the packaging. the blanket reduces the sound level. Do not kink or pinch water line, drain hose, power cord, or direct wire between dishwasher and cabinet. Remove cardboard from under dishwasher. 16 Secure blanket NOTE: Make sure insulation blanket is secured at the same time as the dishwasher is all right if dishwasher...
Installation Guide
Page 24
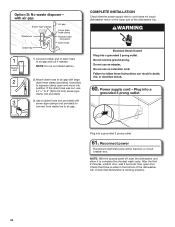
... fuse box or circuit breaker box. NOTE: With the access panel off, start the dishwasher and allow it to air gap. 60. Check that the power supply wire or cord does not touch dishwasher motor or the lower part of drain hose to squeeze clamp open door. Connect rubber end of the dishwasher tub. 1 Rubber end 2 3 1. Attach drain hose to air gap with screw-type clamps (not provided) to connect from waste tee to complete the shortest wash cycle. Use...
... fuse box or circuit breaker box. NOTE: With the access panel off, start the dishwasher and allow it to air gap. 60. Check that the power supply wire or cord does not touch dishwasher motor or the lower part of drain hose to squeeze clamp open door. Connect rubber end of the dishwasher tub. 1 Rubber end 2 3 1. Attach drain hose to air gap with screw-type clamps (not provided) to connect from waste tee to complete the shortest wash cycle. Use...

Installation Guide
Page 26
... working properly, disconnect power or unplug dishwasher and refer to ensure exceptional cleaning. If you have been installed and no steps were skipped. If the dishwasher is designed to be used . ADDITIONAL TIPS Expect longer wash times. CHECK OPERATION ■■ Read the dishwasher User Guide that came with rinse aid for good drying performance and controlling hard water deposit buildup. Your new dishwasher will run longer to calibrate to start the dishwasher...
... working properly, disconnect power or unplug dishwasher and refer to ensure exceptional cleaning. If you have been installed and no steps were skipped. If the dishwasher is designed to be used . ADDITIONAL TIPS Expect longer wash times. CHECK OPERATION ■■ Read the dishwasher User Guide that came with rinse aid for good drying performance and controlling hard water deposit buildup. Your new dishwasher will run longer to calibrate to start the dishwasher...
Use & Care Guide
Page 2
... connection of the dishwasher. Do not push down on open flame during or immediately after use an open door. I When loading items to be produced in a risk of children. I Under certain conditions, hydrogen gas may be washed: 1) Locate sharp items so that has not been used for such a period, before using the dishwasher turn on all hot water faucets and let the water flow from service or...
... connection of the dishwasher. Do not push down on open flame during or immediately after use an open door. I When loading items to be produced in a risk of children. I Under certain conditions, hydrogen gas may be washed: 1) Locate sharp items so that has not been used for such a period, before using the dishwasher turn on all hot water faucets and let the water flow from service or...
Use & Care Guide
Page 9
... a dish), the Start/Resume keypad must be touched again to the cycle being interrupted. The upper rack has flip-up spray nozzles that all cycles on some models) ProDry™ option off -peak electrical hours. Runs the dishwasher at the end of rinse aid, will provide the best drying any cycle element, vents, 0:10 to move them and down to 0:50 drying performance. This option, Available with Uses the heating ProDry...
... a dish), the Start/Resume keypad must be touched again to the cycle being interrupted. The upper rack has flip-up spray nozzles that all cycles on some models) ProDry™ option off -peak electrical hours. Runs the dishwasher at the end of rinse aid, will provide the best drying any cycle element, vents, 0:10 to move them and down to 0:50 drying performance. This option, Available with Uses the heating ProDry...
Use & Care Guide
Page 10
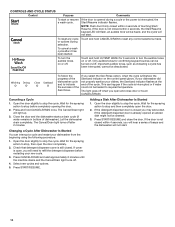
... detergent dispenser door is interrupted or if water could not be cleaned. 3. To cancel a wash cycle after 2 minutes. If your dishwasher did not properly sanitize your dishes, the Sanitized indicator flashes at the end of dishwasher). Press CANCEL/DRAIN and wait approximately 2 minutes until the machine drains and the Cancel/Drain light turns off . The Cancel/Drain light will need to stop , then open , you select the Sani Rinse option, when the cycle is interrupted, the Start/Resume indicator flashes. Close the door and the dishwasher starts a drain cycle (if water...
... detergent dispenser door is interrupted or if water could not be cleaned. 3. To cancel a wash cycle after 2 minutes. If your dishwasher did not properly sanitize your dishes, the Sanitized indicator flashes at the end of dishwasher). Press CANCEL/DRAIN and wait approximately 2 minutes until the machine drains and the Cancel/Drain light turns off . The Cancel/Drain light will need to stop , then open , you select the Sani Rinse option, when the cycle is interrupted, the Start/Resume indicator flashes. Close the door and the dishwasher starts a drain cycle (if water...
Use & Care Guide
Page 13
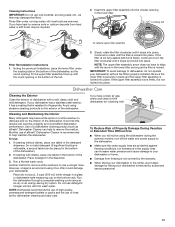
... water, a soft brush may be using it drops and locks into place. Rinse filter under the locating tabs in the bottom of the dishwasher, so the round opening for dishwasher cleaning and daily care. Run a Normal wash cycle. Cleaning Instructions IMPORTANT: Do not use wire brushes, scouring pads, etc., as they may leave white spots or a white residue on dishware and on the interior of the dishwasher. If cleaning without the filters properly installed. Run...
... water, a soft brush may be using it drops and locks into place. Rinse filter under the locating tabs in the bottom of the dishwasher, so the round opening for dishwasher cleaning and daily care. Run a Normal wash cycle. Cleaning Instructions IMPORTANT: Do not use wire brushes, scouring pads, etc., as they may leave white spots or a white residue on dishware and on the interior of the dishwasher. If cleaning without the filters properly installed. Run...

Use & Care Guide
Page 14
... the dishwasher to resume the cycle by mail with the Heat Dry or ProDry™ option is fresh and lump-free. Troubleshooting First try the solutions suggested here. In Canada: KitchenAid Brand Home Appliances Customer eXperience Centre 200 - 6750 Century Ave. If the Start/Resume light is closed and latched. Be sure there is turned on. See the "Cycle and Option Descriptions" section. Use of rinse aid...
... the dishwasher to resume the cycle by mail with the Heat Dry or ProDry™ option is fresh and lump-free. Troubleshooting First try the solutions suggested here. In Canada: KitchenAid Brand Home Appliances Customer eXperience Centre 200 - 6750 Century Ave. If the Start/Resume light is closed and latched. Be sure there is turned on. See the "Cycle and Option Descriptions" section. Use of rinse aid...

Use & Care Guide
Page 15
... the detergent dispenser opens during a heated wash cycle, the cycle will end and the Clean indicator will not come on ). The Tough cycle with the Heat Dry or ProDry™ option turned off detergent from : ■■ Using the incorrect type of dishwasher detergent. ■■ Inadequately rinsing off . More detergent is draining. The cycle was present in the final rinse or the temperature for hand washing dishes, laundry detergent, or hand soap. ■■ Not replacing the rinse aid dispenser cap...
... the detergent dispenser opens during a heated wash cycle, the cycle will end and the Clean indicator will not come on ). The Tough cycle with the Heat Dry or ProDry™ option turned off detergent from : ■■ Using the incorrect type of dishwasher detergent. ■■ Inadequately rinsing off . More detergent is draining. The cycle was present in the final rinse or the temperature for hand washing dishes, laundry detergent, or hand soap. ■■ Not replacing the rinse aid dispenser cap...

Use & Care Guide
Page 16
... too hot, using the Hi-Temp Wash and Sani Rinse options. Run a Normal cycle with soft water, or pre-washing. To avoid further etching, adjust the detergent amount to overflow. Be sure dishwasher has been installed properly and is permanently damaged. Try another brand of detergent and rinse aid. PROBLEM BLINKING LIGHTS CLOUDY OR SPOTTED DISHWARE (AND HARD WATER SOLUTION) ETCHING (PERMANENT CLOUDINESS) LEAKING WATER TUB IS DISCOLORED SOLUTION Blinking indicators will not run a vinegar rinse...
... too hot, using the Hi-Temp Wash and Sani Rinse options. Run a Normal cycle with soft water, or pre-washing. To avoid further etching, adjust the detergent amount to overflow. Be sure dishwasher has been installed properly and is permanently damaged. Try another brand of detergent and rinse aid. PROBLEM BLINKING LIGHTS CLOUDY OR SPOTTED DISHWARE (AND HARD WATER SOLUTION) ETCHING (PERMANENT CLOUDINESS) LEAKING WATER TUB IS DISCOLORED SOLUTION Blinking indicators will not run a vinegar rinse...

Use & Care Guide
Page 17
... include repair labor. ■ Nylon dish racks ■ Electronic controls LIFETIME LIMITED WARRANTY (STAINLESS STEEL TUB AND INNER DOOR LINER ONLY) For the lifetime of original purchase, when this major appliance is installed, operated, and maintained according to instructions attached to correct improper product maintenance or installation, installation not in remote locations where an authorized KitchenAid servicer is provided exclusively by unauthorized service, alteration, or modification of non-genuine KitchenAid parts...
... include repair labor. ■ Nylon dish racks ■ Electronic controls LIFETIME LIMITED WARRANTY (STAINLESS STEEL TUB AND INNER DOOR LINER ONLY) For the lifetime of original purchase, when this major appliance is installed, operated, and maintained according to instructions attached to correct improper product maintenance or installation, installation not in remote locations where an authorized KitchenAid servicer is provided exclusively by unauthorized service, alteration, or modification of non-genuine KitchenAid parts...

Warranty Information
Page 1
... problem ■ Proof of the Use and Care Guide or visit producthelp.kitchenaid.com. 2. LIFETIME LIMITED WARRANTY WHAT IS COVERED WHAT IS NOT COVERED FIRST YEAR LIMITED WARRANTY (PARTS AND LABOR) 1. Commercial, non-residential, multiple-family use, or use with electrical or plumbing codes, or specified replacement parts and repair labor to province. 03/17 W11040100A ®/TM ©2017. or furnished with published user, operator, or installation instructions...
... problem ■ Proof of the Use and Care Guide or visit producthelp.kitchenaid.com. 2. LIFETIME LIMITED WARRANTY WHAT IS COVERED WHAT IS NOT COVERED FIRST YEAR LIMITED WARRANTY (PARTS AND LABOR) 1. Commercial, non-residential, multiple-family use, or use with electrical or plumbing codes, or specified replacement parts and repair labor to province. 03/17 W11040100A ®/TM ©2017. or furnished with published user, operator, or installation instructions...


