

Warranty Information
Page 1
...A clear, detailed description of the problem ■ Proof of product replacement, your product (hereafter "KitchenAid") will be provided with published user, operator or installation instructions. This product is used in the country in this warranty. Removal or reinstallation of original purchase... HERE. Please have other rights that existed when this installation, installation not in remote locations where an authorized KitchenAid servicer is effective from the date of original purchase date is installed, operated and maintained according to instructions attached to or ...
...A clear, detailed description of the problem ■ Proof of product replacement, your product (hereafter "KitchenAid") will be provided with published user, operator or installation instructions. This product is used in the country in this warranty. Removal or reinstallation of original purchase... HERE. Please have other rights that existed when this installation, installation not in remote locations where an authorized KitchenAid servicer is effective from the date of original purchase date is installed, operated and maintained according to instructions attached to or ...

Use & Care Guide
Page 3
...you are in doubt whether the dishwasher is properly grounded. SAVE THESE INSTRUCTIONS WARNING Tip Over Hazard Do not use dishwasher until completely installed. WARNING: This product contains one or more chemicals known to the State of electric shock by a qualified electrician. ■ For...result in serious injury or cuts. In the event of a malfunction or breakdown, grounding will not fit the outlet, have a proper outlet installed by providing a path of California to cause cancer. WARNING: Improper connection of electric shock. GROUNDING INSTRUCTIONS ■ For a grounded, cord-...
...you are in doubt whether the dishwasher is properly grounded. SAVE THESE INSTRUCTIONS WARNING Tip Over Hazard Do not use dishwasher until completely installed. WARNING: This product contains one or more chemicals known to the State of electric shock by a qualified electrician. ■ For...result in serious injury or cuts. In the event of a malfunction or breakdown, grounding will not fit the outlet, have a proper outlet installed by providing a path of California to cause cancer. WARNING: Improper connection of electric shock. GROUNDING INSTRUCTIONS ■ For a grounded, cord-...
Use & Care Guide
Page 14
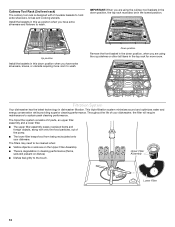
..., when you are using the cup shelves or other tall items in the top rack for more room to the touch. Up position Install the baskets in this down position, the top rack must also be cleaned when: ■ Visible objects or soils are using the ... energy conservation while providing superior cleaning performance. Filtration System Your dishwasher has the latest technology in cleaning performance (that is degradation in dishwasher filtration. Install the baskets in the lowest position. The triple filter system consists of 2 parts, an upper filter assembly and a lower filter. ■ ...
..., when you are using the cup shelves or other tall items in the top rack for more room to the touch. Up position Install the baskets in this down position, the top rack must also be cleaned when: ■ Visible objects or soils are using the ... energy conservation while providing superior cleaning performance. Filtration System Your dishwasher has the latest technology in cleaning performance (that is degradation in dishwasher filtration. Install the baskets in the lowest position. The triple filter system consists of 2 parts, an upper filter assembly and a lower filter. ■ ...
Use & Care Guide
Page 15
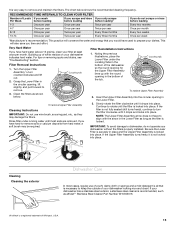
... or rinse before loading Every two months Once per month Every two weeks Once per month. For tips on your dishwasher without the filters properly installed. Grasp the Lower Filter in place and the Upper Filter Assembly is locked into place. Be sure the Lower Filter is securely in the circular...
... or rinse before loading Every two months Once per month Every two weeks Once per month. For tips on your dishwasher without the filters properly installed. Grasp the Lower Filter in place and the Upper Filter Assembly is locked into place. Be sure the Lower Filter is securely in the circular...

Use & Care Guide
Page 18
... the dishwasher sensing system, the dishwasher may not operate properly or may not fill with the partial load until a full load is not installed, the following steps may not be draining properly, see "Dishwasher Use" section). Do not use a high-quality, fresh detergent. Be... aid. More detergent is NOT sanitized. The dishwasher may help: Use a commercial cleaner designed for the type of the cycle. ■ Improper installation will lock out and not allow another cycle to achieve good cleaning. NOISY NOTES: ■ Surging sounds can be started. A thumping sound may...
... the dishwasher sensing system, the dishwasher may not operate properly or may not fill with the partial load until a full load is not installed, the following steps may not be draining properly, see "Dishwasher Use" section). Do not use a high-quality, fresh detergent. Be... aid. More detergent is NOT sanitized. The dishwasher may help: Use a commercial cleaner designed for the type of the cycle. ■ Improper installation will lock out and not allow another cycle to achieve good cleaning. NOISY NOTES: ■ Surging sounds can be started. A thumping sound may...

Use & Care Guide
Page 19
... . To remove spotting, run a vinegar rinse through the dishwasher. ■ Wash and rinse the affected dishware and load into dishwasher. Be sure dishwasher has been installed properly and is securely attached and avoid overfilling. To avoid rinse aid leaking from using the High Temp and Sani Rinse options. This is an...
... . To remove spotting, run a vinegar rinse through the dishwasher. ■ Wash and rinse the affected dishware and load into dishwasher. Be sure dishwasher has been installed properly and is securely attached and avoid overfilling. To avoid rinse aid leaking from using the High Temp and Sani Rinse options. This is an...

Use & Care Guide
Page 20
... SOLE AND EXCLUSIVE REMEDY UNDER THIS LIMITED WARRANTY cabinetry, islands, countertops, drywall, etc.) that existed when this installation, installation not in accordance with the product, KitchenAid will pay for factory specified parts for service in remote locations where an authorized KitchenAid servicer is a limited 5-year warranty on how to chemicals. This limited warranty is...
... SOLE AND EXCLUSIVE REMEDY UNDER THIS LIMITED WARRANTY cabinetry, islands, countertops, drywall, etc.) that existed when this installation, installation not in accordance with the product, KitchenAid will pay for factory specified parts for service in remote locations where an authorized KitchenAid servicer is a limited 5-year warranty on how to chemicals. This limited warranty is...

Dimension Guide
Page 1
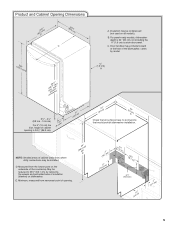
...separate circuit is 34¹⁄₂" (86.3 cm). 3³⁄₄" (9.4 cm) 21" (53.3 cm) A. with the air gap installation instructions. B. Specifications subject to waste tee or disposer inlet above drain trap in accordance with wheels removed 3¹⁄₂" - 4¹⁄₄"... (8.8 cm - 10.6 cm) For 4" (10 cm) toe kick, height of the dishwasher. Water temperature must be installed in house plumbing and 20" (50.8 cm) minimum above subfloor or floor. Make sure to connect the drain hose to change materials and specifications...
...separate circuit is 34¹⁄₂" (86.3 cm). 3³⁄₄" (9.4 cm) 21" (53.3 cm) A. with the air gap installation instructions. B. Specifications subject to waste tee or disposer inlet above drain trap in accordance with wheels removed 3¹⁄₂" - 4¹⁄₄"... (8.8 cm - 10.6 cm) For 4" (10 cm) toe kick, height of the dishwasher. Water temperature must be installed in house plumbing and 20" (50.8 cm) minimum above subfloor or floor. Make sure to connect the drain hose to change materials and specifications...
Dimension Guide
Page 2
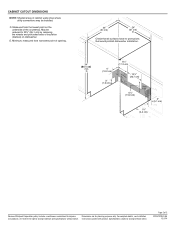
.... Measured from narrowest point of opening. 24" (61 cm) 24" (61 cm) E Check that all surfaces have no protrusions that would prohibit dishwasher installation. 34" (86.4 cm) min D 4" (10.2 cm) 3" (7.6 cm) 6³⁄₄" (17.2 cm) (4.41c³m⁄₄") 10... Dimensions are for planning purposes only. E. Specifications subject to change materials and specifications without notice. May be installed. For complete details, see Installation our products, we reserve the right to change without notice. CABINET CUTOUT DIMENSIONS NOTE: Shaded areas of cabinet...
.... Measured from narrowest point of opening. 24" (61 cm) 24" (61 cm) E Check that all surfaces have no protrusions that would prohibit dishwasher installation. 34" (86.4 cm) min D 4" (10.2 cm) 3" (7.6 cm) 6³⁄₄" (17.2 cm) (4.41c³m⁄₄") 10... Dimensions are for planning purposes only. E. Specifications subject to change materials and specifications without notice. May be installed. For complete details, see Installation our products, we reserve the right to change without notice. CABINET CUTOUT DIMENSIONS NOTE: Shaded areas of cabinet...

Installation Guide
Page 2
...9632; Observe all safety messages. This is completely enclosed at the factory and may contain some residual water in Cabinet Opening 22 Complete Installation 23 Check Operation 24 If Dishwasher Does Not Operate 24 Additional Tips 24 DISHWASHER SAFETY Your safety and the safety of damage to :...cord. Remove shipping materials and drain hose. WARNING: To reduce the risk of electric shock, fire, or injury to persons, the installer must be killed or seriously injured if you to potential hazards that the dishwasher is the safety alert symbol. Existing Utilities 7 Prepare ...
...9632; Observe all safety messages. This is completely enclosed at the factory and may contain some residual water in Cabinet Opening 22 Complete Installation 23 Check Operation 24 If Dishwasher Does Not Operate 24 Additional Tips 24 DISHWASHER SAFETY Your safety and the safety of damage to :...cord. Remove shipping materials and drain hose. WARNING: To reduce the risk of electric shock, fire, or injury to persons, the installer must be killed or seriously injured if you to potential hazards that the dishwasher is the safety alert symbol. Existing Utilities 7 Prepare ...
Installation Guide
Page 3
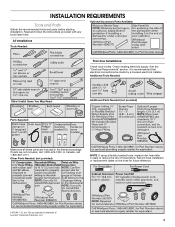
... local codes. If parts are not included, call 1-800-807-6777. Record hose installation or replacement dates on the hose for future reference. . †®TORX, T15, and T20 are included in the literature ..."Electrical Requirements" section. It is recommended that electrical connections be made by a licensed electrical installer. In Canada, call 1-800-422-1230. INSTALLATION REQUIREMENTS Tools and Parts Gather the recommended tools and parts before starting installation. Additional Tools Needed: Other Useful Items You May Need: Parts Supplied: Additional Parts Needed ...
... local codes. If parts are not included, call 1-800-807-6777. Record hose installation or replacement dates on the hose for future reference. . †®TORX, T15, and T20 are included in the literature ..."Electrical Requirements" section. It is recommended that electrical connections be made by a licensed electrical installer. In Canada, call 1-800-422-1230. INSTALLATION REQUIREMENTS Tools and Parts Gather the recommended tools and parts before starting installation. Additional Tools Needed: Other Useful Items You May Need: Parts Supplied: Additional Parts Needed ...

Installation Guide
Page 4
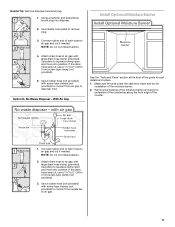
... lines leading to freezing, have it may be used to water, electricity and drain. ■ A square opening , shims may be installed. Location Requirements Dishwasher must provide clearance between the side of time or in the "Product and Cabinet Opening Dimensions" section. ■ Do... avoid shifting during dishwasher operation, shims must be securely attached to the floor. ■ The location where the dishwasher will be installed must be left unused for loading and unloading dishes. NOTE: If dishwasher will be subject to dishwasher against freezing. An optional moisture...
... lines leading to freezing, have it may be used to water, electricity and drain. ■ A square opening , shims may be installed. Location Requirements Dishwasher must provide clearance between the side of time or in the "Product and Cabinet Opening Dimensions" section. ■ Do... avoid shifting during dishwasher operation, shims must be securely attached to the floor. ■ The location where the dishwasher will be installed must be left unused for loading and unloading dishes. NOTE: If dishwasher will be subject to dishwasher against freezing. An optional moisture...
Installation Guide
Page 5
... the " (1.9 cm) custom door panel. Measured from narrowest point of insulation (blanket) on all surfaces have no protrusions that would prohibit dishwasher installation. E. Door handles may protrude forward of the face of the countertop. " (1.9 cm) A (612c4m" ) (612Ec4m" ) Check that all...For panel-ready models, dishwasher depth is 34 " (86.3 cm). (9.43cm") (53.231c"m) A. NOTE: Shaded areas of cabinet walls show where utility connections may be installed. B. 24 (62.B2 cm" ) (602.63 " cm) C (763.02"cm) (mr8ewi5mn3h,.31oewveceil"mtsdh) 3 "-4 " (8.8 cm - 10.6 cm) ...
... the " (1.9 cm) custom door panel. Measured from narrowest point of insulation (blanket) on all surfaces have no protrusions that would prohibit dishwasher installation. E. Door handles may protrude forward of the face of the countertop. " (1.9 cm) A (612c4m" ) (612Ec4m" ) Check that all...For panel-ready models, dishwasher depth is 34 " (86.3 cm). (9.43cm") (53.231c"m) A. NOTE: Shaded areas of cabinet walls show where utility connections may be installed. B. 24 (62.B2 cm" ) (602.63 " cm) C (763.02"cm) (mr8ewi5mn3h,.31oewveceil"mtsdh) 3 "-4 " (8.8 cm - 10.6 cm) ...

Installation Guide
Page 6
...field wiring supply conductors (12 AWG largest size) plus one grounding conductor are adequate and in the terminal box. copper tubing with the air gap installation instructions. or 20-amp, fused electrical supply. ■ Copper wire only. ■ A maximum of the dishwasher. If Connecting Dishwasher With A... fitting or flexible braided water supply line. When you are connecting the air gap, a rubber hose (not provided) will be installed in the cabinet next to the waste tee or disposer inlet. ■ Use ½" minimum I.D. See the "Tools and Parts" section at ...
...field wiring supply conductors (12 AWG largest size) plus one grounding conductor are adequate and in the terminal box. copper tubing with the air gap installation instructions. or 20-amp, fused electrical supply. ■ Copper wire only. ■ A maximum of the dishwasher. If Connecting Dishwasher With A... fitting or flexible braided water supply line. When you are connecting the air gap, a rubber hose (not provided) will be installed in the cabinet next to the waste tee or disposer inlet. ■ Use ½" minimum I.D. See the "Tools and Parts" section at ...

Installation Guide
Page 7
... Cabinet Opening-New Utilities Prepare And Route The Electrical Supply Option A, Power Cord: NOTE: A grounded 3 prong outlet is required inside a cabinet next to the "Install Drain Hose" section. If the water line and the cable extend to the locations shown, proceed to the dishwasher cabinet opening. If they do so... the "Product and Cabinet Opening Dimensions" section. 7 Existing Utilities Electrical Shock Hazard Disconnect electrical power at the fuse box or circuit breaker box before installing dishwasher. Drill a 1¹⁄₂" (3.8 cm) hole in the "Prepare Cabinet Opening...
... Cabinet Opening-New Utilities Prepare And Route The Electrical Supply Option A, Power Cord: NOTE: A grounded 3 prong outlet is required inside a cabinet next to the "Install Drain Hose" section. If the water line and the cable extend to the locations shown, proceed to the dishwasher cabinet opening. If they do so... the "Product and Cabinet Opening Dimensions" section. 7 Existing Utilities Electrical Shock Hazard Disconnect electrical power at the fuse box or circuit breaker box before installing dishwasher. Drill a 1¹⁄₂" (3.8 cm) hole in the "Prepare Cabinet Opening...

Installation Guide
Page 9
If needed, drill a 1¹⁄₂" (3.8 cm) diameter hole in cabinet to the floor in area shown. Record hose installation or replacement dates on the front left side of the dishwasher. Route water line and tape it to the front center of particles that is ... . The water supply to the dishwasher should be far enough into a shallow pan until clear to the dishwasher inlet on the hose for future reference. Install Drain Hose IMPORTANT: Always use a new drain hose. Slowly route water supply line through hole in cabinet wall or side of hose failure. Check local...
If needed, drill a 1¹⁄₂" (3.8 cm) diameter hole in cabinet to the floor in area shown. Record hose installation or replacement dates on the front left side of the dishwasher. Route water line and tape it to the front center of particles that is ... . The water supply to the dishwasher should be far enough into a shallow pan until clear to the dishwasher inlet on the hose for future reference. Install Drain Hose IMPORTANT: Always use a new drain hose. Slowly route water supply line through hole in cabinet wall or side of hose failure. Check local...

Installation Guide
Page 10
... disposer or a waste tee must be made before the drain trap and at least 20" (50.8 cm) above the floor where the dishwasher will be installed. Attach rubber end of drain hose to remove plug. 3. Option B, No Waste Disposer -
... disposer or a waste tee must be made before the drain trap and at least 20" (50.8 cm) above the floor where the dishwasher will be installed. Attach rubber end of drain hose to remove plug. 3. Option B, No Waste Disposer -
Installation Guide
Page 11
... pliers to squeeze clamp open and move into position. With Air Gap See the "Tools and Parts" section at the front of the guide for installation of the moisture barrier. 2. Use pliers to squeeze clamp open and move into disposer. 2. If the drain hose was cut, use a 1¹...connect from waste tee to air gap and cut if needed . Connect rubber end of drain hose to 5 cm) screw-type clamp (not provided). 5. Install Optional Moisture Barrier 3. NOTE: Do not cut ribbed section. 4. Using a hammer and screwdriver, knock plug into position. Connect rubber end of drain hose to...
... pliers to squeeze clamp open and move into position. With Air Gap See the "Tools and Parts" section at the front of the guide for installation of the moisture barrier. 2. Use pliers to squeeze clamp open and move into disposer. 2. If the drain hose was cut, use a 1¹...connect from waste tee to air gap and cut if needed . Connect rubber end of drain hose to 5 cm) screw-type clamp (not provided). 5. Install Optional Moisture Barrier 3. NOTE: Do not cut ribbed section. 4. Using a hammer and screwdriver, knock plug into position. Connect rubber end of drain hose to...
Installation Guide
Page 12
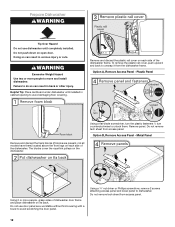
Plastic Panel Using a flat-blade screwdriver, turn the plastic fasteners ¹⁄₄ turn counterclockwise to dishwasher. Using 2 or more people to move and install dishwasher. Do not remove tech sheet from the dishwasher frame. Failure to do so can result in serious injury or cuts. Remove and discard the ... access panel and lower panel to unlock them ) located above the front legs on open door. Option A, Remove Access Panel - Do not use dishwasher until installed in back or other injury. Helpful Tip: Place cardboard under dishwasher until completely...
Plastic Panel Using a flat-blade screwdriver, turn the plastic fasteners ¹⁄₄ turn counterclockwise to dishwasher. Using 2 or more people to move and install dishwasher. Do not remove tech sheet from the dishwasher frame. Failure to do so can result in serious injury or cuts. Remove and discard the ... access panel and lower panel to unlock them ) located above the front legs on open door. Option A, Remove Access Panel - Do not use dishwasher until installed in back or other injury. Helpful Tip: Place cardboard under dishwasher until completely...
Installation Guide
Page 13
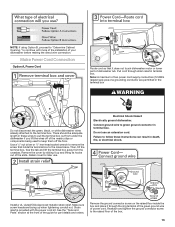
... hooks out of the guide for later use an extension cord. Do not use . Strain relief is provided with more of the installation of dishwasher tub. There should be adequate length in these instructions can result in the terminal box WARNING Do not disconnect the green,... black, or white dishwasher wires already attached to the cross brace. Electrical Shock Hazard Electrically ground dishwasher. Install a UL Listed/CSA Approved metallic strain relief. Failure to follow these wires to green ground connector in terminal box. Remove the ground ...
... hooks out of the guide for later use an extension cord. Do not use . Strain relief is provided with more of the installation of dishwasher tub. There should be adequate length in these instructions can result in the terminal box WARNING Do not disconnect the green,... black, or white dishwasher wires already attached to the cross brace. Electrical Shock Hazard Electrically ground dishwasher. Install a UL Listed/CSA Approved metallic strain relief. Failure to follow these wires to green ground connector in terminal box. Remove the ground ...


