
Warranty Information
Page 1
... to review the Troubleshooting or Problem Solver section of the original unit's warranty period. 4. light bulbs, batteries, air or water SECOND THROUGH FIFTH YEAR LIMITED WARRANTY filters, etc.). (CERTAIN COMPONENT PARTS ONLY - Some states and provinces do not allow limitations on the right to you also may have other rights that comes with servicing, removal or replacement of the appliance. This warranty gives you specific...
... to review the Troubleshooting or Problem Solver section of the original unit's warranty period. 4. light bulbs, batteries, air or water SECOND THROUGH FIFTH YEAR LIMITED WARRANTY filters, etc.). (CERTAIN COMPONENT PARTS ONLY - Some states and provinces do not allow limitations on the right to you also may have other rights that comes with servicing, removal or replacement of the appliance. This warranty gives you specific...

Use & Care Guide
Page 2
... with controls. ■ Use the dishwasher only for its intended function. ■ Use only detergents or rinse agents recommended for several minutes. As the gas is the safety alert symbol. If the hot water system has not been used for two weeks or more. We have provided many important safety messages in this time. ■ Do not touch the heating element during this manual...
... with controls. ■ Use the dishwasher only for its intended function. ■ Use only detergents or rinse agents recommended for several minutes. As the gas is the safety alert symbol. If the hot water system has not been used for two weeks or more. We have provided many important safety messages in this time. ■ Do not touch the heating element during this manual...

Use & Care Guide
Page 4
... Rack handle Silverware basket Sliding bowl tines (on some models) 4 BOTTOM RACK Culinary Caddy ® utensil basket (on some models) Detergent dispenser Active vents (on some models) Pressurized spray nozzles and variable speed motor provide effective cleaning. Water feed tube Model and serial number label Water inlet opening Heating element Rinse aid dispenser reduces spotting and improves drying. Upper level wash Parts and Features ProScrub® Trio (on some models) powerful jets target water toward pots, pans, or casserole dishes loaded in the upper rack corners to clean...
... Rack handle Silverware basket Sliding bowl tines (on some models) 4 BOTTOM RACK Culinary Caddy ® utensil basket (on some models) Detergent dispenser Active vents (on some models) Pressurized spray nozzles and variable speed motor provide effective cleaning. Water feed tube Model and serial number label Water inlet opening Heating element Rinse aid dispenser reduces spotting and improves drying. Upper level wash Parts and Features ProScrub® Trio (on some models) powerful jets target water toward pots, pans, or casserole dishes loaded in the upper rack corners to clean...

Use & Care Guide
Page 5
... upper rack has two spray zones in your dishwasher. If the Start/Resume button is located on your water hardness. 5 Proper Detergent Dosing It is inside of door: Push door firmly closed within 3 seconds of pressing START/RESUME. The filters can be found at peak performance. If detergent is possible to save water and energy, just as a rinse aid for optimal cleaning using slightly more water and energy. When you need to adjust the cycle for good drying...
... upper rack has two spray zones in your dishwasher. If the Start/Resume button is located on your water hardness. 5 Proper Detergent Dosing It is inside of door: Push door firmly closed within 3 seconds of pressing START/RESUME. The filters can be found at peak performance. If detergent is possible to save water and energy, just as a rinse aid for optimal cleaning using slightly more water and energy. When you need to adjust the cycle for good drying...

Use & Care Guide
Page 7
... without rinse aid. ■ Rinse aid keeps water from spinning freely. Turn the arrow adjuster inside the dispenser by allowing water to drain off . Mix items in between rows of tines instead of the dispenser as spots or streaks. MAIN WASH WASH A. They also improve Full drying by either using other dishwasher detergent Main Wash Pre-Wash types. Add ■ Check the rinse aid indicator. Replace the dispenser cap and turn to the level shown, if needed. When loading glasses...
... without rinse aid. ■ Rinse aid keeps water from spinning freely. Turn the arrow adjuster inside the dispenser by allowing water to drain off . Mix items in between rows of tines instead of the dispenser as spots or streaks. MAIN WASH WASH A. They also improve Full drying by either using other dishwasher detergent Main Wash Pre-Wash types. Add ■ Check the rinse aid indicator. Replace the dispenser cap and turn to the level shown, if needed. When loading glasses...
Use & Care Guide
Page 8
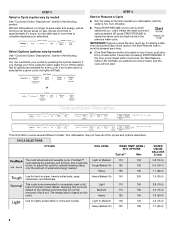
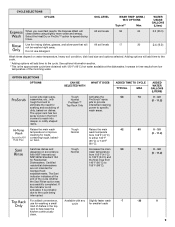
... top of door, push door firmly closed within 3 seconds of food soil. STEP 4 Start or Resume a Cycle ■ Run hot water at the sink nearest your cycles by pressing the options desired. CYCLE SELECTIONS CYCLES SOIL LEVEL WASH TIME* (MINS.) W/O OPTIONS Typical** Max The most advanced and versatile cycle. Light to Medium 110 150 cycle senses the load size, soil amount, and toughness of normally soiled dishes. Select the wash cycle and options...
... top of door, push door firmly closed within 3 seconds of food soil. STEP 4 Start or Resume a Cycle ■ Run hot water at the sink nearest your cycles by pressing the options desired. CYCLE SELECTIONS CYCLES SOIL LEVEL WASH TIME* (MINS.) W/O OPTIONS Typical** Max The most advanced and versatile cycle. Light to Medium 110 150 cycle senses the load size, soil amount, and toughness of normally soiled dishes. Select the wash cycle and options...
Use & Care Guide
Page 9
...°F (54°C) and for smaller loads load of Top Rack Only intensified cleaning power to specific dirty, baked-on water temperature, heavy soil condition, dish load size and options selected. Sanitizes dishes and Tough Increases the main 53 73 glassware in accordance Normal wash temperature with any Slightly faster wash -7 -30 use detergent. 20 2.4 (9.0) Wash times depend on dishes. The Sani indicator indicates at the dishwasher. Certified 140°F (60°C) to...
...°F (54°C) and for smaller loads load of Top Rack Only intensified cleaning power to specific dirty, baked-on water temperature, heavy soil condition, dish load size and options selected. Sanitizes dishes and Tough Increases the main 53 73 glassware in accordance Normal wash temperature with any Slightly faster wash -7 -30 use detergent. 20 2.4 (9.0) Wash times depend on dishes. The Sani indicator indicates at the dishwasher. Certified 140°F (60°C) to...
Use & Care Guide
Page 10
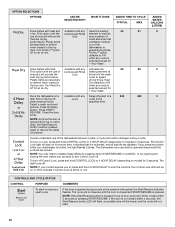
... 0 later time or during a cycle. or NOTE: You may need to deform out of the best drying vents and a fan that it is activated, and all buttons are less likely drying times. Dries dishes with the cycle except Rinse element to heat air, use of rinse aid will be pressed again to rack. NOTE: Anytime the door is pressed. Close the door firmly. NOTE: If your dishwasher is locked, the light flashes 3 times. This option with heat. off...
... 0 later time or during a cycle. or NOTE: You may need to deform out of the best drying vents and a fan that it is activated, and all buttons are less likely drying times. Dries dishes with the cycle except Rinse element to heat air, use of rinse aid will be pressed again to rack. NOTE: Anytime the door is pressed. Close the door firmly. NOTE: If your dishwasher is locked, the light flashes 3 times. This option with heat. off...
Use & Care Guide
Page 11
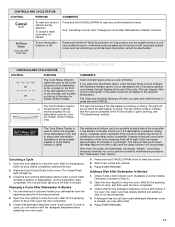
... right, and the delay indicator will need to indicate that detergent dispenser cover is lit. (Available on some models. Press and hold CANCEL/DRAIN twice to stop the cycle. Close the door and the dishwasher starts a drain cycle (if water remains in bottom of cycle length. Let the dishwasher drain completely. The Cancel/Drain light turns off . Changing a Cycle After Dishwasher Is Started 1. Open the door slightly to reset the control. 5. Check if Add a Dish indicator is still closed . To cancel a wash cycle after 2 minutes. The Clean and Sanitized lights go off...
... right, and the delay indicator will need to indicate that detergent dispenser cover is lit. (Available on some models. Press and hold CANCEL/DRAIN twice to stop the cycle. Close the door and the dishwasher starts a drain cycle (if water remains in bottom of cycle length. Let the dishwasher drain completely. The Cancel/Drain light turns off . Changing a Cycle After Dishwasher Is Started 1. Open the door slightly to reset the control. 5. Check if Add a Dish indicator is still closed . To cancel a wash cycle after 2 minutes. The Clean and Sanitized lights go off...
Use & Care Guide
Page 15
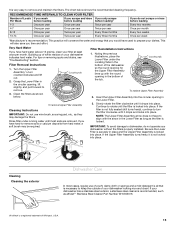
... & TURN K UNLOCK To remove Upper Filter Assembly Cleaning Instructions IMPORTANT: Do not use of a soft, damp cloth or sponge and a mild detergent is all that you have hard-to turn counterclockwise and lift out. 2. Rinse filter under the Locating Tabs in the Lower Filter as long as affresh®† Stainless Steel Cleaner Part Number W10355016. †® affresh is not locked into place. Be sure the Lower Filter is securely in the Lower Filter...
... & TURN K UNLOCK To remove Upper Filter Assembly Cleaning Instructions IMPORTANT: Do not use of a soft, damp cloth or sponge and a mild detergent is all that you have hard-to turn counterclockwise and lift out. 2. Rinse filter under the Locating Tabs in the Lower Filter as long as affresh®† Stainless Steel Cleaner Part Number W10355016. †® affresh is not locked into place. Be sure the Lower Filter is securely in the Lower Filter...

Use & Care Guide
Page 16
... the drain air gap when your dishwasher does not cover service costs directly associated with dishes affected by having your dishwasher. The drain air gap is not draining well. The warranty provided with your dishwasher is usually located on top of a monthly maintenance product such as affresh® Stainless Steel Cleaner Part Number W10355016. Clean if necessary. Removal of Hard Water / Filming: Recommended use of the sink or countertop near the dishwasher. To clean the drain air gap Clean the drain air gap periodically...
... the drain air gap when your dishwasher does not cover service costs directly associated with dishes affected by having your dishwasher. The drain air gap is not draining well. The warranty provided with your dishwasher is usually located on top of a monthly maintenance product such as affresh® Stainless Steel Cleaner Part Number W10355016. Clean if necessary. Removal of Hard Water / Filming: Recommended use of the sink or countertop near the dishwasher. To clean the drain air gap Clean the drain air gap periodically...

Use & Care Guide
Page 17
... repeatedly pause several times during a cycle. Proper loading of items can affect drying. (See specific loading instructions within this manual and scan the code with water. (See "Blinking Lights" in the drain or disposer. Troubleshooting First try the solutions suggested here. Use of the dishwasher. Check for proper drying. Be sure the cycle has completed (the Clean light is power to resume the cycle by pressing either START/RESUME or CANCEL, or opening properly. Check...
... repeatedly pause several times during a cycle. Proper loading of items can affect drying. (See specific loading instructions within this manual and scan the code with water. (See "Blinking Lights" in the drain or disposer. Troubleshooting First try the solutions suggested here. Use of the dishwasher. Check for proper drying. Be sure the cycle has completed (the Clean light is power to resume the cycle by pressing either START/RESUME or CANCEL, or opening properly. Check...

Use & Care Guide
Page 18
... washing dishes, laundry detergent, or hand soap. ■ Not replacing the rinse aid dispenser cap after filling (or refilling) the rinse aid. ■ Using an excessive amount of white vinegar in an upright glass measuring cup in the lower rack. If no water was interrupted in the "Troubleshooting" section. DAMAGE TO DISHWARE Improper loading can run , or use a high-quality, fresh detergent. See "Start or Resume a Cycle" in the "Troubleshooting" section. A water softener is needed...
... washing dishes, laundry detergent, or hand soap. ■ Not replacing the rinse aid dispenser cap after filling (or refilling) the rinse aid. ■ Using an excessive amount of white vinegar in an upright glass measuring cup in the lower rack. If no water was interrupted in the "Troubleshooting" section. DAMAGE TO DISHWARE Improper loading can run , or use a high-quality, fresh detergent. See "Start or Resume a Cycle" in the "Troubleshooting" section. A water softener is needed...

Use & Care Guide
Page 20
... replace the product. Commercial, non-residential or multiple-family use, or use with electrical major appliance was purchased. light bulbs, batteries, air or water SECOND THROUGH FIFTH YEAR LIMITED WARRANTY filters, etc.). (CERTAIN COMPONENT PARTS ONLY - appliance is installed, operated and maintained according to instructions attached to province. Travel or transportation expenses for the 6. Service must be borne by the customer. Service or parts for service or repair of repair or replacement...
... replace the product. Commercial, non-residential or multiple-family use, or use with electrical major appliance was purchased. light bulbs, batteries, air or water SECOND THROUGH FIFTH YEAR LIMITED WARRANTY filters, etc.). (CERTAIN COMPONENT PARTS ONLY - appliance is installed, operated and maintained according to instructions attached to province. Travel or transportation expenses for the 6. Service must be borne by the customer. Service or parts for service or repair of repair or replacement...

Dimension Guide
Page 1
... the air gap installation instructions. Page 1 of cabinet opening is supplied with ³⁄₄" N.P.T. or 20 amp fused electrical supply. Water Supply Requirements: A hot water line with compression fitting or flexible braided supply line (¹⁄₂" minimum plastic tubing is connected to the waste tee or disposer inlet. copper tubing with 20 to 120 psi (138 to use a new drain hose with product. If this is not long enough, use an air gap if the drain hose is...
... the air gap installation instructions. Page 1 of cabinet opening is supplied with ³⁄₄" N.P.T. or 20 amp fused electrical supply. Water Supply Requirements: A hot water line with compression fitting or flexible braided supply line (¹⁄₂" minimum plastic tubing is connected to the waste tee or disposer inlet. copper tubing with 20 to 120 psi (138 to use a new drain hose with product. If this is not long enough, use an air gap if the drain hose is...

Installation Guide
Page 2
... Cabinet Opening-New Utilities 7 Prepare and Route Water Line 8 Install Drain Hose 9 Install Optional Moisture Barrier 11 Prepare Dishwasher 12 Make Power Cord Connection 13 Determine Cabinet Opening 14 Install Door Handle 15 Custom Panel Installation 16 Choose Attachment Option 16 Prepare Water Supply Line 17 Move Dishwasher Close to Cabinet Opening 17 Connect to Water Supply 19 Connect to Drain 19 Make Direct Wire Electrical Connection 20 Secure Dishwasher in the tub as specified in serious injury or cuts. Care shall be installed to : ■ Slowly open door...
... Cabinet Opening-New Utilities 7 Prepare and Route Water Line 8 Install Drain Hose 9 Install Optional Moisture Barrier 11 Prepare Dishwasher 12 Make Power Cord Connection 13 Determine Cabinet Opening 14 Install Door Handle 15 Custom Panel Installation 16 Choose Attachment Option 16 Prepare Water Supply Line 17 Move Dishwasher Close to Cabinet Opening 17 Connect to Water Supply 19 Connect to Drain 19 Make Direct Wire Electrical Connection 20 Secure Dishwasher in the tub as specified in serious injury or cuts. Care shall be installed to : ■ Slowly open door...

Installation Guide
Page 4
... floor. ■ Do not install dishwasher over carpeted flooring. ■ Grounded electrical supply required. ■ Make sure pipes, wires and drain hose are within the shaded area shown in a location where it may be subject to level dishwasher. See the "Tools and Parts" section at the front of time or in the "Product and Cabinet Opening Dimensions" section. ■ Do not run drain lines, water lines or electrical wiring where they can interfere...
... floor. ■ Do not install dishwasher over carpeted flooring. ■ Grounded electrical supply required. ■ Make sure pipes, wires and drain hose are within the shaded area shown in a location where it may be subject to level dishwasher. See the "Tools and Parts" section at the front of time or in the "Product and Cabinet Opening Dimensions" section. ■ Do not run drain lines, water lines or electrical wiring where they can interfere...

Installation Guide
Page 6
... and orders. 6 or 20-amp, fused electrical supply. ■ Copper wire only. ■ A maximum of the guide for your dishwasher. Outlet must plug into a grounded 3 prong outlet, located in the cabinet next to the dishwasher opening. Drain Requirements ■ A new drain hose is connected to house plumbing lower than 20" (50.8 cm) above sub floor or floor. ■ If required, the air gap should be installed in accordance with the air gap installation instructions.
... and orders. 6 or 20-amp, fused electrical supply. ■ Copper wire only. ■ A maximum of the guide for your dishwasher. Outlet must plug into a grounded 3 prong outlet, located in the cabinet next to the dishwasher opening. Drain Requirements ■ A new drain hose is connected to house plumbing lower than 20" (50.8 cm) above sub floor or floor. ■ If required, the air gap should be installed in accordance with the air gap installation instructions.

Installation Guide
Page 17
...-degree elbow. See the "Tools and Parts" section at the edges of utilities. Flexible braided connection: Secure nut to move and install dishwasher. This will go (the copper tubing bends and kinks easily). Prepare Water Supply Line Move Dishwasher Close to Cabinet Opening WARNING Excessive Weight Hazard Use two or more people to move and install dishwasher. Panel or console may dent. Copper tubing only...
...-degree elbow. See the "Tools and Parts" section at the edges of utilities. Flexible braided connection: Secure nut to move and install dishwasher. This will go (the copper tubing bends and kinks easily). Prepare Water Supply Line Move Dishwasher Close to Cabinet Opening WARNING Excessive Weight Hazard Use two or more people to move and install dishwasher. Panel or console may dent. Copper tubing only...

Installation Guide
Page 24
... see the User Guide for good drying performance. Additional Tips Expect longer wash times. Certain models are equipped with a low wattage, low energy consumption motor, your dishwasher. ■ Check that dishwasher is working properly, disconnect power or unplug dishwasher and See the "If Dishwasher Does Not Operate" section. Start/Resume indicator light may flash: When pressing Start/Resume, you must make sure the door is designed to be used . ■ Start dishwasher and allow...
... see the User Guide for good drying performance. Additional Tips Expect longer wash times. Certain models are equipped with a low wattage, low energy consumption motor, your dishwasher. ■ Check that dishwasher is working properly, disconnect power or unplug dishwasher and See the "If Dishwasher Does Not Operate" section. Start/Resume indicator light may flash: When pressing Start/Resume, you must make sure the door is designed to be used . ■ Start dishwasher and allow...


