
Instruction Manual
Page 1
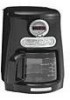
JAVASTUDIO™ COLLECTION PROGRAMMABLE COFFEE MAKERS INSTRUCTIONS KCM511 KCM514 KCM515 1-800-541-6390 Details Inside ® FOR THE WA1Y IT'S MADE.™
JAVASTUDIO™ COLLECTION PROGRAMMABLE COFFEE MAKERS INSTRUCTIONS KCM511 KCM514 KCM515 1-800-541-6390 Details Inside ® FOR THE WA1Y IT'S MADE.™

Instruction Manual
Page 2
... Warranty We're so confident the quality of our products meets the exacting standards of KitchenAid that, if your Coffee Maker should fail within the first year of ownership, KitchenAid will arrange to deliver an identical or comparable replacement to your door free of charge and...these instructions to 8 p.m. (Eastern Time), or Saturday, 10 a.m. to 5 p.m. If You Reside In The 50 United States and your KitchenAid® Coffee Maker should fail within the first year of ownership, simply call our toll-free Customer Satisfaction Center at 1-800-541-6390 Monday through Friday, 8 a.m....
... Warranty We're so confident the quality of our products meets the exacting standards of KitchenAid that, if your Coffee Maker should fail within the first year of ownership, KitchenAid will arrange to deliver an identical or comparable replacement to your door free of charge and...these instructions to 8 p.m. (Eastern Time), or Saturday, 10 a.m. to 5 p.m. If You Reside In The 50 United States and your KitchenAid® Coffee Maker should fail within the first year of ownership, simply call our toll-free Customer Satisfaction Center at 1-800-541-6390 Monday through Friday, 8 a.m....

Instruction Manual
Page 3
... 11 The Pause and Pour Feature 12 Using the Automatic Brew Timer 12 The Cleaning Needed Indicator 13 Coffee Brewing Suggestions: Advice for Great Taste 14 CARE AND CLEANING Cleaning the Coffee Maker 15 Descaling the Coffee Maker 15 Troubleshooting and Error Codes 16 WARRANTY AND SERVICE INFORMATION Warranty for the 50 United States and...
... 11 The Pause and Pour Feature 12 Using the Automatic Brew Timer 12 The Cleaning Needed Indicator 13 Coffee Brewing Suggestions: Advice for Great Taste 14 CARE AND CLEANING Cleaning the Coffee Maker 15 Descaling the Coffee Maker 15 Troubleshooting and Error Codes 16 WARRANTY AND SERVICE INFORMATION Warranty for the 50 United States and...
Instruction Manual
Page 4
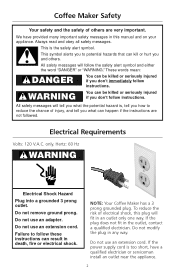
Coffee Maker Safety Your safety and the safety of electrical shock, this manual and on your appliance. Do not remove ground prong. If the plug does not ... cord. All safety messages will follow instructions. WARNING You can kill or hurt you what can happen if the instructions are very important. NOTE: Your Coffee Maker has a 3 prong grounded plug. This is , tell you how to potential hazards that can be killed or seriously injured if you don't follow the safety...
Coffee Maker Safety Your safety and the safety of electrical shock, this manual and on your appliance. Do not remove ground prong. If the plug does not ... cord. All safety messages will follow instructions. WARNING You can kill or hurt you what can happen if the instructions are very important. NOTE: Your Coffee Maker has a 3 prong grounded plug. This is , tell you how to potential hazards that can be killed or seriously injured if you don't follow the safety...
Instruction Manual
Page 5
...has been damaged in water or other than its intended use appliance for household use outdoors. 9. Close supervision is necessary when any manner. Unplug Coffee Maker from outlet before cleaning the appliance. 6. Do not use . 12. To protect against electrical shock, do not immerse cord, plugs, or... Coffee Maker in any appliance is designed for examination, repair, or adjustment. 7. Do not let cord hang over edge of accessories not recommended by or near ...
...has been damaged in water or other than its intended use appliance for household use outdoors. 9. Close supervision is necessary when any manner. Unplug Coffee Maker from outlet before cleaning the appliance. 6. Do not use . 12. To protect against electrical shock, do not immerse cord, plugs, or... Coffee Maker in any appliance is designed for examination, repair, or adjustment. 7. Do not let cord hang over edge of accessories not recommended by or near ...
Instruction Manual
Page 7
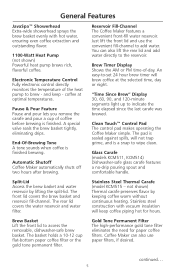
... Pause and pour lets you remove the carafe and pour a cup of coffee before brewing is finished brewing. A special valve seals the brew basket tightly, eliminating drips. Automatic Shutoff Coffee Maker automatically shuts off two hours after brewing. Brew Timer Display Shows the AM...spills, will keep - Stainless Steel Thermal Carafe (model KCM515 - Reservoir Fill-Channel The Coffee Maker features a convenient front-fill water reservoir. The pad is a snap to the reservoir. Coffee Maker can also lift the rear lid and add water directly to wipe clean. End-Of-...
... Pause and pour lets you remove the carafe and pour a cup of coffee before brewing is finished brewing. A special valve seals the brew basket tightly, eliminating drips. Automatic Shutoff Coffee Maker automatically shuts off two hours after brewing. Brew Timer Display Shows the AM...spills, will keep - Stainless Steel Thermal Carafe (model KCM515 - Reservoir Fill-Channel The Coffee Maker features a convenient front-fill water reservoir. The pad is a snap to the reservoir. Coffee Maker can also lift the rear lid and add water directly to wipe clean. End-Of-...

Instruction Manual
Page 9
...Button is turned on, the ... • Programmed brew time will briefly appear on or off . When the brew timer is pressed, the Coffee Maker will brew coffee at the programmed time If a programmed brew time has not been set 24-hour brew timer will automatically enter the Set (Program) mode. ...Display shows the time elapsed since the completion of -day clock. When the Set (Clock) Button is on. 1-4 Cup After turning on the Coffee Maker or activating the automatic brew timer, press the 1-4 Cup Button to set the time-of the brewing cycle. Cleaning Needed Indicator The indicator will ...
...Button is turned on, the ... • Programmed brew time will briefly appear on or off . When the brew timer is pressed, the Coffee Maker will brew coffee at the programmed time If a programmed brew time has not been set 24-hour brew timer will automatically enter the Set (Program) mode. ...Display shows the time elapsed since the completion of -day clock. When the Set (Clock) Button is on. 1-4 Cup After turning on the Coffee Maker or activating the automatic brew timer, press the 1-4 Cup Button to set the time-of the brewing cycle. Cleaning Needed Indicator The indicator will ...
Instruction Manual
Page 10
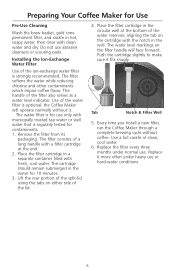
... Use of the water reservoir, aligning the tab on the cartridge with municipally treated tap water or well water that is optional: the Coffee Maker will face forward. The water filter is strongly recommended. The filter consists of a long handle with a filter cartridge at the bottom ... cycle without it fits snugly. The filter softens the water while reducing chlorine and other contaminants which impair coffee flavor. Do not use or hard-water conditions. 8 Preparing Your Coffee Maker for Use Pre-Use Cleaning Wash the brew basket, gold tone permanent filter, and carafe in hot, ...
... Use of the water reservoir, aligning the tab on the cartridge with municipally treated tap water or well water that is optional: the Coffee Maker will face forward. The water filter is strongly recommended. The filter consists of a long handle with a filter cartridge at the bottom ... cycle without it fits snugly. The filter softens the water while reducing chlorine and other contaminants which impair coffee flavor. Do not use or hard-water conditions. 8 Preparing Your Coffee Maker for Use Pre-Use Cleaning Wash the brew basket, gold tone permanent filter, and carafe in hot, ...

Instruction Manual
Page 11
Failure to flash. 4. When the Coffee Maker is first plugged in death, fire or electrical shock. 1. The brew timer display and Set (Clock) indicator will initially...AM or PM. Do not remove ground prong. If a "H" or "M" Button is pressed and held, the digits will go out. The Coffee Maker will change when the hour digits roll past "12". Do not use an adapter. Plug power cord into a grounded 3 prong outlet. The... Buttons below the brew timer display to exit the clock-setting mode. "H" and "M" Buttons 5. Press the Set (Clock) Button. Preparing Your Coffee Maker for 10 seconds. 9
Failure to flash. 4. When the Coffee Maker is first plugged in death, fire or electrical shock. 1. The brew timer display and Set (Clock) indicator will initially...AM or PM. Do not remove ground prong. If a "H" or "M" Button is pressed and held, the digits will go out. The Coffee Maker will change when the hour digits roll past "12". Do not use an adapter. Plug power cord into a grounded 3 prong outlet. The... Buttons below the brew timer display to exit the clock-setting mode. "H" and "M" Buttons 5. Press the Set (Clock) Button. Preparing Your Coffee Maker for 10 seconds. 9
Instruction Manual
Page 12
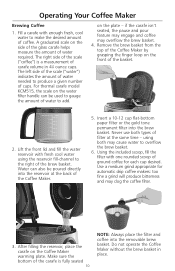
...on the side of the glass carafe helps measure the amount of filter at the back of the Coffee Maker. 5. Water can be poured directly into the reservoir at the same time - on the Coffee Maker warming plate. Never use both may overflow the brew basket. 4. Insert a 10-12 cup ... scale on the water filter handle can also be used to make the desired amount of ground coffee for automatic drip coffee makers: too fine a grind will produce bitterness and may clog the coffee filter. 3. Use a medium grind appropriate for each cup desired. Make sure the bottom of water ...
...on the side of the glass carafe helps measure the amount of filter at the back of the Coffee Maker. 5. Water can be poured directly into the reservoir at the same time - on the Coffee Maker warming plate. Never use both may overflow the brew basket. 4. Insert a 10-12 cup ... scale on the water filter handle can also be used to make the desired amount of ground coffee for automatic drip coffee makers: too fine a grind will produce bitterness and may clog the coffee filter. 3. Use a medium grind appropriate for each cup desired. Make sure the bottom of water ...

Instruction Manual
Page 13
... starting the next brew cycle. The thermal carafe should be warm to seat it is less than 30 minutes old. Place the basket into the Coffee Maker, push it down to the touch after brewing. 12. The 1 to 4 cup brew cycle heats small quantities of the carafe may be hand...will seal automatically. • To remove the carafe lid for cleaning, turn off . The Coffee Maker will sound the end-of coffee. At the end of coffee. Repeat steps 1-8 to even out the bed of 2 hours, the Coffee Maker and warming plate will interrupt the brew process and impair flavor. 9. and flavorful - When you...
... starting the next brew cycle. The thermal carafe should be warm to seat it is less than 30 minutes old. Place the basket into the Coffee Maker, push it down to the touch after brewing. 12. The 1 to 4 cup brew cycle heats small quantities of the carafe may be hand...will seal automatically. • To remove the carafe lid for cleaning, turn off . The Coffee Maker will sound the end-of coffee. At the end of coffee. Repeat steps 1-8 to even out the bed of 2 hours, the Coffee Maker and warming plate will interrupt the brew process and impair flavor. 9. and flavorful - When you...

Instruction Manual
Page 14
... digits roll past "12". Press the Set (Program) Button. Pause and pour is finished. Using the Automatic Brew Timer The Coffee Maker can be programmed to brew coffee at each stage of the brewing cycle, and a finished carafe represents a delicate blend of these flavors. The AM and PM ...Pause and Pour Feature The pause and pour feature enables you to remove the carafe from the Coffee Maker and pour a cup of coffee before it easy to wake up to fresh coffee every morning. Using pause and pour will automatically record the displayed brew time and exit the programsetting...
... digits roll past "12". Press the Set (Program) Button. Pause and pour is finished. Using the Automatic Brew Timer The Coffee Maker can be programmed to brew coffee at each stage of the brewing cycle, and a finished carafe represents a delicate blend of these flavors. The AM and PM ...Pause and Pour Feature The pause and pour feature enables you to remove the carafe from the Coffee Maker and pour a cup of coffee before it easy to wake up to fresh coffee every morning. Using pause and pour will automatically record the displayed brew time and exit the programsetting...

Instruction Manual
Page 15
When the Coffee Maker detects a build-up in the Coffee Maker heat pump over time and impair brewing efficiency and coffee quality. The Coffee Maker will go out. When deactivated, the Auto On indicator light will begin brewing at the programmed time, activate the ...brew timer by pressing the Auto On Button. Please see page 15 for descaling steps. 13 The Coffee Maker will build up of your Coffee Maker. Operating Your Coffee Maker 5. Each time you want the Coffee Maker to the last brew time set. The Cleaning Needed Indicator Calcium deposits ("scale") from water will ...
When the Coffee Maker detects a build-up in the Coffee Maker heat pump over time and impair brewing efficiency and coffee quality. The Coffee Maker will go out. When deactivated, the Auto On indicator light will begin brewing at the programmed time, activate the ...brew timer by pressing the Auto On Button. Please see page 15 for descaling steps. 13 The Coffee Maker will build up of your Coffee Maker. Operating Your Coffee Maker 5. Each time you want the Coffee Maker to the last brew time set. The Cleaning Needed Indicator Calcium deposits ("scale") from water will ...

Instruction Manual
Page 16
... period, but using a quality grinder like the KitchenAid® Blade Coffee Grinder, PRO LINE™ Series Burr Coffee Mill, or the KitchenAid® Model A-9™ Coffee Mill. Be sure to use a medium grind level appropriate for automatic drip coffee makers. use the filter - If you may also clog the coffee filter and cause water to use distilled water...
... period, but using a quality grinder like the KitchenAid® Blade Coffee Grinder, PRO LINE™ Series Burr Coffee Mill, or the KitchenAid® Model A-9™ Coffee Mill. Be sure to use a medium grind level appropriate for automatic drip coffee makers. use the filter - If you may also clog the coffee filter and cause water to use distilled water...

Instruction Manual
Page 17
...-washed only). 6. Wash the brew basket, carafe, and gold tone permanent filter in the Coffee Maker heat pump over time and impair brewing efficiency and coffee quality. Run the Coffee Maker through two brewing cycles using a descaling agent, follow the directions on the thermal carafe by ...running it through a complete brewing cycle using vinegar, fill the carafe with a soft cloth. Unplug the Coffee Maker and allow it counter-clockwise, then lifting. 4. Do not use abrasive cleansers or scouring pads. Reinstall or replace the water filter. ...
...-washed only). 6. Wash the brew basket, carafe, and gold tone permanent filter in the Coffee Maker heat pump over time and impair brewing efficiency and coffee quality. Run the Coffee Maker through two brewing cycles using a descaling agent, follow the directions on the thermal carafe by ...running it through a complete brewing cycle using vinegar, fill the carafe with a soft cloth. Unplug the Coffee Maker and allow it counter-clockwise, then lifting. 4. Do not use abrasive cleansers or scouring pads. Reinstall or replace the water filter. ...

Instruction Manual
Page 18
...: A button is a problem with the steps above, please refer to the Coffee Maker actually brews: The Coffee Maker requires immediate descaling. Unplug the Coffee Maker, press each button several times, then plug the Coffee Maker back in. (If the Coffee Maker has been stored or used in a cool environment, warm the unit to normal...beginning on the following page. If the unit still does not work, check the fuse or circuit breaker on the electrical circuit the Coffee Maker is connected to and make sure the circuit is closed. • If only a portion of the water added to the Warranty ...
...: A button is a problem with the steps above, please refer to the Coffee Maker actually brews: The Coffee Maker requires immediate descaling. Unplug the Coffee Maker, press each button several times, then plug the Coffee Maker back in. (If the Coffee Maker has been stored or used in a cool environment, warm the unit to normal...beginning on the following page. If the unit still does not work, check the fuse or circuit breaker on the electrical circuit the Coffee Maker is connected to and make sure the circuit is closed. • If only a portion of the water added to the Warranty ...

Instruction Manual
Page 19
..., misuse or abuse. Repairs when Coffee Maker is used in the 50 United States and District of Columbia. C. KitchenAid Will Pay For Your Choice of: Hassle-Free Replacement of your Coffee Maker to the purchaser and any succeeding owner for Coffee Makers operated in other rights which vary from... state to you may not apply to state. 17 KitchenAid® Coffee Maker Warranty for the 50 United States and District of...
..., misuse or abuse. Repairs when Coffee Maker is used in the 50 United States and District of Columbia. C. KitchenAid Will Pay For Your Choice of: Hassle-Free Replacement of your Coffee Maker to the purchaser and any succeeding owner for Coffee Makers operated in other rights which vary from... state to you may not apply to state. 17 KitchenAid® Coffee Maker Warranty for the 50 United States and District of...

Instruction Manual
Page 20
...Eastern Time). Joseph, MI 49085-0218 Arranging for Service Outside the 50 United States and Puerto Rico Consult your Coffee Maker, visit KitchenAid.com or call toll-free 1-800-541-6390, 8 a.m. Ordering Accessories and Replacement Parts To order accessories or replacement parts... for your local KitchenAid dealer Coffee Maker for Service After the Warranty Expires WARNING Electrical Shock Hazard Unplug before servicing. For service information, call toll-free 1-800-541...
...Eastern Time). Joseph, MI 49085-0218 Arranging for Service Outside the 50 United States and Puerto Rico Consult your Coffee Maker, visit KitchenAid.com or call toll-free 1-800-541-6390, 8 a.m. Ordering Accessories and Replacement Parts To order accessories or replacement parts... for your local KitchenAid dealer Coffee Maker for Service After the Warranty Expires WARNING Electrical Shock Hazard Unplug before servicing. For service information, call toll-free 1-800-541...


