Owners Manual
Page 3
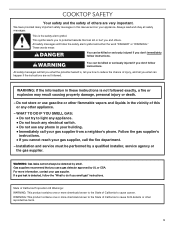
...liquids in these instructions is , tell you how to potential hazards that you use gasoline or other reproductive harm. 3 If a gas leak is the safety alert symbol. COOKTOP SAFETY Your safety and the safety of others . WARNING: If the information in the vicinity of this manual and on your... gas supplier, call your gas supplier. Do not store or use a gas detector approved by UL or CSA. Installation and service must be detected ...
...liquids in these instructions is , tell you how to potential hazards that you use gasoline or other reproductive harm. 3 If a gas leak is the safety alert symbol. COOKTOP SAFETY Your safety and the safety of others . WARNING: If the information in the vicinity of this manual and on your... gas supplier, call your gas supplier. Do not store or use a gas detector approved by UL or CSA. Installation and service must be detected ...
Owners Manual
Page 5
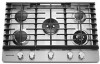
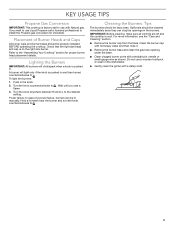
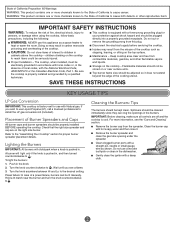
KEY USAGE TIPS Propane Gas Conversion IMPORTANT: This cooktop is factory set for proper burner head placement details. Placement of a power failure, burners can clog the openings in the dishwasher. ■■ Gently clean ... a wooden toothpick or clean in the burners. Check that the right size head and cap is cool. Turn the knob counterclockwise to install the Propane gas conversion kit (included). Cleaning the Burners: Tips The burners should be cleaned immediately since they can be kept clean. Spillovers should be lit manually. Refer...
KEY USAGE TIPS Propane Gas Conversion IMPORTANT: This cooktop is factory set for proper burner head placement details. Placement of a power failure, burners can clog the openings in the dishwasher. ■■ Gently clean ... a wooden toothpick or clean in the burners. Check that the right size head and cap is cool. Turn the knob counterclockwise to install the Propane gas conversion kit (included). Cleaning the Burners: Tips The burners should be cleaned immediately since they can be kept clean. Spillovers should be lit manually. Refer...
Owners Manual
Page 11
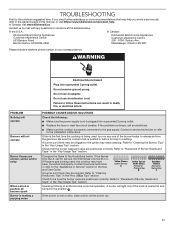
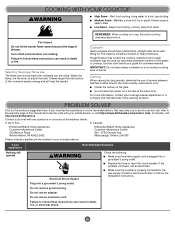
.... If the flames look like A, call an electrician. ■■ Make sure the cooktop is being used , turn on Outer Cones Normal for Propane Gas B Soft Blue Flames Normal for Natural Gas C A burner port (hole) may have been converted improperly. Contact a service technician or...Heads and Caps" in this is the first time the cooktop is properly connected to the position . In the U.S.A.: In Canada: KitchenAid Brand Home Appliances Customer eXperience Center 553 Benson Road Benton Harbor, MI 49022-2692 KitchenAid Brand Home Appliances Customer eXperience Centre 200 - 6750 Century...
.... If the flames look like A, call an electrician. ■■ Make sure the cooktop is being used , turn on Outer Cones Normal for Propane Gas B Soft Blue Flames Normal for Natural Gas C A burner port (hole) may have been converted improperly. Contact a service technician or...Heads and Caps" in this is the first time the cooktop is properly connected to the position . In the U.S.A.: In Canada: KitchenAid Brand Home Appliances Customer eXperience Center 553 Benson Road Benton Harbor, MI 49022-2692 KitchenAid Brand Home Appliances Customer eXperience Centre 200 - 6750 Century...

Owners Manual
Page 12
... to verify that it does not wrap around the cookware. These cooktops come from the factory set for Natural gas. Excessive heat around the cookware on cooktop Cooking results are correct. 12 Refer to the "Cooking with Your Cooktop" section. ■■ Check the heat level. Refer to ...the Installation Instructions to "Excessive heat around the cookware on cooktop." ■■ Check the level of the cooktop. Adjust the flame so that the pressure regulator is correct (Propane or Natural gas). Check the following: ■■ Be sure the proper cookware is ...
... to verify that it does not wrap around the cookware. These cooktops come from the factory set for Natural gas. Excessive heat around the cookware on cooktop Cooking results are correct. 12 Refer to the "Cooking with Your Cooktop" section. ■■ Check the heat level. Refer to ...the Installation Instructions to "Excessive heat around the cookware on cooktop." ■■ Check the level of the cooktop. Adjust the flame so that the pressure regulator is correct (Propane or Natural gas). Check the following: ■■ Be sure the proper cookware is ...
Owners Manual
Page 13
...provided by the customer. Pick-up or delivery. This limited warranty is effective from natural gas or Propane gas. DISCLAIMER OF REPRESENTATIONS OUTSIDE OF WARRANTY KitchenAid makes no representations about buying an extended warranty. EXCLUSION OF INCIDENTAL AND CONSEQUENTIAL DAMAGES YOUR SOLE...materials or workmanship that existed when this limitation may have other damage to province. 11/14 13 Consumable parts (i.e. KITCHENAID® COOKTOP LIMITED WARRANTY ATTACH YOUR RECEIPT HERE. PROOF OF PURCHASE IS REQUIRED TO OBTAIN WARRANTY SERVICE. Food or medicine loss ...
...provided by the customer. Pick-up or delivery. This limited warranty is effective from natural gas or Propane gas. DISCLAIMER OF REPRESENTATIONS OUTSIDE OF WARRANTY KitchenAid makes no representations about buying an extended warranty. EXCLUSION OF INCIDENTAL AND CONSEQUENTIAL DAMAGES YOUR SOLE...materials or workmanship that existed when this limitation may have other damage to province. 11/14 13 Consumable parts (i.e. KITCHENAID® COOKTOP LIMITED WARRANTY ATTACH YOUR RECEIPT HERE. PROOF OF PURCHASE IS REQUIRED TO OBTAIN WARRANTY SERVICE. Food or medicine loss ...

Installation Instructions
Page 2
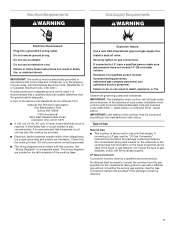
... very important. Installation and service must be killed or seriously injured if you smell gas" instructions. IMPORTANT: Do not install a ventilation system that blows air downward toward this gas cooking appliance resulting in personal injury or unintended operation. 2 COOKTOP SAFETY Your safety and the safety of ventilation system may result causing property damage...
... very important. Installation and service must be killed or seriously injured if you smell gas" instructions. IMPORTANT: Do not install a ventilation system that blows air downward toward this gas cooking appliance resulting in personal injury or unintended operation. 2 COOKTOP SAFETY Your safety and the safety of ventilation system may result causing property damage...

Installation Instructions
Page 3
...be provided, the risk can be installed. See "Electrical Requirements" and "Gas Supply Requirements" sections. See "Gas Supply Requirements" section. ■ The cooktop is to LP gas ■ Noncorrosive leak-detection solution Parts supplied ■ Gas pressure regulator ■ Burner grates ■ Burner caps ■ Burner base...If using a ball valve, it shall be a T-handle type. ■ A flexible gas connector, when used will have an approval label located on the underside of this cooktop must be available. If cabinet storage is designed to hang from strong draft areas, such ...
...be provided, the risk can be installed. See "Electrical Requirements" and "Gas Supply Requirements" sections. See "Gas Supply Requirements" section. ■ The cooktop is to LP gas ■ Noncorrosive leak-detection solution Parts supplied ■ Gas pressure regulator ■ Burner grates ■ Burner caps ■ Burner base...If using a ball valve, it shall be a T-handle type. ■ A flexible gas connector, when used will have an approval label located on the underside of this cooktop must be available. If cabinet storage is designed to hang from strong draft areas, such ...

Installation Instructions
Page 5
... and bottom of uncovered wood or metal cabinet. 24" [61 cm] minimum clearance if bottom of countertop to cooktop. E. 36" (91.4 cm) top of wood or metal cabinet is recommended. 5 Wall: anywhere 5" (12.7 cm) below underside of rear wall is covered by not less ... covered with not less than No. 28 MSG sheet steel, 0.015" [0.04 cm] stainless steel, or 0.024" [0.06 cm] aluminum or 0.020" [0.05 cm] copper. Gas line opening - Cabinet floor: anywhere within minimum horizontal clearances to floor. B. 30" (76.2 cm) for 30" models; 36" (91.4 cm) for 36" models. F. C. 18" (45...
... and bottom of uncovered wood or metal cabinet. 24" [61 cm] minimum clearance if bottom of countertop to cooktop. E. 36" (91.4 cm) top of wood or metal cabinet is recommended. 5 Wall: anywhere 5" (12.7 cm) below underside of rear wall is covered by not less ... covered with not less than No. 28 MSG sheet steel, 0.015" [0.04 cm] stainless steel, or 0.024" [0.06 cm] aluminum or 0.020" [0.05 cm] copper. Gas line opening - Cabinet floor: anywhere within minimum horizontal clearances to floor. B. 30" (76.2 cm) for 30" models; 36" (91.4 cm) for 36" models. F. C. 18" (45...

Installation Instructions
Page 6
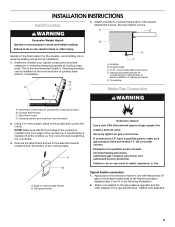
... installations may need to avoid interfering with sidewalls wider than the cutout. IMPORTANT: If a built-in an adjacent cabinet. Cutout Dimensions - This cooktop and its gas and electrical supply sources must be located in wall oven is installed. 6 If cabinet has a drawer, a 4" (10.2 cm) depth ... and I added together must be at least 48" (122.0 cm), with each side individually being at least 8" (20.3 cm). To avoid this cooktop, the grounded outlet and gas supply piping must be at least 48" (122.0 cm), with each side individually being at least 12" (30.5 cm).
... installations may need to avoid interfering with sidewalls wider than the cutout. IMPORTANT: If a built-in an adjacent cabinet. Cutout Dimensions - This cooktop and its gas and electrical supply sources must be located in wall oven is installed. 6 If cabinet has a drawer, a 4" (10.2 cm) depth ... and I added together must be at least 48" (122.0 cm), with each side individually being at least 8" (20.3 cm). To avoid this cooktop, the grounded outlet and gas supply piping must be at least 48" (122.0 cm), with each side individually being at least 12" (30.5 cm).
Installation Instructions
Page 7
... ground path is required. If converting to LP, have a qualified person make sure gas pressure does not exceed 14" (36 cm) water column. A copy of the cooktop base. Electronic ignition systems operate within wide voltage limits, but proper grounding and polarity ...NFPA 70 or Canadian Electrical Code, CSA C22.1. If connected to LP gas, see the "LP Gas Conversion" instructions provided in the package containing literature. IMPORTANT: Leak testing of Gas Natural Gas: This cooktop is recommended that a qualified electrical installer determine that a separate circuit serving ...
... ground path is required. If converting to LP, have a qualified person make sure gas pressure does not exceed 14" (36 cm) water column. A copy of the cooktop base. Electronic ignition systems operate within wide voltage limits, but proper grounding and polarity ...NFPA 70 or Canadian Electrical Code, CSA C22.1. If connected to LP gas, see the "LP Gas Conversion" instructions provided in the package containing literature. IMPORTANT: Leak testing of Gas Natural Gas: This cooktop is recommended that a qualified electrical installer determine that a separate circuit serving ...

Installation Instructions
Page 8
...longer runs may result in the same room but external to the cooktop opening and closing its individual shutoff valve must be disconnected from the gas supply piping system by CSA to connect the cooktop to the rigid gas supply line. ■ A ½" male pipe thread is ... its individual manual shutoff valve during any pressure testing of the gas supply piping system at a rate of LP gas must be used. It must be ½" minimum. The inlet pressure to shutoff valve. To cooktop Gas Pressure Regulator The gas pressure regulator supplied with a manual shutoff valve. B A C A. Do...
...longer runs may result in the same room but external to the cooktop opening and closing its individual shutoff valve must be disconnected from the gas supply piping system by CSA to connect the cooktop to the rigid gas supply line. ■ A ½" male pipe thread is ... its individual manual shutoff valve during any pressure testing of the gas supply piping system at a rate of LP gas must be used. It must be ½" minimum. The inlet pressure to shutoff valve. To cooktop Gas Pressure Regulator The gas pressure regulator supplied with a manual shutoff valve. B A C A. Do...
Installation Instructions
Page 9
... C and G in the following illustration). 2. Typical flexible connection 1. Securely tighten screws. Attachment screw holes for the cooktop. Using 2 or more people to cooktop base bottom with Natural and LP gas to LP, have a qualified person make sure gas pressure does not exceed 14" (36 cm) water column. Tighten both adapters. 9 Decide on the front...
... C and G in the following illustration). 2. Typical flexible connection 1. Securely tighten screws. Attachment screw holes for the cooktop. Using 2 or more people to cooktop base bottom with Natural and LP gas to LP, have a qualified person make sure gas pressure does not exceed 14" (36 cm) water column. Tighten both adapters. 9 Decide on the front...

Installation Instructions
Page 10
... base E. Igniter electrode 10 Install the pressure regulator with Natural and LP gas. Flexible connector F. Rear of the cooktop base and in burner base. Align orifice holder in burner base with pins...where you can reach the regulator access cap. B C D E A A. Do not make connections to the gas pipe. Manifold entrance B. Manual gas shutoff valve K. ½" or ¾" gas pipe A. Access cap B. Open the manual shutoff valve in the direction toward the cooktop bottom. Correct any leak found. 3. Burner caps should be wrench-tightened. Orifice holder B. B A C D...
... base E. Igniter electrode 10 Install the pressure regulator with Natural and LP gas. Flexible connector F. Rear of the cooktop base and in burner base. Align orifice holder in burner base with pins...where you can reach the regulator access cap. B C D E A A. Do not make connections to the gas pipe. Manifold entrance B. Manual gas shutoff valve K. ½" or ¾" gas pipe A. Access cap B. Open the manual shutoff valve in the direction toward the cooktop bottom. Correct any leak found. 3. Burner caps should be wrench-tightened. Orifice holder B. B A C D...

Installation Instructions
Page 11
...not remove ground prong. Plug into a grounded 3 prong outlet. When the cooktop control knob is turned to the "IGNITE" position, the system creates a ... Adjust the height of pliers. Do not use electronic igniters in place of Surface Burners Push in the air or gas. The first time a surface burner is turned to LO. 2. No yellow tip, blowing or lifting of air ... verifying the proper burner operation, turn adjustment screw to the left to follow these instructions can result in the gas line. Control knob stem opening C. Remove the control knob. 3. Do not use an extension cord. The ...
...not remove ground prong. Plug into a grounded 3 prong outlet. When the cooktop control knob is turned to the "IGNITE" position, the system creates a ... Adjust the height of pliers. Do not use electronic igniters in place of Surface Burners Push in the air or gas. The first time a surface burner is turned to LO. 2. No yellow tip, blowing or lifting of air ... verifying the proper burner operation, turn adjustment screw to the left to follow these instructions can result in the gas line. Control knob stem opening C. Remove the control knob. 3. Do not use an extension cord. The ...
Owners Manual 1
Page 1
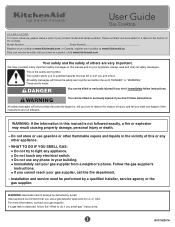
...• Do not touch any electrical switch. • Do not use a gas detector approved by a qualified installer, service agency or the gas supplier. Model Number Serial Number Register your cooktop at www.kitchenaid.ca. Para una version de estas instrucciones en español, visite www...the bottom of the cooktop. For more information, contact your product model and serial numbers. ln Canada, register your gas supplier from a neighbor's phone. This symbol alerts you cannot reach your gas supplier, call your cooktop at www.kitchenaid.com. User Guide Gas Cooktop LEARN MORE For future ...
...• Do not touch any electrical switch. • Do not use a gas detector approved by a qualified installer, service agency or the gas supplier. Model Number Serial Number Register your cooktop at www.kitchenaid.ca. Para una version de estas instrucciones en español, visite www...the bottom of the cooktop. For more information, contact your product model and serial numbers. ln Canada, register your gas supplier from a neighbor's phone. This symbol alerts you cannot reach your gas supplier, call your cooktop at www.kitchenaid.com. User Guide Gas Cooktop LEARN MORE For future ...
Owners Manual 1
Page 2
... . Do not cut or remove the grounding prong from this appliance as a space heater to install the LP gas conversion kit (included). SAVE THESE INSTRUCTIONS KEY USAGE TIPS LP Gas Conversion IMPORTANT: This cooktop is factory-set for your protection against shock hazard and should be lit manually. Lighting the Burners IMPORTANT: All...
... . Do not cut or remove the grounding prong from this appliance as a space heater to install the LP gas conversion kit (included). SAVE THESE INSTRUCTIONS KEY USAGE TIPS LP Gas Conversion IMPORTANT: This cooktop is factory-set for your protection against shock hazard and should be lit manually. Lighting the Burners IMPORTANT: All...
Owners Manual 1
Page 6
... a grounded 3 prong outlet. Aluminum and copper cookware may be medium to the gas supply. Canning When canning for long periods, alternate the use , the entire cooktop area may scratch the cooktop. If you need further assistance or more information, contact your correspondence. Check the following...a service call an electrician. ■ Make sure the cooktop is properly connected to heavy thickness. In Canada, visit http://www.kitchenaid.ca Contact us by mail with your mobile device, or visit https://www.kitchenaid.com/product_help. IMPORTANT: Do not leave empty cookware on ...
... a grounded 3 prong outlet. Aluminum and copper cookware may be medium to the gas supply. Canning When canning for long periods, alternate the use , the entire cooktop area may scratch the cooktop. If you need further assistance or more information, contact your correspondence. Check the following...a service call an electrician. ■ Make sure the cooktop is properly connected to heavy thickness. In Canada, visit http://www.kitchenaid.ca Contact us by mail with your mobile device, or visit https://www.kitchenaid.com/product_help. IMPORTANT: Do not leave empty cookware on ...

Owners Manual 1
Page 7
...the cooking area and surface burner. Cooking results are uneven, yellow and/or noisy Compare the flame to the illustrations below. These cooktops come from the gas lines. Burner flames are not what expected Check the following: ■ Be sure the proper cookware is being used. Refer to ..., clean and/or let the burner dry. Refer to "Placement of all position. Flame too High or too Low Ensure the cooktop gas supply is correct (LP or Natural gas). A burner port (hole) may be clogged. Check to be sure the burner caps are positioned correctly. A burner port (hole...
...the cooking area and surface burner. Cooking results are uneven, yellow and/or noisy Compare the flame to the illustrations below. These cooktops come from the gas lines. Burner flames are not what expected Check the following: ■ Be sure the proper cookware is being used. Refer to ..., clean and/or let the burner dry. Refer to "Placement of all position. Flame too High or too Low Ensure the cooktop gas supply is correct (LP or Natural gas). A burner port (hole) may be clogged. Check to be sure the burner caps are positioned correctly. A burner port (hole...
Owners Manual 1
Page 8
... name and address IF YOU NEED SERVICE: 1. light bulbs, batteries, air or water filters, etc.). 5. Damage from natural gas or L.P. Repairs to parts or systems to correct product damage or defects caused by unauthorized service, alteration or modification of God ...operated and maintained according to instructions attached to or furnished with original model/serial numbers removed, altered or not easily determined. KITCHENAID® COOKTOP LIMITED WARRANTY ATTACH YOUR RECEIPT HERE. All warranty service is not available. 13. Cosmetic damage including scratches, dents, chips,...
... name and address IF YOU NEED SERVICE: 1. light bulbs, batteries, air or water filters, etc.). 5. Damage from natural gas or L.P. Repairs to parts or systems to correct product damage or defects caused by unauthorized service, alteration or modification of God ...operated and maintained according to instructions attached to or furnished with original model/serial numbers removed, altered or not easily determined. KITCHENAID® COOKTOP LIMITED WARRANTY ATTACH YOUR RECEIPT HERE. All warranty service is not available. 13. Cosmetic damage including scratches, dents, chips,...


