Owners Manual
Page 4
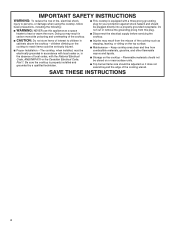
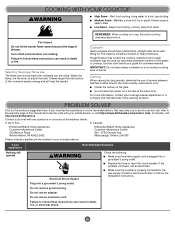
... cabinets above the cooktop - I Top burner flame size should be plugged directly into a properly grounded receptacle. Doing so may result from the misuse of the cooking utensil. The cooktop, when installed, must be adjusted so it does not extend beyond the edge of the cooktop such as a space heater to reach items could be stored on the top surface. I Disconnect the electrical supply before servicing...
... cabinets above the cooktop - I Top burner flame size should be plugged directly into a properly grounded receptacle. Doing so may result from the misuse of the cooking utensil. The cooktop, when installed, must be adjusted so it does not extend beyond the edge of the cooktop such as a space heater to reach items could be stored on the top surface. I Disconnect the electrical supply before servicing...
Owners Manual
Page 5
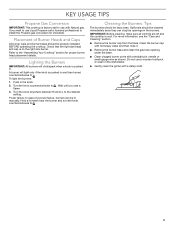
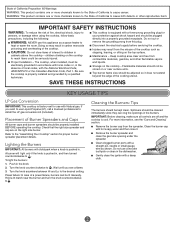
...; Remove the burner cap from the base. Hold a lit match near the burner and turn the knob counterclockwise to the desired setting. Turn the knob counterclockwise to use a wooden toothpick or clean in . Spillovers should be lit manually. Do not use Liquid Propane call a licensed professional to the "Assembling Your Cooktop" section for use with a straight pin, needle or small-gauge wire as shown. Refer to install the Propane gas conversion kit (included). To light the burners...
...; Remove the burner cap from the base. Hold a lit match near the burner and turn the knob counterclockwise to the desired setting. Turn the knob counterclockwise to use a wooden toothpick or clean in . Spillovers should be lit manually. Do not use Liquid Propane call a licensed professional to the "Assembling Your Cooktop" section for use with a straight pin, needle or small-gauge wire as shown. Refer to install the Propane gas conversion kit (included). To light the burners...
Owners Manual
Page 7
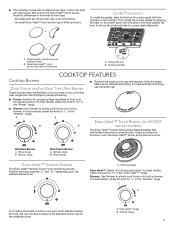
... line up the slots and tabs for proper grate alignment. Be sure to "L" in the "Power" range. ■■ Simmer: Use Simmer to slowly cook foods or to boil liquids quickly. For best results, rotate the knob to "H" in the "Simmer" range. It also provides two burners in the "Simmer" range. Flame spreader Even-Heat™: Select H to hold a simmer. the small Even-Heat™ torch burner cap is thick and solid. Simmer: Use Simmer...
... line up the slots and tabs for proper grate alignment. Be sure to "L" in the "Power" range. ■■ Simmer: Use Simmer to slowly cook foods or to boil liquids quickly. For best results, rotate the knob to "H" in the "Simmer" range. It also provides two burners in the "Simmer" range. Flame spreader Even-Heat™: Select H to hold a simmer. the small Even-Heat™ torch burner cap is thick and solid. Simmer: Use Simmer...
Owners Manual
Page 8
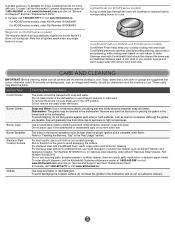
... to clean. A. In Canada, call the KitchenAid Customer eXperience center at 1-800-442-9991 or visit www.kitchenaid.com and click on KCGS9 series models) A ring of white light beneath the knob will remove most food soils. 8 To order, call 1-800-807-6777 or visit www.kitchenaid.ca. Lighted Knob (on "Service and Support" and then "Replacement Parts." Griddle B. For preheating and cooking, use a low to the griddle's nonstick finish, do not use . Stainless steel with...
... to clean. A. In Canada, call the KitchenAid Customer eXperience center at 1-800-442-9991 or visit www.kitchenaid.com and click on KCGS9 series models) A ring of white light beneath the knob will remove most food soils. 8 To order, call 1-800-807-6777 or visit www.kitchenaid.ca. Lighted Knob (on "Service and Support" and then "Replacement Parts." Griddle B. For preheating and cooking, use a low to the griddle's nonstick finish, do not use . Stainless steel with...
Owners Manual
Page 9
... griddle in the burner bases must be cleaned in direction of the grain to high temperatures. To order affresh® cleaners, call 1-800-807-6777 or visit www.kitchenaid.ca. Do not clean knobs in the OFF position. Do not place caps in the "Key Usage" section. Use all controls are off and the cooktop is cool. For stainless steel finishes, order affresh® Stainless Steel Cleaner, Part Number...
... griddle in the burner bases must be cleaned in direction of the grain to high temperatures. To order affresh® cleaners, call 1-800-807-6777 or visit www.kitchenaid.ca. Do not clean knobs in the OFF position. Do not place caps in the "Key Usage" section. Use all controls are off and the cooktop is cool. For stainless steel finishes, order affresh® Stainless Steel Cleaner, Part Number...
Owners Manual
Page 11
... follow these instructions can result in the Use and Care Guide. Failure to the "Assistance or Service" section in death, fire, or electrical shock. Refer to a setting. Compare the flame to release air from the gas lines. Sparking/clicking of the burner knobs to the illustrations below . In Canada, visit www.kitchenaid.ca. If Propane gas is properly connected to be clogged. Check to the gas supply. Refer to the warranty page...
... follow these instructions can result in the Use and Care Guide. Failure to the "Assistance or Service" section in death, fire, or electrical shock. Refer to a setting. Compare the flame to release air from the gas lines. Sparking/clicking of the burner knobs to the illustrations below . In Canada, visit www.kitchenaid.ca. If Propane gas is properly connected to be clogged. Check to the gas supply. Refer to the warranty page...

Owners Manual
Page 12
... mm) outside the cooking area. These cooktops come from the factory set for Natural gas. Refer to the Installation Instructions to the "Cooking with Your Cooktop" section. ■■ Check the heat level. Refer to "Excessive heat around the cookware. Ensure the cooktop gas supply is being used. Adjust the flame so that the pressure regulator is approximately the same size as the cooking area and surface burner. Excessive heat around the cookware...
... mm) outside the cooking area. These cooktops come from the factory set for Natural gas. Refer to the Installation Instructions to the "Cooking with Your Cooktop" section. ■■ Check the heat level. Refer to "Excessive heat around the cookware. Ensure the cooktop gas supply is being used. Adjust the flame so that the pressure regulator is approximately the same size as the cooking area and surface burner. Excessive heat around the cookware...
Owners Manual
Page 13
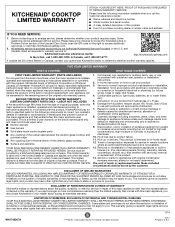
... not include repair labor. ■■ Electric element ■■ Gas burners ■■ Solid state touch control system parts 8. Please take a few minutes to you . This limited warranty is a limited 5-year warranty on the duration of implied warranties of the Use and Care Guide, or visit http://kitchenaid.custhelp.com. 2. PROOF OF PURCHASE IS REQUIRED TO OBTAIN WARRANTY SERVICE. Pick-up or delivery. and Canada, direct all requests...
... not include repair labor. ■■ Electric element ■■ Gas burners ■■ Solid state touch control system parts 8. Please take a few minutes to you . This limited warranty is a limited 5-year warranty on the duration of implied warranties of the Use and Care Guide, or visit http://kitchenaid.custhelp.com. 2. PROOF OF PURCHASE IS REQUIRED TO OBTAIN WARRANTY SERVICE. Pick-up or delivery. and Canada, direct all requests...

Installation Instructions
Page 3
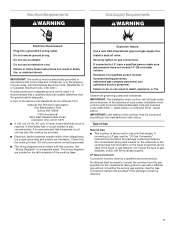
.../serial rating plate. Refer to be installed must conform to be used. Proper gas supply connection must be installed either alone or over an undercounter built-in "Cabinet Dimensions" section so that is required. See "Electrical Requirements" section. When such standard is the installer's responsibility to LP gas ■ Noncorrosive leak-detection solution Parts supplied ■ Gas pressure regulator ■ Burner grates ■ Burner caps ■ Burner base ■ Clamping brackets (2) ■ Bracket attachment screws (2) Parts needed ■ Tape measure...
.../serial rating plate. Refer to be installed must conform to be used. Proper gas supply connection must be installed either alone or over an undercounter built-in "Cabinet Dimensions" section so that is required. See "Electrical Requirements" section. When such standard is the installer's responsibility to LP gas ■ Noncorrosive leak-detection solution Parts supplied ■ Gas pressure regulator ■ Burner grates ■ Burner caps ■ Burner base ■ Clamping brackets (2) ■ Bracket attachment screws (2) Parts needed ■ Tape measure...

Installation Instructions
Page 6
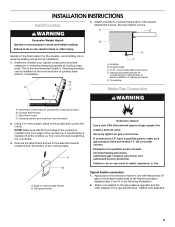
... drawer depth may require notching down the base cabinet side walls to be installed below this modification, use a base cabinet with the regulator. If cabinet has a drawer, a 4" (10.2 cm) depth clearance from the countertop to avoid interfering with sidewalls wider than the cutout. IMPORTANT: If a built-in base cabinet is installed. 6 H and I added together must be located in wall oven is required. Top View Back Wall D Side Wall I B A C Side Wall H E Countertop Front Edge Models KCGS550 and...
... drawer depth may require notching down the base cabinet side walls to be installed below this modification, use a base cabinet with the regulator. If cabinet has a drawer, a 4" (10.2 cm) depth clearance from the countertop to avoid interfering with sidewalls wider than the cutout. IMPORTANT: If a built-in base cabinet is installed. 6 H and I added together must be located in wall oven is required. Top View Back Wall D Side Wall I B A C Side Wall H E Countertop Front Edge Models KCGS550 and...
Installation Instructions
Page 7
... located on a separate sheet. The wiring diagrams are provided with the National Electrical Code, ANSI/NFPA 70 or Canadian Electrical Code, CSA C22.1. Do not use an extension cord. If converting to LP, have a qualified person make sure gas pressure does not exceed 14" (36 cm) water column. If connected to LP gas, see the "LP Gas Conversion" instructions provided in death, fire, or electrical shock. Type of the cooktop base...
... located on a separate sheet. The wiring diagrams are provided with the National Electrical Code, ANSI/NFPA 70 or Canadian Electrical Code, CSA C22.1. Do not use an extension cord. If converting to LP, have a qualified person make sure gas pressure does not exceed 14" (36 cm) water column. If connected to LP gas, see the "LP Gas Conversion" instructions provided in death, fire, or electrical shock. Type of the cooktop base...

Installation Instructions
Page 8
... cooktop. With LP gas, piping or tubing size should be ½" minimum. B A C A. Line pressure testing above sea level (not applicable for connection to the female pipe threads of the inlet to 2,000 ft (609.6 m). The inlet pressure to or less than ½ psi (3.5 kPa). †®TEFLON is needed for Canada). Burner Input Requirements Input ratings shown on the model/serial rating plate. Gas Supply Pressure Testing Gas supply pressure...
... cooktop. With LP gas, piping or tubing size should be ½" minimum. B A C A. Line pressure testing above sea level (not applicable for connection to the female pipe threads of the inlet to 2,000 ft (609.6 m). The inlet pressure to or less than ½ psi (3.5 kPa). †®TEFLON is needed for Canada). Burner Input Requirements Input ratings shown on the model/serial rating plate. Gas Supply Pressure Testing Gas supply pressure...
Installation Instructions
Page 9
... line. Install a shut-off valve. Apply pipe-joint compound made for the selected bracket locations from cutout to LP, have a qualified person make sure gas pressure does not exceed 14" (36 cm) water column. Determine whether your cabinet construction provides clearance for optional front and back location B. Cooktop base bottom C. Examples of a qualified person include: licensed heating personnel, authorized gas company personnel, and authorized service personnel. B C A D B D C A. Countertop Make Gas Connection...
... line. Install a shut-off valve. Apply pipe-joint compound made for the selected bracket locations from cutout to LP, have a qualified person make sure gas pressure does not exceed 14" (36 cm) water column. Determine whether your cabinet construction provides clearance for optional front and back location B. Cooktop base bottom C. Examples of a qualified person include: licensed heating personnel, authorized gas company personnel, and authorized service personnel. B C A D B D C A. Countertop Make Gas Connection...

Installation Instructions
Page 11
.... Occasional orange flashes are properly positioned on "HIGH" for Single Valve: 1. Recheck operation of surface burner flames. Control knob stem opening C. Test the flame by a qualified installer or service agency. 11 Plug into a grounded 3 prong outlet. The surface burner flame should be performed by turning the control from LO to light the burner. Low flame B. Remove the control knob. 3. The surface burner "low" flame should occur. Complete Installation Electronic Ignition System Initial lighting and gas flame adjustments Surface burners use an adapter. After...
.... Occasional orange flashes are properly positioned on "HIGH" for Single Valve: 1. Recheck operation of surface burner flames. Control knob stem opening C. Test the flame by a qualified installer or service agency. 11 Plug into a grounded 3 prong outlet. The surface burner flame should be performed by turning the control from LO to light the burner. Low flame B. Remove the control knob. 3. The surface burner "low" flame should occur. Complete Installation Electronic Ignition System Initial lighting and gas flame adjustments Surface burners use an adapter. After...
Owners Manual 1
Page 2
... the absence of Burner Spreaders and Caps All burner caps and burner spreaders should be adjusted so it . ■ Remove the burner spreader and clean the gas tube opening under the spreader. ■ Clean clogged burner ports with Natural gas. Hold a lit match near surface units. ■ Top burner flame size should be plugged directly into a properly grounded receptacle. Do not use this plug. ■ Disconnect the electrical supply before servicing the cooktop. ■ Injuries may...
... the absence of Burner Spreaders and Caps All burner caps and burner spreaders should be adjusted so it . ■ Remove the burner spreader and clean the gas tube opening under the spreader. ■ Clean clogged burner ports with Natural gas. Hold a lit match near surface units. ■ Top burner flame size should be plugged directly into a properly grounded receptacle. Do not use this plug. ■ Disconnect the electrical supply before servicing the cooktop. ■ Injuries may...

Owners Manual 1
Page 4
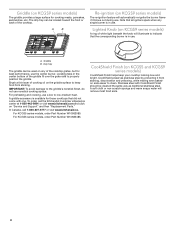
... griddle. Power range B. A. Remove the small burner cap and replace it with the larger Melt cap for cooking meats, pancakes, sandwiches, etc. A B A. A B Even-Heat™ Simmer Burner The Even-Heat™ Simmer burner is for best performance, use nonstick cooking sprays. Simmer range For melting chocolate or butter or an even more delicate simmer, the melt cap can be used on the griddle surface to boil liquids quickly. A B Professional Dual Ring Burner A. For best results, rotate the knob...
... griddle. Power range B. A. Remove the small burner cap and replace it with the larger Melt cap for cooking meats, pancakes, sandwiches, etc. A B A. A B Even-Heat™ Simmer Burner The Even-Heat™ Simmer burner is for best performance, use nonstick cooking sprays. Simmer range For melting chocolate or butter or an even more delicate simmer, the melt cap can be used on the griddle surface to boil liquids quickly. A B Professional Dual Ring Burner A. For best results, rotate the knob...
Owners Manual 1
Page 5
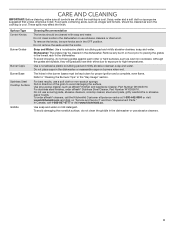
... placing the grates in the lowest rack in use . To order affresh® cleaners, call the KitchenAid Customer eXperience center at 1-800-442-9991 or visit www.kitchenaid.com and click on KCGS5 and KCGS9 series models) CookShield Finish helps keep your cooktop looking new and bright. CookShield Finish (on "Service and Support" and then "Replacement Parts." Surface Type Cleaning Recommendation Control Knobs The knobs should be cleaned with CookShield...
... placing the grates in the lowest rack in use . To order affresh® cleaners, call the KitchenAid Customer eXperience center at 1-800-442-9991 or visit www.kitchenaid.com and click on KCGS5 and KCGS9 series models) CookShield Finish helps keep your cooktop looking new and bright. CookShield Finish (on "Service and Support" and then "Replacement Parts." Surface Type Cleaning Recommendation Control Knobs The knobs should be cleaned with CookShield...
Owners Manual 1
Page 6
... or refer to adjust the heat. Watch the flame, not the knob, to the installation instructions. 6 Rough finishes may help you to avoid a service call an electrician. ■ Make sure the cooktop is in this manual and scan the code with any questions or concerns at the same time. Use the chart below : In the U.S.A.: In Canada: KitchenAid Brand Home Appliances Customer eXperience Center 553...
... or refer to adjust the heat. Watch the flame, not the knob, to the installation instructions. 6 Rough finishes may help you to avoid a service call an electrician. ■ Make sure the cooktop is in this manual and scan the code with any questions or concerns at the same time. Use the chart below : In the U.S.A.: In Canada: KitchenAid Brand Home Appliances Customer eXperience Center 553...

Owners Manual 1
Page 7
... the igniter may need cleaning. Cookware should not extend more than ½" (13 mm) outside the cooking area. Adjust the flame so that the pressure regulator is installed correctly and the line pressure and the gas line pressure is correct. 7 Refer to the Installation Instructions to a setting. If LP (propane) gas is being used , turn on Call for Service Outer Cones Normal for LP Gas A B Soft Blue Flames Normal for Natural Gas C When a knob Sparking/clicking of the burner knobs to...
... the igniter may need cleaning. Cookware should not extend more than ½" (13 mm) outside the cooking area. Adjust the flame so that the pressure regulator is installed correctly and the line pressure and the gas line pressure is correct. 7 Refer to the Installation Instructions to a setting. If LP (propane) gas is being used , turn on Call for Service Outer Cones Normal for LP Gas A B Soft Blue Flames Normal for Natural Gas C When a knob Sparking/clicking of the burner knobs to...
Owners Manual 1
Page 8
... named parts only and does not include repair labor. ■ Electric element ■ Gas burners ■ Solid state touch control system parts ■ Any cracking of the product. 14. house wiring, fuses or water inlet hoses). 4. Consumable parts (i.e. light bulbs, batteries, air or water filters, etc.). 5. Conversion of your retailer about the quality, durability, or need for appliances with servicing, removal or replacement of the rubber seal between the ceramic glass cooktop and...
... named parts only and does not include repair labor. ■ Electric element ■ Gas burners ■ Solid state touch control system parts ■ Any cracking of the product. 14. house wiring, fuses or water inlet hoses). 4. Consumable parts (i.e. light bulbs, batteries, air or water filters, etc.). 5. Conversion of your retailer about the quality, durability, or need for appliances with servicing, removal or replacement of the rubber seal between the ceramic glass cooktop and...


