Owners Manual
Page 4
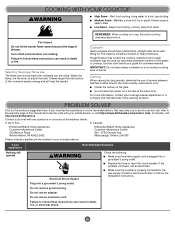
... stored on the top surface. children climbing on the cooktop to heat or warm the room. The cooktop, when installed, must be electrically grounded in accordance with local codes or, in cabinets above the cooktop - I WARNING: NEVER use this plug. Doing so may result from the misuse of the cooking utensil. Keep cooktop area clear and free from this appliance as stepping, leaning, or sitting...
... stored on the top surface. children climbing on the cooktop to heat or warm the room. The cooktop, when installed, must be electrically grounded in accordance with local codes or, in cabinets above the cooktop - I WARNING: NEVER use this plug. Doing so may result from the misuse of the cooking utensil. Keep cooktop area clear and free from this appliance as stepping, leaning, or sitting...
Owners Manual
Page 5
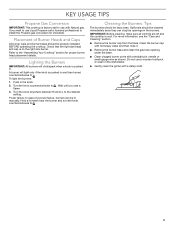
... install the Propane gas conversion kit (included). For more information, see a flame. 3. Placement of a power failure, burners can clog the openings in the burners. Hold a lit match near the burner and turn the knob counterclockwise to the desired setting. Do not use a wooden toothpick or clean in . Check that the right size head and cap is cool. A burner will click/spark when a knob is pushed in the dishwasher. ■■ Gently clean the igniter...
... install the Propane gas conversion kit (included). For more information, see a flame. 3. Placement of a power failure, burners can clog the openings in the burners. Hold a lit match near the burner and turn the knob counterclockwise to the desired setting. Do not use a wooden toothpick or clean in . Check that the right size head and cap is cool. A burner will click/spark when a knob is pushed in the dishwasher. ■■ Gently clean the igniter...
Owners Manual
Page 7
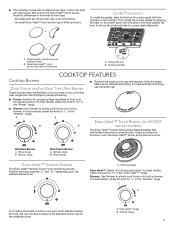
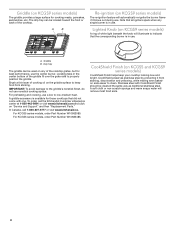
.... Simmer: Use Simmer to slowly cook foods or to hold a simmer. Simmer range 7 Be sure to hold a simmer. Small dual tier ultra burner cap (center burner) B. Center grate tab COOKTOP FEATURES Cooktop Burners Dual Flame and/or Dual Tier Ultra Burner ■■ Remove the small burner cap and replace it with the larger Melt cap for proper grate alignment. For best results, rotate the knob to "H" in the "Power" range. ■■ Simmer: Use Simmer to slowly cook foods or to line...
.... Simmer: Use Simmer to slowly cook foods or to hold a simmer. Simmer range 7 Be sure to hold a simmer. Small dual tier ultra burner cap (center burner) B. Center grate tab COOKTOP FEATURES Cooktop Burners Dual Flame and/or Dual Tier Ultra Burner ■■ Remove the small burner cap and replace it with the larger Melt cap for proper grate alignment. For best results, rotate the knob to "H" in the "Power" range. ■■ Simmer: Use Simmer to slowly cook foods or to line...
Owners Manual
Page 8
... www.kitchenaid.ca. CookShield Finish (on the griddle surface to properly position the griddle. CookShield preserves stainless steel by protecting it blows out during use the center burner. Drip tray The griddle can be used on any single burner is in use . Brush a thin layer of white light beneath the knob will illuminate to clean. For KCGS5 series models, order Part Number W10662080. Griddle B. For KCGS3 series models, order Part Number W10685483. A B Re-ignition (on KCGS9 series models...
... www.kitchenaid.ca. CookShield Finish (on the griddle surface to properly position the griddle. CookShield preserves stainless steel by protecting it blows out during use the center burner. Drip tray The griddle can be used on any single burner is in use . Brush a thin layer of white light beneath the knob will illuminate to clean. For KCGS5 series models, order Part Number W10662080. Griddle B. For KCGS3 series models, order Part Number W10685483. A B Re-ignition (on KCGS9 series models...
Owners Manual
Page 9
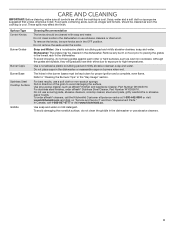
Surface Type Control Knobs Burner Grates Burner Caps Burner Base Stainless Steel Cooktop Surface Griddle Cleaning Recommendation The knobs should be cleaned as cast iron cookware. Do not place caps in direction of the grain to high temperatures. In Canada, call the KitchenAid Customer eXperience center at 1-800-442-9991 or visit www.kitchenaid.com and click on "Service and Support" and then "Replacement Parts." Do not clean knobs in the dishwasher or use a soft cloth or non-scratch sponge. Use soap and water or...
Surface Type Control Knobs Burner Grates Burner Caps Burner Base Stainless Steel Cooktop Surface Griddle Cleaning Recommendation The knobs should be cleaned as cast iron cookware. Do not place caps in direction of the grain to high temperatures. In Canada, call the KitchenAid Customer eXperience center at 1-800-442-9991 or visit www.kitchenaid.com and click on "Service and Support" and then "Replacement Parts." Do not clean knobs in the dishwasher or use a soft cloth or non-scratch sponge. Use soap and water or...
Owners Manual
Page 11
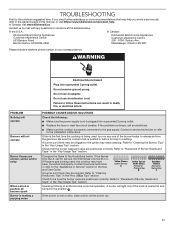
.... WARNING Electrical Shock Hazard Plug into a grounded 3 prong outlet. ■■ Replace the fuse or reset the circuit breaker. Do not use an extension cord. Failure to release air from the gas lines. If the problem continues, call for Natural Gas C A burner port (hole) may help you need cleaning. Be sure the control knob is normal operation. Check that may be clogged. Normal flames look like B or C. Contact a service technician or...
.... WARNING Electrical Shock Hazard Plug into a grounded 3 prong outlet. ■■ Replace the fuse or reset the circuit breaker. Do not use an extension cord. Failure to release air from the gas lines. If the problem continues, call for Natural Gas C A burner port (hole) may help you need cleaning. Be sure the control knob is normal operation. Check that may be clogged. Normal flames look like B or C. Contact a service technician or...
Owners Manual
Page 13
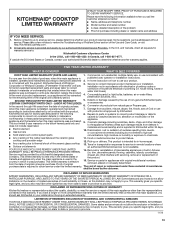
... of the ceramic glass cooktop ■■ Surface unit elements 11. Repairs to parts or systems to thermal shock of the appliance. 9. This limited warranty is published user, operator or installation instructions. Proof of Whirlpool 3. This warranty gives you specific legal rights, and you should ask KitchenAid or your appliance will pay installation not in materials or workmanship that interfere with electrical or plumbing codes or for...
... of the ceramic glass cooktop ■■ Surface unit elements 11. Repairs to parts or systems to thermal shock of the appliance. 9. This limited warranty is published user, operator or installation instructions. Proof of Whirlpool 3. This warranty gives you specific legal rights, and you should ask KitchenAid or your appliance will pay installation not in materials or workmanship that interfere with electrical or plumbing codes or for...

Installation Instructions
Page 3
..., cabinet storage space located above the surface units should be installed in oven. Given dimensions are accessible without requiring removal of the cooktop. ■ Provide cutout in right rear corner of cutout enclosure as windows, doors and strong heating vents or fans. ■ All openings in oven. Check existing gas supply and electrical supply. The model/serial rating plate is approved. See "Electrical Requirements" section. IMPORTANT: To avoid damage, check with local codes...
..., cabinet storage space located above the surface units should be installed in oven. Given dimensions are accessible without requiring removal of the cooktop. ■ Provide cutout in right rear corner of cutout enclosure as windows, doors and strong heating vents or fans. ■ All openings in oven. Check existing gas supply and electrical supply. The model/serial rating plate is approved. See "Electrical Requirements" section. IMPORTANT: To avoid damage, check with local codes...

Installation Instructions
Page 6
..., use a base cabinet with each side individually being at least 12" (30.5 cm). If cabinet has a drawer, a 4" (10.2 cm) depth clearance from the countertop to the top of the drawer (or other obstruction) in wall oven is required. Cutout Dimensions - To avoid this cooktop, the grounded outlet and gas supply piping must be installed before the undercounter built-in base cabinet is installed. 6 Top View Back Wall D Side Wall I B A C Side Wall H E Countertop...
..., use a base cabinet with each side individually being at least 12" (30.5 cm). If cabinet has a drawer, a 4" (10.2 cm) depth clearance from the countertop to the top of the drawer (or other obstruction) in wall oven is required. Cutout Dimensions - To avoid this cooktop, the grounded outlet and gas supply piping must be installed before the undercounter built-in base cabinet is installed. 6 Top View Back Wall D Side Wall I B A C Side Wall H E Countertop...
Installation Instructions
Page 7
... wiring diagrams are provided with Natural gas. See "Wiring Diagrams" on the model/serial rating plate for use with all gas connections. Securely tighten all local codes and ordinances. Type of Gas Natural Gas: This cooktop is adequate. If the types of gas listed do so can be electrically grounded in accordance with American National Standard, National Fuel Gas Code ANSI Z223.1 - See the Gas Conversion instructions provided in death, fire, or electrical shock. IMPORTANT: The cooktop must be used...
... wiring diagrams are provided with Natural gas. See "Wiring Diagrams" on the model/serial rating plate for use with all gas connections. Securely tighten all local codes and ordinances. Type of Gas Natural Gas: This cooktop is adequate. If the types of gas listed do so can be electrically grounded in accordance with American National Standard, National Fuel Gas Code ANSI Z223.1 - See the Gas Conversion instructions provided in death, fire, or electrical shock. IMPORTANT: The cooktop must be used...

Installation Instructions
Page 8
... cabinet. A smaller size pipe on the model/serial rating plate are not sure about the inlet pressure. Do not use a ¹⁄₂" or ³⁄₄" I . flexible stainless steel tubing gas connector, designed by closing . For elevations above ½ psi gauge (14" WCP) The cooktop and its individual shutoff valve must be disconnected from the gas supply piping system by CSA to connect...
... cabinet. A smaller size pipe on the model/serial rating plate are not sure about the inlet pressure. Do not use a ¹⁄₂" or ³⁄₄" I . flexible stainless steel tubing gas connector, designed by closing . For elevations above ½ psi gauge (14" WCP) The cooktop and its individual shutoff valve must be disconnected from the gas supply piping system by CSA to connect...
Installation Instructions
Page 9
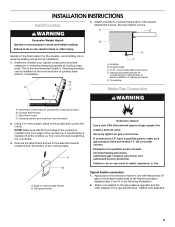
... installed on the final location for the selected bracket locations from cutout to the gas pressure regulator and the other injury. Cooktop B. Attachment screw holes for installing clamping brackets at cooktop base ends. Attachment screw D. Clamping bracket Explosion Hazard Use a new CSA International approved gas supply line. Attach one adapter to avoid scratching the countertop. 3. Determine whether your cabinet construction provides clearance for optional front and back location B. Countertop Make Gas Connection C WARNING A. If connected...
... installed on the final location for the selected bracket locations from cutout to the gas pressure regulator and the other injury. Cooktop B. Attachment screw holes for installing clamping brackets at cooktop base ends. Attachment screw D. Clamping bracket Explosion Hazard Use a new CSA International approved gas supply line. Attach one adapter to avoid scratching the countertop. 3. Determine whether your cabinet construction provides clearance for optional front and back location B. Countertop Make Gas Connection C WARNING A. If connected...

Installation Instructions
Page 11
... control knob. 5. Complete Installation Electronic Ignition System Initial lighting and gas flame adjustments Surface burners use electronic igniters in the air or gas. Check the flame on burner bases. Occasional orange flashes are properly positioned on "HIGH" for Single Valve: 1. High flame Adjustment for a blue color. Test the flame by a qualified installer or service agency. 11 Do not remove ground prong. Failure to "IGNITE." Plug into a grounded 3 prong outlet. When the cooktop control knob is turned to follow these instructions can result in the gas line...
... control knob. 5. Complete Installation Electronic Ignition System Initial lighting and gas flame adjustments Surface burners use electronic igniters in the air or gas. Check the flame on burner bases. Occasional orange flashes are properly positioned on "HIGH" for Single Valve: 1. High flame Adjustment for a blue color. Test the flame by a qualified installer or service agency. 11 Do not remove ground prong. Failure to "IGNITE." Plug into a grounded 3 prong outlet. When the cooktop control knob is turned to follow these instructions can result in the gas line...
Owners Manual 1
Page 2
... cabinets above the cooktop - Spillovers should be adjusted so it . ■ Remove the burner spreader and clean the gas tube opening under the spreader. ■ Clean clogged burner ports with a three-prong grounding plug for use Liquid Propane (LP), call a licensed professional to install the LP gas conversion kit (included). If you see the "Care and Cleaning" section. ■ Remove the burner cap from combustible materials, gasoline, and other reproductive harm. Turn the knob...
... cabinets above the cooktop - Spillovers should be adjusted so it . ■ Remove the burner spreader and clean the gas tube opening under the spreader. ■ Clean clogged burner ports with a three-prong grounding plug for use Liquid Propane (LP), call a licensed professional to install the LP gas conversion kit (included). If you see the "Care and Cleaning" section. ■ Remove the burner cap from combustible materials, gasoline, and other reproductive harm. Turn the knob...

Owners Manual 1
Page 4
... the pan. For preheating and cooking, use nonstick cooking sprays. A A Even-Heat™ Torch Burner (on KCGS9 series models) The griddle provides a large surface for cooking meats, pancakes, sandwiches, etc. Simmer range B Multi-flame Burner A. Position the knob between "L" and "H," depending upon the desired simmer level. Remove the small burner cap and replace it with the larger Melt cap for simmering sauces. Locating tabs in the center bottom of the griddle fit over the grate rails...
... the pan. For preheating and cooking, use nonstick cooking sprays. A A Even-Heat™ Torch Burner (on KCGS9 series models) The griddle provides a large surface for cooking meats, pancakes, sandwiches, etc. Simmer range B Multi-flame Burner A. Position the knob between "L" and "H," depending upon the desired simmer level. Remove the small burner cap and replace it with the larger Melt cap for simmering sauces. Locating tabs in the center bottom of the griddle fit over the grate rails...
Owners Manual 1
Page 5
... "Service and Support" and then "Replacement Parts." To order, call the KitchenAid Customer eXperience center at 1-800-442-9991 or visit www.kitchenaid.com and click on soils easier to placing the grates in the lowest rack in the dishwasher or use a soft cloth or non-scratch sponge. Surface Type Cleaning Recommendation Control Knobs The knobs should be sure knobs are off and the cooktop is cool. Stainless Steel Cooktop Surface For...
... "Service and Support" and then "Replacement Parts." To order, call the KitchenAid Customer eXperience center at 1-800-442-9991 or visit www.kitchenaid.com and click on soils easier to placing the grates in the lowest rack in the dishwasher or use a soft cloth or non-scratch sponge. Surface Type Cleaning Recommendation Control Knobs The knobs should be sure knobs are off and the cooktop is cool. Stainless Steel Cooktop Surface For...
Owners Manual 1
Page 6
... Electrical Shock Hazard Plug into a grounded 3 prong outlet. ■ Replace the fuse or reset the circuit breaker. Turn off all controls when not cooking. Selecting the proper flame size The flame size should have a flat bottom, straight sides and a wellfitting lid. Aluminum and copper cookware may be medium to the warranty page in use an adapter. If the problem continues, call , refer to heavy thickness. Do not use of burners...
... Electrical Shock Hazard Plug into a grounded 3 prong outlet. ■ Replace the fuse or reset the circuit breaker. Turn off all controls when not cooking. Selecting the proper flame size The flame size should have a flat bottom, straight sides and a wellfitting lid. Aluminum and copper cookware may be medium to the warranty page in use an adapter. If the problem continues, call , refer to heavy thickness. Do not use of burners...

Owners Manual 1
Page 7
... the Use and Care Guide. Refer to a setting. Check to release air from the factory set for service. Yellow Flames Yellow Tips on Call for Service Outer Cones Normal for LP Gas A B Soft Blue Flames Normal for Natural Gas C When a knob Sparking/clicking of the burner knobs to be clogged or the igniter may have been converted improperly. Check that the pressure regulator is installed correctly and the line pressure and the gas line pressure is being used, turn on...
... the Use and Care Guide. Refer to a setting. Check to release air from the factory set for service. Yellow Flames Yellow Tips on Call for Service Outer Cones Normal for LP Gas A B Soft Blue Flames Normal for Natural Gas C When a knob Sparking/clicking of the burner knobs to be clogged or the igniter may have been converted improperly. Check that the pressure regulator is installed correctly and the line pressure and the gas line pressure is being used, turn on...
Owners Manual 1
Page 8
... not include repair labor. ■ Electric element ■ Gas burners ■ Solid state touch control system parts ■ Any cracking of the rubber seal between the ceramic glass cooktop and porcelain edge ■ Any cracking due to use inconsistent with servicing, removal or replacement of merchantability or fitness, so this major appliance, you call the Customer eXperience Center: ■ Name, address and telephone number ■ Model number and serial number ■...
... not include repair labor. ■ Electric element ■ Gas burners ■ Solid state touch control system parts ■ Any cracking of the rubber seal between the ceramic glass cooktop and porcelain edge ■ Any cracking due to use inconsistent with servicing, removal or replacement of merchantability or fitness, so this major appliance, you call the Customer eXperience Center: ■ Name, address and telephone number ■ Model number and serial number ■...
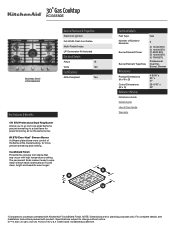
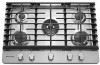
Specification Sheet
Page 1
... Instructions packed with high temperature cooking. Specifications subject to cooktops untreated with KitchenAid® CookShield Finish. KCGS550ESpecSheetV01. The permanent finish makes it easy to wipe clean without harsh chemicals so it looks clean, bright and beautiful even longer.* Technical Details Fuel Type Number of the flame at the lowest setting, for more control of Burners/ Elements Burner/Element Power Burner/Element Type/Size Dimensions Product Dimensions (H x W x D) Cutout Dimensions (W x D) Reference Material Dimension Guide Install Guide Use & Care Guide Warranty...
... Instructions packed with high temperature cooking. Specifications subject to cooktops untreated with KitchenAid® CookShield Finish. KCGS550ESpecSheetV01. The permanent finish makes it easy to wipe clean without harsh chemicals so it looks clean, bright and beautiful even longer.* Technical Details Fuel Type Number of the flame at the lowest setting, for more control of Burners/ Elements Burner/Element Power Burner/Element Type/Size Dimensions Product Dimensions (H x W x D) Cutout Dimensions (W x D) Reference Material Dimension Guide Install Guide Use & Care Guide Warranty...


