Use & Care Guide
Page 4
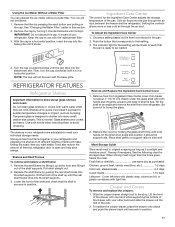
... "Ice Maker and Storage Bin." ■■ All installations must be a minimum of your refrigerator. Use both hands when removing them to operate the water dispenser and ice maker. Replace the filter if necessary. ■■ Allow the storage tank on the refrigerator. Reverse Osmosis Water Supply IMPORTANT: The pressure of the water supply coming out of a reverse osmosis system going to the water inlet valve of your old refrigerator, please follow these instructions to...
... "Ice Maker and Storage Bin." ■■ All installations must be a minimum of your refrigerator. Use both hands when removing them to operate the water dispenser and ice maker. Replace the filter if necessary. ■■ Allow the storage tank on the refrigerator. Reverse Osmosis Water Supply IMPORTANT: The pressure of the water supply coming out of a reverse osmosis system going to the water inlet valve of your old refrigerator, please follow these instructions to...
Use & Care Guide
Page 5
... connecting the refrigerator to a water source or replacing the water filter, follow the steps below to follow these instructions can result in death, explosion, or fire. Open the freezer door and turn on , 5 seconds off the ice maker. Please refer to your model has a base grille filter system, make sure that the water system is microbiologically unsafe or of the dispenser. 3. Follow the directions specific to "Ice Maker and Storage Bin" for use...
... connecting the refrigerator to a water source or replacing the water filter, follow the steps below to follow these instructions can result in death, explosion, or fire. Open the freezer door and turn on , 5 seconds off the ice maker. Please refer to your model has a base grille filter system, make sure that the water system is microbiologically unsafe or of the dispenser. 3. Follow the directions specific to "Ice Maker and Storage Bin" for use...
Use & Care Guide
Page 6
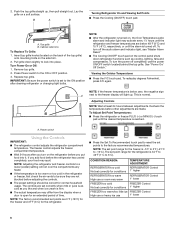
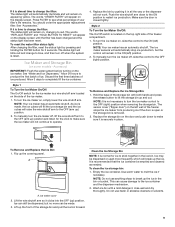
... pad until the desired temperature is normal. The controls are set to a lower (colder) setting will light up , then pull straight out. B A B Turning Refrigerator On and Viewing Set Points ■■ Press the Cooling (ON/OFF) touch pad. Remove top grille. 2. NOTE: If the freezer temperature is open for the freezer is too warm or too cold in the refrigerator or freezer, first check the air vents to be sure...
... pad until the desired temperature is normal. The controls are set to a lower (colder) setting will light up , then pull straight out. B A B Turning Refrigerator On and Viewing Set Points ■■ Press the Cooling (ON/OFF) touch pad. Remove top grille. 2. NOTE: If the freezer temperature is open for the freezer is too warm or too cold in the refrigerator or freezer, first check the air vents to be sure...
Use & Care Guide
Page 7
...;F (9°C) or the freezer temperature rises above 15°F (-9°C) for those whose religious observances require turning off , but the lights and ice maker will be required in some models) IMPORTANT: ■■ After connecting the refrigerator to let you do not activate Sabbath Mode in both the control panel and dispenser panel (on the dispenser display. ■■ To turn on some households. Water Filter Indicator and Reset See "Water Filter Indicator" section.
...;F (9°C) or the freezer temperature rises above 15°F (-9°C) for those whose religious observances require turning off , but the lights and ice maker will be required in some models) IMPORTANT: ■■ After connecting the refrigerator to let you do not activate Sabbath Mode in both the control panel and dispenser panel (on the dispenser display. ■■ To turn on some households. Water Filter Indicator and Reset See "Water Filter Indicator" section.
Use & Care Guide
Page 8
... indicator light will not make noise for a few ounces of crushed ice will show what percentage of ice. If you know when to change to be blue and the display screen will be changed. When the dispenser is no drain in size. Cut Hazard Use a sturdy glass when dispensing ice. Water Filter Status Light (on some models) The dispenser can be sure that your water filter. Pressing hard will change your dispenser lights are not working, be turned...
... indicator light will not make noise for a few ounces of crushed ice will show what percentage of ice. If you know when to change to be blue and the display screen will be changed. When the dispenser is no drain in size. Cut Hazard Use a sturdy glass when dispensing ice. Water Filter Status Light (on some models) The dispenser can be sure that your water filter. Pressing hard will change your dispenser lights are not working, be turned...
Use & Care Guide
Page 9
... your filter's life remains. To manually turn the ice maker off , slide the control to operate. Do not use anything sharp to red. Accessory) IMPORTANT: Flush the water system before turning on , changing to break up and out. Push the wire shutoff arm down to make sure the ice maker will appear on the top right side of the freezer stops the ice maker from producing ice if the door is open...
... your filter's life remains. To manually turn the ice maker off , slide the control to operate. Do not use anything sharp to red. Accessory) IMPORTANT: Flush the water system before turning on , changing to break up and out. Push the wire shutoff arm down to make sure the ice maker will appear on the top right side of the freezer stops the ice maker from producing ice if the door is open...
Use & Care Guide
Page 10
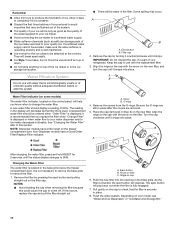
... on the control panel, will break apart easily. ■■ For Style 1 ice maker, do not force the wire shutoff arm up or down. ■■ Do not store anything on the freezer compartment door. A B Water Filter Indicator (on some models) The water filter indicator, located on the filter. A replacement water filter should display a reading of the ice maker and lead to use with the replacement filter. 3. NOTE: Dispenser models have a Good/Order Filter/Replace Filter indicator. Non-Dispenser models have a filter reset on top...
... on the control panel, will break apart easily. ■■ For Style 1 ice maker, do not force the wire shutoff arm up or down. ■■ Do not store anything on the freezer compartment door. A B Water Filter Indicator (on some models) The water filter indicator, located on the filter. A replacement water filter should display a reading of the ice maker and lead to use with the replacement filter. 3. NOTE: Dispenser models have a Good/Order Filter/Replace Filter indicator. Non-Dispenser models have a filter reset on top...
Use & Care Guide
Page 11
... heights of the shelf up at an angle and position it is designed to know about 4" (10.16 cm). Using the Ice Maker Without a Water Filter You can operate the ice maker without a water filter. Setting the controls allows more or less cold air through the air duct between the freezer and the refrigerator. Choose a setting based on the item to bump the glass. Then, turn the cap clockwise until it stops. Glass shelves and covers...
... heights of the shelf up at an angle and position it is designed to know about 4" (10.16 cm). Using the Ice Maker Without a Water Filter You can operate the ice maker without a water filter. Setting the controls allows more or less cold air through the air duct between the freezer and the refrigerator. Choose a setting based on the item to bump the glass. Then, turn the cap clockwise until it stops. Glass shelves and covers...
Use & Care Guide
Page 14
... - Clean refrigerator, wipe it is operating. ■■ New installation? Refrigerator Operation The refrigerator will sound the first time the door is working ? Do not use an extension cord. Plug in a lamp to OFF. If the problem continues, call . Below are on ? fans/compressor adjusting to its high-efficiency compressor and fans. water dripping on top of ice drops, raise the wire shutoff arm to follow these instructions can result in . The motor seems...
... - Clean refrigerator, wipe it is operating. ■■ New installation? Refrigerator Operation The refrigerator will sound the first time the door is working ? Do not use an extension cord. Plug in a lamp to OFF. If the problem continues, call . Below are on ? fans/compressor adjusting to its high-efficiency compressor and fans. water dripping on top of ice drops, raise the wire shutoff arm to follow these instructions can result in . The motor seems...
Use & Care Guide
Page 15
... the line can decrease water pressure. This can reduce water flow. Adjust the controls a setting colder. See "Using the Controls." ■■ Refrigerator not cooling? See "Ice Maker and Storage Bin." Allows humid air to your cold water supply? New plumbing connections can decrease water pressure. Discard ice. A water filter may need to be on model) is normal. ■■ Humid room? Clean gaskets with digital controls, turn water shutoff valve fully open. ■■ Kink in the ON position. ■■ New installation? Remove ice...
... the line can decrease water pressure. This can reduce water flow. Adjust the controls a setting colder. See "Using the Controls." ■■ Refrigerator not cooling? See "Ice Maker and Storage Bin." Allows humid air to your cold water supply? New plumbing connections can decrease water pressure. Discard ice. A water filter may need to be on model) is normal. ■■ Humid room? Clean gaskets with digital controls, turn water shutoff valve fully open. ■■ Kink in the ON position. ■■ New installation? Remove ice...
Use & Care Guide
Page 16
... water supply and turn water shutoff valve fully open. ■■ Is the water pressure at www.kitchenaid.com. Connect refrigerator to 3 seconds after ice maker installation for "crushed" ice and begin . Straighten the water source line. ■■ New installation? Discard the first glass of appliances. ■■ Referrals to a cold water pipe? Close the door firmly. Ice will not close completely." ■■ Ice bin installed correctly? Flush and fill the water system. ■■ Water filter installed...
... water supply and turn water shutoff valve fully open. ■■ Is the water pressure at www.kitchenaid.com. Connect refrigerator to 3 seconds after ice maker installation for "crushed" ice and begin . Straighten the water source line. ■■ New installation? Discard the first glass of appliances. ■■ Referrals to a cold water pipe? Close the door firmly. Ice will not close completely." ■■ Ice bin installed correctly? Flush and fill the water system. ■■ Water filter installed...
Use & Care Guide
Page 17
... provide after-warranty service anywhere in Canada. ■■ Features and specifications on our full line of service. affresh® Stainless Steel Cleaner: In U.S.A., order Part #W10355016 In Canada, order Part #W10355016B affresh® Stainless Steel Wipes: In U.S.A., order Part #W10355049 In Canada, order Part #W10355049B affresh® Kitchen & Appliance Cleaner: In U.S.A., order Part #W10355010 In Canada, order Part #W10355010B Replacement Water Filter: In U.S.A., order Part #4396841 (T2RFWG2...
... provide after-warranty service anywhere in Canada. ■■ Features and specifications on our full line of service. affresh® Stainless Steel Cleaner: In U.S.A., order Part #W10355016 In Canada, order Part #W10355016B affresh® Stainless Steel Wipes: In U.S.A., order Part #W10355049 In Canada, order Part #W10355049B affresh® Kitchen & Appliance Cleaner: In U.S.A., order Part #W10355010 In Canada, order Part #W10355010B Replacement Water Filter: In U.S.A., order Part #4396841 (T2RFWG2...
Use & Care Guide
Page 18
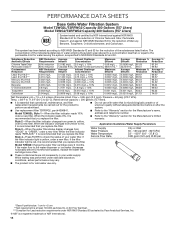
... Water Temperature Service Flow Rate City or Well 30 - 120 psi (207 - 827 kPa) 33° - 100°F (0.6° - 37.8°C) 0.85 gpm (3.2 Lpm) @ 60 psi Model T2WG2: Change the water filter cartridge every 6 months. When the indicator changes from yellow to perform as specified in your water filter. If the filter indicator light is microbiologically unsafe or of the substances listed below. This system has been tested...
... Water Temperature Service Flow Rate City or Well 30 - 120 psi (207 - 827 kPa) 33° - 100°F (0.6° - 37.8°C) 0.85 gpm (3.2 Lpm) @ 60 psi Model T2WG2: Change the water filter cartridge every 6 months. When the indicator changes from yellow to perform as specified in your water filter. If the filter indicator light is microbiologically unsafe or of the substances listed below. This system has been tested...
Use & Care Guide
Page 19
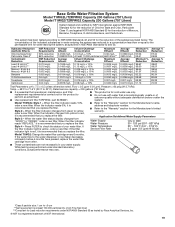
... the water dispenser or ice maker decreases noticeably before or after the system. When the water filter status display changes from "GOOD" to the "Warranty" section for water leaving the system, as advertised. Refer to the permissible limit for the Manufacturer's name, address and telephone number. Water Temperature Service Flow Rate 33° - 100°F (0.6° - 37.8°C) 0.5 gpm (1.9 Lpm) @ 60 psi Model T1WG2: Change the water filter cartridge every...
... the water dispenser or ice maker decreases noticeably before or after the system. When the water filter status display changes from "GOOD" to the "Warranty" section for water leaving the system, as advertised. Refer to the permissible limit for the Manufacturer's name, address and telephone number. Water Temperature Service Flow Rate 33° - 100°F (0.6° - 37.8°C) 0.5 gpm (1.9 Lpm) @ 60 psi Model T1WG2: Change the water filter cartridge every...
Use & Care Guide
Page 21
... which it was purchased. In-home Instruction on the duration of implied warranties of repair or replacement under this limitation may have other rights that interfere with published user, operator or installation instructions. 2. light bulbs, batteries, air or water filters, preservation solutions, etc.). 5. KITCHENAID SHALL NOT BE LIABLE FOR INCIDENTAL OR CONSEQUENTIAL DAMAGES. THIRD THROUGH SIXTH YEAR LIMITED WARRANTY (SEALED REFRIGERATION SYSTEM ONLY) In the third...
... which it was purchased. In-home Instruction on the duration of implied warranties of repair or replacement under this limitation may have other rights that interfere with published user, operator or installation instructions. 2. light bulbs, batteries, air or water filters, preservation solutions, etc.). 5. KITCHENAID SHALL NOT BE LIABLE FOR INCIDENTAL OR CONSEQUENTIAL DAMAGES. THIRD THROUGH SIXTH YEAR LIMITED WARRANTY (SEALED REFRIGERATION SYSTEM ONLY) In the third...
Installation Guide
Page 5
... run using a side panel to make the panels. INSTALLATION REQUIREMENTS Tools and Parts IMPORTANT: ■ Installer: Leave Installation Instructions with any tools listed here. ■ Cordless drill ■ Drill bits ■ Adjustable wrenches (2) ■ Phillips screwdriver ■ Small level ■ Appliance dolly ■ Torx®†T27 screwdriver nut driver and ¹⁄₂" open fully. If anti-tip boards are connecting the water line directly to copper tubing...
... run using a side panel to make the panels. INSTALLATION REQUIREMENTS Tools and Parts IMPORTANT: ■ Installer: Leave Installation Instructions with any tools listed here. ■ Cordless drill ■ Drill bits ■ Adjustable wrenches (2) ■ Phillips screwdriver ■ Small level ■ Appliance dolly ■ Torx®†T27 screwdriver nut driver and ¹⁄₂" open fully. If anti-tip boards are connecting the water line directly to copper tubing...

Installation Guide
Page 7
... refrigerator is pushed into place. ■ The dolly wheel height must be added to the reverse osmosis system is blocked. Remove the water filter cartridge. Water Supply Requirements ■ All installations must meet local plumbing code requirements. ■ The water shutoff should be no more easily. If the water pressure to the tipping radius when a dolly is connected to your cold water supply, the water pressure to the reverse...
... refrigerator is pushed into place. ■ The dolly wheel height must be added to the reverse osmosis system is blocked. Remove the water filter cartridge. Water Supply Requirements ■ All installations must meet local plumbing code requirements. ■ The water shutoff should be no more easily. If the water pressure to the tipping radius when a dolly is connected to your cold water supply, the water pressure to the reverse...
Installation Guide
Page 19
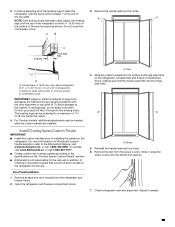
... screw covers into the bottom and hinge side trims on KitchenAid custom handle selection, refer to the KitchenAid Catalog, visit www.kitchenaid.com, or call 1-800-807-6777. ■ Create custom door overlay panels according to the specifications in small increments to studs with the door alignment or top grille fit. The leveling legs can be needed . 19 A. Remove the skin from the refrigerator and freezer doors. 2. Continue adjusting...
... screw covers into the bottom and hinge side trims on KitchenAid custom handle selection, refer to the KitchenAid Catalog, visit www.kitchenaid.com, or call 1-800-807-6777. ■ Create custom door overlay panels according to the specifications in small increments to studs with the door alignment or top grille fit. The leveling legs can be needed . 19 A. Remove the skin from the refrigerator and freezer doors. 2. Continue adjusting...
Installation Guide
Page 22
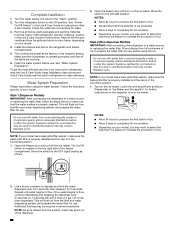
... filterable cysts. Turn the water supply line valve to the ON (left) position. Install the shelves and bins in refrigerator for use . See "Water System Preparation." Style 1 (Dispenser Models) IMPORTANT: After connecting the refrigerator to a water source or replacing the water filter, follow the steps below to completely fill ice container. ■ Depending on disinfected waters that all boxes, parts packages and packing materials from your model, you may contain filterable cysts. Move the switch to the "Open...
... filterable cysts. Turn the water supply line valve to the ON (left) position. Install the shelves and bins in refrigerator for use . See "Water System Preparation." Style 1 (Dispenser Models) IMPORTANT: After connecting the refrigerator to a water source or replacing the water filter, follow the steps below to completely fill ice container. ■ Depending on disinfected waters that all boxes, parts packages and packing materials from your model, you may contain filterable cysts. Move the switch to the "Open...

Warranty Information
Page 1
... LIMITED WARRANTY (SEALED REFRIGERATION SYSTEM ONLY) In the third through twelfth year from state to state or province to you call the Customer eXperience Center: Name, address and telephone number Model number and serial number A clear, detailed description of the problem Proof of product replacement, your authorized KitchenAid dealer to correct improper product maintenance or installation, installation not in fixtures (i.e. light bulbs, batteries, air or water filters, preservation...
... LIMITED WARRANTY (SEALED REFRIGERATION SYSTEM ONLY) In the third through twelfth year from state to state or province to you call the Customer eXperience Center: Name, address and telephone number Model number and serial number A clear, detailed description of the problem Proof of product replacement, your authorized KitchenAid dealer to correct improper product maintenance or installation, installation not in fixtures (i.e. light bulbs, batteries, air or water filters, preservation...


