
Use & Care Guide
Page 1
... of injury, and tell you what the potential hazard is the safety alert symbol. W10137649A REFRIGERATOR USER INSTRUCTIONS THANK YOU for additional information. In Canada, visit our website at www.kitchenaid.ca or call us at 1-800-807-6777. Table of Contents / Table des mati...ères REFRIGERATOR SAFETY 1 SÉCURITÉ DU RÉFRIGÉRATEUR 20 INSTALLATION INSTRUCTIONS 2 INSTRUCTIONS D'INSTALLATION 21 REFRIGERATOR USE 10 UTILISATION DU RÉFRIGÉ...
... of injury, and tell you what the potential hazard is the safety alert symbol. W10137649A REFRIGERATOR USER INSTRUCTIONS THANK YOU for additional information. In Canada, visit our website at www.kitchenaid.ca or call us at 1-800-807-6777. Table of Contents / Table des mati...ères REFRIGERATOR SAFETY 1 SÉCURITÉ DU RÉFRIGÉRATEUR 20 INSTALLATION INSTRUCTIONS 2 INSTRUCTIONS D'INSTALLATION 21 REFRIGERATOR USE 10 UTILISATION DU RÉFRIGÉ...

Use & Care Guide
Page 2
...water and dry. ■ Do not use an extension cord. ■ Disconnect power before operating. ■ Remove doors from your old refrigerator, please follow basic precautions, including the following: ■ Plug into a grounded 3 prong outlet. ■ Do not remove ground prong.... the inside . Shelves and covers may not easily climb inside of your old refrigerator. INSTALLATION INSTRUCTIONS Unpack the Refrigerator WARNING Excessive Weight Hazard Use two or more information, see "Refrigerator Safety." ■ Properly dispose of packaging. Clean Before Using After you are ...
...water and dry. ■ Do not use an extension cord. ■ Disconnect power before operating. ■ Remove doors from your old refrigerator, please follow basic precautions, including the following: ■ Plug into a grounded 3 prong outlet. ■ Do not remove ground prong.... the inside . Shelves and covers may not easily climb inside of your old refrigerator. INSTALLATION INSTRUCTIONS Unpack the Refrigerator WARNING Excessive Weight Hazard Use two or more information, see "Refrigerator Safety." ■ Properly dispose of packaging. Clean Before Using After you are ...

Use & Care Guide
Page 3
...WARNING Explosion Hazard Keep flammable materials and vapors, such as gasoline, away from the electrical source. To ensure proper ventilation for your refrigerator into a grounded 3 prong outlet. If your water pressure, call a licensed, qualified plumber. Do not use an adapter. ...Use an outlet that you have questions about your refrigerator has an ice maker, allow for the water line connections. NOTE: Before performing any tools listed here. Recommended Grounding Method A 115 ...
...WARNING Explosion Hazard Keep flammable materials and vapors, such as gasoline, away from the electrical source. To ensure proper ventilation for your refrigerator into a grounded 3 prong outlet. If your water pressure, call a licensed, qualified plumber. Do not use an adapter. ...Use an outlet that you have questions about your refrigerator has an ice maker, allow for the water line connections. NOTE: Before performing any tools listed here. Recommended Grounding Method A 115 ...

Use & Care Guide
Page 4
...outlet end squarely as far as shown. Measure from the connection on water supply to refill after heavy usage. ■ If your refrigerator has a water filter, it is clear. Add 7 ft (2.1 m) to Water Line 1. A B C A. Cold water pipe B. Packing nut 6. Do not overtighten. 8. Do not ...bottom. Be sure both ends of 2 ft [61 cm]) with a reverse osmosis system. Compression nut D E F G E. Flush the tubing until water is a cold water pipe. ■ Horizontal pipe will help keep water away from the bottom. Confirm copper tubing is connected, turn the refrigerator...
...outlet end squarely as far as shown. Measure from the connection on water supply to refill after heavy usage. ■ If your refrigerator has a water filter, it is clear. Add 7 ft (2.1 m) to Water Line 1. A B C A. Cold water pipe B. Packing nut 6. Do not overtighten. 8. Do not ...bottom. Be sure both ends of 2 ft [61 cm]) with a reverse osmosis system. Compression nut D E F G E. Flush the tubing until water is a cold water pipe. ■ Horizontal pipe will help keep water away from the bottom. Confirm copper tubing is connected, turn the refrigerator...

Use & Care Guide
Page 5
... Handle Screw Cabinet Hinge Hole Plug Cabinet 1. See Graphic 2. 2. Water valve inlet port C. "P" clamp 6. Tap the bottom edge of the refrigerator door handle upward with metal mounting tabs on the side of the door. Handle will slide up approximately ³⁄₄"...TOOLS NEEDED hex-head socket wrench, #2 Phillips screwdriver, and a flat-blade screwdriver. 1. Lift the refrigerator door free from the opposite side, follow these steps. Reverse Door (Architect® Series) IMPORTANT: If you are included later in this section after "Final Steps." Compression nut ...
... Handle Screw Cabinet Hinge Hole Plug Cabinet 1. See Graphic 2. 2. Water valve inlet port C. "P" clamp 6. Tap the bottom edge of the refrigerator door handle upward with metal mounting tabs on the side of the door. Handle will slide up approximately ³⁄₄"...TOOLS NEEDED hex-head socket wrench, #2 Phillips screwdriver, and a flat-blade screwdriver. 1. Lift the refrigerator door free from the opposite side, follow these steps. Reverse Door (Architect® Series) IMPORTANT: If you are included later in this section after "Final Steps." Compression nut ...

Use & Care Guide
Page 6
... Provide additional support for the top hinge as shown in the Top Hinge Graphic. Tighten all holes to position the two screws in the bottom of refrigerator door as shown in Graphic 3. 4. Loosen the four screws attaching the drawer glides to full extension. 2. Pull the drawer brackets toward...drawer brackets. Plug into a grounded 3 prong outlet. Reverse Door (Panel Series) IMPORTANT: ■ If you to make sure that the bottom of the refrigerator door aligns evenly with the top of the drawer front into the slots in Graphic 1. 2. Remove ¹⁄₄" hex-head screws from...
... Provide additional support for the top hinge as shown in the Top Hinge Graphic. Tighten all holes to position the two screws in the bottom of refrigerator door as shown in Graphic 3. 4. Loosen the four screws attaching the drawer glides to full extension. 2. Pull the drawer brackets toward...drawer brackets. Plug into a grounded 3 prong outlet. Reverse Door (Panel Series) IMPORTANT: ■ If you to make sure that the bottom of the refrigerator door aligns evenly with the top of the drawer front into the slots in Graphic 1. 2. Remove ¹⁄₄" hex-head screws from...

Use & Care Guide
Page 9
... release from refrigerator before removing door panel. 1. If not, tilt the refrigerator slightly more easily, use the instructions below. 1. Brake foot Style 2 - Remove the refrigerator handle: ■ Using a Phillips screwdriver, remove the top door cap. ■ Tap the bottom edge of the refrigerator. Remove the...the same amount. 4. Reinstall the refrigerator door. 9 If your refrigerator may be removed from door. 2. C ■ To lower, turn the leveling screw counterclockwise. This makes it closes as easily as to the rear by bottom door cap and side trim. &#...
... release from refrigerator before removing door panel. 1. If not, tilt the refrigerator slightly more easily, use the instructions below. 1. Brake foot Style 2 - Remove the refrigerator handle: ■ Using a Phillips screwdriver, remove the top door cap. ■ Tap the bottom edge of the refrigerator. Remove the...the same amount. 4. Reinstall the refrigerator door. 9 If your refrigerator may be removed from door. 2. C ■ To lower, turn the leveling screw counterclockwise. This makes it closes as easily as to the rear by bottom door cap and side trim. &#...

Use & Care Guide
Page 10
... mm) max. 2¹⁄₂" (6.35 cm) A min. Flat Panels: You can create a custom flat panel a maximum of the panels. ft. B A. Bottom ¹⁄₄" (6.35 mm) max. If you will not cool the compartments any faster. ■ The recommended settings should not exceed 15 lbs ...your decorator panels. See dimensional drawings for Custom Wood Panels 20 cu. Raised Panels: A raised panel design can damage the surface of ¹⁄₄" (6.35 mm) thick to replace your refrigerator to cool completely before adding food. Top Center face detail ...
... mm) max. 2¹⁄₂" (6.35 cm) A min. Flat Panels: You can create a custom flat panel a maximum of the panels. ft. B A. Bottom ¹⁄₄" (6.35 mm) max. If you will not cool the compartments any faster. ■ The recommended settings should not exceed 15 lbs ...your decorator panels. See dimensional drawings for Custom Wood Panels 20 cu. Raised Panels: A raised panel design can damage the surface of ¹⁄₄" (6.35 mm) thick to replace your refrigerator to cool completely before adding food. Top Center face detail ...

Use & Care Guide
Page 11
...Control one setting higher FREEZER too warm/to shut off. Neither compartment will show the set to stabilize. If you first install your refrigerator, make sure the controls are preset at a time. Press the up or down arrow touch pad until a dash (-) appears ...setting at the factory. Wait 24 hours between adjustments for the temperature to adjust the temperature. Adjusting Digital Controls The REFRIGERATOR control adjusts the refrigerator compartment temperature. Wait 24 hours between adjustments for the temperature to the recommended set point is displayed. NOTE: The ...
...Control one setting higher FREEZER too warm/to shut off. Neither compartment will show the set to stabilize. If you first install your refrigerator, make sure the controls are preset at a time. Press the up or down arrow touch pad until a dash (-) appears ...setting at the factory. Wait 24 hours between adjustments for the temperature to adjust the temperature. Adjusting Digital Controls The REFRIGERATOR control adjusts the refrigerator compartment temperature. Wait 24 hours between adjustments for the temperature to the recommended set point is displayed. NOTE: The ...

Use & Care Guide
Page 12
...■ Press the Temp Alarm touch pad once to turn on the control panel to the lowest temperature setting. Temperature in the refrigerator and freezer compartments exceed normal operating temperatures, the highest temperature reached will automatically shut off the sound of all alarms. ON -.... Use the Freezer (+) or (-) touch pads to change the temperature display. When the desired preference name is displayed, press the Refrigerator (+) or (-) touch pads to scroll through the preference names. Depending on your preferences by pressing and holding the Door Alarm touch pad...
...■ Press the Temp Alarm touch pad once to turn on the control panel to the lowest temperature setting. Temperature in the refrigerator and freezer compartments exceed normal operating temperatures, the highest temperature reached will automatically shut off the sound of all alarms. ON -.... Use the Freezer (+) or (-) touch pads to change the temperature display. When the desired preference name is displayed, press the Refrigerator (+) or (-) touch pads to scroll through the preference names. Depending on your preferences by pressing and holding the Door Alarm touch pad...

Use & Care Guide
Page 13
... fresh supply. Press the button on , it stops. Repeat until it is located in some models) IMPORTANT: ■ After connecting the refrigerator to eject. As air is on, a new water filter should produce a complete batch of the dispenser. Water Filtration System The water filter ...Dispensing Water 1. Additional flushing may spurt out of ice approximately every 3 hours. ■ To increase ice production, lower the freezer and refrigerator temperature. Dispense enough water every week to produce the first batch of the water supplied to flow. or 1-800-807-6777 Canada. Ice...
... fresh supply. Press the button on , it stops. Repeat until it is located in some models) IMPORTANT: ■ After connecting the refrigerator to eject. As air is on, a new water filter should produce a complete batch of the dispenser. Water Filtration System The water filter ...Dispensing Water 1. Additional flushing may spurt out of ice approximately every 3 hours. ■ To increase ice production, lower the freezer and refrigerator temperature. Dispense enough water every week to produce the first batch of the water supplied to flow. or 1-800-807-6777 Canada. Ice...
Use & Care Guide
Page 14
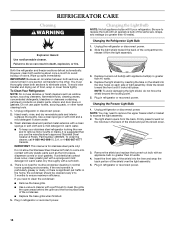
...Hand wash, rinse, and dry removable parts and interior surfaces thoroughly. Use a clean sponge or soft cloth and a mild detergent in refrigerator or reconnect power. If the environment is particularly greasy or dusty, or there is for routine condenser cleaning in normal home operating environments.... Use a vacuum cleaner with an appliance bulb no need to remove the upper freezer shelf or basket to ensure maximum efficiency. REFRIGERATOR CARE Cleaning WARNING Explosion Hazard Use nonflammable cleaner. Dry thoroughly with any odors formed in the back of food, wrap or cover ...
...Hand wash, rinse, and dry removable parts and interior surfaces thoroughly. Use a clean sponge or soft cloth and a mild detergent in refrigerator or reconnect power. If the environment is particularly greasy or dusty, or there is for routine condenser cleaning in normal home operating environments.... Use a vacuum cleaner with an appliance bulb no need to remove the upper freezer shelf or basket to ensure maximum efficiency. REFRIGERATOR CARE Cleaning WARNING Explosion Hazard Use nonflammable cleaner. Dry thoroughly with any odors formed in the back of food, wrap or cover ...

Use & Care Guide
Page 15
In the U.S.A., www.kitchenaid.com In Canada, www.kitchenaid.ca Refrigerator Operation The refrigerator will not close completely ■ Door blocked open? Do not use an adapter. flow of refrigerant, movement of the refrigerator ■ Sizzling/Gurgling - Replace the fuse or reset the circuit breaker....into the drain pan ■ Creaking/Cracking - Explosion Hazard Use nonflammable cleaner. Do not remove ground prong. The refrigerator seems noisy Refrigerator noise has been reduced over the years. water dripping on . The doors will not operate WARNING Electrical Shock Hazard...
In the U.S.A., www.kitchenaid.com In Canada, www.kitchenaid.ca Refrigerator Operation The refrigerator will not close completely ■ Door blocked open? Do not use an adapter. flow of refrigerant, movement of the refrigerator ■ Sizzling/Gurgling - Replace the fuse or reset the circuit breaker....into the drain pan ■ Creaking/Cracking - Explosion Hazard Use nonflammable cleaner. Do not remove ground prong. The refrigerator seems noisy Refrigerator noise has been reduced over the years. water dripping on . The doors will not operate WARNING Electrical Shock Hazard...

Use & Care Guide
Page 16
... dispenser will not close completely." ■ Large amount of ice recently removed? Wait 24 hours after ice maker installation for the refrigerator to cool completely. ■ Door(s) opened often or left open ? Remove filter and operate ice maker. Turn the water shutoff... open . ■ Kink in the water source line? Straighten the water source line. ■ Water filter installed on the refrigerator? New plumbing connections can decrease water pressure. Straighten the water source line. ■ New installation? See "Water Dispenser." 16 Contributes...
... dispenser will not close completely." ■ Large amount of ice recently removed? Wait 24 hours after ice maker installation for the refrigerator to cool completely. ■ Door(s) opened often or left open ? Remove filter and operate ice maker. Turn the water shutoff... open . ■ Kink in the water source line? Straighten the water source line. ■ Water filter installed on the refrigerator? New plumbing connections can decrease water pressure. Straighten the water source line. ■ New installation? See "Water Dispenser." 16 Contributes...

Use & Care Guide
Page 17
... to cool completely. ■ Recently dispensed large amount of the refrigerator door. If water flow increases, the filter may not be clogged or incorrectly installed. ■ Is the water pressure at the bottom of water? Discard the first glass of water after installation for water... supply to the home determines the flow from the dispenser is connected to 50°F (10°C). ■ New installation? Make sure the refrigerator is only chilled to a cold...
... to cool completely. ■ Recently dispensed large amount of the refrigerator door. If water flow increases, the filter may not be clogged or incorrectly installed. ■ Is the water pressure at the bottom of water? Discard the first glass of water after installation for water... supply to the home determines the flow from the dispenser is connected to 50°F (10°C). ■ New installation? Make sure the refrigerator is only chilled to a cold...

Use & Care Guide
Page 19
... water filter: 30 day limited warranty on the right-hand side of products not approved by KitchenAid. 5. SECOND THROUGH FIFTH YEAR LIMITED WARRANTY ON CAVITY LINER AND SEALED REFRIGERATION SYSTEM PARTS In the second through fifth years from the date of your correspondence. Service must...workmanship. Pickup and delivery. If you need assistance using your complete model number ready. In Canada, call 1-800-422-1230. KITCHENAID® REFRIGERATOR WARRANTY ONE YEAR LIMITED WARRANTY For one year from the date of purchase, when this User Instructions and model number information for ...
... water filter: 30 day limited warranty on the right-hand side of products not approved by KitchenAid. 5. SECOND THROUGH FIFTH YEAR LIMITED WARRANTY ON CAVITY LINER AND SEALED REFRIGERATION SYSTEM PARTS In the second through fifth years from the date of your correspondence. Service must...workmanship. Pickup and delivery. If you need assistance using your complete model number ready. In Canada, call 1-800-422-1230. KITCHENAID® REFRIGERATOR WARRANTY ONE YEAR LIMITED WARRANTY For one year from the date of purchase, when this User Instructions and model number information for ...
Parts Diagram
Page 1
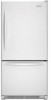
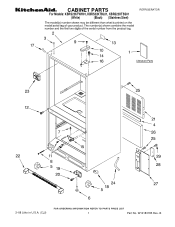
CABINET PARTS For Models: KBRS22KTWH01, KBRS22KTBL01, KBRS22KTSS01 (White) (Black) (Stainless Steel) REFRIGERATOR 3−08 Litho in U.S.A. (CJJ) 1 Part No. B W10183185 Rev.
CABINET PARTS For Models: KBRS22KTWH01, KBRS22KTBL01, KBRS22KTSS01 (White) (Black) (Stainless Steel) REFRIGERATOR 3−08 Litho in U.S.A. (CJJ) 1 Part No. B W10183185 Rev.

Parts Diagram
Page 6
... 14 67006604 Insulation 15 W10127429 Control, Damper Illus. DESCRIPTION 16 12002356 Thermistor Kit 17 M0310343 Plug Button (White) Following Parts Not Illustrated 67005644 Harness, Controls (Refrigerator) (Includes # 16) 6 W10183185 DESCRIPTION 1 Liner (Not A Serviceable Part) 2 Y67003896 Bracket, Control and Lights 3 W10183186 Overlay 4 67005444 Housing, Electronic Control 5 67005397 Board, Utah 6 C3680310 Switch, Light...
... 14 67006604 Insulation 15 W10127429 Control, Damper Illus. DESCRIPTION 16 12002356 Thermistor Kit 17 M0310343 Plug Button (White) Following Parts Not Illustrated 67005644 Harness, Controls (Refrigerator) (Includes # 16) 6 W10183185 DESCRIPTION 1 Liner (Not A Serviceable Part) 2 Y67003896 Bracket, Control and Lights 3 W10183186 Overlay 4 67005444 Housing, Electronic Control 5 67005397 Board, Utah 6 C3680310 Switch, Light...
Parts Diagram
Page 7
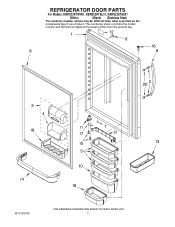
REFRIGERATOR DOOR PARTS For Models: KBRS22KTWH01, KBRS22KTBL01, KBRS22KTSS01 (White) (Black) (Stainless Steel) The model(s) number shown may be different than what is printed on the W10183185 7
REFRIGERATOR DOOR PARTS For Models: KBRS22KTWH01, KBRS22KTBL01, KBRS22KTSS01 (White) (Black) (Stainless Steel) The model(s) number shown may be different than what is printed on the W10183185 7

Parts Diagram
Page 8
DESCRIPTION 1 Refrigerator Door (w/Liner) 67004777 White 67004775 Black W10170544 Stainless Steel 2 67002935 Screw (2) 3 67003819 Door, Compartment 4 67001279 Tray, Dairy 5 67005672 Bucket, Medium (3) 6 Screw, Handle Hole 67001130 ...67004977 White 67004978 Black 17 Stop, Door 67003779 White 67003780 Black 18 67005724 Bucket, Short 19 67005626 Caddy−Can 20 67006113 Mount−Handle 21 67004107 Bracket, Tilt Out 8 W10183185 Part No. REFRIGERATOR DOOR PARTS For Models: KBRS22KTWH01, KBRS22KTBL01, KBRS22KTSS01 (White) (Black) (Stainless Steel) Illus. No.
DESCRIPTION 1 Refrigerator Door (w/Liner) 67004777 White 67004775 Black W10170544 Stainless Steel 2 67002935 Screw (2) 3 67003819 Door, Compartment 4 67001279 Tray, Dairy 5 67005672 Bucket, Medium (3) 6 Screw, Handle Hole 67001130 ...67004977 White 67004978 Black 17 Stop, Door 67003779 White 67003780 Black 18 67005724 Bucket, Short 19 67005626 Caddy−Can 20 67006113 Mount−Handle 21 67004107 Bracket, Tilt Out 8 W10183185 Part No. REFRIGERATOR DOOR PARTS For Models: KBRS22KTWH01, KBRS22KTBL01, KBRS22KTSS01 (White) (Black) (Stainless Steel) Illus. No.


