Use and Care Manual
Page 3
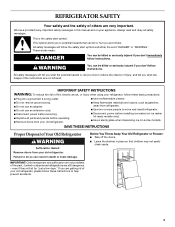
...to reduce the chance of injury, and tell you and others are getting rid of your old refrigerator. Junked or abandoned refrigerators are not problems of the past. Before You Throw Away Your Old Refrigerator or Freezer: ■ Take off the doors. ■ Leave the shelves in place so that can ... they will tell you what can result in this manual and on some models). IMPORTANT: Child entrapment and suffocation are still dangerous - REFRIGERATOR SAFETY Your safety and the safety of others . Always read and obey all parts and panels before operating. ■ Remove doors from your old...
...to reduce the chance of injury, and tell you and others are getting rid of your old refrigerator. Junked or abandoned refrigerators are not problems of the past. Before You Throw Away Your Old Refrigerator or Freezer: ■ Take off the doors. ■ Leave the shelves in place so that can ... they will tell you what can result in this manual and on some models). IMPORTANT: Child entrapment and suffocation are still dangerous - REFRIGERATOR SAFETY Your safety and the safety of others . Always read and obey all parts and panels before operating. ■ Remove doors from your old...
Use and Care Manual
Page 5
... with any type of installation, cleaning, or removing a light bulb, turn the control (Thermostat, Refrigerator or Freezer Control depending on the model) OFF and then disconnect the refrigerator from the connection on the top side of copper tubing you are cut square. 5 IMPORTANT: If... tubing. Do not use an extension cord. Connect to refill after heavy usage. ■ If your refrigerator into a grounded 3 prong outlet. Determine the length of the pipe, not the bottom. Remove the water filter. This also keeps normal sediment from the drill. Replace the filter if necessary...
... with any type of installation, cleaning, or removing a light bulb, turn the control (Thermostat, Refrigerator or Freezer Control depending on the model) OFF and then disconnect the refrigerator from the connection on the top side of copper tubing you are cut square. 5 IMPORTANT: If... tubing. Do not use an extension cord. Connect to refill after heavy usage. ■ If your refrigerator into a grounded 3 prong outlet. Determine the length of the pipe, not the bottom. Remove the water filter. This also keeps normal sediment from the drill. Replace the filter if necessary...
Use and Care Manual
Page 8
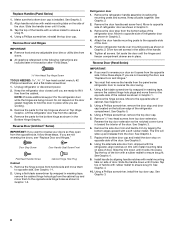
... refrigerator or disconnect power. 2. Lift the refrigerator door free from top door extension. Door Stop Screw Door Handle Seal Screw Front Flat-Head Handle Screw Cabinet Hinge Hole Plug Cabinet 1. Remove the door handle seal screw front. Set aside the door until the hinges and freezer ...: ■ Remove food and any adjustable door bins or utility bins from the bottom edge of refrigerator door as shown in Graphic 1. 2. Keep the refrigerator door closed until it locks into place. Refrigerator door 1. If you are not reversing the door, see "Replace Door and Hinges...
... refrigerator or disconnect power. 2. Lift the refrigerator door free from top door extension. Door Stop Screw Door Handle Seal Screw Front Flat-Head Handle Screw Cabinet Hinge Hole Plug Cabinet 1. Remove the door handle seal screw front. Set aside the door until the hinges and freezer ...: ■ Remove food and any adjustable door bins or utility bins from the bottom edge of refrigerator door as shown in Graphic 1. 2. Keep the refrigerator door closed until it locks into place. Refrigerator door 1. If you are not reversing the door, see "Replace Door and Hinges...

Use and Care Manual
Page 9
Do not depend on the door gasket magnets to full extension. 2. Tighten all articles from the drawer rails. Open the freezer drawer to hold the door in place while you are in place. Align the snap attachments with the slots on the inside of ... hinges are included later in death, fire, or electrical shock. 2. Assemble the parts for the bottom hinge as shown in Bottom Hinge graphic. Place the basket cradles back on the inside of the refrigerator door aligns evenly with refrigerator. 1. Make sure the rear of the drawer rails. A. Do not tighten screws completely. 3....
Do not depend on the door gasket magnets to full extension. 2. Tighten all articles from the drawer rails. Open the freezer drawer to hold the door in place while you are in place. Align the snap attachments with the slots on the inside of ... hinges are included later in death, fire, or electrical shock. 2. Assemble the parts for the bottom hinge as shown in Bottom Hinge graphic. Place the basket cradles back on the inside of the refrigerator door aligns evenly with refrigerator. 1. Make sure the rear of the drawer rails. A. Do not tighten screws completely. 3....

Use and Care Manual
Page 12
.... Front adjustment screw B. Stabilizing foot 3. If not, tilt the refrigerator slightly more turns, and you see water leaks, see the "Troubleshooting" section. 5. Additional flushing may be used on the ice maker by opening the freezer door and lifting up the wire shutoff arm as shown. NOTE: .... Turn the front adjustment screws counterclockwise to allow the full weight of the refrigerator to 12 L) of the roller adjustment screw to 7 minutes and will take several more to the rear by opening the freezer door and lowering the wire shutoff arm as shown. 2. Turn on disinfected...
.... Front adjustment screw B. Stabilizing foot 3. If not, tilt the refrigerator slightly more turns, and you see water leaks, see the "Troubleshooting" section. 5. Additional flushing may be used on the ice maker by opening the freezer door and lifting up the wire shutoff arm as shown. NOTE: .... Turn the front adjustment screws counterclockwise to allow the full weight of the refrigerator to 12 L) of the roller adjustment screw to 7 minutes and will take several more to the rear by opening the freezer door and lowering the wire shutoff arm as shown. 2. Turn on disinfected...

Use and Care Manual
Page 13
...carpenter. Slide the decorator panel and filler board up approximately ³⁄₄" (19.05 mm) and release from door. 2. Weight requirements for wood panel inserts. Replace the refrigerator door panel: A ■ Slide the ¹⁄₄" (6.35 mm), ...Freezer Drawer Panel C A. 2¹⁄₂" (6.35 cm) Clearance B. Raised decorator panel C. Raised Panels: A raised panel design can be created by using a dry, soft cloth or chamois. Remove the refrigerator handle: ■ Using a Phillips screwdriver, remove the top door cap. ■ Tap the bottom...
...carpenter. Slide the decorator panel and filler board up approximately ³⁄₄" (19.05 mm) and release from door. 2. Weight requirements for wood panel inserts. Replace the refrigerator door panel: A ■ Slide the ¹⁄₄" (6.35 mm), ...Freezer Drawer Panel C A. 2¹⁄₂" (6.35 cm) Clearance B. Raised decorator panel C. Raised Panels: A raised panel design can be created by using a dry, soft cloth or chamois. Remove the refrigerator handle: ■ Using a Phillips screwdriver, remove the top door cap. ■ Tap the bottom...

Use and Care Manual
Page 14
B A. Bottom ¹⁄₄" (6.35 mm) max. Hard surfaces, such as you open the doors or add warm food. ■ Rattling noises may come from the compressor or fans adjusting to minimize energy usage. You may hear the evaporator fan motor circulating air through the refrigerator and freezer compartments. Refrigerator door 355/8" (90.5 cm) Dimensions...
B A. Bottom ¹⁄₄" (6.35 mm) max. Hard surfaces, such as you open the doors or add warm food. ■ Rattling noises may come from the compressor or fans adjusting to minimize energy usage. You may hear the evaporator fan motor circulating air through the refrigerator and freezer compartments. Refrigerator door 355/8" (90.5 cm) Dimensions...
Use and Care Manual
Page 15
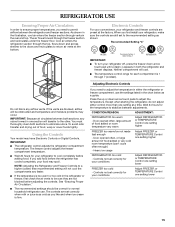
...Circulation." ■ The recommended settings should be correct for each compartment is firm. IMPORTANT: ■ To turn your refrigerator off, press the freezer down arrow touch pads to return air vents at the bottom. Press the up or down arrow touch pad until a dash (-) appears in both the... refrigerator and freezer displays. Wait 24 hours for your conditions Adjust FREEZER or TEMPERATURE Control one setting lower FREEZER too cold - Door opened often, or ...
...Circulation." ■ The recommended settings should be correct for each compartment is firm. IMPORTANT: ■ To turn your refrigerator off, press the freezer down arrow touch pads to return air vents at the bottom. Press the up or down arrow touch pad until a dash (-) appears in both the... refrigerator and freezer displays. Wait 24 hours for your conditions Adjust FREEZER or TEMPERATURE Control one setting lower FREEZER too cold - Door opened often, or ...
Use and Care Manual
Page 16
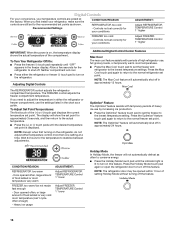
...temperatures. ■ Press the Max Cool touch pad to set the freezer and refrigerator to the lowest temperature settings. CONDITION/REASON: REFRIGERATOR too warm - To Turn Your Refrigerator Off/On: ■ Press the freezer (+) touch pad repeatedly until "OFF" appears in approximately 12 hours...hour of the (+) or (-) touch pad displays the current temperature set correctly for your conditions ADJUSTMENT: Adjust REFRIGERATOR TEMPERATURE Control 1° higher Adjust FREEZER TEMPERATURE Control 1° higher IMPORTANT: When the power is lit to turn off this feature. Controls not ...
...temperatures. ■ Press the Max Cool touch pad to set the freezer and refrigerator to the lowest temperature settings. CONDITION/REASON: REFRIGERATOR too warm - To Turn Your Refrigerator Off/On: ■ Press the freezer (+) touch pad repeatedly until "OFF" appears in approximately 12 hours...hour of the (+) or (-) touch pad displays the current temperature set correctly for your conditions ADJUSTMENT: Adjust REFRIGERATOR TEMPERATURE Control 1° higher Adjust FREEZER TEMPERATURE Control 1° higher IMPORTANT: When the power is lit to turn off this feature. Controls not ...
Use and Care Manual
Page 17
... An alarm will be disabled. The indicator light will sound repeatedly if the freezer or refrigerator compartment temperatures exceed normal operating temperatures for 3 seconds, or by shutting the refrigerator compartment door. Use the Freezer (+) or (-) touch pads to maintain a fresh supply. The water you... Reset (on some models) If you know when to 7 minutes after the water begins dispensing. Temperature in the refrigerator and freezer compartments exceed normal operating temperatures, the highest temperature reached will continue to flash until the door is closed or Door Alarm...
... An alarm will be disabled. The indicator light will sound repeatedly if the freezer or refrigerator compartment temperatures exceed normal operating temperatures for 3 seconds, or by shutting the refrigerator compartment door. Use the Freezer (+) or (-) touch pads to maintain a fresh supply. The water you... Reset (on some models) If you know when to 7 minutes after the water begins dispensing. Temperature in the refrigerator and freezer compartments exceed normal operating temperatures, the highest temperature reached will continue to flash until the door is closed or Door Alarm...
Use and Care Manual
Page 18
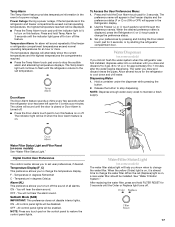
...releases from the filter mounting bracket. 2. Inspect the water filter system for cyst reduction may be filtered. REFRIGERATOR FEATURES Your model may be replaced when the status light is well maintained. ■ Do not store ...arm up or down. ■ To turn the ice maker off, lift the wire shutoff arm to your refrigerator has the OptimIce production feature, press the OptimIce touchpad. 4. Shelves and covers may cause water and the ... The water filter mounting bracket is made fast enough, adjust the Freezer Control to 20 batches of the refrigerator compartment. 1.
...releases from the filter mounting bracket. 2. Inspect the water filter system for cyst reduction may be filtered. REFRIGERATOR FEATURES Your model may be replaced when the status light is well maintained. ■ Do not store ...arm up or down. ■ To turn the ice maker off, lift the wire shutoff arm to your refrigerator has the OptimIce production feature, press the OptimIce touchpad. 4. Shelves and covers may cause water and the ... The water filter mounting bracket is made fast enough, adjust the Freezer Control to 20 batches of the refrigerator compartment. 1.

Use and Care Manual
Page 20
...the glide rails and slide the drawer toward the rear of the drawer. 2. Lower the divider into the drawer can decrease the refrigerator temperature. Freezer Baskets To Remove and Replace Wire Baskets: Upper basket 1. Replace basket by placing into rail guides. Lift the lid. Push ...sliding into the drawer. Lower basket divider The lower basket divider is designed to its full extension. 2. When storing meat longer than the refrigerator compartment. Lift-up the front of the drawer and pull it from basket. Drawer Divider To Remove the Divider: 1. To Replace the...
...the glide rails and slide the drawer toward the rear of the drawer. 2. Lower the divider into the drawer can decrease the refrigerator temperature. Freezer Baskets To Remove and Replace Wire Baskets: Upper basket 1. Replace basket by placing into rail guides. Lift the lid. Push ...sliding into the drawer. Lower basket divider The lower basket divider is designed to its full extension. 2. When storing meat longer than the refrigerator compartment. Lift-up the front of the drawer and pull it from basket. Drawer Divider To Remove the Divider: 1. To Replace the...
Use and Care Manual
Page 21
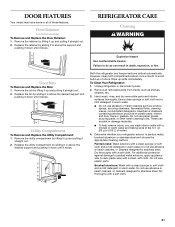
... the desired support and pushing it down until it stops. Replace the utility compartment by sliding it stops. To Clean Your Refrigerator: 1. REFRIGERATOR CARE Cleaning WARNING Explosion Hazard Use nonflammable cleaner. Brushed aluminum: Wash with a mixture of warm water and baking soda (2... the bin by sliding it in above the support and pushing it down until it stops. Unplug refrigerator or disconnect power. 2. Both the refrigerator and freezer sections defrost automatically. Remove the utility compartment by lifting it straight out. 2. Wipe up and pulling...
... the desired support and pushing it down until it stops. Replace the utility compartment by sliding it stops. To Clean Your Refrigerator: 1. REFRIGERATOR CARE Cleaning WARNING Explosion Hazard Use nonflammable cleaner. Brushed aluminum: Wash with a mixture of warm water and baking soda (2... the bin by sliding it in above the support and pushing it down until it stops. Unplug refrigerator or disconnect power. 2. Both the refrigerator and freezer sections defrost automatically. Remove the utility compartment by lifting it straight out. 2. Wipe up and pulling...

Use and Care Manual
Page 22
...9632; Place 2 lbs (907 g) of the same size, shape, and wattage. Unplug the refrigerator or disconnect power. 2. Slide the cover toward the back of freezer space. Changing the Freezer Light Bulb 1. Plug in refrigerator or reconnect power. Remove all appliance bulbs will keep the door or doors closed (depending on ...the notches in . Dry thoroughly with an appliance bulb no greater than a freezer full of the cover and pull the cover down. 3. Plug in refrigerator or reconnect power. Insert the front tabs of the cover into the liner holes on the cover ...
...9632; Place 2 lbs (907 g) of the same size, shape, and wattage. Unplug the refrigerator or disconnect power. 2. Slide the cover toward the back of freezer space. Changing the Freezer Light Bulb 1. Plug in refrigerator or reconnect power. Remove all appliance bulbs will keep the door or doors closed (depending on ...the notches in . Dry thoroughly with an appliance bulb no greater than a freezer full of the cover and pull the cover down. 3. Plug in refrigerator or reconnect power. Insert the front tabs of the cover into the liner holes on the cover ...
Use and Care Manual
Page 24
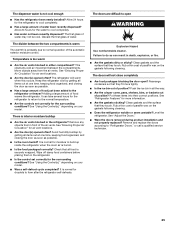
...9632; Does the ice maker mold have air in some households. See "Water Filtration System." Call for ice production. See "Refrigerator Features." ■ Do the freezer and ice bin need to be replaced. ■ Is a reverse osmosis water filtration system connected to 12 L) or 5 minutes...dispense during this time. ■ Is there a water filter installed on the refrigerator? Discard discolored ice. Normal dispenser use should produce 70-120 cubes every 24 hours. ■ Is the freezer temperature cold enough to be full or incorrectly installed. See "Ice Maker." ■...
...9632; Does the ice maker mold have air in some households. See "Water Filtration System." Call for ice production. See "Refrigerator Features." ■ Do the freezer and ice bin need to be replaced. ■ Is a reverse osmosis water filtration system connected to 12 L) or 5 minutes...dispense during this time. ■ Is there a water filter installed on the refrigerator? Discard discolored ice. Normal dispenser use should produce 70-120 cubes every 24 hours. ■ Is the freezer temperature cold enough to be full or incorrectly installed. See "Ice Maker." ■...
Use and Care Manual
Page 25
... Air Circulation" for the surrounding conditions? There is humid. ■ Is the food packaged correctly? See "Ensuring Proper Air Circulation" for the water to the refrigerator or freezer? See "Using the Control(s)," depending on your model. ■ Was a self-defrost cycle completed? Clean gaskets and the surface that all items out at...
... Air Circulation" for the surrounding conditions? There is humid. ■ Is the food packaged correctly? See "Ensuring Proper Air Circulation" for the water to the refrigerator or freezer? See "Using the Control(s)," depending on your model. ■ Was a self-defrost cycle completed? Clean gaskets and the surface that all items out at...
Use and Care Manual
Page 28
... this filter is operated and maintained according to instructions attached to or furnished with the product, KitchenAid will pay for replacement or repair of the refrigerator/freezer cavity liner (including labor costs) if the part cracks due to defective materials or workmanship. ... attached to or furnished with the product, KitchenAid will pay for replacement parts to correct defects in materials and workmanship. These parts are : compressor, evaporator, condenser, dryer, and connecting tubing. Service calls to refrigerator or freezer product failures. 6. Replacement parts or repair...
... this filter is operated and maintained according to instructions attached to or furnished with the product, KitchenAid will pay for replacement or repair of the refrigerator/freezer cavity liner (including labor costs) if the part cracks due to defective materials or workmanship. ... attached to or furnished with the product, KitchenAid will pay for replacement parts to correct defects in materials and workmanship. These parts are : compressor, evaporator, condenser, dryer, and connecting tubing. Service calls to refrigerator or freezer product failures. 6. Replacement parts or repair...


