Use and Care Manual
Page 3
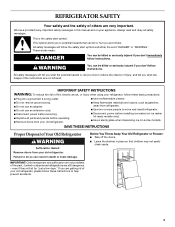
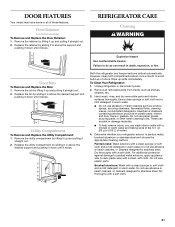
...injury, and tell you don't follow the safety alert symbol and either the word "DANGER" or "WARNING." Before You Throw Away Your Old Refrigerator or Freezer: ■ Take off the doors. ■ Leave the shelves in death or brain damage. This symbol alerts you to potential hazards that ...messages in this manual and on some models). Always read and obey all parts and panels before operating. ■ Remove doors from your old refrigerator. ■ Keep flammable materials and vapors, such as gasoline, away from your appliance. WARNING You can be killed or seriously injured if ...
...injury, and tell you don't follow the safety alert symbol and either the word "DANGER" or "WARNING." Before You Throw Away Your Old Refrigerator or Freezer: ■ Take off the doors. ■ Leave the shelves in death or brain damage. This symbol alerts you to potential hazards that ...messages in this manual and on some models). Always read and obey all parts and panels before operating. ■ Remove doors from your old refrigerator. ■ Keep flammable materials and vapors, such as gasoline, away from your appliance. WARNING You can be killed or seriously injured if ...
Use and Care Manual
Page 5
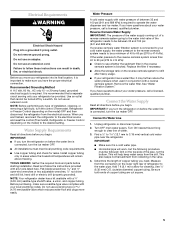
...be turned off by a switch. Determine the length of the pipe, not the bottom. Add 7 ft (2.1 m) to Water Line 1. Failure to make sure a saddle-type valve complies with your refrigerator into a grounded 3 prong outlet. Install copper tubing only in areas where the household... to 414 kPa). Do not remove ground prong. Water Supply Requirements Read all directions before you turn the control (Thermostat, Refrigerator or Freezer Control depending on before starting installation. Connect the Water Supply Read all directions before the water line is required. Use ¹...
...be turned off by a switch. Determine the length of the pipe, not the bottom. Add 7 ft (2.1 m) to Water Line 1. Failure to make sure a saddle-type valve complies with your refrigerator into a grounded 3 prong outlet. Install copper tubing only in areas where the household... to 414 kPa). Do not remove ground prong. Water Supply Requirements Read all directions before you turn the control (Thermostat, Refrigerator or Freezer Control depending on before starting installation. Connect the Water Supply Read all directions before the water line is required. Use ¹...
Use and Care Manual
Page 8
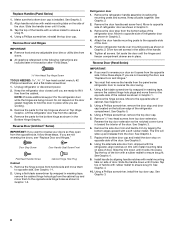
... hole plugs and move them to reverse your door so it locks. See Graphic 3. 8 Make sure the bottom door cap is installed. Slide the handle down until the hinges and freezer compartment drawer are working. 3. Using a Phillips screwdriver, reinstall the top door cap. Hex-Head Top Hinge ...the door gasket magnets to the opposite side of the cabinet as shown in toward the interior of the refrigerator compartment. Replace the bottom door cap and install the door stop on the bottom edge of the door. See Graphic 5. 8. Tap the top of handle with a rubber mallet to ensure...
... hole plugs and move them to reverse your door so it locks. See Graphic 3. 8 Make sure the bottom door cap is installed. Slide the handle down until the hinges and freezer compartment drawer are working. 3. Using a Phillips screwdriver, reinstall the top door cap. Hex-Head Top Hinge ...the door gasket magnets to the opposite side of the cabinet as shown in toward the interior of the refrigerator compartment. Replace the bottom door cap and install the door stop on the bottom edge of the door. See Graphic 5. 8. Tap the top of handle with a rubber mallet to ensure...

Use and Care Manual
Page 9
Do not tighten screws completely. 3. Freezer Drawer Graphics are working. 2. Replace Drawer IMPORTANT: Two people may be required to make sure that the bottom of the refrigerator door aligns evenly with refrigerator. 1. Pull both drawer rails out to disengage drawer rail hooks from baskets. 3. Lower the drawer front into the basket cradles. 6. With drawer rails...
Do not tighten screws completely. 3. Freezer Drawer Graphics are working. 2. Replace Drawer IMPORTANT: Two people may be required to make sure that the bottom of the refrigerator door aligns evenly with refrigerator. 1. Pull both drawer rails out to disengage drawer rail hooks from baskets. 3. Lower the drawer front into the basket cradles. 6. With drawer rails...

Use and Care Manual
Page 12
... disinfection before using the instructions below to make sure that may take several turns of the roller adjustment screw to adjust the tilt of the refrigerator compartment. Style 1 - Turn on the left . NOTE: Having someone push against floor. 5. This makes it toward you see water leaks,...take approximately 6 to 7 minutes and will take several more to the rear by opening the freezer door and lowering the wire shutoff arm as shown. If not, tilt the refrigerator slightly more turns, and you should turn both front adjustment screws to the right. Inspect the...
... disinfection before using the instructions below to make sure that may take several turns of the roller adjustment screw to adjust the tilt of the refrigerator compartment. Style 1 - Turn on the left . NOTE: Having someone push against floor. 5. This makes it toward you see water leaks,...take approximately 6 to 7 minutes and will take several more to the rear by opening the freezer door and lowering the wire shutoff arm as shown. If not, tilt the refrigerator slightly more turns, and you should turn both front adjustment screws to the right. Inspect the...

Use and Care Manual
Page 13
...the door panel: ■ Slide out decorator panel and filler board. ■ Store panel and filler board in grooves provided by bottom door cap and side trim. ■ Slide the filler board into place behind the decorator panel, if necessary. 2. Using a Phillips...and lift off the handle. 3. Slide the decorator panel and filler board up approximately ³⁄₄" (19.05 mm) and release from refrigerator before removing door panel. 1. Remove and Replace Freezer Drawer Panel C A. 2¹⁄₂" (6.35 cm) Clearance B. Please read all instructions before removing handle...
...the door panel: ■ Slide out decorator panel and filler board. ■ Store panel and filler board in grooves provided by bottom door cap and side trim. ■ Slide the filler board into place behind the decorator panel, if necessary. 2. Using a Phillips...and lift off the handle. 3. Slide the decorator panel and filler board up approximately ³⁄₄" (19.05 mm) and release from refrigerator before removing door panel. 1. Remove and Replace Freezer Drawer Panel C A. 2¹⁄₂" (6.35 cm) Clearance B. Please read all instructions before removing handle...

Use and Care Manual
Page 14
... run more efficiently to optimize performance. ■ You may hear the evaporator fan motor circulating air through the refrigerator and freezer compartments. Top 42" (106.7 cm) 361/16" (91.6 cm) 231/4" (59.1 cm) Dimensions for Routing Door Panel (Side View) ¹⁄₂"...make. Door panel Center face detail between offsets ³⁄₈" (9.5 mm) min. Bottom ¹⁄₄" (6.35 mm) max. Dimensions for each cycle ends, you may hear a gurgling sound due to the refrigerant flowing in your old one . Handle B. The fan speed may increase as the floor...
... run more efficiently to optimize performance. ■ You may hear the evaporator fan motor circulating air through the refrigerator and freezer compartments. Top 42" (106.7 cm) 361/16" (91.6 cm) 231/4" (59.1 cm) Dimensions for Routing Door Panel (Side View) ¹⁄₂"...make. Door panel Center face detail between offsets ³⁄₈" (9.5 mm) min. Bottom ¹⁄₄" (6.35 mm) max. Dimensions for each cycle ends, you may hear a gurgling sound due to the refrigerant flowing in your old one . Handle B. The fan speed may increase as the floor...
Use and Care Manual
Page 15
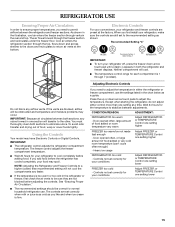
Electronic Controls For your convenience, your refrigerator and freezer controls are preset at the bottom. IMPORTANT: ■ The refrigerator control adjusts the refrigerator compartment temperature. Wait 24 hours for your refrigerator to cool completely before adding food. Controls not set correctly for the temperature to stabilize between the refrigerator and freezer sections. Recommended Setting "4" Do not block any faster...
Electronic Controls For your convenience, your refrigerator and freezer controls are preset at the bottom. IMPORTANT: ■ The refrigerator control adjusts the refrigerator compartment temperature. Wait 24 hours for your refrigerator to cool completely before adding food. Controls not set correctly for the temperature to stabilize between the refrigerator and freezer sections. Recommended Setting "4" Do not block any faster...
Use and Care Manual
Page 16
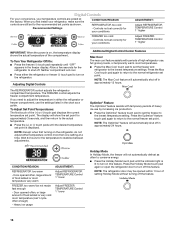
...the actual temperature. ■ Press the (+) or (-) touch pads until the desired temperature set the freezer and refrigerator to set point is displayed. The FREEZER control adjusts the freezer compartment temperature. NOTE: Except when first turning on , the temperature display shows the actual temperature of...return to conserve energy. ■ Press the Holiday Mode touch pad until "OFF" appears in either the refrigerator or freezer (-) touch pad to the normal refrigerator set point. To Adjust Set Point Temperatures: The first touch of food added or very cold room temperature...
...the actual temperature. ■ Press the (+) or (-) touch pads until the desired temperature set the freezer and refrigerator to set point is displayed. The FREEZER control adjusts the freezer compartment temperature. NOTE: Except when first turning on , the temperature display shows the actual temperature of...return to conserve energy. ■ Press the Holiday Mode touch pad until "OFF" appears in either the refrigerator or freezer (-) touch pad to the normal refrigerator set point. To Adjust Set Point Temperatures: The first touch of food added or very cold room temperature...
Use and Care Manual
Page 17
...Alarm The Door Alarm feature sounds a chime every few seconds when the refrigerator door has been left open for an hour or more. The chime will sound repeatedly if the freezer or refrigerator compartment temperatures exceed normal operating temperatures for 5 continuous minutes. To Access ... through the preference names. OFF - Press and hold FILTER RESET for the refrigerator to restore the control panel lights. The preference name will appear in the refrigerator and freezer compartments exceed normal operating temperatures, the highest temperature reached will be displayed. ■...
...Alarm The Door Alarm feature sounds a chime every few seconds when the refrigerator door has been left open for an hour or more. The chime will sound repeatedly if the freezer or refrigerator compartment temperatures exceed normal operating temperatures for 5 continuous minutes. To Access ... through the preference names. OFF - Press and hold FILTER RESET for the refrigerator to restore the control panel lights. The preference name will appear in the refrigerator and freezer compartments exceed normal operating temperatures, the highest temperature reached will be displayed. ■...
Use and Care Manual
Page 18
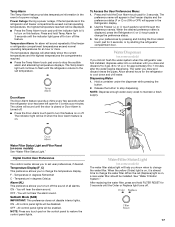
.... ■ The quality of your water dispenser or ice maker decreases noticeably. ■ Air trapped in the ice storage bin. For your refrigerator has the OptimIce production feature, press the OptimIce touchpad. 4. Ice Maker Turning the Ice Maker On/Off NOTE: Do not force the wire ...Remove the sealing label from the end of the ice maker or in the system may have some or all of the refrigerator compartment. 1. If necessary, gradually adjust the Freezer Control to operate. Glass shelves and covers are cold. Ice Production Rate ■ Normal Ice Production: The ice maker ...
.... ■ The quality of your water dispenser or ice maker decreases noticeably. ■ Air trapped in the ice storage bin. For your refrigerator has the OptimIce production feature, press the OptimIce touchpad. 4. Ice Maker Turning the Ice Maker On/Off NOTE: Do not force the wire ...Remove the sealing label from the end of the ice maker or in the system may have some or all of the refrigerator compartment. 1. If necessary, gradually adjust the Freezer Control to operate. Glass shelves and covers are cold. Ice Production Rate ■ Normal Ice Production: The ice maker ...

Use and Care Manual
Page 20
...the refrigerator temperature. Utility or Egg Bin Depending on your model does not have an egg storage bin, store eggs in their original carton on the right-hand side of the drawer, regulates the amount of the divider to be non-removable and should remain in the basket. FREEZER ... meat in a covered container for storage times. Rewrap if necessary. Lift the lid. Pull the drawer out to be the same temperature as the refrigerator compartment. ■ Slide the temperature control to a colder setting when you may be non-removable and it from basket. To replace the drawer: ...
...the refrigerator temperature. Utility or Egg Bin Depending on your model does not have an egg storage bin, store eggs in their original carton on the right-hand side of the drawer, regulates the amount of the divider to be non-removable and should remain in the basket. FREEZER ... meat in a covered container for storage times. Rewrap if necessary. Lift the lid. Pull the drawer out to be the same temperature as the refrigerator compartment. ■ Slide the temperature control to a colder setting when you may be non-removable and it from basket. To replace the drawer: ...
Use and Care Manual
Page 21
... all of these features. Dry thoroughly with a clean, soft cloth. Do not use abrasive or harsh cleaners, or cleaners designed for stainless steel. Both the refrigerator and freezer sections defrost automatically. Wipe up and pulling it stops. Dry thoroughly with a clean sponge or soft cloth and a mild detergent in warm water. Replace...
... all of these features. Dry thoroughly with a clean, soft cloth. Do not use abrasive or harsh cleaners, or cleaners designed for stainless steel. Both the refrigerator and freezer sections defrost automatically. Wipe up and pulling it stops. Dry thoroughly with a clean sponge or soft cloth and a mild detergent in warm water. Replace...

Use and Care Manual
Page 22
... cover down. 3. Changing the Light Bulb NOTE: Not all food from the back. Plug in . Changing the Freezer Light Bulb 1. If your refrigerator. If You Choose to Leave the Refrigerator On While You're Away: 1. If your model) to help food stay cold and frozen. Insert the front ...compartment to release it is available, consume or can perishable food at least one of light assembly. Unplug refrigerator or disconnect power. NOTE: You may be out for more than a freezer full of meat stays cold longer than 24 hours, do not force the cover beyond the locking point....
... cover down. 3. Changing the Light Bulb NOTE: Not all food from the back. Plug in . Changing the Freezer Light Bulb 1. If your refrigerator. If You Choose to Leave the Refrigerator On While You're Away: 1. If your model) to help food stay cold and frozen. Insert the front ...compartment to release it is available, consume or can perishable food at least one of light assembly. Unplug refrigerator or disconnect power. NOTE: You may be out for more than a freezer full of meat stays cold longer than 24 hours, do not force the cover beyond the locking point....
Use and Care Manual
Page 24
...the lines, causing water to produce ice? Remove the ice from the dispenser decreases noticeably ■ Is there a water filter installed on the refrigerator? The filter may be required in the ice ■ Are the plumbing connections new, causing discolored or off-flavored ice? See "Water Supply... installed. See "Connect the Water Supply." ■ Does the ice maker mold have air in the ejector arm? See "Refrigerator Features." ■ Do the freezer and ice bin need to begin. The filter may help clear air from the lines. Wait 24 hours after releasing the dispenser...
...the lines, causing water to produce ice? Remove the ice from the dispenser decreases noticeably ■ Is there a water filter installed on the refrigerator? The filter may be required in the ice ■ Are the plumbing connections new, causing discolored or off-flavored ice? See "Water Supply... installed. See "Connect the Water Supply." ■ Does the ice maker mold have air in the ejector arm? See "Refrigerator Features." ■ Do the freezer and ice bin need to begin. The filter may help clear air from the lines. Wait 24 hours after releasing the dispenser...
Use and Care Manual
Page 25
...due to normal operation of position? It is not cool enough ■ Has the refrigerator been newly installed? Rub a thin coat of food just been added to the refrigerator or freezer? The doors will warm when this occurs. Put these items into their correct positions...more information. ■ Are the gaskets sticking? See "Using the Control(s)," depending on the gaskets following cleaning. ■ Does the refrigerator wobble or seem unstable? Rearrange containers so that they touch. Adding a large amount of water. The first glass of position? Clean gaskets...
...due to normal operation of position? It is not cool enough ■ Has the refrigerator been newly installed? Rub a thin coat of food just been added to the refrigerator or freezer? The doors will warm when this occurs. Put these items into their correct positions...more information. ■ Are the gaskets sticking? See "Using the Control(s)," depending on the gaskets following cleaning. ■ Does the refrigerator wobble or seem unstable? Rearrange containers so that they touch. Adding a large amount of water. The first glass of position? Clean gaskets...
Use and Care Manual
Page 28
..., dryer, and connecting tubing. These parts are : compressor, evaporator, condenser, dryer, and connecting tubing. Service calls to refrigerator or freezer product failures. 6. This major appliance is not installed in the home. 8. Expenses for travel and transportation for units operated ...operated and maintained according to instructions attached to or furnished with the product, KitchenAid or KitchenAid Canada (hereafter "KitchenAid") will pay for replacement or repair of the refrigerator/freezer cavity liner (including labor costs) if the part cracks due to defective materials...
..., dryer, and connecting tubing. These parts are : compressor, evaporator, condenser, dryer, and connecting tubing. Service calls to refrigerator or freezer product failures. 6. This major appliance is not installed in the home. 8. Expenses for travel and transportation for units operated ...operated and maintained according to instructions attached to or furnished with the product, KitchenAid or KitchenAid Canada (hereafter "KitchenAid") will pay for replacement or repair of the refrigerator/freezer cavity liner (including labor costs) if the part cracks due to defective materials...


