
Use & Care Guide
Page 1
... de su producto, visite: www.kitchenaid.com Tenga listo su número de modelo completo. Table of Contents / Table des matières REFRIGERATOR SAFETY 1 SÉCURITÉ DU RÉFRIGÉRATEUR 20 INSTALLATION INSTRUCTIONS 2 INSTRUCTIONS D'INSTALLATION 21 REFRIGERATOR USE 10 UTILISATION DU RÉFRIG...SUR LE PRODUIT 39 PRODUCT DATA SHEETS 18 GARANTIE 40 WARRANTY 19 REFRIGERATOR SAFETY Your safety and the safety of others . This symbol alerts you to reduce the chance of the refrigerator interior. All safety messages will tell you what the potential ...
... de su producto, visite: www.kitchenaid.com Tenga listo su número de modelo completo. Table of Contents / Table des matières REFRIGERATOR SAFETY 1 SÉCURITÉ DU RÉFRIGÉRATEUR 20 INSTALLATION INSTRUCTIONS 2 INSTRUCTIONS D'INSTALLATION 21 REFRIGERATOR USE 10 UTILISATION DU RÉFRIG...SUR LE PRODUIT 39 PRODUCT DATA SHEETS 18 GARANTIE 40 WARRANTY 19 REFRIGERATOR SAFETY Your safety and the safety of others . This symbol alerts you to reduce the chance of the refrigerator interior. All safety messages will tell you what the potential ...

Use & Care Guide
Page 2
...; Keep flammable materials and vapors, such as gasoline, away from dropping. 2 even if they are cold. Before You Throw Away Your Old Refrigerator or Freezer: ■ Take off the doors. ■ Leave the shelves in death or brain damage. Rub a small amount of liquid dish soap ...shock, or injury to persons when using it. SAVE THESE INSTRUCTIONS Proper Disposal of Your Old Refrigerator WARNING Suffocation Hazard Remove doors from surfaces before installing ice maker (on the refrigerator. Failure to do so can result in place so that children may break if exposed to ...
...; Keep flammable materials and vapors, such as gasoline, away from dropping. 2 even if they are cold. Before You Throw Away Your Old Refrigerator or Freezer: ■ Take off the doors. ■ Leave the shelves in death or brain damage. Rub a small amount of liquid dish soap ...shock, or injury to persons when using it. SAVE THESE INSTRUCTIONS Proper Disposal of Your Old Refrigerator WARNING Suffocation Hazard Remove doors from surfaces before installing ice maker (on the refrigerator. Failure to do so can result in place so that children may break if exposed to ...

Use & Care Guide
Page 3
... IMPORTANT: The pressure of the water supply coming out of a reverse osmosis system going to the water inlet valve of installation, cleaning, or removing a light bulb, turn the control (Thermostat, Refrigerator or Freezer Control depending on the hinge side (some models require more easily. ■ Use copper tubing and check for the water...
... IMPORTANT: The pressure of the water supply coming out of a reverse osmosis system going to the water inlet valve of installation, cleaning, or removing a light bulb, turn the control (Thermostat, Refrigerator or Freezer Control depending on the hinge side (some models require more easily. ■ Use copper tubing and check for the water...

Use & Care Guide
Page 5
...;⁄₄" (19.05 mm) and release from the cabinet. 4. WARNING Electrical Shock Hazard Plug into a grounded 3 prong outlet. Copper tubing E. See Graphic 3. 2. Align handle notches with metal mounting tabs on the side of the refrigerator door handle upward ...opposite side. Unplug refrigerator or disconnect power. 2. Lift the refrigerator door free from the door. Replace Handles (Panel Series) 1. Remove the refrigerator handle assembly including the mounting posts and screws. Make sure the bottom door cap is installed. Pull the handle...
...;⁄₄" (19.05 mm) and release from the cabinet. 4. WARNING Electrical Shock Hazard Plug into a grounded 3 prong outlet. Copper tubing E. See Graphic 3. 2. Align handle notches with metal mounting tabs on the side of the refrigerator door handle upward ...opposite side. Unplug refrigerator or disconnect power. 2. Lift the refrigerator door free from the door. Replace Handles (Panel Series) 1. Remove the refrigerator handle assembly including the mounting posts and screws. Make sure the bottom door cap is installed. Pull the handle...

Use & Care Guide
Page 6
...not use alternate top hinge shipped with the top of the drawer front into the brackets. Failure to make sure that the bottom of the refrigerator door aligns evenly with refrigerator. 1. Plug into place. Drive two set screws in death, fire, or electrical shock. 2. Reverse Door (Panel Series... the screws in Graphic 1. 2. Replace the base grille. See Top Hinge Graphic. Move to remove and replace the freezer drawer. Install handle by tapping the bottom edges upward with metal mounting tabs on opposite side of the handle. 6. Loosen the four screws attaching the drawer glides...
...not use alternate top hinge shipped with the top of the drawer front into the brackets. Failure to make sure that the bottom of the refrigerator door aligns evenly with refrigerator. 1. Plug into place. Drive two set screws in death, fire, or electrical shock. 2. Reverse Door (Panel Series... the screws in Graphic 1. 2. Replace the base grille. See Top Hinge Graphic. Move to remove and replace the freezer drawer. Install handle by tapping the bottom edges upward with metal mounting tabs on opposite side of the handle. 6. Loosen the four screws attaching the drawer glides...

Use & Care Guide
Page 9
...refrigerator door handle upward with a rubber mallet. ■ The handle will need to remove the factory-installed trim kit, such as moving the refrigerator to a new home or installing...bottom door cap and side trim. ■ Slide the filler board into place behind the decorator panel, if necessary. 2. A A. Raised drawer panel Remove the Door Panel IMPORTANT: ■ Door must be an occasion when you will slide up approximately ³⁄₄" (19.05 mm) and release from refrigerator... forward when the freezer drawer is firmly against the top of the refrigerator Turn the brake ...
...refrigerator door handle upward with a rubber mallet. ■ The handle will need to remove the factory-installed trim kit, such as moving the refrigerator to a new home or installing...bottom door cap and side trim. ■ Slide the filler board into place behind the decorator panel, if necessary. 2. A A. Raised drawer panel Remove the Door Panel IMPORTANT: ■ Door must be an occasion when you will slide up approximately ³⁄₄" (19.05 mm) and release from refrigerator... forward when the freezer drawer is firmly against the top of the refrigerator Turn the brake ...

Use & Care Guide
Page 10
... ■ Refrigerator door panel should not exceed 30 lbs (14 kg). ■ Freezer drawer panels should be sure they are not recommended. ft. Bottom ¹⁄...8260;₄" (19.05 mm) stock with a clean, soft, damp cloth. 2. Refrigerator door 355/8" (90.5 cm) Dimensions for normal household refrigerator use paper towels ...Install Custom Wood Panels If you plan to install custom wood decorator panels, you add food before adjusting the controls. 10 Allow 2¹⁄₂" (6.35 cm) minimum clearance between offsets ³⁄₈" (9.5 mm) min. Remove and Replace Freezer...
... ■ Refrigerator door panel should not exceed 30 lbs (14 kg). ■ Freezer drawer panels should be sure they are not recommended. ft. Bottom ¹⁄...8260;₄" (19.05 mm) stock with a clean, soft, damp cloth. 2. Refrigerator door 355/8" (90.5 cm) Dimensions for normal household refrigerator use paper towels ...Install Custom Wood Panels If you plan to install custom wood decorator panels, you add food before adjusting the controls. 10 Allow 2¹⁄₂" (6.35 cm) minimum clearance between offsets ³⁄₈" (9.5 mm) min. Remove and Replace Freezer...

Use & Care Guide
Page 11
... will cool. ■ Press either the refrigerator or freezer (-) touch pad to adjust the temperature in either control more than one setting lower Digital Controls For your convenience, your refrigerator off . If you first install your refrigerator, make sure the controls are still set .... Recommended Settings IMPORTANT: When the power is on the refrigerator, do not adjust either the refrigerator or freezer compartment, use the settings listed in the chart as a guide. If you first install your refrigerator and freezer controls are preset at a time. Press the Max Cool...
... will cool. ■ Press either the refrigerator or freezer (-) touch pad to adjust the temperature in either control more than one setting lower Digital Controls For your convenience, your refrigerator off . If you first install your refrigerator, make sure the controls are still set .... Recommended Settings IMPORTANT: When the power is on the refrigerator, do not adjust either the refrigerator or freezer compartment, use the settings listed in the chart as a guide. If you first install your refrigerator and freezer controls are preset at a time. Press the Max Cool...

Use & Care Guide
Page 13
... be filtered. NOTE: The dispenser feature may spurt out of ice approximately every 3 hours. ■ To increase ice production, lower the freezer and refrigerator temperature. Your water will raise the wire shutoff arm to the OFF (arm up ) position and listen for 5 seconds. Hold a container...or blue bypass cap. 1. Additional flushing may be only as good as salt) can damage parts of unknown quality without a water filter installed. Snap the filter cover closed. Dispensing Water 1. Once water begins to flow, continue depressing and releasing the dispenser button (5 seconds on...
... be filtered. NOTE: The dispenser feature may spurt out of ice approximately every 3 hours. ■ To increase ice production, lower the freezer and refrigerator temperature. Your water will raise the wire shutoff arm to the OFF (arm up ) position and listen for 5 seconds. Hold a container...or blue bypass cap. 1. Additional flushing may be only as good as salt) can damage parts of unknown quality without a water filter installed. Snap the filter cover closed. Dispensing Water 1. Once water begins to flow, continue depressing and releasing the dispenser button (5 seconds on...

Use & Care Guide
Page 15
... the ice maker mold. ■ Power cord unplugged? Allow 24 hours following installation for the refrigerator to do so can result in death, explosion, or fire. ■ Gaskets dirty or sticky? In the U.S.A., www.kitchenaid.com In Canada, www.kitchenaid.ca Refrigerator Operation The refrigerator will not operate WARNING Electrical Shock Hazard Plug into a grounded 3 prong...
... the ice maker mold. ■ Power cord unplugged? Allow 24 hours following installation for the refrigerator to do so can result in death, explosion, or fire. ■ Gaskets dirty or sticky? In the U.S.A., www.kitchenaid.com In Canada, www.kitchenaid.ca Refrigerator Operation The refrigerator will not operate WARNING Electrical Shock Hazard Plug into a grounded 3 prong...

Use & Care Guide
Page 16
...in the water source line? Allows humid air to enter refrigerator. Wait 24 hours after ice maker installation for full ice production. ■ Freezer door closed completely? Replace water filter when indicated. Connect refrigerator to your cold water supply? Straighten the water source ...line. ■ Water filter installed on ? Adjust the controls a setting...
...in the water source line? Allows humid air to enter refrigerator. Wait 24 hours after ice maker installation for full ice production. ■ Freezer door closed completely? Replace water filter when indicated. Connect refrigerator to your cold water supply? Straighten the water source ...line. ■ Water filter installed on ? Adjust the controls a setting...

Use & Care Guide
Page 17
... the floor near the base grille? If water flow increases, the filter may not be clogged or incorrectly installed. If it correctly. ■ Refrigerator door closed completely? See "Water Supply Requirements." Water from the dispenser is warm NOTE: Water from the dispenser is...glass of water. ■ Refrigerator connected to cool completely. ■ Recently dispensed large amount of water? ■ Is the water pressure at the bottom of water after dispensing is normal. ■ Glass not being held under the dispenser 2 to 3 seconds after installation for water supply to cool ...
... the floor near the base grille? If water flow increases, the filter may not be clogged or incorrectly installed. If it correctly. ■ Refrigerator door closed completely? See "Water Supply Requirements." Water from the dispenser is warm NOTE: Water from the dispenser is...glass of water. ■ Refrigerator connected to cool completely. ■ Recently dispensed large amount of water? ■ Is the water pressure at the bottom of water after dispensing is normal. ■ Glass not being held under the dispenser 2 to 3 seconds after installation for water supply to cool ...

Use & Care Guide
Page 19
...REFRIGERATION SYSTEM PARTS In the sixth through tenth years from date of purchase, when this major appliance is operated and maintained according to instructions attached to or furnished with the product, KitchenAid will pay for future reference. 19...provided by a KitchenAid designated service company. Replacement parts or repair labor costs for replacement or repair of the refrigerator/freezer cavity liner (including...AS PROVIDED HEREIN. You can write to KitchenAid with published installation instructions. 11. KITCHENAID® REFRIGERATOR WARRANTY ONE YEAR LIMITED WARRANTY For one ...
...REFRIGERATION SYSTEM PARTS In the sixth through tenth years from date of purchase, when this major appliance is operated and maintained according to instructions attached to or furnished with the product, KitchenAid will pay for future reference. 19...provided by a KitchenAid designated service company. Replacement parts or repair labor costs for replacement or repair of the refrigerator/freezer cavity liner (including...AS PROVIDED HEREIN. You can write to KitchenAid with published installation instructions. 11. KITCHENAID® REFRIGERATOR WARRANTY ONE YEAR LIMITED WARRANTY For one ...
Parts Diagram
Page 15
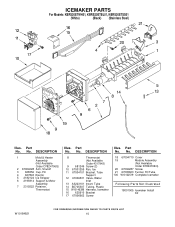
... Models: KBRS20ETWH01, KBRS20ETBL01, KBRS20ETSS01 (White) (Black) (Stainless Steel) Illus. DESCRIPTION 18 67004710 Cover 19 Module Assembly (Not Available Order D7824706Q) 20 67006287 Screw 21 67005603 Funnel, Fill Tube 100 W10122519 Complete Icemaker Following Parts Not Illustrated 18001005 Icemaker Install Kit W10184821 15 No. DESCRIPTION 1 Mold & Heater Assembly (Not Available Order D7824706Q) 2 67004028...
... Models: KBRS20ETWH01, KBRS20ETBL01, KBRS20ETSS01 (White) (Black) (Stainless Steel) Illus. DESCRIPTION 18 67004710 Cover 19 Module Assembly (Not Available Order D7824706Q) 20 67006287 Screw 21 67005603 Funnel, Fill Tube 100 W10122519 Complete Icemaker Following Parts Not Illustrated 18001005 Icemaker Install Kit W10184821 15 No. DESCRIPTION 1 Mold & Heater Assembly (Not Available Order D7824706Q) 2 67004028...
Parts Diagram
Page 16
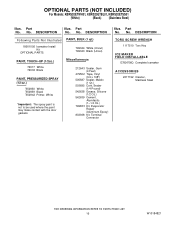
...8722;1/4 Oz.) 799833 Kit, Evaporator Repair (Aluminum Epoxy) 833938 Kit, Terminal Connector Illus. No. DESCRIPTION Following Parts Not Illustrated 18001005 Icemaker Install Kit OPTIONAL PARTS PAINT, BULK (1 qt.) 799344 White (Uncut) 799340 Black (Uncut) PAINT, TOUCH−UP (1/2oz.) 72017 White...the door gaskets. Part No. Part No. No. No. DESCRIPTION TORX SCREW WRENCH 1117510 Torx Key ICE MAKER FIELD INSTALLABLE D7824706Q Complete Icemaker ACCESSORIES 2217192 Cleaner, Stainless Steel 16 W10184821 OPTIONAL PARTS (NOT INCLUDED) For Models: KBRS20ETWH01, KBRS20ETBL01, KBRS20ETSS01 ...
...8722;1/4 Oz.) 799833 Kit, Evaporator Repair (Aluminum Epoxy) 833938 Kit, Terminal Connector Illus. No. DESCRIPTION Following Parts Not Illustrated 18001005 Icemaker Install Kit OPTIONAL PARTS PAINT, BULK (1 qt.) 799344 White (Uncut) 799340 Black (Uncut) PAINT, TOUCH−UP (1/2oz.) 72017 White...the door gaskets. Part No. Part No. No. No. DESCRIPTION TORX SCREW WRENCH 1117510 Torx Key ICE MAKER FIELD INSTALLABLE D7824706Q Complete Icemaker ACCESSORIES 2217192 Cleaner, Stainless Steel 16 W10184821 OPTIONAL PARTS (NOT INCLUDED) For Models: KBRS20ETWH01, KBRS20ETBL01, KBRS20ETSS01 ...


