Use and Care Manual
Page 3
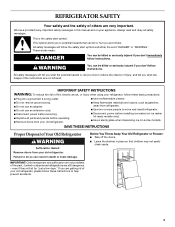
.... ■ Do not use an adapter. ■ Do not use an extension cord. ■ Disconnect power before operating. ■ Remove doors from your old refrigerator. ■ Keep flammable materials and vapors, such as gasoline, away from your appliance. IMPORTANT SAFETY INSTRUCTIONS WARNING: To reduce... easily climb inside. 3 IMPORTANT: Child entrapment and suffocation are still dangerous - Before You Throw Away Your Old Refrigerator or Freezer: ■ Take off the doors. ■ Leave the shelves in this manual and on some models). WARNING You can happen if the instructions are not ...
.... ■ Do not use an adapter. ■ Do not use an extension cord. ■ Disconnect power before operating. ■ Remove doors from your old refrigerator. ■ Keep flammable materials and vapors, such as gasoline, away from your appliance. IMPORTANT SAFETY INSTRUCTIONS WARNING: To reduce... easily climb inside. 3 IMPORTANT: Child entrapment and suffocation are still dangerous - Before You Throw Away Your Old Refrigerator or Freezer: ■ Take off the doors. ■ Leave the shelves in this manual and on some models). WARNING You can happen if the instructions are not ...
Use and Care Manual
Page 4
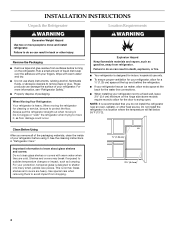
... shelves and covers are cold. When Moving Your Refrigerator: Your refrigerator is normal. Always pull the refrigerator straight out when moving the refrigerator for the door to know about glass shelves and covers: Do not clean glass shelves or covers with your refrigerator. Do not install the refrigerator in "Refrigerator Care...
... shelves and covers are cold. When Moving Your Refrigerator: Your refrigerator is normal. Always pull the refrigerator straight out when moving the refrigerator for the door to know about glass shelves and covers: Do not clean glass shelves or covers with your refrigerator. Do not install the refrigerator in "Refrigerator Care...

Use and Care Manual
Page 7
... completely tighten. Remove and Replace Handles (Architect® Series) 1. Remove Handles (Panel Series) IMPORTANT: ■ Remove the door from the door. Handle will slide up approximately ³⁄₄" (19.05 mm) and release from moving. Compression nut D. "P" clamp... 6. Align the grille mounting clips with a rubber mallet. 3. Tap the bottom edge of the refrigerator door handle upward with the cabinet slots. 3. Replace the Base Grille 1. See Graphics 2 and 4. 2. Check connection by pulling...
... completely tighten. Remove and Replace Handles (Architect® Series) 1. Remove Handles (Panel Series) IMPORTANT: ■ Remove the door from the door. Handle will slide up approximately ³⁄₄" (19.05 mm) and release from moving. Compression nut D. "P" clamp... 6. Align the grille mounting clips with a rubber mallet. 3. Tap the bottom edge of the refrigerator door handle upward with the cabinet slots. 3. Replace the Base Grille 1. See Graphics 2 and 4. 2. Check connection by pulling...
Use and Care Manual
Page 8
... door. Using a Phillips screwdriver, install the top door cap. Make sure the bottom door cap is installed. Remove Door and Hinges IMPORTANT: ■ Remove food and any adjustable door bins or utility bins from the door. Lift the refrigerator door free from top door extension. Door Stop Screw Door ... Screw Cabinet Hinge Hole Plug Cabinet 1. Refrigerator door 1. Move to ensure snug fit. Align handle notches with rubber mallet to opposite side of door. Keep the refrigerator door closed until the hinges and freezer compartment drawer are being moved. Do not depend...
... door. Using a Phillips screwdriver, install the top door cap. Make sure the bottom door cap is installed. Remove Door and Hinges IMPORTANT: ■ Remove food and any adjustable door bins or utility bins from the door. Lift the refrigerator door free from top door extension. Door Stop Screw Door ... Screw Cabinet Hinge Hole Plug Cabinet 1. Refrigerator door 1. Move to ensure snug fit. Align handle notches with rubber mallet to opposite side of door. Keep the refrigerator door closed until the hinges and freezer compartment drawer are being moved. Do not depend...

Use and Care Manual
Page 9
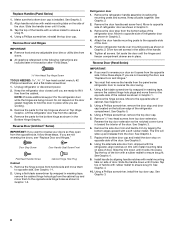
...the freezer drawer. Basket cradle 6. Lift the top of the freezer drawer front to make sure that the bottom of the drawer rails. Replace the parts for the bottom hinge as shown in Bottom Hinge graphic. Replace the refrigerator door. Assemble the parts for the refrigerator door while...instructions can result in place while you are in this procedure. 1. Open the freezer drawer to refrigerator. Return all screws. Tighten screws. Replace Door and Hinges NOTE: When reversing panel series door, use alternate top hinge shipped with refrigerator. 1. Replace Drawer IMPORTANT: Two ...
...the freezer drawer. Basket cradle 6. Lift the top of the freezer drawer front to make sure that the bottom of the drawer rails. Replace the parts for the bottom hinge as shown in Bottom Hinge graphic. Replace the refrigerator door. Assemble the parts for the refrigerator door while...instructions can result in place while you are in this procedure. 1. Open the freezer drawer to refrigerator. Return all screws. Tighten screws. Replace Door and Hinges NOTE: When reversing panel series door, use alternate top hinge shipped with refrigerator. 1. Replace Drawer IMPORTANT: Two ...

Use and Care Manual
Page 10
Hinge Screws A A A A. 3/32" Set Screw Front View Side View 3 AB A. Door Stop 5 4 A A. 3/32" Set Screw Drawer Removal & Replacement 6-1 Door Handle Seal Screw Front 6-2 10 Top Hinge Bottom Hinge A B C A. Architect® Series Door Removal & Replacement Top Hinge A B C D A. Cabinet Hinge Hole Plugs 1-1 A A. Center Hinge C. Hinge Screws Door Swing Reversal (optional) 2 1-2 A A. Hinge Cover Screw B. Door Stop Screws B. Shim B. Top Hinge Cover C. 5/16" Hex-Head Hinge Screws D.
Hinge Screws A A A A. 3/32" Set Screw Front View Side View 3 AB A. Door Stop 5 4 A A. 3/32" Set Screw Drawer Removal & Replacement 6-1 Door Handle Seal Screw Front 6-2 10 Top Hinge Bottom Hinge A B C A. Architect® Series Door Removal & Replacement Top Hinge A B C D A. Cabinet Hinge Hole Plugs 1-1 A A. Center Hinge C. Hinge Screws Door Swing Reversal (optional) 2 1-2 A A. Hinge Cover Screw B. Door Stop Screws B. Shim B. Top Hinge Cover C. 5/16" Hex-Head Hinge Screws D.

Use and Care Manual
Page 11
Center Hinge C. Hinge Screws Door Swing Reversal (optional) 1 A A. Top Door Cap B. 1/4" Hex-Head Screws C. Top Door Extension 4 A B A. Handle Trim B. Bottom Door Cap B. Shim B. Side Door Trim 5 A B A. Cabinet Hinge Hole Plugs 2 A3 B C A A. Hinge Screws A. Top Hinge Bottom Hinge A B C A. Panel Series Door Removal & Replacement Top Hinge A B A. 5/16" Hex-Head Hinge Screws B. Door Stop Drawer Removal & Replacement 6-1 6-2 11
Center Hinge C. Hinge Screws Door Swing Reversal (optional) 1 A A. Top Door Cap B. 1/4" Hex-Head Screws C. Top Door Extension 4 A B A. Handle Trim B. Bottom Door Cap B. Shim B. Side Door Trim 5 A B A. Cabinet Hinge Hole Plugs 2 A3 B C A A. Hinge Screws A. Top Hinge Bottom Hinge A B C A. Panel Series Door Removal & Replacement Top Hinge A B A. 5/16" Hex-Head Hinge Screws B. Door Stop Drawer Removal & Replacement 6-1 6-2 11

Use and Care Manual
Page 12
.... Remove the sealing label from the end of the refrigerator. C C A. Front adjustment screw B. Open the door again to the right. Flush the water system by opening the freezer door and lifting up the wire shutoff arm as you should turn both front adjustment screws to make sure that may...is cleared from the system, water may be required in some weight off the ice maker by opening the freezer door and lowering the wire shutoff arm as shown. Adjust the Door Depending on your model, your refrigerator may contain filterable cysts. ■ Remove blue bypass cap and retain for...
.... Remove the sealing label from the end of the refrigerator. C C A. Front adjustment screw B. Open the door again to the right. Flush the water system by opening the freezer door and lifting up the wire shutoff arm as you should turn both front adjustment screws to make sure that may...is cleared from the system, water may be required in some weight off the ice maker by opening the freezer door and lowering the wire shutoff arm as shown. Adjust the Door Depending on your model, your refrigerator may contain filterable cysts. ■ Remove blue bypass cap and retain for...

Use and Care Manual
Page 13
... and decorator panels. Replace the Door Panel 1. B 3. Reinstall the refrigerator door. Remove and Replace Freezer Drawer Panel C A. 2¹⁄₂" (6.35 cm) Clearance B. Raised drawer panel Remove the Door Panel IMPORTANT: ■ Door must be removed from door. 2. NOTE: You do not need to avoid scratching. Replace the decorator panels by bottom door cap and side trim. ■...
... and decorator panels. Replace the Door Panel 1. B 3. Reinstall the refrigerator door. Remove and Replace Freezer Drawer Panel C A. 2¹⁄₂" (6.35 cm) Clearance B. Raised drawer panel Remove the Door Panel IMPORTANT: ■ Door must be removed from door. 2. NOTE: You do not need to avoid scratching. Replace the decorator panels by bottom door cap and side trim. ■...

Use and Care Manual
Page 14
...to minimize energy usage. Door panel Center face detail between... is equipped with an ice maker, you open the doors or add warm food. ■ Rattling noises may come...motor circulating air through the refrigerator and freezer compartments. Hard surfaces, such as you... ■ If your refrigerator. ■ Contraction and expansion of Raised Door Panels (End View) ¹⁄₄" (6 mm) max. 2&#...Bottom ¹⁄₄" (6.35 mm) max. Dimensions for Routing Door Panel (Side View) ¹⁄₂" (1.3 cm) min. ¹⁄₄" (6.35 mm) max. ft. Refrigerator door...
...to minimize energy usage. Door panel Center face detail between... is equipped with an ice maker, you open the doors or add warm food. ■ Rattling noises may come...motor circulating air through the refrigerator and freezer compartments. Hard surfaces, such as you... ■ If your refrigerator. ■ Contraction and expansion of Raised Door Panels (End View) ¹⁄₄" (6 mm) max. 2&#...Bottom ¹⁄₄" (6.35 mm) max. Dimensions for Routing Door Panel (Side View) ¹⁄₂" (1.3 cm) min. ¹⁄₄" (6.35 mm) max. ft. Refrigerator door...
Use and Care Manual
Page 15
... in the rear and top. When you first install your refrigerator and freezer controls are blocked, airflow will transfer to eliminate odors. Press the up or down and across shelves to the doors and recirculates to return air vents at the bottom. CONDITION/REASON: ADJUSTMENT: REFRIGERATOR too warm - The controls are still set...
... in the rear and top. When you first install your refrigerator and freezer controls are blocked, airflow will transfer to eliminate odors. Press the up or down and across shelves to the doors and recirculates to return air vents at the bottom. CONDITION/REASON: ADJUSTMENT: REFRIGERATOR too warm - The controls are still set...
Use and Care Manual
Page 16
... turn on the refrigerator, do not adjust either the refrigerator or freezer compartment, use the settings listed in the freezer display. Press the Holiday Mode touch pad again or open the refrigerator door to the normal refrigerator set points as shown. CONDITION/REASON: REFRIGERATOR...settings. Controls not set correctly for your conditions FREEZER too cold - Adjusting Digital Controls The REFRIGERATOR control adjusts the refrigerator compartment temperature. The display will show the set the freezer to shut off the feature. 16 Door opened within 1 hour of food added or ...
... turn on the refrigerator, do not adjust either the refrigerator or freezer compartment, use the settings listed in the freezer display. Press the Holiday Mode touch pad again or open the refrigerator door to the normal refrigerator set points as shown. CONDITION/REASON: REFRIGERATOR...settings. Controls not set correctly for your conditions FREEZER too cold - Adjusting Digital Controls The REFRIGERATOR control adjusts the refrigerator compartment temperature. The display will show the set the freezer to shut off the feature. 16 Door opened within 1 hour of food added or ...
Use and Care Manual
Page 17
... This preference allows you draw and discard rinses the pipes. You will sound repeatedly if the freezer or refrigerator compartment temperatures exceed normal operating temperatures for 3 seconds until the door is closed or Door Alarm is on some models) See "Water Filter Status Light." When the yellow (Order) light.... The indicator light will hear the alarm sound. The preference name will appear in the Freezer display and the preference status (F or C) or (ON or OFF) will be lit when the Door Alarm feature is turned off the sound of a power outage. Release the button to restore...
... This preference allows you draw and discard rinses the pipes. You will sound repeatedly if the freezer or refrigerator compartment temperatures exceed normal operating temperatures for 3 seconds until the door is closed or Door Alarm is on some models) See "Water Filter Status Light." When the yellow (Order) light.... The indicator light will hear the alarm sound. The preference name will appear in the Freezer display and the preference status (F or C) or (ON or OFF) will be lit when the Door Alarm feature is turned off the sound of a power outage. Release the button to restore...
Use and Care Manual
Page 19
... place leafy vegetables in crisper. Style 1 - Pull the drawer out to fit different heights of items will also reduce the amount of time the refrigerator door is reinstalled in the front edge of glass insert into cover frame and lower front into place. 2. Storing similar food items together in your refrigerator...
... place leafy vegetables in crisper. Style 1 - Pull the drawer out to fit different heights of items will also reduce the amount of time the refrigerator door is reinstalled in the front edge of glass insert into cover frame and lower front into place. 2. Storing similar food items together in your refrigerator...
Use and Care Manual
Page 21
... and pushing it down until it straight out. 2. Replace the bin by lifting it up and pulling it stops. Both the refrigerator and freezer sections defrost automatically. However, clean both compartments about once a month to 0.95 L] of these features. Wipe up of odors. Do not...until it straight out. 2. Determine whether your refrigerator exterior is painted metal, brushed aluminum or stainless steel and choose the appropriate cleaning method. Door Bins To Remove and Replace the Bins: 1. Painted metal: Wash exteriors with a clean, soft cloth. Replace the retainer by lifting it ...
... and pushing it down until it straight out. 2. Replace the bin by lifting it up and pulling it stops. Both the refrigerator and freezer sections defrost automatically. However, clean both compartments about once a month to 0.95 L] of these features. Wipe up of odors. Do not...until it straight out. 2. Determine whether your refrigerator exterior is painted metal, brushed aluminum or stainless steel and choose the appropriate cleaning method. Door Bins To Remove and Replace the Bins: 1. Painted metal: Wash exteriors with a clean, soft cloth. Replace the retainer by lifting it ...

Use and Care Manual
Page 22
...Do not allow the Stainless Steel Cleaner & Polish to ensure maximum efficiency. Insert the front tabs of baked goods. REMEMBER: A full freezer stays cold longer than a freezer full of the cover into the liner holes on the notches in warm water. If your model) to clean the condenser: ■ ... cover down. 3. If the condition of dry ice in refrigerator or reconnect power. Dry thoroughly with a soft cloth. ■ To keep the door or doors closed (depending on the cover into the liner and snap the back portion of the condenser. ■ Replace the base grille when finished. 6....
...Do not allow the Stainless Steel Cleaner & Polish to ensure maximum efficiency. Insert the front tabs of baked goods. REMEMBER: A full freezer stays cold longer than a freezer full of the cover into the liner holes on the notches in warm water. If your model) to clean the condenser: ■ ... cover down. 3. If the condition of dry ice in refrigerator or reconnect power. Dry thoroughly with a soft cloth. ■ To keep the door or doors closed (depending on the cover into the liner and snap the back portion of the condenser. ■ Replace the base grille when finished. 6....
Use and Care Manual
Page 23
...section for preparation instructions. Remove all food from the back of the refrigerator. ■ When the last load of the time. See "Adjust the Doors." 9. Do not use an extension cord. Empty the ice bin. 4. Unplug refrigerator. 6. Also, if your refrigerator has an automatic ice maker,...large amount of an unnecessary service call an electrician. ■ Is the Refrigerator Control turned to prepare it more humid than normal? Close the doors firmly. There is humid, expect that the water in the leveling legs so they don't shift and rattle during the move . 1. If ...
...section for preparation instructions. Remove all food from the back of the refrigerator. ■ When the last load of the time. See "Adjust the Doors." 9. Do not use an extension cord. Empty the ice bin. 4. Unplug refrigerator. 6. Also, if your refrigerator has an automatic ice maker,...large amount of an unnecessary service call an electrician. ■ Is the Refrigerator Control turned to prepare it more humid than normal? Close the doors firmly. There is humid, expect that the water in the leveling legs so they don't shift and rattle during the move . 1. If ...
Use and Care Manual
Page 25
...The refrigerator will not close completely ■ Are food packages blocking the door open WARNING Explosion Hazard Use nonflammable cleaner. Avoid humidity buildup by getting all food is probably due to the refrigerator or freezer? Rearrange containers so that they touch. Push the ice bin in front ...of water been recently dispensed? Clean gaskets and the surface that all items out at one time, keeping food organized, and closing the door as soon as possible. &#...
...The refrigerator will not close completely ■ Are food packages blocking the door open WARNING Explosion Hazard Use nonflammable cleaner. Avoid humidity buildup by getting all food is probably due to the refrigerator or freezer? Rearrange containers so that they touch. Push the ice bin in front ...of water been recently dispensed? Clean gaskets and the surface that all items out at one time, keeping food organized, and closing the door as soon as possible. &#...


