
Use & Care Guide
Page 3
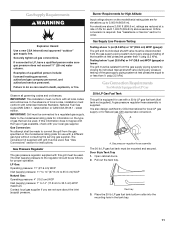
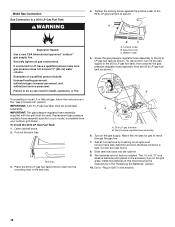
... for outdoor use only. WARNING You can be a T-handle type. ■ A flexible gas connector, when used at elevations above 2000 ft (609.6 m) orifice conversion is the responsibility of the grill. 3 Extinguish any other flammable liquids or vapors in this manual and on the model/serial ...rating plate. Always read and obey all safety messages. Shut off gas to potential hazards that are very important. Open lid. ...
... for outdoor use only. WARNING You can be a T-handle type. ■ A flexible gas connector, when used at elevations above 2000 ft (609.6 m) orifice conversion is the responsibility of the grill. 3 Extinguish any other flammable liquids or vapors in this manual and on the model/serial ...rating plate. Always read and obey all safety messages. Shut off gas to potential hazards that are very important. Open lid. ...
Use & Care Guide
Page 5
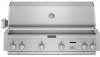
...500 mAmp transformer assembly for the rotisserie motor ■ 1 single-prong plug/5,000 mAmp transformer assembly for the grill (power supply) ■ Convertible regulator set for 4" WCP Natural gas ■ 1 single-prong plug/500 mAmp transformer assembly for the rotisserie motor (on some models) ■ ...models) Parts Needed ■ Gas line shutoff valve ■ ½" male pipe thread nipple for Natural gas ■ LP gas fuel tank tray ■ 1.5 V "D" size alkaline batteries ■ Vinyl grill cover Parts Needed - 20 lb LP gas models ■ 20 lb LP gas fuel tank - Read and ...
...500 mAmp transformer assembly for the rotisserie motor ■ 1 single-prong plug/5,000 mAmp transformer assembly for the grill (power supply) ■ Convertible regulator set for 4" WCP Natural gas ■ 1 single-prong plug/500 mAmp transformer assembly for the rotisserie motor (on some models) ■ ...models) Parts Needed ■ Gas line shutoff valve ■ ½" male pipe thread nipple for Natural gas ■ LP gas fuel tank tray ■ 1.5 V "D" size alkaline batteries ■ Vinyl grill cover Parts Needed - 20 lb LP gas models ■ 20 lb LP gas fuel tank - Read and ...
Use & Care Guide
Page 7
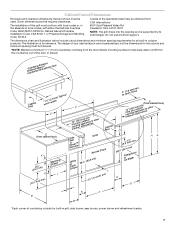
... that are shown must conform with local codes or, in the absence of local codes, with either the National Fuel Gas Code, ANSI Z223.1/NPFA 54, Natural Gas and Propane Installation Code, CSA B149.1, or Propane Storage and Handling Code, B149.2. other D (3.8 c1m¹⁄...8328;" (53.0 cm) L 2¹⁄₂" (6.4 cm) min. 3" to help keep water runoff from the countertop out of this grill must be obtained from the door/drawer mounting surface to o(7p.e6ncmho)omdin. The installation of the door or drawer. *bcOoevtuwenretheearntnoegpddgaiensdtoafcnacbeinet face CFaacbeinet *...
... that are shown must conform with local codes or, in the absence of local codes, with either the National Fuel Gas Code, ANSI Z223.1/NPFA 54, Natural Gas and Propane Installation Code, CSA B149.1, or Propane Storage and Handling Code, B149.2. other D (3.8 c1m¹⁄...8328;" (53.0 cm) L 2¹⁄₂" (6.4 cm) min. 3" to help keep water runoff from the countertop out of this grill must be obtained from the door/drawer mounting surface to o(7p.e6ncmho)omdin. The installation of the door or drawer. *bcOoevtuwenretheearntnoegpddgaiensdtoafcnacbeinet face CFaacbeinet *...

Use & Care Guide
Page 9
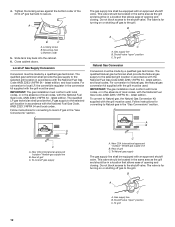
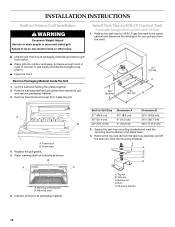
... H 24" (61.0 cm) 35¼" (89.5 cm) Cutout Dimensions - ventilation both sides 5" (12.7 cm) max. 5" (12.7 cm) max. 9 Built-in Outdoor Grill Enclosure Ventilation for LP Gas: An enclosure for mounting the optional door or drawers. One ventilation opening within 1" (2.5 cm) of the bottom of the enclosure and the bottom...the top is to be a minimum of 20 in .2 (129.0 cm2) min. If converting to LP gas, these vents are to be in the enclosure: An enclosure for use with an LP gas fuel tank for mounting the optional door or drawers. ventilation both sides 1" (2.5 cm) max. 10 in ...
... H 24" (61.0 cm) 35¼" (89.5 cm) Cutout Dimensions - ventilation both sides 5" (12.7 cm) max. 5" (12.7 cm) max. 9 Built-in Outdoor Grill Enclosure Ventilation for LP Gas: An enclosure for mounting the optional door or drawers. One ventilation opening within 1" (2.5 cm) of the bottom of the enclosure and the bottom...the top is to be a minimum of 20 in .2 (129.0 cm2) min. If converting to LP gas, these vents are to be in the enclosure: An enclosure for use with an LP gas fuel tank for mounting the optional door or drawers. ventilation both sides 1" (2.5 cm) max. 10 in ...
Use & Care Guide
Page 10
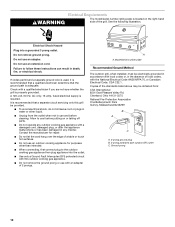
...a Ground Fault Interrupter (GFI) protected circuit with this grill be provided. ■ To avoid electrical shock, do not immerse cord or plugs in water or other than intended. ■ When connecting, first connect plug to the outdoor cooking gas appliance then plug appliance into a grounded 3 prong outlet...use with an adapter of the standards listed above may be electrically grounded in accordance with local codes or, in the absence of the grill. See the following illustration. Copies of 2 prongs. Do not use an extension cord. It is recommended that the ground path is ...
...a Ground Fault Interrupter (GFI) protected circuit with this grill be provided. ■ To avoid electrical shock, do not immerse cord or plugs in water or other than intended. ■ When connecting, first connect plug to the outdoor cooking gas appliance then plug appliance into a grounded 3 prong outlet...use with an adapter of the standards listed above may be electrically grounded in accordance with local codes or, in the absence of the grill. See the following illustration. Copies of 2 prongs. Do not use an extension cord. It is recommended that the ground path is ...
Use & Care Guide
Page 11
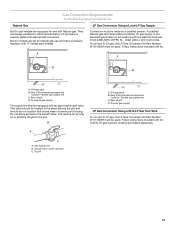
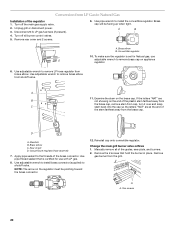
... codes, installation must conform with a different gas type without consulting the serving gas supplier. Contact local gas supplier if you are for LP Gas 20 lb LP Gas Fuel Tank This grill is required. Place the 20 lb LP gas fuel tank bottom collar into the mounting hole... psig (3.5 kPa). Securely tighten all gas connections. Examples of the gas supply piping system at test pressures equal to the model/serial rating plate for instructions. IMPORTANT: Grill must be used . Gas Pressure Regulator The gas pressure regulator supplied with grill must be used . See "Assistance or...
... codes, installation must conform with a different gas type without consulting the serving gas supplier. Contact local gas supplier if you are for LP Gas 20 lb LP Gas Fuel Tank This grill is required. Place the 20 lb LP gas fuel tank bottom collar into the mounting hole... psig (3.5 kPa). Securely tighten all gas connections. Examples of the gas supply piping system at test pressures equal to the model/serial rating plate for instructions. IMPORTANT: Grill must be used . Gas Pressure Regulator The gas pressure regulator supplied with grill must be used . See "Assistance or...
Use & Care Guide
Page 12
...or shutting off gas to the grill. To grill 12 A The gas supply line shall be used . The valve is for turning on or shutting off gas to the grill. Local LP Gas Supply Conversion Conversion must be made by a qualified gas technician. To grill Natural Gas Conversion Conversion must... be made by a qualified gas technician. Tighten the locking screw against ...
...or shutting off gas to the grill. To grill 12 A The gas supply line shall be used . The valve is for turning on or shutting off gas to the grill. Local LP Gas Supply Conversion Conversion must be made by a qualified gas technician. To grill Natural Gas Conversion Conversion must... be made by a qualified gas technician. Tighten the locking screw against ...
Use & Care Guide
Page 13
Conversion must be used . The valve is for LP (propane or butane) gases with Natural gas. Rear of grill D. A 20 lb LP gas fuel tank must be used . A qualified Natural gas technician shall provide the LP gas supply to the selected grill location in accordance with an approved shutoff valve. This valve should be located in the...
Conversion must be used . The valve is for LP (propane or butane) gases with Natural gas. Rear of grill D. A 20 lb LP gas fuel tank must be used . A qualified Natural gas technician shall provide the LP gas supply to the selected grill location in accordance with an approved shutoff valve. This valve should be located in the...
Use & Care Guide
Page 14
... other injury. Remove all packaging material. Remove warming shelf and grill grates from inside the grill and remove packaging material. 3. A B C D E A. Bolt E. Install Tank Tray for 20 lb LP Gas Fuel Tank For Models Equipped for your grill size from the tank tray assembly and lift the tank tray off...Cut the tiedowns holding the grates together. 2. Position the tank tray for 20 lb LP gas fuel tank in . ■ Open the hood. Remove the top nuts (4) from the chart. ■ Unpack grill. Place warming shelf on brackets as shown. Square the tank tray mounting brackets and mark...
... other injury. Remove all packaging material. Remove warming shelf and grill grates from inside the grill and remove packaging material. 3. A B C D E A. Bolt E. Install Tank Tray for 20 lb LP Gas Fuel Tank For Models Equipped for your grill size from the tank tray assembly and lift the tank tray off...Cut the tiedowns holding the grates together. 2. Position the tank tray for 20 lb LP gas fuel tank in . ■ Open the hood. Remove the top nuts (4) from the chart. ■ Unpack grill. Place warming shelf on brackets as shown. Square the tank tray mounting brackets and mark...

Use & Care Guide
Page 15
....) B. Mounting bracket 11 30 cm) 6" (15.2 cm) 21" (53.3 cm) for 48" (121.9 cm) doors 9" (22.9 cm) for 20 lb gas fuel tank C. Plug in the storage area under the grill is required to be plugged in and out without touching the cabinet door opening and is ¹⁄₈" (0.32 cm... or shelf (not supplied) that is large enough to keep a second 20 lb LP gas fuel tank from being stored in the electrical connector from the back of the grill to be adjusted so that the bottom of grill NOTE: These connectors must be loose. Tank tray for 36" (91.4 cm) doors 2⁵...
....) B. Mounting bracket 11 30 cm) 6" (15.2 cm) 21" (53.3 cm) for 48" (121.9 cm) doors 9" (22.9 cm) for 20 lb gas fuel tank C. Plug in the storage area under the grill is required to be plugged in and out without touching the cabinet door opening and is ¹⁄₈" (0.32 cm... or shelf (not supplied) that is large enough to keep a second 20 lb LP gas fuel tank from being stored in the electrical connector from the back of the grill to be adjusted so that the bottom of grill NOTE: These connectors must be loose. Tank tray for 36" (91.4 cm) doors 2⁵...
Use & Care Guide
Page 16
... solution. Failure to your outdoor grill dealer. Replacement gas pressure regulator/hose assembly specific to do so can result in the "Gas Conversions" section. Turn on the grill grate. Wait a few minutes for gas to the 20 lb LP gas fuel tank, then unscrew the gas pressure regulator/hose assembly from your... model, is available from the 20 lb LP gas fuel tank as shown. (To...
... solution. Failure to your outdoor grill dealer. Replacement gas pressure regulator/hose assembly specific to do so can result in the "Gas Conversions" section. Turn on the grill grate. Wait a few minutes for gas to the 20 lb LP gas fuel tank, then unscrew the gas pressure regulator/hose assembly from your... model, is available from the 20 lb LP gas fuel tank as shown. (To...

Use & Care Guide
Page 17
...International 8501 East Pleasant Valley Rd. Locate or build a noncombustible surface inside the island cabinet to the grill. NOTE: The cord must be to LP, have a qualified person make sure gas pressure does not exceed 11" (28 cm) water column. Du Pont De Nemours and Company. 17 ...installed. Single-prong plug 2. To Natural gas or Local LP gas supply †®TEFLON is parallel to Natural Gas or Local LP Gas WARNING 2. Gas Connection to the gas pipe. The valve is open when the handle is a registered trademark of the grill at this time following the instructions in...
...International 8501 East Pleasant Valley Rd. Locate or build a noncombustible surface inside the island cabinet to the grill. NOTE: The cord must be to LP, have a qualified person make sure gas pressure does not exceed 11" (28 cm) water column. Du Pont De Nemours and Company. 17 ...installed. Single-prong plug 2. To Natural gas or Local LP gas supply †®TEFLON is parallel to Natural Gas or Local LP Gas WARNING 2. Gas Connection to the gas pipe. The valve is open when the handle is a registered trademark of the grill at this time following the instructions in...

Use & Care Guide
Page 18
... (GFI) protected circuit with grills that are converted to disconnecting the electrical power. This kit is designed for conversion to 2000 ft elevation. For higher elevations contact KitchenAid at 1-800-422-1230 in water or other than intended. ■ When connecting, first connect plug to the outdoor cooking gas appliance then plug appliance...
... (GFI) protected circuit with grills that are converted to disconnecting the electrical power. This kit is designed for conversion to 2000 ft elevation. For higher elevations contact KitchenAid at 1-800-422-1230 in water or other than intended. ■ When connecting, first connect plug to the outdoor cooking gas appliance then plug appliance...

Use & Care Guide
Page 19
...brass cap on the convertible regulator. 6. Also record the conversion date and the technician/company that is certified for LP gas, use adjustable wrench to the grill. 3. Use pipe wrench to remove LP hose regulator from B the brass cap. Convertible regulator 10. Use adjustable ...be showing on the regulator must be facing up when tight. Bubbles will be a certified manual shutoff valve in the gas supply line near the grill for use with LP gas. 8. Unplug grill or disconnect power. 3. Brass cap will show a leak. A 11. C 12. Use adjustable wrench to install...
...brass cap on the convertible regulator. 6. Also record the conversion date and the technician/company that is certified for LP gas, use adjustable wrench to the grill. 3. Use pipe wrench to remove LP hose regulator from B the brass cap. Convertible regulator 10. Use adjustable ...be showing on the regulator must be facing up when tight. Bubbles will be a certified manual shutoff valve in the gas supply line near the grill for use with LP gas. 8. Unplug grill or disconnect power. 3. Brass cap will show a leak. A 11. C 12. Use adjustable wrench to install...
Use & Care Guide
Page 20
... use adjustable wrench to remove brass cap on the regulator must be facing up when tight. Unplug grill or disconnect power. 3. Use pipe wrench to remove brass elbow from shutoff valve. Convertible regulator 10. Gas pressure regulator/hose assembly 7. Use pipe thread sealant that hold the burner in place. A B A. Reinstall cap onto...
... use adjustable wrench to remove brass cap on the regulator must be facing up when tight. Unplug grill or disconnect power. 3. Use pipe wrench to remove brass elbow from shutoff valve. Convertible regulator 10. Gas pressure regulator/hose assembly 7. Use pipe thread sealant that hold the burner in place. A B A. Reinstall cap onto...
Use & Care Guide
Page 21
...brass orifice located at the back of the supply pipe. 4. Burner 6. A A. Two screws 3. Repeat the procedure for each grill burner. Change the Sear burner orifices (for each rear burner. Remove the burner igniter mounting screws. 21 Remove the access cover and...A. A Change the Rotisserie-infrared burner orifice(s) 1. Grill burner orifice 5. Spider guard B. Replace the spider guard and secure with this kit to the end of the gas valves. Install new 2.34 mm orifices supplied with the 2 screws removed in Step 2. 6. Reattach gas burner using 2 screws. 3. Use 6 mm socket...
...brass orifice located at the back of the supply pipe. 4. Burner 6. A A. Two screws 3. Repeat the procedure for each grill burner. Change the Sear burner orifices (for each rear burner. Remove the burner igniter mounting screws. 21 Remove the access cover and...A. A Change the Rotisserie-infrared burner orifice(s) 1. Grill burner orifice 5. Spider guard B. Replace the spider guard and secure with this kit to the end of the gas valves. Install new 2.34 mm orifices supplied with the 2 screws removed in Step 2. 6. Reattach gas burner using 2 screws. 3. Use 6 mm socket...
Use & Care Guide
Page 22
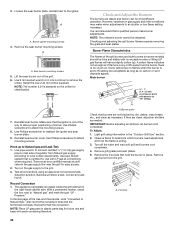
... the last page of the Use and Care Guide, write "Converted to allow proper positioning of burner. NOTE: Place LP gas parts in place. Light grill using an approved noncorrosive leakdetection solution. A A. 2 screws 22 Remove the sear burner mounting screws. Burner Flame Characteristics The ...2 screws that burners are acceptable as long as needed. Correct any leak found. Remove gas burner from the grill. Turn on all connections using information in the gas supply line near the grill for future use with burners on some models) should be blue and stable with pack...
... the last page of the Use and Care Guide, write "Converted to allow proper positioning of burner. NOTE: Place LP gas parts in place. Light grill using an approved noncorrosive leakdetection solution. A A. 2 screws 22 Remove the sear burner mounting screws. Burner Flame Characteristics The ...2 screws that burners are acceptable as long as needed. Correct any leak found. Remove gas burner from the grill. Turn on all connections using information in the gas supply line near the grill for future use with burners on some models) should be blue and stable with pack...
Use & Care Guide
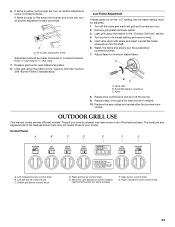
Page 23
...of the features listed. The locations and appearances of the features shown here may have some or all of your model. Electronic grill display (on some models) F. A A. Low Flame Adjustment If flame goes out on some models) Light switch button (on... away from ¹⁄₈" (3.2 mm) to minimum stable flame. Replace gas burner, sear plates and grates. 8. Turn off the burner. 9. Remove grill grates and sear plates. 3. Light grill using information in the "Outdoor Grill Use" section. 4. Watch the flame and slowly turn air shutter adjustment screw ...
...of the features listed. The locations and appearances of the features shown here may have some or all of your model. Electronic grill display (on some models) F. A A. Low Flame Adjustment If flame goes out on some models) Light switch button (on... away from ¹⁄₈" (3.2 mm) to minimum stable flame. Replace gas burner, sear plates and grates. 8. Turn off the burner. 9. Remove grill grates and sear plates. 3. Light grill using information in the "Outdoor Grill Use" section. 4. Watch the flame and slowly turn air shutter adjustment screw ...

Use & Care Guide
Page 24
... the set time ends, reminder tones will be used on medium or low settings because the gas consumption is used to start the timer countdown. Time set , press the Start/Reset button once to keep grill burning for Modes 1 and 2. When desired time is pushed to 12 hours and 59 minutes, then... or the Start/Reset button is set button E. "00:00" will appear in hours and minutes up or down depending on your 20 lb LP gas fuel tank is OFF. For grills connected to "Timer" mode. NOTE: The minute timer will default to local LP (fixed pipe) or natural...
... the set time ends, reminder tones will be used on medium or low settings because the gas consumption is used to start the timer countdown. Time set , press the Start/Reset button once to keep grill burning for Modes 1 and 2. When desired time is pushed to 12 hours and 59 minutes, then... or the Start/Reset button is set button E. "00:00" will appear in hours and minutes up or down depending on your 20 lb LP gas fuel tank is OFF. For grills connected to "Timer" mode. NOTE: The minute timer will default to local LP (fixed pipe) or natural...
Use & Care Guide
Page 25
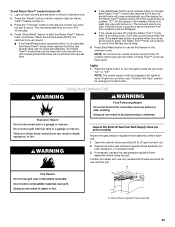
...fire. Do not store combustible materials near combustible materials. Press Start/Reset button to turn the lights inside the grill hood "On" or "Off." A Fire Hazard Do not use . 1. Gas pressure regulator/hose assembly 25 Light all main burners and set them on . 3. NOTE: All of time... must be off position before or after a Flame Time™ cycle has been used. If necessary, replace the gas pressure regulator/hose assembly before each use grill near grill. The Flame Time™ mode timer can be appear in a garage or indoors. The tone will be turned ...
...fire. Do not store combustible materials near combustible materials. Press Start/Reset button to turn the lights inside the grill hood "On" or "Off." A Fire Hazard Do not use . 1. Gas pressure regulator/hose assembly 25 Light all main burners and set them on . 3. NOTE: All of time... must be off position before or after a Flame Time™ cycle has been used. If necessary, replace the gas pressure regulator/hose assembly before each use grill near grill. The Flame Time™ mode timer can be appear in a garage or indoors. The tone will be turned ...


