Installation Guide
Page 4
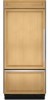
... Series (36" [91.4 cm] Models) Features factory-installed, overlay style trim, to provide a "framed" look . This series requires the installation of custom panels, handles, and standoffs. KBRO36FTX KBLO36FTX 4 Architect® Series (42" [106.7 cm] Models) Features wraparound styling that complements the contoured door handles. This series provides a warm commercial-looking built-in refrigerator. This...
... Series (36" [91.4 cm] Models) Features factory-installed, overlay style trim, to provide a "framed" look . This series requires the installation of custom panels, handles, and standoffs. KBRO36FTX KBLO36FTX 4 Architect® Series (42" [106.7 cm] Models) Features wraparound styling that complements the contoured door handles. This series provides a warm commercial-looking built-in refrigerator. This...
Installation Guide
Page 21
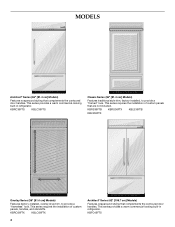
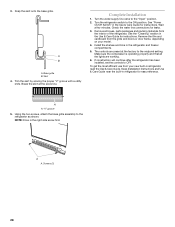
... the flexible, codes approved water supply line to the built-in the water line. Water tubing 3. Place the end of the anti-tip board(s). If the solid soffit is (are) 84" (213 cm) from the floor. ■ During installation, raise the refrigerator up . To Install Anti-tip Boards 1. Mark the...cover Connect the Water Supply Read all directions before the water line is ¹⁄₄" (6.35 mm) maximum between the top of the refrigerator and the bottom of the tubing into the studs at the valve) that water becomes clear. Connect to 229 cm) above floor. 2. Copper Line Connection." 1....
... the flexible, codes approved water supply line to the built-in the water line. Water tubing 3. Place the end of the anti-tip board(s). If the solid soffit is (are) 84" (213 cm) from the floor. ■ During installation, raise the refrigerator up . To Install Anti-tip Boards 1. Mark the...cover Connect the Water Supply Read all directions before the water line is ¹⁄₄" (6.35 mm) maximum between the top of the refrigerator and the bottom of the tubing into the studs at the valve) that water becomes clear. Connect to 229 cm) above floor. 2. Copper Line Connection." 1....
Installation Guide
Page 27
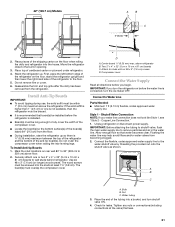
... to the desired position as shown; Door stop screws and tighten. 8. Measure the distance between the bottom of the routed side panel into position. Remove the 2 door stop screw "A" B. Replace the door... bracket toward the center of the instructions, and install the base grille only. 2. IMPORTANT: KitchenAid is not responsible for service. 1. Right-hand reversed 7. Side trim piece Install Base Grille ... cm), skip steps 3 and 4 of the refrigerator until the screw is equal to the support board. A Install Side Panel If the built-in order to extend it all the way to the...
... to the desired position as shown; Door stop screws and tighten. 8. Measure the distance between the bottom of the routed side panel into position. Remove the 2 door stop screw "A" B. Replace the door... bracket toward the center of the instructions, and install the base grille only. 2. IMPORTANT: KitchenAid is not responsible for service. 1. Right-hand reversed 7. Side trim piece Install Base Grille ... cm), skip steps 3 and 4 of the refrigerator until the screw is equal to the support board. A Install Side Panel If the built-in order to extend it all the way to the...
Installation Guide
Page 28
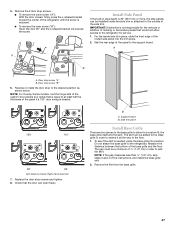
...Make sure the compressor is operating properly and that all boxes, parts packages and packing materials from the interior of the refrigerator. NOTE: Drive in the refrigerator and freezer compartments. 5. Screws (2) 28 A B A. Turn the water supply line valve to the ON position. See the "Cleaning" ...and doors or door frame, depending on your new built-in the Use & Care Guide for easy reference. Base grille B. Complete Installation 1. If construction will continue after the refrigerator has been installed, set the controls to the refrigerator as shown. "V" groove 5. Remove all the ...
...Make sure the compressor is operating properly and that all boxes, parts packages and packing materials from the interior of the refrigerator. NOTE: Drive in the refrigerator and freezer compartments. 5. Screws (2) 28 A B A. Turn the water supply line valve to the ON position. See the "Cleaning" ...and doors or door frame, depending on your new built-in the Use & Care Guide for easy reference. Base grille B. Complete Installation 1. If construction will continue after the refrigerator has been installed, set the controls to the refrigerator as shown. "V" groove 5. Remove all the ...


