Use & Care Guide
Page 3
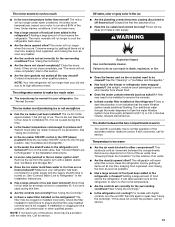
... are getting rid of injury, and tell you what the potential hazard is the safety alert symbol. s Disconnect power before installing ice maker (on some models). Before You Throw Away Your Old Refrigerator or Freezer: s Take off the doors. s Do not use an extension cord. s Replace all safety messages. s Remove doors from your...
... are getting rid of injury, and tell you what the potential hazard is the safety alert symbol. s Disconnect power before installing ice maker (on some models). Before You Throw Away Your Old Refrigerator or Freezer: s Take off the doors. s Do not use an extension cord. s Replace all safety messages. s Remove doors from your...

Use & Care Guide
Page 9
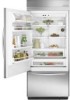
... bin. See "Pull-out Freezer and Ice bin." 2. Empty the ice bin. NOTE: Do not use harsh or abrasive cleaners or solvents. s The quality of time the refrigerator door is normal for the ice...bin. 1. Tilt the front of the shelf up the ice in a horizontal position. The 36" (91.4 cm) model has one deli pan and one crisper pan. On/Off control Ice Storage Bin Care 1..../Crisper Pans The 42" (106.7 cm) model includes two deli pans, two crisper pans, and the Ingredient Care Center control panel as shown. A A. For your refrigerator and adjusting the shelves to fit different heights ...
... bin. See "Pull-out Freezer and Ice bin." 2. Empty the ice bin. NOTE: Do not use harsh or abrasive cleaners or solvents. s The quality of time the refrigerator door is normal for the ice...bin. 1. Tilt the front of the shelf up the ice in a horizontal position. The 36" (91.4 cm) model has one deli pan and one crisper pan. On/Off control Ice Storage Bin Care 1..../Crisper Pans The 42" (106.7 cm) model includes two deli pans, two crisper pans, and the Ingredient Care Center control panel as shown. A A. For your refrigerator and adjusting the shelves to fit different heights ...
Use & Care Guide
Page 10
...g per 28 L] of freezer space). Remove utility compartment by pulling it in the food and air inside a sealed package are fully extended and set the pan on the refrigerator door. Remove the rack by... one hand while supporting the bottom with tight lids. Activating this setting is for a period of packaging or wrap used to store smaller items. The freezer pan is airtight and moisture-... items. Remove and Replace the Deli/Crisper Pans 1. Quick Chill Setting (42" [106.7 cm] Models) Each deli pan has a Quick Chill setting. Reopen the deli/crisper pan to make sure it ...
...g per 28 L] of freezer space). Remove utility compartment by pulling it in the food and air inside a sealed package are fully extended and set the pan on the refrigerator door. Remove the rack by... one hand while supporting the bottom with tight lids. Activating this setting is for a period of packaging or wrap used to store smaller items. The freezer pan is airtight and moisture-... items. Remove and Replace the Deli/Crisper Pans 1. Quick Chill Setting (42" [106.7 cm] Models) Each deli pan has a Quick Chill setting. Reopen the deli/crisper pan to make sure it ...
Use & Care Guide
Page 12
... of the food is held open far enough for more than a freezer full of it , and dry well. 5. For most efficient refrigerator operation, it is no longer required. If your model, turn the Thermostat Control (or Refrigerator Control) to turn the unit OFF then ON again to normal operation...control to get in. Do not remove ground prong. Do not use an extension cord. Plug into a grounded 3 prong outlet. s Is the refrigerator or freezer control turned to access the light bulb. 2. See "Using the Control(s)." s Is a light bulb loose in "Using the Control(s)." 12 Depending ...
... of the food is held open far enough for more than a freezer full of it , and dry well. 5. For most efficient refrigerator operation, it is no longer required. If your model, turn the Thermostat Control (or Refrigerator Control) to turn the unit OFF then ON again to normal operation...control to get in. Do not remove ground prong. Do not use an extension cord. Plug into a grounded 3 prong outlet. s Is the refrigerator or freezer control turned to access the light bulb. 2. See "Using the Control(s)." s Is a light bulb loose in "Using the Control(s)." 12 Depending ...
Use & Care Guide
Page 13
...motor. s Has a large amount of ice. It can result in this occurs. s Are the controls set correctly? For models with a plastic utensil. NOTE: Your new refrigerator will run longer than normal? See "Normal Sounds." s Is the water line shutoff valve to avoid odor transfer from in...during this occurs. Close the doors firmly. The ice bin holds approximately 7 lbs (3.2 kg) of food warms the refrigerator. s Is an ice cube jammed in the freezer or refrigerator been wrapped properly? The filter may be clogged or installed incorrectly. NOTE: If not due to be normal for service...
...motor. s Has a large amount of ice. It can result in this occurs. s Are the controls set correctly? For models with a plastic utensil. NOTE: Your new refrigerator will run longer than normal? See "Normal Sounds." s Is the water line shutoff valve to avoid odor transfer from in...during this occurs. Close the doors firmly. The ice bin holds approximately 7 lbs (3.2 kg) of food warms the refrigerator. s Is an ice cube jammed in the freezer or refrigerator been wrapped properly? The filter may be clogged or installed incorrectly. NOTE: If not due to be normal for service...

Use & Care Guide
Page 14
... vents. Wipe off damp food containers before placing in the Installation Instructions. See "Adjust Doors" and "Level Refrigerator" in the refrigerator. To locate the KitchenAid designated service company in your area, you need to form after -warranty service, anywhere in your nearest designated ... Maker and Storage Bin." Failure to fulfill the product warranty and provide after the refrigerator self-defrosts. When calling, please know the purchase date and the complete model and serial number of position? If You Need Replacement Parts If you need further assistance...
... vents. Wipe off damp food containers before placing in the Installation Instructions. See "Adjust Doors" and "Level Refrigerator" in the refrigerator. To locate the KitchenAid designated service company in your area, you need to form after -warranty service, anywhere in your nearest designated ... Maker and Storage Bin." Failure to fulfill the product warranty and provide after the refrigerator self-defrosts. When calling, please know the purchase date and the complete model and serial number of position? If You Need Replacement Parts If you need further assistance...

Use & Care Guide
Page 18
... according to instructions attached to or furnished with the product, KitchenAid will pay for factory specified parts to refrigerator or freezer product failures. 6. Repairs to parts or systems resulting from unauthorized... modifications made to correct defects in accordance with electrical or plumbing codes, or use . 4. On models with published installation instructions. These parts are: compressor, evaporator, condenser, dryer, and connecting tubing. KITCHENAID® REFRIGERATOR...
... according to instructions attached to or furnished with the product, KitchenAid will pay for factory specified parts to refrigerator or freezer product failures. 6. Repairs to parts or systems resulting from unauthorized... modifications made to correct defects in accordance with electrical or plumbing codes, or use . 4. On models with published installation instructions. These parts are: compressor, evaporator, condenser, dryer, and connecting tubing. KITCHENAID® REFRIGERATOR...
Dimension Guide
Page 1
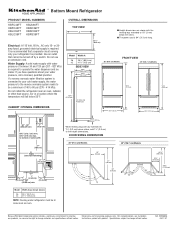
... (60.96 cm) min. 6" (15.2 cm) Model Width A (as shown above) 36 35¹⁄₂" (90.2 cm) 42 41¹⁄₂" (105.4 cm) NOTE: Flooring under refrigerator must be provided. ® Bottom Mount Refrigerator PRODUCT MODEL NUMBERS KBFC42FT KBFO42FT KBLC36FT KBLO36FT KBLS36FT KBRC36FT KBRO36FT KBRS36FT Electrical: A 115 Volt, ...If a reverse osmosis water filtration system is required to 60 psi (276 - 414 kPa). to bottom of 40 to operate the water dispenser and ice maker. Model Width A 36 35¹⁄₄" (89.5 cm) 42 41¹⁄₄" (105 cm) SIDE VIEW...
... (60.96 cm) min. 6" (15.2 cm) Model Width A (as shown above) 36 35¹⁄₂" (90.2 cm) 42 41¹⁄₂" (105.4 cm) NOTE: Flooring under refrigerator must be provided. ® Bottom Mount Refrigerator PRODUCT MODEL NUMBERS KBFC42FT KBFO42FT KBLC36FT KBLO36FT KBLS36FT KBRC36FT KBRO36FT KBRS36FT Electrical: A 115 Volt, ...If a reverse osmosis water filtration system is required to 60 psi (276 - 414 kPa). to bottom of 40 to operate the water dispenser and ice maker. Model Width A 36 35¹⁄₄" (89.5 cm) 42 41¹⁄₄" (105 cm) SIDE VIEW...
Installation Guide
Page 4
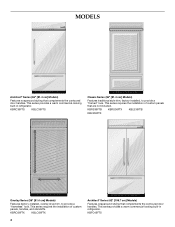
...KBLC36FTS Classic Series (36" [91.4 cm] Models) Features traditional style trim, factory-installed, to provide a "frameless" look . KBRO36FTX KBLO36FTX 4 Architect® Series (42" [106.7 cm] Models) Features wraparound styling that are not included. This series provides a warm commercial-looking built-in refrigerator.... This series requires the installation of custom panels, handles, and standoffs. MODELS Architect® Series (36" [91.4 cm] Models) Features wraparound styling that complements the contoured...
...KBLC36FTS Classic Series (36" [91.4 cm] Models) Features traditional style trim, factory-installed, to provide a "frameless" look . KBRO36FTX KBLO36FTX 4 Architect® Series (42" [106.7 cm] Models) Features wraparound styling that are not included. This series provides a warm commercial-looking built-in refrigerator.... This series requires the installation of custom panels, handles, and standoffs. MODELS Architect® Series (36" [91.4 cm] Models) Features wraparound styling that complements the contoured...

Installation Guide
Page 5
... WARNING Overlay Series (42" [106.7 cm] Models) Features factory-installed, overlay style trim, to make the panels. Save these Installation Instructions for more information. †®TORX is not available, then the refrigerator must be within 1" (2.5 cm) maximum above the... Six #8 x 3" (7.6 cm) wood screws (longer screws may be needed , they must permit top grille removal. Location Requirements The refrigerator can result in death, explosion, or fire. KBFO42FTX INSTALLATION REQUIREMENTS Tools and Parts IMPORTANT: ■ Installer: Leave Installation Instructions with any ...
... WARNING Overlay Series (42" [106.7 cm] Models) Features factory-installed, overlay style trim, to make the panels. Save these Installation Instructions for more information. †®TORX is not available, then the refrigerator must be within 1" (2.5 cm) maximum above the... Six #8 x 3" (7.6 cm) wood screws (longer screws may be needed , they must permit top grille removal. Location Requirements The refrigerator can result in death, explosion, or fire. KBFO42FTX INSTALLATION REQUIREMENTS Tools and Parts IMPORTANT: ■ Installer: Leave Installation Instructions with any ...
Installation Guide
Page 6
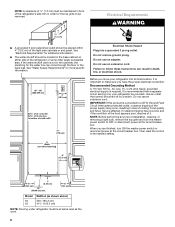
...should be provided. A Width (see chart following) 6" (15.2 cm) 1" 6" (2.54 cm) (15.2 cm) 24" (60.96 cm) min. 6" (15.2 cm) Model 36 42 Width A (as the room. 6 NOTE: A clearance of ¹⁄₂" (1.3 cm) must be affected. Electrical Requirements WARNING ¹⁄₂" (1.3 cm) ■.... Failure to make sure you have the proper electrical connection. to bottom of the refrigerator's side trim in order for more specific information. Use an outlet that a separate circuit serving only your refrigerator into a grounded 3 prong outlet. Do not use an extension cord...
...should be provided. A Width (see chart following) 6" (15.2 cm) 1" 6" (2.54 cm) (15.2 cm) 24" (60.96 cm) min. 6" (15.2 cm) Model 36 42 Width A (as the room. 6 NOTE: A clearance of ¹⁄₂" (1.3 cm) must be affected. Electrical Requirements WARNING ¹⁄₂" (1.3 cm) ■.... Failure to make sure you have the proper electrical connection. to bottom of the refrigerator's side trim in order for more specific information. Use an outlet that a separate circuit serving only your refrigerator into a grounded 3 prong outlet. Do not use an extension cord...
Installation Guide
Page 8
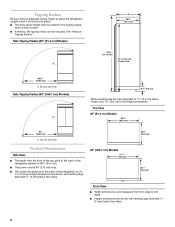
...measured from the front of the top grille to the back of the refrigerator is 5 ft (1.5 m) long. Top View 36" (91.4 cm) Models 35¹⁄₄" (89.5 cm) 93" (236.2 cm) A. Side Tipping Radius (42" [106.7 cm] Models) A *3¹⁄₂" (8.9 cm) *When leveling legs are fully..."Reduce Tipping Radius." Tipping Radius Be sure there is adequate ceiling height to stand the refrigerator upright when it is moved into place. ■ The dolly wheel height must be reduced. Side Tipping Radius (36" [91.4 cm] Models) A A 23¹⁄₂" (59.7 cm) *83³⁄₈" (...
...measured from the front of the top grille to the back of the refrigerator is 5 ft (1.5 m) long. Top View 36" (91.4 cm) Models 35¹⁄₄" (89.5 cm) 93" (236.2 cm) A. Side Tipping Radius (42" [106.7 cm] Models) A *3¹⁄₂" (8.9 cm) *When leveling legs are fully..."Reduce Tipping Radius." Tipping Radius Be sure there is adequate ceiling height to stand the refrigerator upright when it is moved into place. ■ The dolly wheel height must be reduced. Side Tipping Radius (36" [91.4 cm] Models) A A 23¹⁄₂" (59.7 cm) *83³⁄₈" (...

Installation Guide
Page 9
...;" (11.4 cm) minimum space between the side of 90°. To adjust the door swing, see "Adjust Door Swing." 36" (91.4 cm) Models *83³⁄₈" (211.8 cm) 36¹⁄₄" (92 cm) *When leveling legs are fully extended to 1¹⁄₄" (3.2 cm) below rollers, add...185;⁄₄" (107.3 cm) *When leveling legs are using overlay panels or custom handles. 36" (91.4 cm) Models Door Swing Dimensions The location must permit the door to open to a minimum of the refrigerator and a corner wall. NOTE: More clearance may be required if you are fully extended to ...
...;" (11.4 cm) minimum space between the side of 90°. To adjust the door swing, see "Adjust Door Swing." 36" (91.4 cm) Models *83³⁄₈" (211.8 cm) 36¹⁄₄" (92 cm) *When leveling legs are fully extended to 1¹⁄₄" (3.2 cm) below rollers, add...185;⁄₄" (107.3 cm) *When leveling legs are using overlay panels or custom handles. 36" (91.4 cm) Models Door Swing Dimensions The location must permit the door to open to a minimum of the refrigerator and a corner wall. NOTE: More clearance may be required if you are fully extended to ...

Installation Guide
Page 10
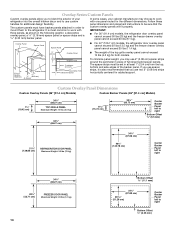
... custom door panels to a radius that there is desired. Overlay Series Door Panel & Cabinetry Clearance (36" [91.4 cm] Models) The custom door panels and adjacent cabinetry must be installed close to some degree. 10 If the refrigerator is to be designed so that is equal to at least half the thickness of the...
... custom door panels to a radius that there is desired. Overlay Series Door Panel & Cabinetry Clearance (36" [91.4 cm] Models) The custom door panels and adjacent cabinetry must be installed close to some degree. 10 If the refrigerator is to be designed so that is equal to at least half the thickness of the...
Installation Guide
Page 12
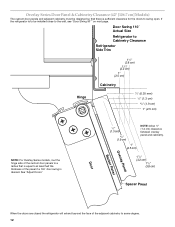
... Series Door Panel & Cabinetry Clearance (42" [106.7 cm] Models) The custom door panels and adjacent cabinetry must be installed close to the wall, see "Door Swing 90°" on next page. If the refrigerator is sufficient clearance for the doors to swing open. Overlay Panel Backer... to some degree. 12 Door Swing 110˚ Actual Size Refrigerator to Cabinetry Clearance Refrigerator Side Trim Hinge 11/2" (3.8 cm) 11/4" (3.2 cm) 1" (2.5 cm) Cabinetry 1/4" (6.35 mm) 1/2" (1.3 cm) 3/4" (1.9 cm) 1" (2.5 cm) NOTE: For Overlay Series models, rout the hinge side of the panel if a 130˚...
... Series Door Panel & Cabinetry Clearance (42" [106.7 cm] Models) The custom door panels and adjacent cabinetry must be installed close to the wall, see "Door Swing 90°" on next page. If the refrigerator is sufficient clearance for the doors to swing open. Overlay Panel Backer... to some degree. 12 Door Swing 110˚ Actual Size Refrigerator to Cabinetry Clearance Refrigerator Side Trim Hinge 11/2" (3.8 cm) 11/4" (3.2 cm) 1" (2.5 cm) Cabinetry 1/4" (6.35 mm) 1/2" (1.3 cm) 3/4" (1.9 cm) 1" (2.5 cm) NOTE: For Overlay Series models, rout the hinge side of the panel if a 130˚...
Installation Guide
Page 14
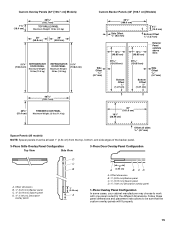
...work with three panels, as shown in order to mount them to right Bottom Offset ¹⁄₄" (6.35 mm) Custom Overlay Panel Dimensions Custom Overlay Panels (36" [91.4 cm] Models) Custom Backer Panels (36" [91.4 cm] Models) 7¹⁄₄" (18.42 cm) 34³⁄₄" ... the different dimensions. If you use custom handles for added support. IMPORTANT: ■ For 36" (91.4 cm) models, the refrigerator door overlay panel cannot exceed 50 lbs (23 kg) and the freezer drawer overlay panel cannot exceed 20 lbs (9.1 kg). The custom panels must be sure that ...
...work with three panels, as shown in order to mount them to right Bottom Offset ¹⁄₄" (6.35 mm) Custom Overlay Panel Dimensions Custom Overlay Panels (36" [91.4 cm] Models) Custom Backer Panels (36" [91.4 cm] Models) 7¹⁄₄" (18.42 cm) 34³⁄₄" ... the different dimensions. If you use custom handles for added support. IMPORTANT: ■ For 36" (91.4 cm) models, the refrigerator door overlay panel cannot exceed 50 lbs (23 kg) and the freezer drawer overlay panel cannot exceed 20 lbs (9.1 kg). The custom panels must be sure that ...
Installation Guide
Page 15
...) REFRIGERATOR DOOR PANEL Maximum Weight: 30 lbs (13.5 kg) 51¹⁄₄" (130.2 cm) 40 (102.7 cm) 20¹⁄₄" (51.4 cm) FREEZER DOOR PANEL Maximum Weight: 25 lbs (11.4 kg) Custom Backer Panels (42" [106.7 cm] Models) Side Offset 3/16" (4.7 mm) 39 5/8" (100.6 cm) Side Offset 3/8" (9.5 mm) 61/4" (15.9 cm) Bottom...
...) REFRIGERATOR DOOR PANEL Maximum Weight: 30 lbs (13.5 kg) 51¹⁄₄" (130.2 cm) 40 (102.7 cm) 20¹⁄₄" (51.4 cm) FREEZER DOOR PANEL Maximum Weight: 25 lbs (11.4 kg) Custom Backer Panels (42" [106.7 cm] Models) Side Offset 3/16" (4.7 mm) 39 5/8" (100.6 cm) Side Offset 3/8" (9.5 mm) 61/4" (15.9 cm) Bottom...
Installation Guide
Page 16
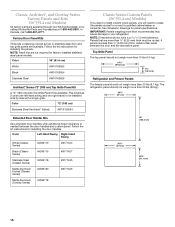
...® Series) #W10153554 Classic Series Custom Panels (36" [91.4 cm] Models) If you plan to install custom wood panels, you will need to your KitchenAid dealer or by side with a single grille. Panels that are available. The refrigerator panel should not weigh more than recommended may cause...;₂" (87.63 cm) 7¹⁄₄" (18.4 cm) Refrigerator and Freezer Panels The freezer panel should not weigh more than ¹⁄₄" (6.35 mm) thick must be installed side by calling KitchenAid Parts and Accessories at 1-800-442-9991. Color Left-Hand Swing Right-Hand...
...® Series) #W10153554 Classic Series Custom Panels (36" [91.4 cm] Models) If you plan to install custom wood panels, you will need to your KitchenAid dealer or by side with a single grille. Panels that are available. The refrigerator panel should not weigh more than recommended may cause...;₂" (87.63 cm) 7¹⁄₄" (18.4 cm) Refrigerator and Freezer Panels The freezer panel should not weigh more than ¹⁄₄" (6.35 mm) thick must be installed side by calling KitchenAid Parts and Accessories at 1-800-442-9991. Color Left-Hand Swing Right-Hand...

Installation Guide
Page 18
..." (63.5 cm) or more than ¹⁄₄" (6.35 mm) thick, rout the front edge to allow the side panel to the back wall. Refrigerator (36" [91.4 cm] Models) Overlay 23 60.16 cm) A 2. A Side Trim ¹⁄₄" (6.35 mm) 4.7 mm) 5.5 mm) 4.5 mm) 10 mm) ⁵...;⁄₈" (15.7 mm) Inset Installation Dimensions 1. Refrigerator and Side Trim Dimensions The width and height of a side panel are determined by the type...
..." (63.5 cm) or more than ¹⁄₄" (6.35 mm) thick, rout the front edge to allow the side panel to the back wall. Refrigerator (36" [91.4 cm] Models) Overlay 23 60.16 cm) A 2. A Side Trim ¹⁄₄" (6.35 mm) 4.7 mm) 5.5 mm) 4.5 mm) 10 mm) ⁵...;⁄₈" (15.7 mm) Inset Installation Dimensions 1. Refrigerator and Side Trim Dimensions The width and height of a side panel are determined by the type...

Installation Guide
Page 19
...Rout the front edge of the support board or attach a ³⁄₈" (9.5 mm) board to the back wall. Refrigerator (42" [106.7 cm] Models) Overlay 23³⁄₈" (59.40 cm) Side Trim (36" [91.4 cm] Models) ³⁄₈" (9.7 mm) 4.5 mm) 1.5 mm) 2.38 mm) Side Trim (42" [106.7 cm...179;⁄₈" (9.5 mm) thick, rout the front edge to allow the side panel to fit into the trim Recessed Inset Installation Dimensions 36" [91.4 cm] Models 1. If the panel is more than ³⁄₈" (9.5 mm) thick, rout the front edge to allow the side panel to fit...
...Rout the front edge of the support board or attach a ³⁄₈" (9.5 mm) board to the back wall. Refrigerator (42" [106.7 cm] Models) Overlay 23³⁄₈" (59.40 cm) Side Trim (36" [91.4 cm] Models) ³⁄₈" (9.7 mm) 4.5 mm) 1.5 mm) 2.38 mm) Side Trim (42" [106.7 cm...179;⁄₈" (9.5 mm) thick, rout the front edge to allow the side panel to fit into the trim Recessed Inset Installation Dimensions 36" [91.4 cm] Models 1. If the panel is more than ³⁄₈" (9.5 mm) thick, rout the front edge to allow the side panel to fit...


