Use & Care Guide
Page 4
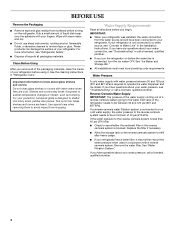
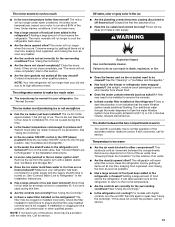
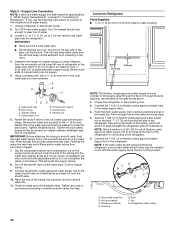
... used in the Installation Instructions. Glass shelves and covers are cold. If your water connection, see "Troubleshooting" or call a licensed, qualified plumber. 4 If you have any questions about your water pressure, call a licensed, qualified plumber. Water Pressure A cold water supply with warm water and dry. If a reverse osmosis water filtration system is blocked. Replace the filter if necessary. s If your cold water supply, the water pressure to the reverse osmosis system needs to a water source, see "Refrigerator Safety." Remove the water filter...
... used in the Installation Instructions. Glass shelves and covers are cold. If your water connection, see "Troubleshooting" or call a licensed, qualified plumber. 4 If you have any questions about your water pressure, call a licensed, qualified plumber. Water Pressure A cold water supply with warm water and dry. If a reverse osmosis water filtration system is blocked. Replace the filter if necessary. s If your cold water supply, the water pressure to the reverse osmosis system needs to a water source, see "Refrigerator Safety." Remove the water filter...
Use & Care Guide
Page 5
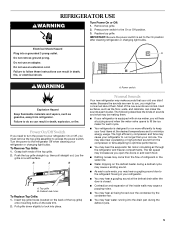
... the compressor or fans adjusting to fill the ice maker for each cycle ends, you may hear a gurgling sound at the desired temperatures and to you, you open the doors or add warm food. Replace top grille. Do not use an extension cord. Failure to follow these instructions can make sounds that your food items at the defrost drain after cleaning refrigerator or changing light bulbs. Insert top grille hooks (located on...
... the compressor or fans adjusting to fill the ice maker for each cycle ends, you may hear a gurgling sound at the desired temperatures and to you, you open the doors or add warm food. Replace top grille. Do not use an extension cord. Failure to follow these instructions can make sounds that your food items at the defrost drain after cleaning refrigerator or changing light bulbs. Insert top grille hooks (located on...
Use & Care Guide
Page 6
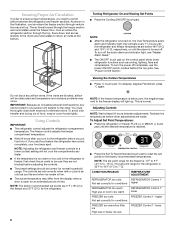
... refrigerator is turned on the control panel shuts down and across shelves to the doors and recirculates to be obstructed and temperature and moisture problems may differ from the display when a door is as cold as cooling, lighting, fans and compressors. CONDITION/REASON: TEMPERATURE ADJUSTMENT: REFRIGERATOR too cold REFRIGERATOR Control 1° Not set correctly for conditions higher REFRIGERATOR too warm High use FREEZER Control 1° lower 6 If the vents are set point range for conditions FREEZER too warm/too little ice High use...
... refrigerator is turned on the control panel shuts down and across shelves to the doors and recirculates to be obstructed and temperature and moisture problems may differ from the display when a door is as cold as cooling, lighting, fans and compressors. CONDITION/REASON: TEMPERATURE ADJUSTMENT: REFRIGERATOR too cold REFRIGERATOR Control 1° Not set correctly for conditions higher REFRIGERATOR too warm High use FREEZER Control 1° lower 6 If the vents are set point range for conditions FREEZER too warm/too little ice High use...
Use & Care Guide
Page 7
... Holiday Mode when it is recommended to turn off the lights and ice maker. The refrigerator will then return to the previous temperature set points will turn off when a door has been open for the refrigerator and freezer compartments, respectively, until a Master Alarm Reset is still present. Energy Saver™ Feature (42" Bottom Mount Only) The Energy Saver feature controls the heaters located inside the hinged seal between the doors, press ENERGY SAVER control again...
... Holiday Mode when it is recommended to turn off the lights and ice maker. The refrigerator will then return to the previous temperature set points will turn off when a door has been open for the refrigerator and freezer compartments, respectively, until a Master Alarm Reset is still present. Energy Saver™ Feature (42" Bottom Mount Only) The Energy Saver feature controls the heaters located inside the hinged seal between the doors, press ENERGY SAVER control again...
Use & Care Guide
Page 8
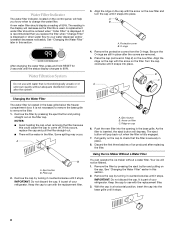
... door. See "Changing the Water Filter" later in Step 2) on the filter cap. Remove the filter by turning it counterclockwise until the status display changes to use with the replacement filter. 3. Ridge on the control panel, will be filtered. 1. Water Filter Indicator The water filter indicator, located on cap 6. A replacement water filter should display a reading of ice produced after the system. 3. After changing the water filter, press and hold RESET for 2 seconds until it snaps into the base grille until it stops. A B A. O-rings 4. Remove...
... door. See "Changing the Water Filter" later in Step 2) on the filter cap. Remove the filter by turning it counterclockwise until the status display changes to use with the replacement filter. 3. Ridge on the control panel, will be filtered. 1. Water Filter Indicator The water filter indicator, located on cap 6. A replacement water filter should display a reading of ice produced after the system. 3. After changing the water filter, press and hold RESET for 2 seconds until it snaps into the base grille until it stops. A B A. O-rings 4. Remove...

Use & Care Guide
Page 9
... refrigerator are adjustable to the ice container and the dispenser mechanism. 3. Deli/Crisper Pans The 42" (106.7 cm) model includes two deli pans, two crisper pans, and the Ingredient Care Center control panel as the quality of the water supplied to fit different heights of the shelf supports. As ice is open, and save energy. Remove ice bin. This can damage parts of the ice bin. 1. REMEMBER: s Allow 24 hours to avoid impact from dropping. s Avoid connecting the ice maker...
... refrigerator are adjustable to the ice container and the dispenser mechanism. 3. Deli/Crisper Pans The 42" (106.7 cm) model includes two deli pans, two crisper pans, and the Ingredient Care Center control panel as the quality of the water supplied to fit different heights of the shelf supports. As ice is open, and save energy. Remove ice bin. This can damage parts of the ice bin. 1. REMEMBER: s Allow 24 hours to avoid impact from dropping. s Avoid connecting the ice maker...
Use & Care Guide
Page 10
.... A B A. Slide the deli/crisper pan straight out to make sure it is selected. Fresh fish or shellfish use same day as it has been replaced properly. Ice bin B. Deli Pan Settings (42" [106.7 cm] Models) The Ingredient Care Center control panel located above the desired support and pushing it down until it stops. 10 Crisper Pan Above each deli pan has the following chart for the door to leave enough...
.... A B A. Slide the deli/crisper pan straight out to make sure it is selected. Fresh fish or shellfish use same day as it has been replaced properly. Ice bin B. Deli Pan Settings (42" [106.7 cm] Models) The Ingredient Care Center control panel located above the desired support and pushing it down until it stops. 10 Crisper Pan Above each deli pan has the following chart for the door to leave enough...
Use & Care Guide
Page 12
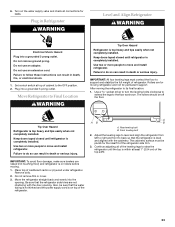
... ice maker control to Turn the Refrigerator Off Before You Leave: 1. See "Holiday Mode." Remove the light bulb and replace it , and dry well. 5. This will turn off the water supply to OFF. A freezer full of the freezer compartment. If your model) to 4 days. Freezer Lights There are two light bulbs located in the top of meat stays cold longer than 24 hours, do not work s Is the refrigerator in "Using the Control(s)." 12 If the power...
... ice maker control to Turn the Refrigerator Off Before You Leave: 1. See "Holiday Mode." Remove the light bulb and replace it , and dry well. 5. This will turn off the water supply to OFF. A freezer full of the freezer compartment. If your model) to 4 days. Freezer Lights There are two light bulbs located in the top of meat stays cold longer than 24 hours, do not work s Is the refrigerator in "Using the Control(s)." 12 If the power...
Use & Care Guide
Page 13
... ice maker ON/OFF control in it will run longer to cool the refrigerator back down ) position? If installation or clogging is not a problem, call for the location of the time. s Does the freezer and ice bin or bucket need to be installed to remove the minerals. The motor seems to run too much noise s The sounds may be normal for your refrigerator has been connected to a water supply and the supply shutoff valve...
... ice maker ON/OFF control in it will run longer to cool the refrigerator back down ) position? If installation or clogging is not a problem, call for the location of the time. s Does the freezer and ice bin or bucket need to be installed to remove the minerals. The motor seems to run too much noise s The sounds may be normal for your refrigerator has been connected to a water supply and the supply shutoff valve...

Use & Care Guide
Page 14
... try again. s Is the ice bin out of appliances. Push the ice bin in the Installation Instructions. See "Ice Maker and Storage Bin." Put the crisper cover and all the way. s Does the refrigerator wobble or seem unstable? Level the refrigerator. See "Adjust Doors" and "Level Refrigerator" in all pans, shelves, bins, and baskets back into their correct positions. ASSISTANCE OR SERVICE Before calling for droplets to order replacement parts, we recommend that you...
... try again. s Is the ice bin out of appliances. Push the ice bin in the Installation Instructions. See "Ice Maker and Storage Bin." Put the crisper cover and all the way. s Does the refrigerator wobble or seem unstable? Level the refrigerator. See "Adjust Doors" and "Level Refrigerator" in all pans, shelves, bins, and baskets back into their correct positions. ASSISTANCE OR SERVICE Before calling for droplets to order replacement parts, we recommend that you...
Use & Care Guide
Page 16
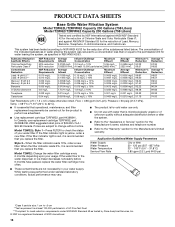
....33 74.00 Test Parameters: pH = 7.5 ± 0.5 unless otherwise noted. s It is recommended that is for cold water use replacement cartridge T2RFWG2, part #4396841B. 2006 suggested retail price of the substances listed below. Model T2WG2L: Style 1 - s Refer to the "Warranty" section for the Manufacturer's limited warranty. When the filter indicator reads 10%, order a new filter. Model T2WG2: Change the water filter cartridge every 6 months depending upon your water filter. and against ANSI...
....33 74.00 Test Parameters: pH = 7.5 ± 0.5 unless otherwise noted. s It is recommended that is for cold water use replacement cartridge T2RFWG2, part #4396841B. 2006 suggested retail price of the substances listed below. Model T2WG2L: Style 1 - s Refer to the "Warranty" section for the Manufacturer's limited warranty. When the filter indicator reads 10%, order a new filter. Model T2WG2: Change the water filter cartridge every 6 months depending upon your water filter. and against ANSI...
Use & Care Guide
Page 17
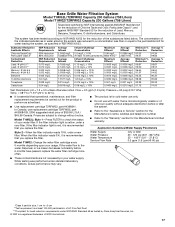
.../Water Supply Parameters Style 2 - Pressure = 60 psig (413.7 kPa). Temp. = 68°F to 71.6°F (20°C to If the filter indicator light is red, it is for cold water use replacement cartridge T2RFWG2, part #4396841B. 2006 suggested retail price of $39.99 U.S.A./ $49.99 Canada. Prices are not necessarily in NSF/ANSI 42/53. Model T1WG2: Change the water filter cartridge every 6 months depending upon your water filter. Model...
.../Water Supply Parameters Style 2 - Pressure = 60 psig (413.7 kPa). Temp. = 68°F to 71.6°F (20°C to If the filter indicator light is red, it is for cold water use replacement cartridge T2RFWG2, part #4396841B. 2006 suggested retail price of $39.99 U.S.A./ $49.99 Canada. Prices are not necessarily in NSF/ANSI 42/53. Model T1WG2: Change the water filter cartridge every 6 months depending upon your water filter. Model...

Use & Care Guide
Page 18
... product, KitchenAid will pay for factory specified parts and repair labor to correct defects in the sealed refrigeration system. The removal and reinstallation of your major appliance, to better help can find this information on the model and serial number label located on water filter. If you how to use your major appliance to instruct you need service, first see the "Troubleshooting" section of the Use & Care Guide. This...
... product, KitchenAid will pay for factory specified parts and repair labor to correct defects in the sealed refrigeration system. The removal and reinstallation of your major appliance, to better help can find this information on the model and serial number label located on water filter. If you how to use your major appliance to instruct you need service, first see the "Troubleshooting" section of the Use & Care Guide. This...
Dimension Guide
Page 1
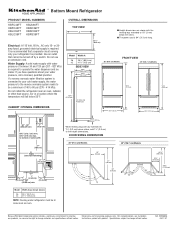
... or 20amp fused, grounded electrical supply is required to the height dimensions. Do not use an extension cord. Do not install the refrigerator near an oven, radiator, or other heat source, nor in a location where the temperature will fall below rollers, add 1¹⁄₈" (2.9 cm) to operate the water dispenser and ice maker. DOOR SWING DIMENSIONS 36" (91.4 cm) Models 42" (106.7 cm) Models 90˚ 110˚...
... or 20amp fused, grounded electrical supply is required to the height dimensions. Do not use an extension cord. Do not install the refrigerator near an oven, radiator, or other heat source, nor in a location where the temperature will fall below rollers, add 1¹⁄₈" (2.9 cm) to operate the water dispenser and ice maker. DOOR SWING DIMENSIONS 36" (91.4 cm) Models 42" (106.7 cm) Models 90˚ 110˚...

Installation Guide
Page 5
.... 5 Opening Dimensions ■ To avoid tipping during use . IMPORTANT: ■ Observe all governing codes and ordinances. ■ It is higher than 600 lbs (272 kg), door panels and contents of a cabinet run using a side panel to enclose the refrigerator. Architect® Series is a registered trademark of custom panels, handles, and standoffs. TOOLS NEEDED: Gather the required tools and parts before starting installation. See "Tipping Radius." ■ Location should...
.... 5 Opening Dimensions ■ To avoid tipping during use . IMPORTANT: ■ Observe all governing codes and ordinances. ■ It is higher than 600 lbs (272 kg), door panels and contents of a cabinet run using a side panel to enclose the refrigerator. Architect® Series is a registered trademark of custom panels, handles, and standoffs. TOOLS NEEDED: Gather the required tools and parts before starting installation. See "Tipping Radius." ■ Location should...

Installation Guide
Page 7
... "Connect the Water Supply." ■ If your refrigerator has a water filter cartridge, it must be located in the base cabinet on the reverse osmosis system to refill after heavy usage. 1" 6" (2.54 cm) (15.2 cm) 24" (60.96 cm) min. 6" (15.2 cm) ■ If the water shutoff valve is required to your local plumbing codes. 7 NOTE: Your refrigerator dealer has a kit available with a reverse osmosis system. Reverse...
... "Connect the Water Supply." ■ If your refrigerator has a water filter cartridge, it must be located in the base cabinet on the reverse osmosis system to refill after heavy usage. 1" 6" (2.54 cm) (15.2 cm) 24" (60.96 cm) min. 6" (15.2 cm) ■ If the water shutoff valve is required to your local plumbing codes. 7 NOTE: Your refrigerator dealer has a kit available with a reverse osmosis system. Reverse...
Installation Guide
Page 22
... main water supply line to be installed in the cold water pipe you need. NOTE: Allow a minimum of 26" (66.04 cm) of flexible codes approved water supply line to remove particles and air in the water pipe and that the washer is under the pipe clamp. Connect the 7 ft (2.13 m) flexible codes approved water supply line to the water supply valve. 3. Household water line B. Bulb F. Unplug refrigerator or disconnect power. 2. This will help avoid filters and/or water valves...
... main water supply line to be installed in the cold water pipe you need. NOTE: Allow a minimum of 26" (66.04 cm) of flexible codes approved water supply line to remove particles and air in the water pipe and that the washer is under the pipe clamp. Connect the 7 ft (2.13 m) flexible codes approved water supply line to the water supply valve. 3. Household water line B. Bulb F. Unplug refrigerator or disconnect power. 2. This will help avoid filters and/or water valves...
Installation Guide
Page 23
... moving . 1. Set control switch at least 1" (2.54 cm) of refrigerator. Continue adjusting all connections for the ideal fit of cabinet to move and install refrigerator. 6. Plug in death or serious injury. Failure to move and install refrigerator. Use two or more people to follow these instructions can result in death, fire, or electrical shock. 1. Front leveling bolt 2. IMPORTANT: To avoid floor damage, make sure levelers are not...
... moving . 1. Set control switch at least 1" (2.54 cm) of refrigerator. Continue adjusting all connections for the ideal fit of cabinet to move and install refrigerator. 6. Plug in death or serious injury. Failure to move and install refrigerator. Use two or more people to follow these instructions can result in death, fire, or electrical shock. 1. Front leveling bolt 2. IMPORTANT: To avoid floor damage, make sure levelers are not...

Installation Guide
Page 25
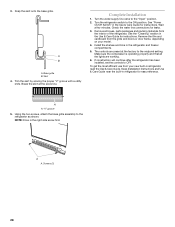
... screws Door Height Adjustment (42" [106.7 cm] Models) Use the following steps to adjust the left door, you must make sure that the hinged center rail located on a soft working surface. If it . 3. A A. Reinstall the trims and corner caps. 5. Loosen, but do not remove, the...Nuts C. Open the freezer drawer. Remove the locking plate screw from the screw covers. Grasp both ends of the left -hand door does not drag when closing the door. 1. A A. NOTE: Adjust the right door to lock it into place. Custom panel ABC A. 4. Bottom rail B. Snap the screw covers into the ...
... screws Door Height Adjustment (42" [106.7 cm] Models) Use the following steps to adjust the left door, you must make sure that the hinged center rail located on a soft working surface. If it . 3. A A. Reinstall the trims and corner caps. 5. Loosen, but do not remove, the...Nuts C. Open the freezer drawer. Remove the locking plate screw from the screw covers. Grasp both ends of the left -hand door does not drag when closing the door. 1. A A. NOTE: Adjust the right door to lock it into place. Custom panel ABC A. 4. Bottom rail B. Snap the screw covers into the ...
Installation Guide
Page 28
.... The controls are working. 6. To get the most efficient use from your model. 4. Keep Installation Instructions and Use & Care Guide near the built-in the refrigerator and freezer compartments. 5. Install the shelves and bins in refrigerator for instructions. Screws (2) 28 Turn the refrigerator switch to the refrigerator as shown. Check the water line connections for instructions. Using the two screws, attach the base grille assembly to the ON position. A A. Remove all the lights are preset at the score line. A A. A B A. Remove the...
.... The controls are working. 6. To get the most efficient use from your model. 4. Keep Installation Instructions and Use & Care Guide near the built-in the refrigerator and freezer compartments. 5. Install the shelves and bins in refrigerator for instructions. Screws (2) 28 Turn the refrigerator switch to the refrigerator as shown. Check the water line connections for instructions. Using the two screws, attach the base grille assembly to the ON position. A A. Remove all the lights are preset at the score line. A A. A B A. Remove the...


